First, an apology for not posting much in the past few weeks. It's a source of continual amazement to see that people do continue to visit this blog daily, and that the number of followers here continues to rise even in my absence. Almost 300!!!
During her absence in the real world, The Sewing Lawyer seems to have been busy. Although there isn't much production. Actually, if I am honest, there hasn't been any. The Sewing Lawyer's sewing room has mostly been dark and neglected. Too bad the cleaning fairies didn't take advantage of the opportunity to get in there and do some serious organizing.
Really the machine has only been running in connection with a little project which is (sort of) for someone else. If you hang about on sewing sites, you will have come across Debbie Cook of Stitches & Seams. Recently she's turned her considerable talents to producing a pattern and I volunteered to help test it. She kept up her end of the arrangement admirably by sending me the pattern (PDF) and then e-mailing updates on its development in real time. I'm not so sure I've performed adequately as a tester as the item is languishing, almost finished, in the messy sewing room. I did send Debbie feedback on the pattern as I went, anticipating that this might happen, but I'm still hanging my head in shame, and hoping I'm not too deeply entrenched in Debbie's bad books.
On the positive side, the pattern (which is for a wallet) is for sale in her Etsy store where I seriously hope it is selling like hotcakes. It's very professionally-done, IMHO.
On the negative side, The Sewing Lawyer (as usual) has made things difficult for herself by choosing to make the wallet out of leather. My machine is struggling through the layers in places even though the innards are cut out of the intended material - quilting-weight cotton. I think I see some difficult hand-sewing in my near future since there is no way I am attempting to topstitch this baby by machine.
Perhaps in my far-distant future, I see a sewing machine that can power through layers of leather without faltering and skipping stitches.
Pictures to come (I promise) this very weekend. Which is a long weekend in Canada! Yay!
Other things to know, which have something to do with sewing.
While doing laundry today, the evidence clearly indicated it was time for new undies. Not only does The Sewing Lawyer have a guilt-inducing pile of bra patterns with all needed materials sitting on the cutting table, the stash contains all the stuff for making panties, including a TNT pattern (before you ask, it's cloned from a pair purchased in the far distant past, then tweaked through several home-factory panty-making sessions over the years). My version looks (sort of) like Jan Bones "smoothie" panties. But it has a lower rise.
If you are inclined to make your own underthings, not only are there commercial patterns out there (this one from Jalie, for example), there are several for download on the www. I first saw the "cheeky panties" pattern on Burdastyle, but today Google turned up this site which has a link for the graded version as well as the original instructions by Burdastyle member EmilyKate. This pattern intrigues me but having traced it out and compared it with the TNT, my strong suspicion is that it's best reserved for teenagers or those with figures like teenagers. In short, the TNT looks more like a TeNT. I console myself with the thought that the back piece has to be big because it wraps mostly around to the front.
If I blog about making undies, the posts may very well not be illustrated, if you know what I mean.
Finally, I got an iPad for my birthday last month. Being new to Apple (I'm a confirmed PC user) it's taking me some time to get comfortable with and understand how I ought to be using this intriguing little machine. Please help! What are your best recommendations for apps and content? How do you use your iPad in the sewing room?
Saturday, September 3, 2011

Saturday, August 20, 2011
Snagged! Butterick 5992
This is one of the most elusive of the 1970s patterns The Sewing Lawyer has been trying to recover. Woo Hoo!

I think I made it when I was in grade 12, from a light weight cotton which I remember having a very nice hand. I have a mental image of the print but trying to pin the image down enough to write about it is difficult. It had a smallish scale, I remember that, and the motifs were sort of irregularly round and irregularly concentric. The colours were quite bright; a clear blue, red and white, in that order of prominence. It sounds dreadful. It probably was.
After all the lying in wait for this one, strangely I'm content to have its digital image preserved and to know the pattern number. Even though I could buy it for only $3. In a size that has never been my size.
I could have sworn this dress was made from a McCalls pattern. But it was Butterick, my favorite brand of the day.
A few of my past favorites are still lost. But I'm on their trail.

I think I made it when I was in grade 12, from a light weight cotton which I remember having a very nice hand. I have a mental image of the print but trying to pin the image down enough to write about it is difficult. It had a smallish scale, I remember that, and the motifs were sort of irregularly round and irregularly concentric. The colours were quite bright; a clear blue, red and white, in that order of prominence. It sounds dreadful. It probably was.
After all the lying in wait for this one, strangely I'm content to have its digital image preserved and to know the pattern number. Even though I could buy it for only $3. In a size that has never been my size.
I could have sworn this dress was made from a McCalls pattern. But it was Butterick, my favorite brand of the day.
A few of my past favorites are still lost. But I'm on their trail.
This is really boring
However, it seems necessary to document the completion of my brown canvas "boxes", since (surprisingly) so many of you expressed interest in this very utilitarian project.
Without further ado.
Box open and stocked with my white interfacing collection. There's room for more! (The sides are just propped open, they are not stiffened even slightly).

Box flaps closed over contents.

Boxes in situ.

They are squashier than you may have expected. I decided against getting all fancy with closures and labels. The flaps will stay down. Gravity is my friend. And decorating the flap with a small square of the type of stuff inside is quite a graphic reminder.
Sadly, I still need a plastic bag or two up there.
I could make more, but I am going to do something more interesting instead. At least I won't be at risk of an interfacing avalanche when standing at my cutting table.
Without further ado.
Box open and stocked with my white interfacing collection. There's room for more! (The sides are just propped open, they are not stiffened even slightly).

Box flaps closed over contents.
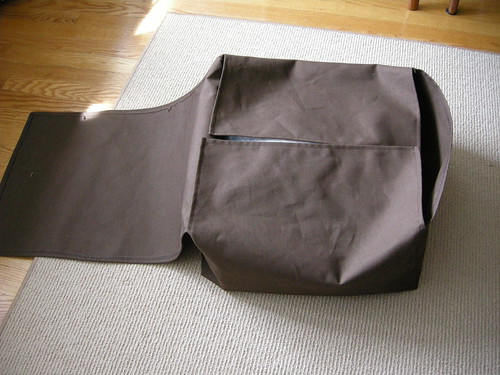
Boxes in situ.
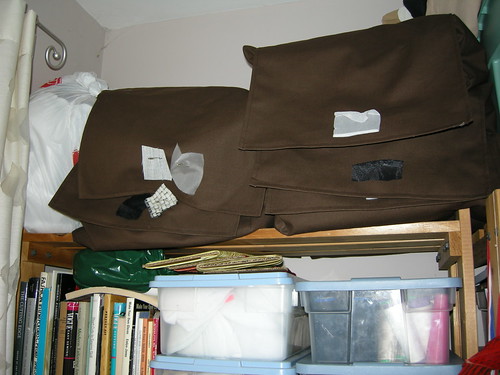
They are squashier than you may have expected. I decided against getting all fancy with closures and labels. The flaps will stay down. Gravity is my friend. And decorating the flap with a small square of the type of stuff inside is quite a graphic reminder.
Sadly, I still need a plastic bag or two up there.
I could make more, but I am going to do something more interesting instead. At least I won't be at risk of an interfacing avalanche when standing at my cutting table.
Sunday, August 14, 2011
Paralyzed by clutter
This is one corner of The Sewing Lawyer's rather small sewing room. It may explain the title:

Specifically, the problem is the bags up top. They contain my stash of interfacing, silk organza, and batting. There's also a bag each of biggish scraps of wool coating and fake fur up there. Every time I need some (say) black fusible, I have to take down two or three bags before I figure out which bag hides the black fusible. It seems every time I put them back, I cause a slippery plastic bag avalanche. A bag full of interfacing that falls the metre or so distance from the top shelf to my cutting board is rather inclined simply to give up the ghost and split, spilling its contents everywhere.
Recently I've basically given up putting them away, which means they are on the cutting board, and on the floor. Too much clutter makes it impossible to sew. This is not good.
I've had it. I have the equipment, the supplies and the ability to fix it. Enter a bolt of sturdy brown canvas (Fabric Flea Market).
A design. Rudimentary, but it should work.
 Heavy canvas "boxes" will not slip and slide on each other. I hope they sit nicely side by side up top.
They may need some kind of handle too. I'll work it out as I make the first one. I have five cut out.
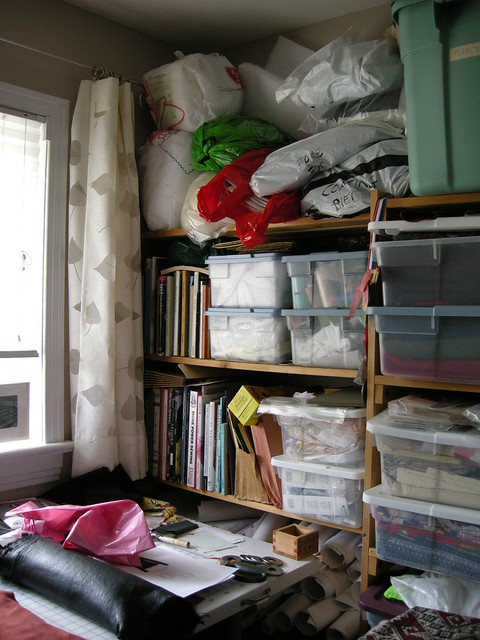
Specifically, the problem is the bags up top. They contain my stash of interfacing, silk organza, and batting. There's also a bag each of biggish scraps of wool coating and fake fur up there. Every time I need some (say) black fusible, I have to take down two or three bags before I figure out which bag hides the black fusible. It seems every time I put them back, I cause a slippery plastic bag avalanche. A bag full of interfacing that falls the metre or so distance from the top shelf to my cutting board is rather inclined simply to give up the ghost and split, spilling its contents everywhere.
Recently I've basically given up putting them away, which means they are on the cutting board, and on the floor. Too much clutter makes it impossible to sew. This is not good.
I've had it. I have the equipment, the supplies and the ability to fix it. Enter a bolt of sturdy brown canvas (Fabric Flea Market).
A design. Rudimentary, but it should work.
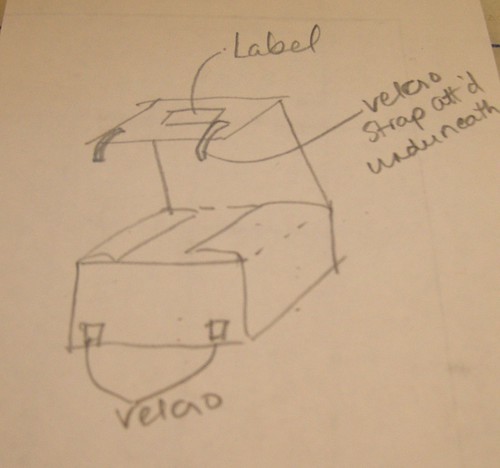
They may need some kind of handle too. I'll work it out as I make the first one. I have five cut out.
Sunday, August 7, 2011
Grey summer suit - it's about time, you say?
Well, for heaven's sake, I wonder what took The Sewing Lawyer so long? It may have been the intervening allure of Vogue 1250. Or her week away on holidays. Perhaps she was slightly discouraged by that mid-project anxiety which often strikes during a longer-term more-complicated sewing project about whether it would fit, or suit her, or be easy enough to wear to be a go-to outfit on hurried weekday mornings. Or maybe it was just the summer heat and doldrums, of which there has been plenty. Whatever the cause, the delay has been overcome.
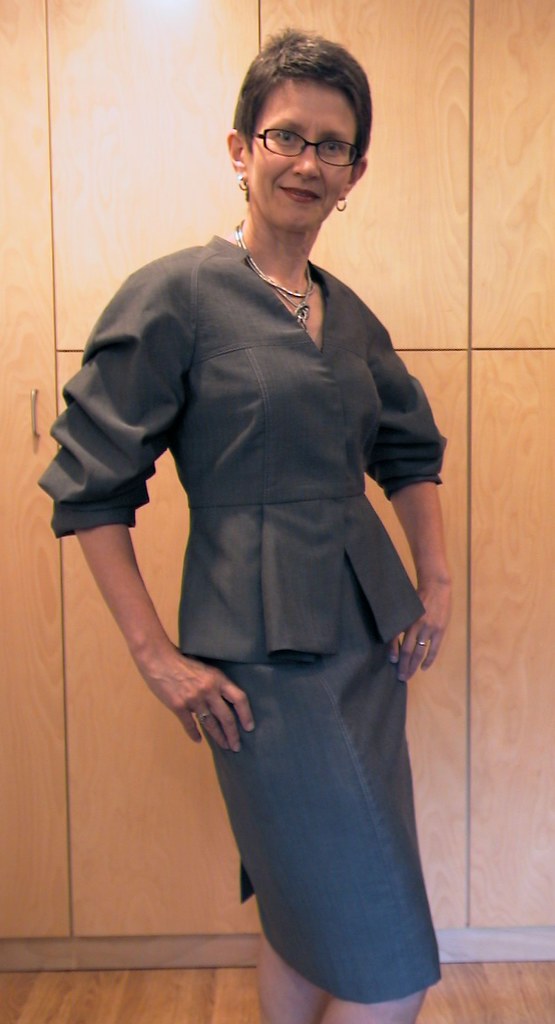
The Sewing Lawyer is pleased to present to you ... (drumroll) ... her grey summer suit.
 Happily, it does fit. And it seems comfortable enough. The jury is out on whether it will be easy to wear.
The last jacket that The Sewing Lawyer made with a peplum was definitely NOT easy to wear.
 It was her attempt to fix the Hot Patterns jacket pattern known as the Metropolitan Jacket. You can read the whole long, sad saga here (if you are a paying member of PatternReview). She sweated and swore at that thing for what seemed like months. Come to think of it, it really was months, And then she hardly ever wore it. Too fussy. Not The Sewing Lawyer's style. Or something.
It (and its matching skirt and pants) have been donated. I hope someone is enjoying them. A lot.
Back to Vogue 8718. I feel cautiously optimistic about it. It isn't gathered. I like its lines. I still really like the sleeves, which are sort of puffed but not at all in the same way as the HP jacket. I think with time I can get over the fact that the fabric (very thin, hard surfaced wool suiting with a slight sheen) is really hard to press, so there are apparent wrinkles and puckers everywhere if you look really closely. This is one of those problems that may well disappear in the closet, if given enough time. (You know, those sewing flaws visible only to the creator...)
 So... what else to tell you about this? How about some more photos?
 The princess seams of the skirt (which is the same as many other skirts in The Sewing Lawyer's closet, a true TNT pattern) are more or less in the right place in the front to flow on from the pleated peplum. I notice that in the back, they are too widely-spaced. Oh well. As I showed you before, the major seams are edgestitched and topstitched because double lines of heavy topstitching thread are an interesting contrast to the extremely smooth fabric. I think that was a good call.
The pattern called for four medium-sized (3/8", or 9mm) snaps to close the jacket. I disagreed. Snaps would be bumpy, and very visible on the underlap side when the jacket is not closed. Covering them to make them less obvious would have made them prone to opening spontaneously. The jacket did not need a closure below the peplum seam (which is slightly above the natural waist). So I sewed on three hooks, on the overlap side, and made thread bars for the underlap. Here are some photos.

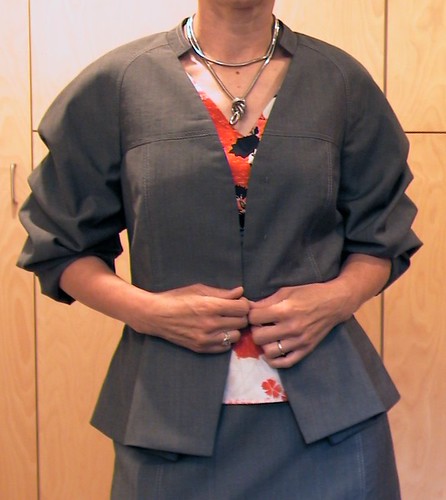
 I am very happy with how this solution works. The thread bars are worked with a sort of button hole stitch, over about 4 foundation stitches. I used the heavy topstitching thread which is a good colour match. The hooks are ugly but they are under the overlap side so cannot be seen.
As you can see (or not) in the photo below.

Other construction notes.
I found the sleeve hem opening was much too wide. I narrowed the under-sleeve seam by approximately .75" (2 cm) on each of the front and back sleeve for a total narrowing of double that amount on each sleeve. This is perfectly fine, and I don't think my arms are unnaturally slender.
I am really happy that I used stout ribbons to pleat the sleeves instead of following the pattern instructions, which were to sew the lining pieces to the upper sleeve before pleating, and then fasten the outer sleeve to the sleeve lining to create the pleats. I just do not think that lining fabric is strong enough to support the sleeve pleats. Plus, using a ribbon allows you to get the pleating right before the jacket is totally lined.

The only dedicated lining pieces are for the sleeves. Otherwise, Vogue instructs to cut the lower and upper CF pieces as facings out of the fashion fabric (as you can see above), and the rest of the body pieces out of lining fabric. In retrospect, I wish I had thought to make a CB piece with a lining pleat, and to add a touch of length to the lining, for ease purposes. As it is, I sewed the lining with slightly smaller seam allowances, and hand-felled the lining at the waist with a seam allowance of maybe 1.2cm (1/2") to give a bit of ease in the length. Using the same pieces for lining risks having a lining that is too short/tight and will pull on the fashion fabric, disturbing the line of the garment.
The other truly weird thing about the Vogue instructions relate to the collar. This is TMI unless you are puzzling through the pattern instructions, but I mention it here in case anyone out there in blogland is sewing this jacket. They say to sew the facing/lining layer to the jacket body before the collar is sewn on i.e. leaving an opening for the collar, and then to sew the collar on with the outer SA pressed up to the inside, and to hand-fell the collar to the jacket side. I could not for the life of me figure out why... Too complicated and risks a truly Becky-Home-Ecky and bulky look. I sewed the collar, ignoring the instructions to press the lower SA up on the outer collar layer. I first topstitched the collar, and then attached it to the jacket shell before attaching the lining. I finally sewed the facing/lining to the jacket/collar at CF/neck from one peplum seam to the other in one pass, enclosing the collar seam (which had to be trimmed). Just ignore Vogue. Sorry I took no pictures of this. If you have questions, ask in the comments and I'll do my best to explain further.
One more thing - I used a fusible tape to snug in the CF edge by maybe 1cm (3/8"). Even though the lower CF piece is more or less on grain, and the upper piece is fully fused, and even though I was reasonably careful with the iron, I found this edge stretched out when I was pressing the seam attaching the facing/lining to the jacket. This was a little in-progress retrofit.
I do like the sleeves. Very much.

The Sewing Lawyer is pleased to present to you ... (drumroll) ... her grey summer suit.
The last jacket that The Sewing Lawyer made with a peplum was definitely NOT easy to wear.
 It was her attempt to fix the Hot Patterns jacket pattern known as the Metropolitan Jacket. You can read the whole long, sad saga here (if you are a paying member of PatternReview). She sweated and swore at that thing for what seemed like months. Come to think of it, it really was months, And then she hardly ever wore it. Too fussy. Not The Sewing Lawyer's style. Or something.
 It (and its matching skirt and pants) have been donated. I hope someone is enjoying them. A lot.
Back to Vogue 8718. I feel cautiously optimistic about it. It isn't gathered. I like its lines. I still really like the sleeves, which are sort of puffed but not at all in the same way as the HP jacket. I think with time I can get over the fact that the fabric (very thin, hard surfaced wool suiting with a slight sheen) is really hard to press, so there are apparent wrinkles and puckers everywhere if you look really closely. This is one of those problems that may well disappear in the closet, if given enough time. (You know, those sewing flaws visible only to the creator...)
 So... what else to tell you about this? How about some more photos?
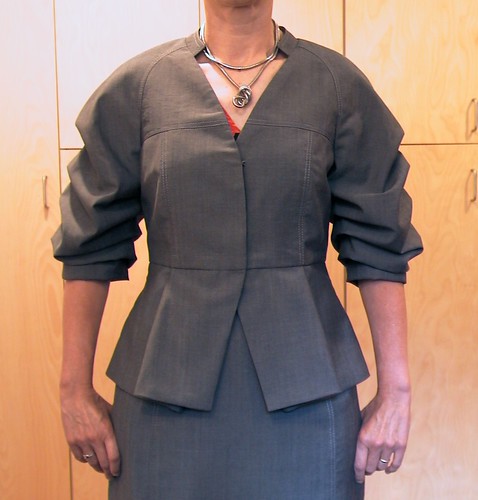 The princess seams of the skirt (which is the same as many other skirts in The Sewing Lawyer's closet, a true TNT pattern) are more or less in the right place in the front to flow on from the pleated peplum. I notice that in the back, they are too widely-spaced. Oh well. As I showed you before, the major seams are edgestitched and topstitched because double lines of heavy topstitching thread are an interesting contrast to the extremely smooth fabric. I think that was a good call.
 The pattern called for four medium-sized (3/8", or 9mm) snaps to close the jacket. I disagreed. Snaps would be bumpy, and very visible on the underlap side when the jacket is not closed. Covering them to make them less obvious would have made them prone to opening spontaneously. The jacket did not need a closure below the peplum seam (which is slightly above the natural waist). So I sewed on three hooks, on the overlap side, and made thread bars for the underlap. Here are some photos.
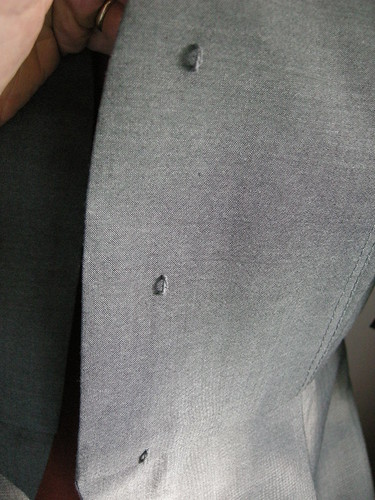
 I am very happy with how this solution works. The thread bars are worked with a sort of button hole stitch, over about 4 foundation stitches. I used the heavy topstitching thread which is a good colour match. The hooks are ugly but they are under the overlap side so cannot be seen.
 As you can see (or not) in the photo below.
Other construction notes.
I found the sleeve hem opening was much too wide. I narrowed the under-sleeve seam by approximately .75" (2 cm) on each of the front and back sleeve for a total narrowing of double that amount on each sleeve. This is perfectly fine, and I don't think my arms are unnaturally slender.
I am really happy that I used stout ribbons to pleat the sleeves instead of following the pattern instructions, which were to sew the lining pieces to the upper sleeve before pleating, and then fasten the outer sleeve to the sleeve lining to create the pleats. I just do not think that lining fabric is strong enough to support the sleeve pleats. Plus, using a ribbon allows you to get the pleating right before the jacket is totally lined.
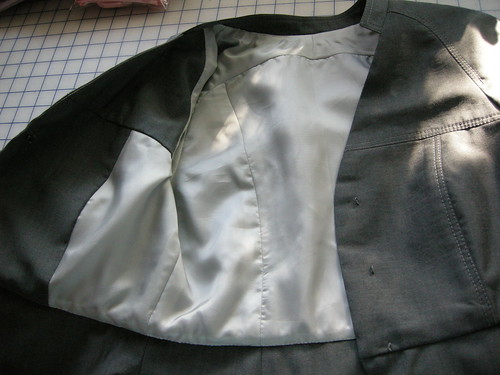
The only dedicated lining pieces are for the sleeves. Otherwise, Vogue instructs to cut the lower and upper CF pieces as facings out of the fashion fabric (as you can see above), and the rest of the body pieces out of lining fabric. In retrospect, I wish I had thought to make a CB piece with a lining pleat, and to add a touch of length to the lining, for ease purposes. As it is, I sewed the lining with slightly smaller seam allowances, and hand-felled the lining at the waist with a seam allowance of maybe 1.2cm (1/2") to give a bit of ease in the length. Using the same pieces for lining risks having a lining that is too short/tight and will pull on the fashion fabric, disturbing the line of the garment.
The other truly weird thing about the Vogue instructions relate to the collar. This is TMI unless you are puzzling through the pattern instructions, but I mention it here in case anyone out there in blogland is sewing this jacket. They say to sew the facing/lining layer to the jacket body before the collar is sewn on i.e. leaving an opening for the collar, and then to sew the collar on with the outer SA pressed up to the inside, and to hand-fell the collar to the jacket side. I could not for the life of me figure out why... Too complicated and risks a truly Becky-Home-Ecky and bulky look. I sewed the collar, ignoring the instructions to press the lower SA up on the outer collar layer. I first topstitched the collar, and then attached it to the jacket shell before attaching the lining. I finally sewed the facing/lining to the jacket/collar at CF/neck from one peplum seam to the other in one pass, enclosing the collar seam (which had to be trimmed). Just ignore Vogue. Sorry I took no pictures of this. If you have questions, ask in the comments and I'll do my best to explain further.
One more thing - I used a fusible tape to snug in the CF edge by maybe 1cm (3/8"). Even though the lower CF piece is more or less on grain, and the upper piece is fully fused, and even though I was reasonably careful with the iron, I found this edge stretched out when I was pressing the seam attaching the facing/lining to the jacket. This was a little in-progress retrofit.
I do like the sleeves. Very much.

Monday, August 1, 2011
More refashioning
Not that The Sewing Lawyer has actually done any. These projects fit into the category of cerebral sewing, triggered by a recent bout of closet purging during which some items were deemed "too old/ill-fitting-to-wear" but whose fabric was deemed "far-too-good-to-throw-out".
 Exhibit A is a dress made ca. 1988-90 from cotton lawn fabric, originally purchased in the long-gone fabric department of the now-defunct Eaton's store in downtown Ottawa. Sigh. They sometimes had really beautiful fabrics, not too expensive for a just-starting-out lawyer.

Witness the fact that I can still do up the back waist zipper (lapped). There is some yardage here, in the skirt. Even though it has both CB and CF seams, I bet I could turn it into a simple sleeveless shirt.
As far as I am concerned, this is perfect fabric. High quality and smooth, it emerges off the clothesline or from under the iron crisp but quickly relaxes into a soft loveliness. Strictly speaking it is probably too lightweight for this dress pattern, Vogue 9770 which came out in 1986 and called for wool crepe, double knit, faille, gabardine and damask.
 I made both views, although left off the little neckline bow on my version of the slim-skirted view A, which I made from navy wool jersey.
I made View B twice. The second version, also much-loved but less hard-wearing, I made from silk noile woven in gigantic checks. This sounds garish but you'll have to take my word for the fact that it wasn't. The colours were soft warm brown and creamy beige, and a bluish grey.
On to the next prospect.
Unlike Exhibit A, which got worn a lot, Exhibit B was ill advised so did not see a lot of action.

 This is a top and skirt. Both pieces were cobbled together without a real pattern about 10 years ago (I should have known better). I remember thinking that I needed two pieces which would not have many seams to break up this fantastic print. Again, the fabric is 100% cotton. It has more body than the lawn illustrated above; it keeps its crispness when worn.
The fabric's source was the Fabric Flea Market. It was a gem donated anonymously by someone who had traveled. In the selvedge, is the hand-lettered information "Design and Hand-Printed in Peru by Silvania S.A." I remember there were also genuine batiks from Indonesia and silks from Thailand that year (illustrating our slogan, "You never know what you will find!"). Naturally, being one of the organizers and doing all the hard work of measuring and pricing donated fabric, I get to see the good stuff before almost everyone else. This is the source of much of The Sewing Lawyer's extensive stash.
But I digress.
 The biggest problem that this outfit has, apart from its tight waist, is that the shirt fits very badly. I had decided that even darts would interfere with the print so though the fabric is very stable and the fit around the neck and armscyes snug (even too tight, if I am truthful), it has no shaping. I remember using the neck and armscye shaping from view C of Vogue 9548. I carefully ignored the fact that this pattern has quite a lot of seam and dart shaping. Really, what was I thinking?
The skirt is just two panels of the relatively narrow yardage (selvedges preserved in the side seams) pleated into a wide waistband.
The good thing about the lack of seams in this outfit is that once taken apart, it should yield some very usable yardage.
I am down to the short strokes on my grey summer suit. Really. It will be unveiled soon.
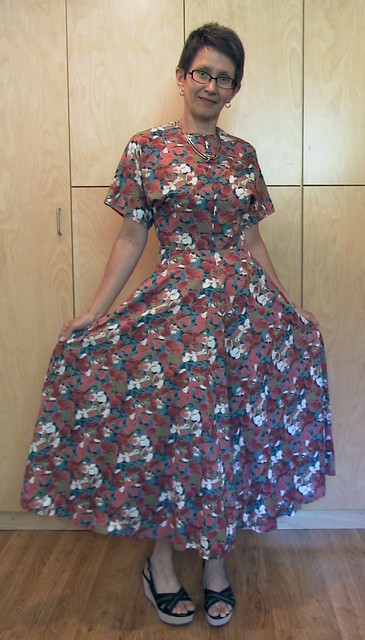 Exhibit A is a dress made ca. 1988-90 from cotton lawn fabric, originally purchased in the long-gone fabric department of the now-defunct Eaton's store in downtown Ottawa. Sigh. They sometimes had really beautiful fabrics, not too expensive for a just-starting-out lawyer.
Witness the fact that I can still do up the back waist zipper (lapped). There is some yardage here, in the skirt. Even though it has both CB and CF seams, I bet I could turn it into a simple sleeveless shirt.
As far as I am concerned, this is perfect fabric. High quality and smooth, it emerges off the clothesline or from under the iron crisp but quickly relaxes into a soft loveliness. Strictly speaking it is probably too lightweight for this dress pattern, Vogue 9770 which came out in 1986 and called for wool crepe, double knit, faille, gabardine and damask.
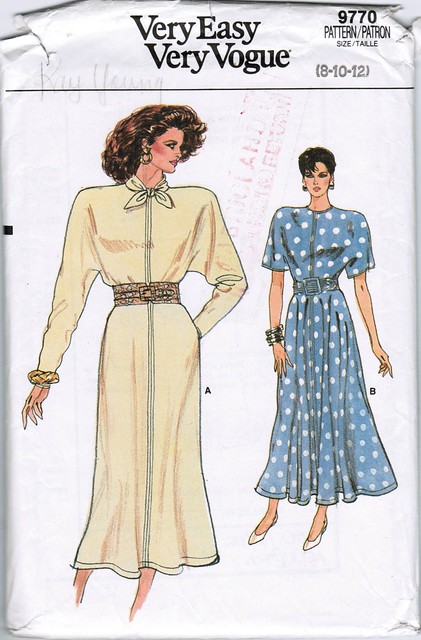
I made View B twice. The second version, also much-loved but less hard-wearing, I made from silk noile woven in gigantic checks. This sounds garish but you'll have to take my word for the fact that it wasn't. The colours were soft warm brown and creamy beige, and a bluish grey.
On to the next prospect.
Unlike Exhibit A, which got worn a lot, Exhibit B was ill advised so did not see a lot of action.
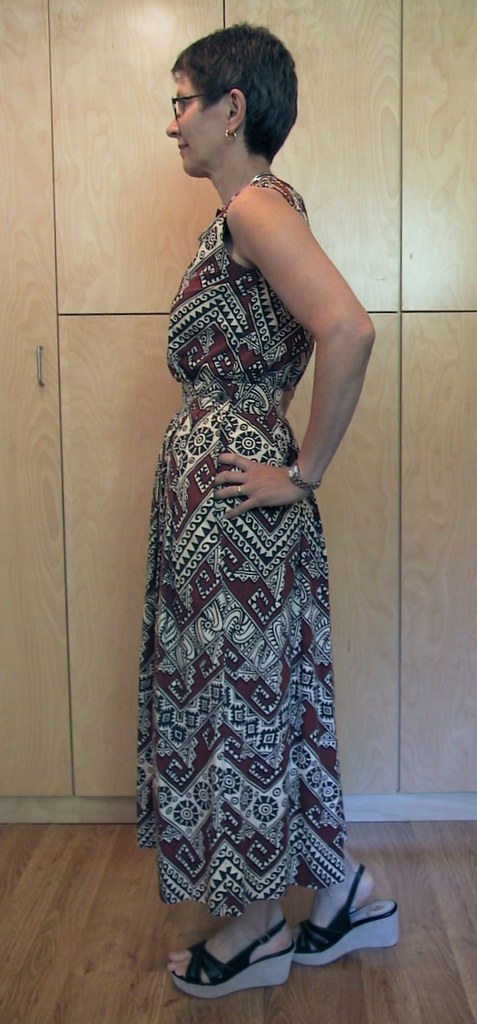
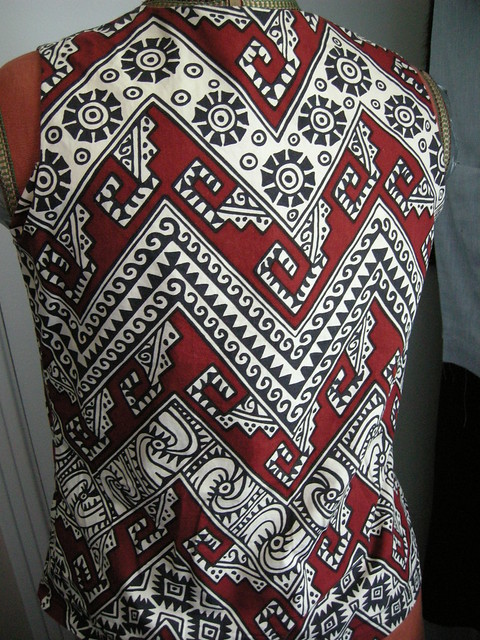 This is a top and skirt. Both pieces were cobbled together without a real pattern about 10 years ago (I should have known better). I remember thinking that I needed two pieces which would not have many seams to break up this fantastic print. Again, the fabric is 100% cotton. It has more body than the lawn illustrated above; it keeps its crispness when worn.
 The fabric's source was the Fabric Flea Market. It was a gem donated anonymously by someone who had traveled. In the selvedge, is the hand-lettered information "Design and Hand-Printed in Peru by Silvania S.A." I remember there were also genuine batiks from Indonesia and silks from Thailand that year (illustrating our slogan, "You never know what you will find!"). Naturally, being one of the organizers and doing all the hard work of measuring and pricing donated fabric, I get to see the good stuff before almost everyone else. This is the source of much of The Sewing Lawyer's extensive stash.
But I digress.
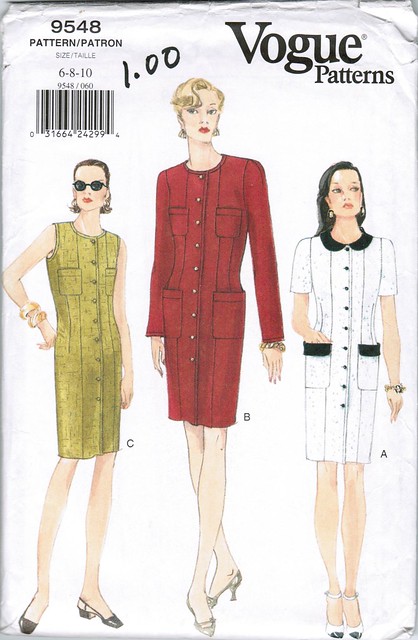 The biggest problem that this outfit has, apart from its tight waist, is that the shirt fits very badly. I had decided that even darts would interfere with the print so though the fabric is very stable and the fit around the neck and armscyes snug (even too tight, if I am truthful), it has no shaping. I remember using the neck and armscye shaping from view C of Vogue 9548. I carefully ignored the fact that this pattern has quite a lot of seam and dart shaping. Really, what was I thinking?
 The skirt is just two panels of the relatively narrow yardage (selvedges preserved in the side seams) pleated into a wide waistband.
The good thing about the lack of seams in this outfit is that once taken apart, it should yield some very usable yardage.
I am down to the short strokes on my grey summer suit. Really. It will be unveiled soon.
Friday, July 29, 2011
The Sewing Lawyer has been on vacation
Which is why there have not been any posts for a little while. So... what have I been doing?
Well, right after I made my second version of Vogue 1250 we departed for a week away, planned around an extended family celebration in the great urban agglomeration that vaguely surrounds the city of Toronto.
I'm happy to report that I survived the hottest July 21 on record in downtown Toronto - the actual temperature was 38C (just over 100F) and the humidex something like 51C (almost 124F). It remained hot, but thankfully not that hot, while we attended the family event and during two days spent in the delightful tiny town of Jordan, which is in the heart of the main wine-producing region of Ontario.
Since this is a sewing blog you may not care much about The Sewing Lawyer's vacation, but let me just share with you one photo, which comes close to capturing how gorgeous this wine-producing part of the country is. (What the photo misses is the country silence, the warm and pleasant breeze, and general feeling of goodwill instilled by being in good company in such a place.)

This was the view from up high on the Niagara escarpment at the lovely terrace of Vineland Estates Winery, where we enjoyed a delicious dinner.
OK, one more thing.

Excellent local wine. Ahhhh.
Enough of that.
I did have some sewing-related touristical experiences. In Toronto, I again visited Perfect Leather and bought some brick red lamb leather to make another jacket.
Toronto has realized that it ought to celebrate its different districts and there are a few pieces of public art in the area around Spadina and Queen, the heart of the garment district.
 The thimble which sits on a pile of giant buttons at the corner of Richmond and Spadina is well-known.
A quick internet search informed me that this was created by Stephen Cruise, and was commissioned as a result of a City of Toronto juried public art selection process. It dates to 1997 when street cars were reinstated on Spadina Avenue.

 These two metal sculptures are located at a streetcar stop on Spadina in the heart of the "Fashion District".
These are part of a series of sculptures at different intersections created by Randy & Berenicci. According to the City of Toronto, the pieces "represent the people and events chronicled in existing public domain images that record the changes to the neighborhood throughout this century. The structures supporting the vignettes recreate the shape of the original Hydro poles, whose function to carry and transmit power and communications is maintained in a metaphorical sense, transmitting the history of the neighborhoods. Replacing the glass insulators of the original poles, overscale cast glass birds sit on various support struts, adding an element of three dimensionality and an air of whimsy." Whew!
The fact that Hamilton Ontario also has a little garment district is less well known. It's on Ottawa Street, and I had a chance to visit en route to Jordan. My semi-planned destination was Bra-Makers Supply, renowned purveyor of all things necessary for beautiful and supportive undergarments. My visit was fast, since there was little on the premises that was of much interest to my husband. Not having enough time to consider and reconsider what I was doing (my usual shopping pattern), I bought The Book (Beverley Johnson's Bra Maker's Manual), two patterns, a bra kit (all fabric and other materials needed for one bra), two additional findings kits, some spiral steel boning, and I forget what else. Oh yeah, two pairs of foam cups. I was fitted for these by Beverley herself, with 3 students taking the intensive 2-month course preparatory to opening their own custom bra businesses looking on. Fastest fitting ever.
 Fortunately for my husband, many of the more interesting stores on Ottawa Street seemed to be closed for vacation, but we discovered more garment/sewing themed art.
The artist is Daniel Davelaar and it's the result of another juried public art competition. According to this site, the sculpture is 3m (10'-0") high and "draped in cloth in such a way as to recall classical Roman and Greek sculpture. It is ... carved from a single block of Mountain Rose Granite." The dark parts are polished and the lighter drapery is left rougher so it looks completely different. I love it!
Back at home, I'm almost finished the jacket from Vogue 8718. The only thing left to do is the front fastenings. The pattern calls for 4 smallish snaps. I don't like that idea - they would be kind of ugly if the jacket is not done up, and the size Vogue wants me to use (9mm or 3/8") seem all too likely to pop open at the slightest provocation. I'm toying with the idea of using hooks on the overlap side and making thread loops (almost invisible) on the underside, but I haven't decided. The overlap is very small (about 1.5" in total or 3cm) so buttons are really out of the question. Anyone have other ideas?
Well, right after I made my second version of Vogue 1250 we departed for a week away, planned around an extended family celebration in the great urban agglomeration that vaguely surrounds the city of Toronto.
I'm happy to report that I survived the hottest July 21 on record in downtown Toronto - the actual temperature was 38C (just over 100F) and the humidex something like 51C (almost 124F). It remained hot, but thankfully not that hot, while we attended the family event and during two days spent in the delightful tiny town of Jordan, which is in the heart of the main wine-producing region of Ontario.
Since this is a sewing blog you may not care much about The Sewing Lawyer's vacation, but let me just share with you one photo, which comes close to capturing how gorgeous this wine-producing part of the country is. (What the photo misses is the country silence, the warm and pleasant breeze, and general feeling of goodwill instilled by being in good company in such a place.)

This was the view from up high on the Niagara escarpment at the lovely terrace of Vineland Estates Winery, where we enjoyed a delicious dinner.
OK, one more thing.

Excellent local wine. Ahhhh.
Enough of that.
I did have some sewing-related touristical experiences. In Toronto, I again visited Perfect Leather and bought some brick red lamb leather to make another jacket.
Toronto has realized that it ought to celebrate its different districts and there are a few pieces of public art in the area around Spadina and Queen, the heart of the garment district.
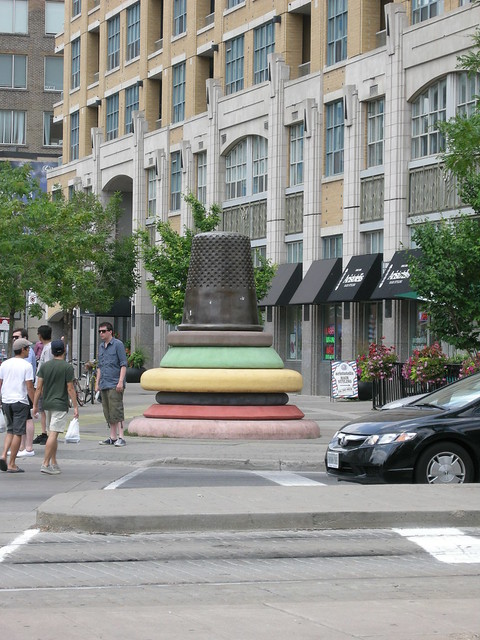 The thimble which sits on a pile of giant buttons at the corner of Richmond and Spadina is well-known.
 A quick internet search informed me that this was created by Stephen Cruise, and was commissioned as a result of a City of Toronto juried public art selection process. It dates to 1997 when street cars were reinstated on Spadina Avenue.

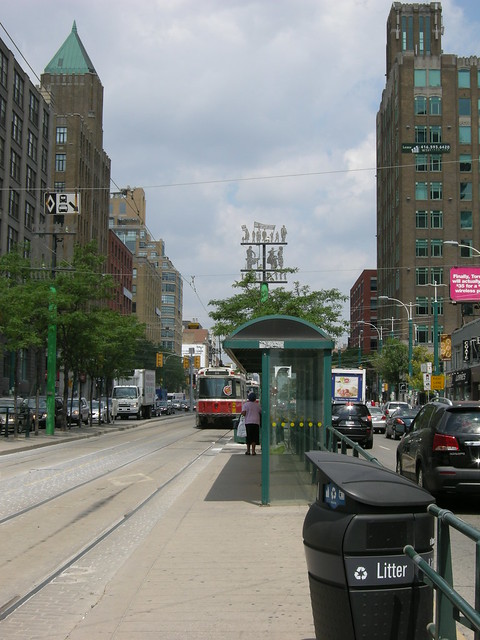 These two metal sculptures are located at a streetcar stop on Spadina in the heart of the "Fashion District".
 These are part of a series of sculptures at different intersections created by Randy & Berenicci. According to the City of Toronto, the pieces "represent the people and events chronicled in existing public domain images that record the changes to the neighborhood throughout this century. The structures supporting the vignettes recreate the shape of the original Hydro poles, whose function to carry and transmit power and communications is maintained in a metaphorical sense, transmitting the history of the neighborhoods. Replacing the glass insulators of the original poles, overscale cast glass birds sit on various support struts, adding an element of three dimensionality and an air of whimsy." Whew!
The fact that Hamilton Ontario also has a little garment district is less well known. It's on Ottawa Street, and I had a chance to visit en route to Jordan. My semi-planned destination was Bra-Makers Supply, renowned purveyor of all things necessary for beautiful and supportive undergarments. My visit was fast, since there was little on the premises that was of much interest to my husband. Not having enough time to consider and reconsider what I was doing (my usual shopping pattern), I bought The Book (Beverley Johnson's Bra Maker's Manual), two patterns, a bra kit (all fabric and other materials needed for one bra), two additional findings kits, some spiral steel boning, and I forget what else. Oh yeah, two pairs of foam cups. I was fitted for these by Beverley herself, with 3 students taking the intensive 2-month course preparatory to opening their own custom bra businesses looking on. Fastest fitting ever.
 Fortunately for my husband, many of the more interesting stores on Ottawa Street seemed to be closed for vacation, but we discovered more garment/sewing themed art.
 The artist is Daniel Davelaar and it's the result of another juried public art competition. According to this site, the sculpture is 3m (10'-0") high and "draped in cloth in such a way as to recall classical Roman and Greek sculpture. It is ... carved from a single block of Mountain Rose Granite." The dark parts are polished and the lighter drapery is left rougher so it looks completely different. I love it!
Back at home, I'm almost finished the jacket from Vogue 8718. The only thing left to do is the front fastenings. The pattern calls for 4 smallish snaps. I don't like that idea - they would be kind of ugly if the jacket is not done up, and the size Vogue wants me to use (9mm or 3/8") seem all too likely to pop open at the slightest provocation. I'm toying with the idea of using hooks on the overlap side and making thread loops (almost invisible) on the underside, but I haven't decided. The overlap is very small (about 1.5" in total or 3cm) so buttons are really out of the question. Anyone have other ideas?
Tuesday, July 19, 2011
Betcha can't make just ONE
Vogue 1250 comes in pairs. Like everyone else, I could not quite stop at one.
 I whipped this up today out of (as you can see) an outrageously large print. It seemed perfect for a pattern with hardly any seams.
I stared at the print for a while before concluding it would not be useful to try to actually plan for any part of it to fall anywhere in particular. And then I blithely folded the fabric and cut the big piece, not particularly paying attention to the print.
 Oh serendipity! Look at how the cowl is nestled in a V in the print! Somehow my shoulders are both more or less red, and I think that the large motifs worked out well in the front.
Of course, I blithely cut out the big piece, without checking to see if I had a sufficiently big bit left for the smaller piece (upper back). Um. No.
It has a CB seam, unlike the DKNY original.

At least I was able to more or less match the two halves through the large motif in the centre.
The CB seam in the skirt *almost* matches. I take no credit. The width of the dress is what it is. Actually, I don't much care for how the print falls on my backside, but I don't really have to look at it, so I don't much care...
And I am really happy with how the print falls in the front.
 Here is one more tidbit of information about this pattern.

 As you can see in the picture above, the original has this rather low V under the arm. It seemed unnecessary. So in my new version, I filled it in a bit. Below is my altered pattern piece. The front did not get altered at all. It's basically a smooth curved line from shoulder to waist. The effect of this extra little wedge of fabric is just that the back attaches higher up. It also pulls the shoulder down slightly to form more of a cap sleeve, which I like.

The other small change I made was to increase the depth of the cut-on facing for the cowl. I felt it was at risk of flipping out as originally planned (a depth of about 7.5cm). I added approximately double that again at CF, tapering to nothing where the facing attaches to the shoulder seam.
Simple.
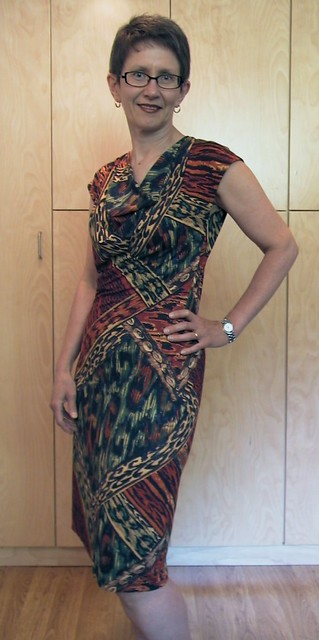
I stared at the print for a while before concluding it would not be useful to try to actually plan for any part of it to fall anywhere in particular. And then I blithely folded the fabric and cut the big piece, not particularly paying attention to the print.
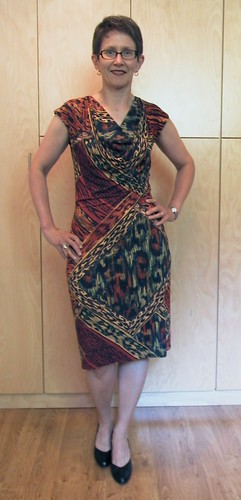 Oh serendipity! Look at how the cowl is nestled in a V in the print! Somehow my shoulders are both more or less red, and I think that the large motifs worked out well in the front.
Of course, I blithely cut out the big piece, without checking to see if I had a sufficiently big bit left for the smaller piece (upper back). Um. No.
It has a CB seam, unlike the DKNY original.
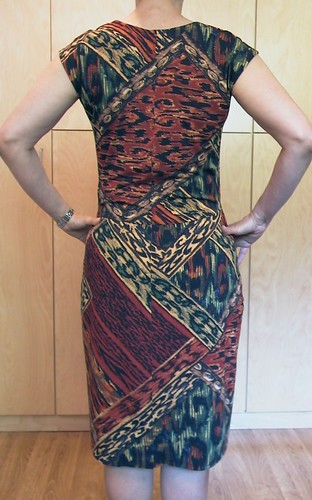
At least I was able to more or less match the two halves through the large motif in the centre.
The CB seam in the skirt *almost* matches. I take no credit. The width of the dress is what it is. Actually, I don't much care for how the print falls on my backside, but I don't really have to look at it, so I don't much care...
And I am really happy with how the print falls in the front.
 Here is one more tidbit of information about this pattern.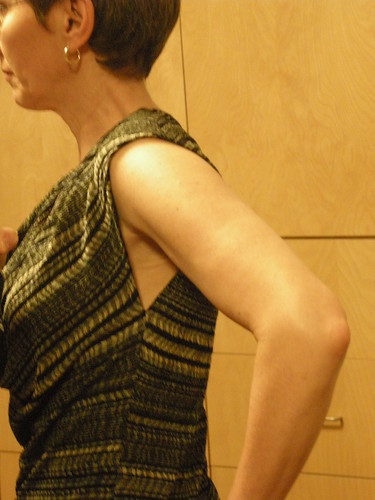
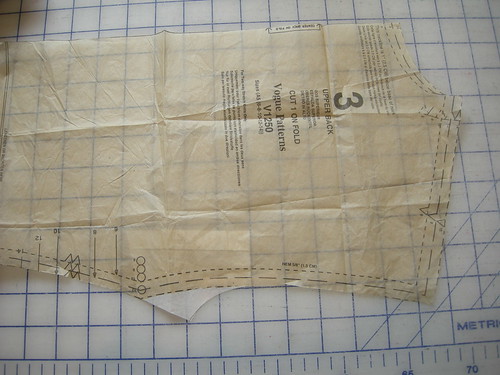 As you can see in the picture above, the original has this rather low V under the arm. It seemed unnecessary. So in my new version, I filled it in a bit. Below is my altered pattern piece. The front did not get altered at all. It's basically a smooth curved line from shoulder to waist. The effect of this extra little wedge of fabric is just that the back attaches higher up. It also pulls the shoulder down slightly to form more of a cap sleeve, which I like.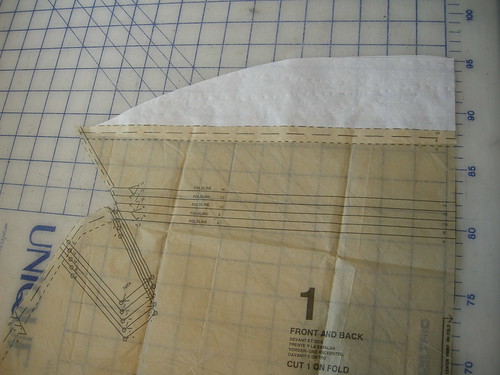
The other small change I made was to increase the depth of the cut-on facing for the cowl. I felt it was at risk of flipping out as originally planned (a depth of about 7.5cm). I added approximately double that again at CF, tapering to nothing where the facing attaches to the shoulder seam.
Simple.
Wednesday, July 13, 2011
Why I'm stuck

The peplum, which you can see here, is self-lined. This is because part of the underside of the peplum is visible at the lower edge, (though not in this picture, you can see it on the photo from the pattern envelope, and in the original Akris version, at this blog post).
Anyhow, I fretted over whether to interface or otherwise beef up the two layers of very thin wool that would make up the peplum. I finally decided to use a firm silk organza underlining, attached to the right side pieces.
I KNEW that the organza was slightly off-grain and rippling but I deluded myself all through sewing the seams, sewing the layers together, pressing, and attaching the peplum to the jacket.
I KNEW IT.
Was it going to stop rippling through sheer force of my will? Of course not.
Am I going to wear it like this? Of course not.
Luckily, I didn't trim or clip or do anything except turn and press.
Hello, seam ripper? Where are you, my friend?
Sunday, July 3, 2011
Hot weather sewing
I was making great progress with Vogue 8718 until I realized that our newly-installed central AC was not functioning as planned, and it is a hot weekend. Erg.
The jacket needed a lot of steam. So I switched gears. Today, I made Vogue 1250 - the DKNY cowl neck dress everyone has been raving about. There are already 17 reviews on PR and it has only been in the book for a month or so. I can see why it's popular. Three pattern pieces, and one of them is a little strip to finish the back neck. This is, as I proved today, a dress that you can make in an afternoon.
However, its design makes it a bit tricky for someone, like The Sewing Lawyer, whose top and bottom are not the same size. (FYI, the top is a pretty straight size 10 and the bottom is just a titch under size 16.)
 This dress is snug at the hip, designed with about 3cm ease, just over 1". And the skirt is a single piece with only one seam at CB. Darts extend to hip level from the bodice side seam to provide shaping. To the right is the schematic drawing of the pattern pieces. I puzzled over how to add width at the hip without completely changing the design (i.e. by adding a side seam). My solution was to slice the pattern vertically through the hip dart, adding a 2cm wide strip. This worked very well, I'm happy to report. Except that I don't actually think I have as much as 3cm ease. Hmmm.
My fabric is a mystery content, striped slinky-like fabric I picked up at Vogue Fabrics in Chicago (I do love the way that sounds :D). I had purchased a generous amount for a top, which turned out to be the right amount for this dress, 1.2 metres. It only needs one length, at least in my size range.
 To ensure the stripes would match, I cut one side of the front, single layer, pinned through the CF line, then folded to match the stripes before cutting the second side. At the point of cutting, I wasn't certain I would need all the 4cm I had added so had not yet cut out the hip dart. I did need it. All of it.
I sewed the dress using a tiny zig zag on my regular sewing machine (1.5 x 1.5 mm) which is narrow enough to press open, strong and stretchy.

 So here's the finished dress. It looks pretty drab, but has some nice blues and cream colours in the stripes.
I was worried that the knit might stretch and the dress grow, but it seems firmer once made than I expected.
The cowl is low, but not indecent.
The back. Kind of plain.
Where's my spanx?
The jacket needed a lot of steam. So I switched gears. Today, I made Vogue 1250 - the DKNY cowl neck dress everyone has been raving about. There are already 17 reviews on PR and it has only been in the book for a month or so. I can see why it's popular. Three pattern pieces, and one of them is a little strip to finish the back neck. This is, as I proved today, a dress that you can make in an afternoon.
However, its design makes it a bit tricky for someone, like The Sewing Lawyer, whose top and bottom are not the same size. (FYI, the top is a pretty straight size 10 and the bottom is just a titch under size 16.)
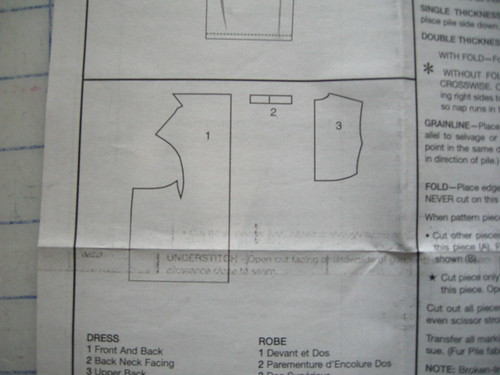
My fabric is a mystery content, striped slinky-like fabric I picked up at Vogue Fabrics in Chicago (I do love the way that sounds :D). I had purchased a generous amount for a top, which turned out to be the right amount for this dress, 1.2 metres. It only needs one length, at least in my size range.
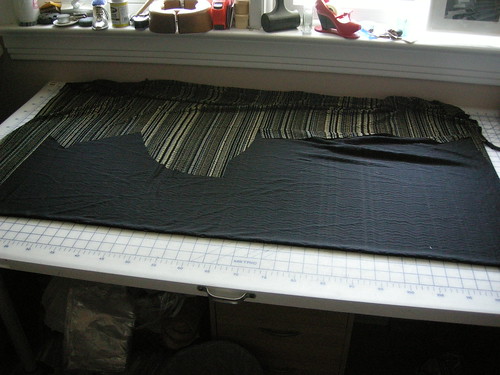
I sewed the dress using a tiny zig zag on my regular sewing machine (1.5 x 1.5 mm) which is narrow enough to press open, strong and stretchy.
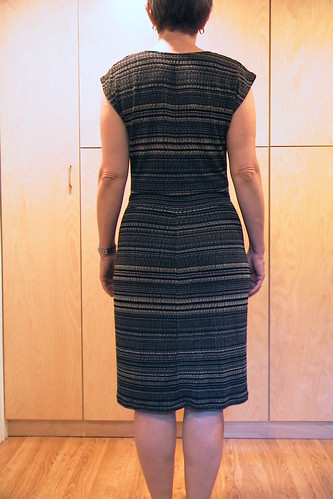
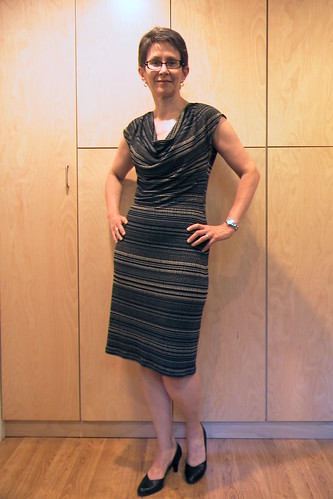 So here's the finished dress. It looks pretty drab, but has some nice blues and cream colours in the stripes.
 I was worried that the knit might stretch and the dress grow, but it seems firmer once made than I expected.
The cowl is low, but not indecent.
The back. Kind of plain.
Where's my spanx?
Subscribe to:
Posts (Atom)


