Showing posts with label bra making. Show all posts

Saturday, July 31, 2021

What else have I made? Bras!

If I was blogging more regularly it would provide me with an accurate account of what I've made in the past months. Oops, now I have to wrack my brains to try and remember.

I went on a bit of a bra-making tear in about February, which is the time of year that tends to happen, if past years are any guide. I made two sports bras and three for everyday wear. 

The first sports bra was the Jalie Coco, which I made with a few amusing sort-of-coordinating stretch fabrics that I bought at Ann's Fabric in Hamilton when I was there last year. 


I have a beef with over-the-head sports bras which is that they are hard to deal with when you've been sweating (which you probably will do while wearing a sports bra, right?). One of the things I thought I would be able to do with this pattern is to insert hooks at the CB of the band. The pattern isn't written that way, and so far I haven't had the energy to figure out how to modify it. But that would make it a lot easier to get on and off, I think. 

Something I realized after wearing this a few times (which I should have realized a lot earlier, since I tend to be short through the armscye area) is that I should have shortened the straps. They look OK but I feel like the bra is sitting too far down on my body. 

The Coco bra has minimal if any shaping and relies on compression to hold everything together. It is fully lined. I used some power mesh from stash in the front and side, and the straps are self-lined. With this type of lining and the firm lower band, the bra is very supportive. The front lining is designed with the option of inserting bra cups between two lining layers, and as a result the front lining is a little complicated. I did not even consider making this option and dumbed the pattern down by combining the CF lining piece with the "cup" lining piece. In this way I got rid of two seams that had no shaping built into them and seemed to have the potential for show-through bumpiness.

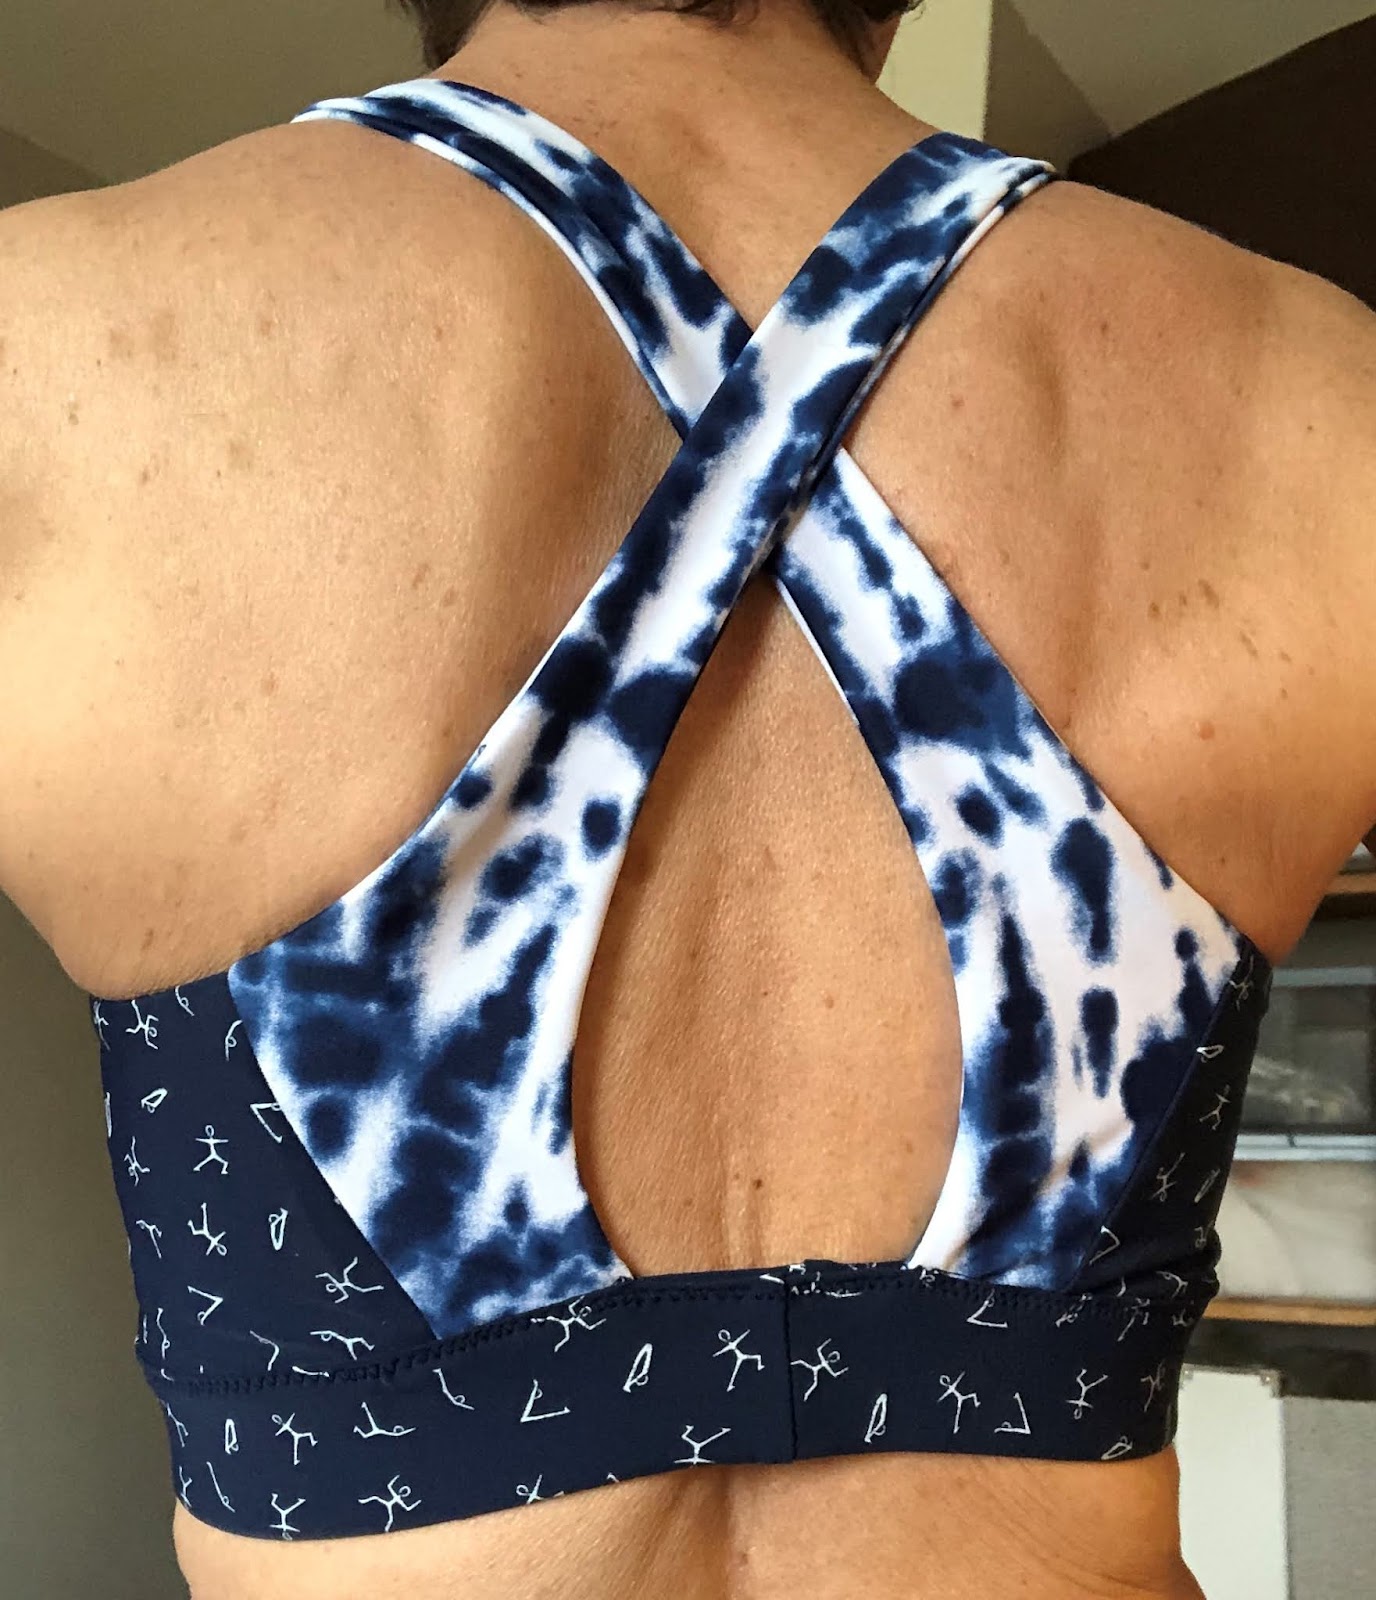
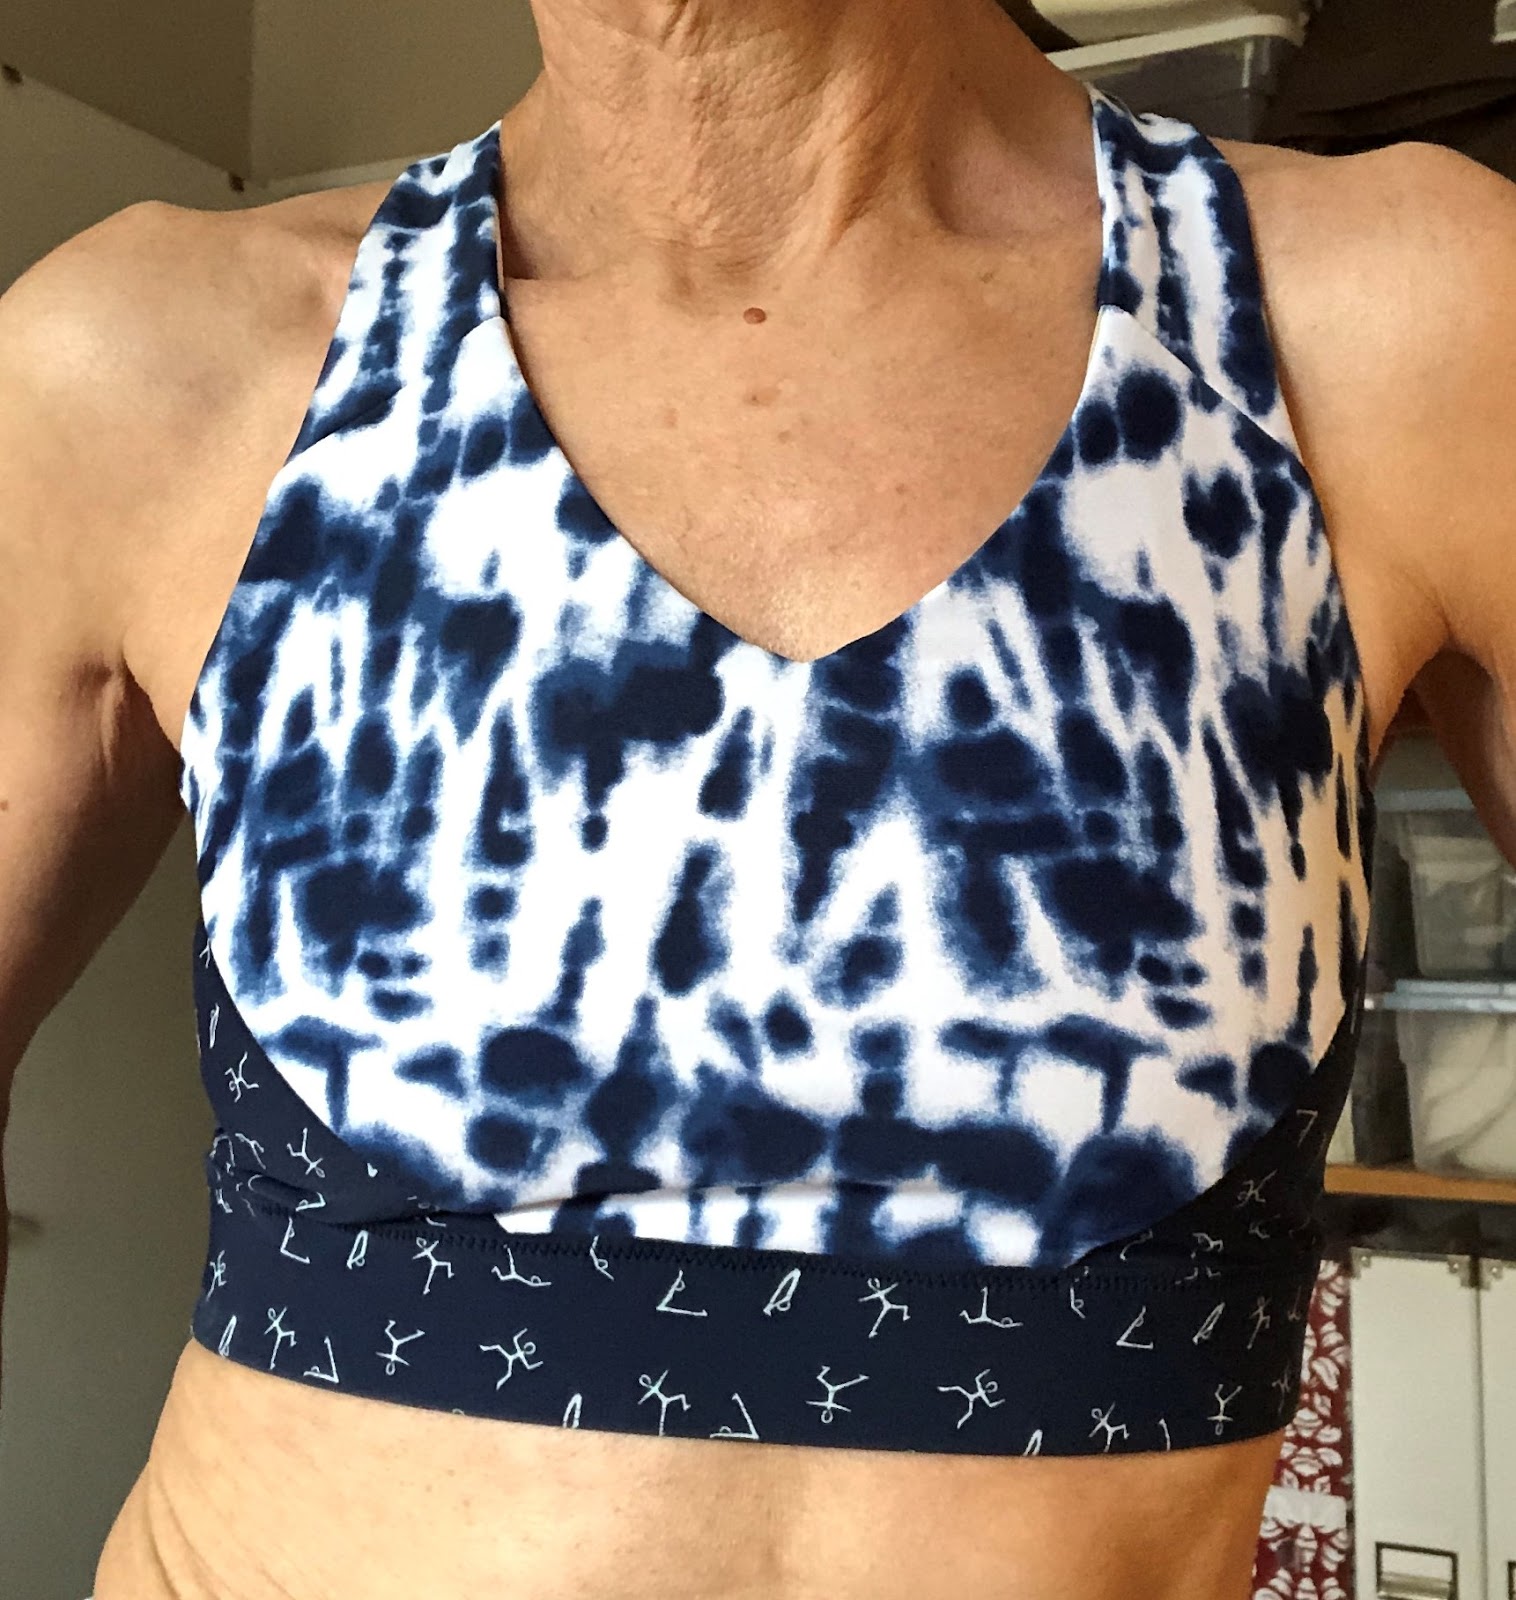
By contrast, the next sports bra that I made has fully shaped cups with plenty of seams. This is the Greenstyle Endurance sports bra. It has a front zipper for easy on-and-offing, no matter how sweaty you are. I went ahead and shortened the straps by about 2.5 cm based on my Coco experience, even though I had never made anything like it before. I love the fit and feel of this bra and the shortened straps are perfect for me. 

The Endurance is sewn with a seamed bra foam inner layer in front, a lined back and all edges are encased in wide fold-over elastic. Surprise! I had bra foam and wide FOE in stash, along with a remnant of colourful nylon lycra and a shortish coil separating zipper. I even had a little scrap of scuba knit for the top and bottom zipper shield. 

I found the bra foam super easy to sew. The edges are butted together and sewn with a 3 step zig-zag - no bulky seam allowances. It's very comfortable against the skin too. 

I skipped the step of stitching down all the seam allowances in the outer fabric, which wasn't the smartest thing since quite predictably, once I washed the bra the seam allowances all did that little rolling thing that jersey knits always do. Luckily this is not noticeable in my busy print, and I can't feel it. Next time.

The bra has a nice racer back and the FOE finishing makes it look very snappy. It is easy to get on and off, although I sometimes find it hard to get the zipper connected at the lower edge when putting it on (negative ease). Maybe a molded plastic zipper would be easier. 

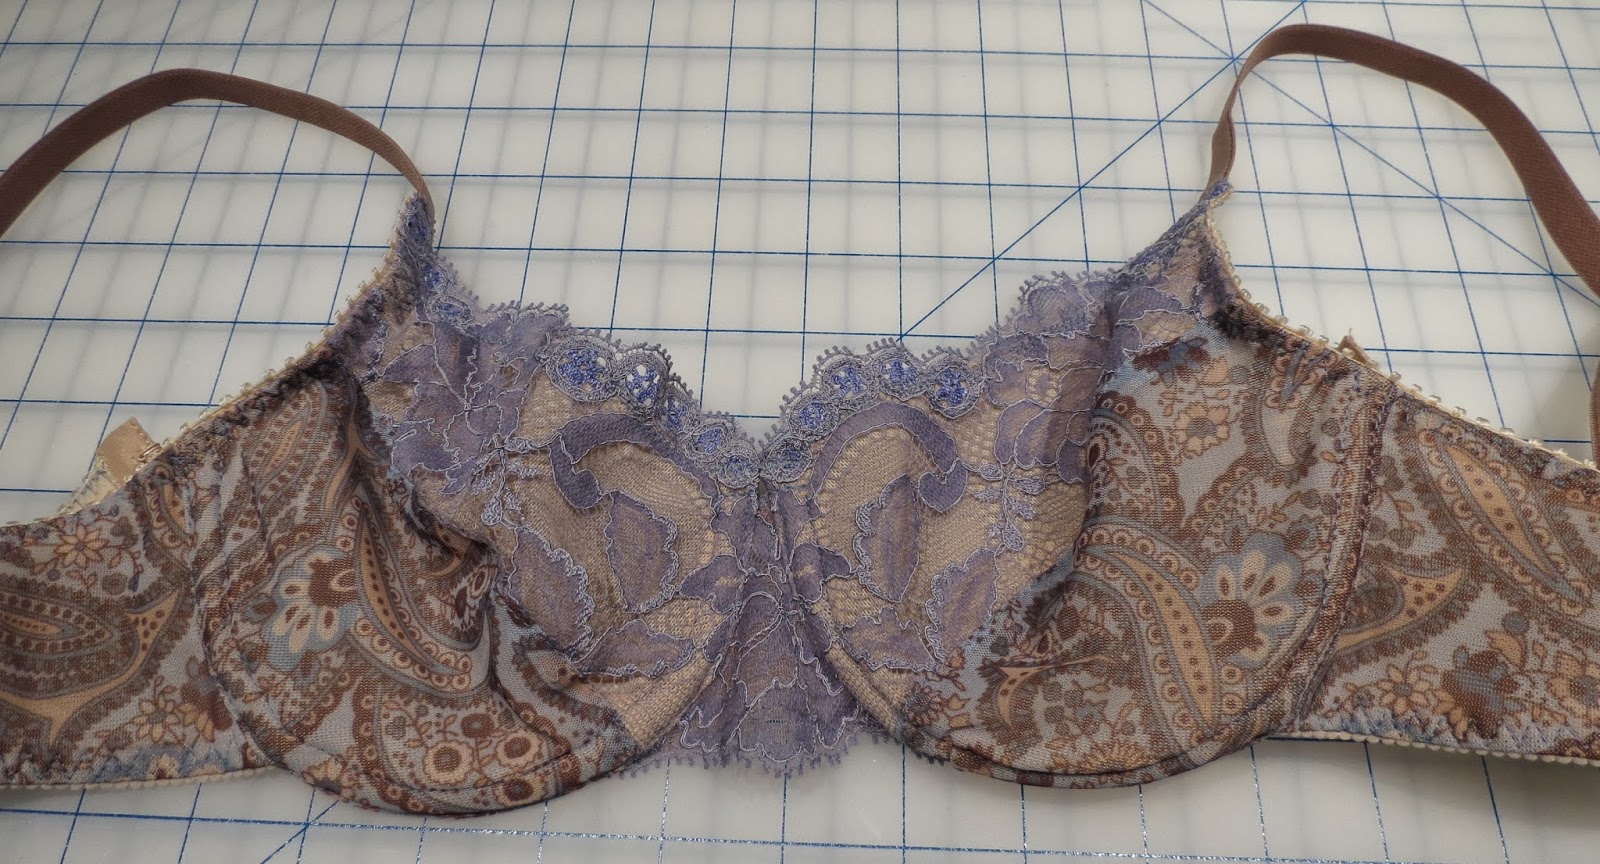
If you are still with me, the other new bra pattern I tried out is the Atelier AFI Exquisite bra. This is a very lovely "balconette" bra with seamed cups. The cups are supposed to be made from non-stretch fabric and decorated with lace. 

I used a stretch fabric but lined it to reduce the stretch factor. And I made a slightly smaller size than recommended. I adjusted the bridge to be narrower than the pattern based on my earlier bra experiments. It turned out perfectly. I'm actually amazed at the fit, especially given that I had previously tried the free Maya pattern and didn't care for it. 

You'll just have to believe me when I say it fits me better than my plastic display form.

I also made 2 versions of my self-drafted bra pattern, including one that is a complete clone of this one and I finally made up the full band version of the same pattern. I had previously made the pattern using the information in Beverly Johnson's Bra Maker's Manual (vol. 1). It worked out fine, although my elastic application left a bit to be desired. 


Tuesday, May 16, 2017

Shapes - mine and not-mine

A picture is worth 1000 words. Therefore, behold:

Marked up ineptly in Skitch

The yellow outlines are the cup pattern pieces for Harriet. The pink outlines my TNT cup pattern. There are two things that occur to me.

  • The shape at the bottom is very different. 
  • The "dart" at the top is very different.

Bottom Edge

The lower edge of the Harriet cup is relatively flat (black arrow) whereas my TNT pattern has quite a curve (red arrow). Harriet curves up, but only a bit, at the seam between the lower cup and the upper cup. My TNT pattern curves deeply and smoothly throughout the entire bottom line of the cup.

Dart

When I say "dart", I mean the space between the top edge of the lower cup piece and the bottom edge of the top cup piece.

To assist, I marked the ends of the dart on the Harriet pattern with orange exclamation markers (the marker should actually point at the little dot on the upper edge of the lower cup) and those on the TNT pattern with green check mark markers.

Imagine the two marked shapes sewn together in three dimensions. We have a lightly darted cup with a lot of curve in the lower edge of the cup (TNT) and a deeply darted cup with a relatively flat lower edge (Harriet).

What is the effect of these differences?

Harriet cup projection - side view
When the lower edge of the Harriet cup is sewn to the frame of the bra, the lower cup projects outward. Because the lower edge is so flat, it's like sewing a cylinder into a flat piece with a circular opening. If you think of the frame as a flat plane, the cup pieces would emerge from it almost at a 90 degree angle. This can be seen at left.

Harriet cup projection - view from the bottom of the band
The big dart in the Harriet cup is formed at the top edge of the lower cup (notice that the seam between the two lower cup pieces is quite flat). The apex of the dart is more or less where the two cup seams converge. Have a look at the photo to the right.

By contrast, when the already-curved edge of the TNT cup is sewn into the same frame shape, it is not forced upward at a right angle, but rather forms a slope. The highest point of the cup is lower (less of a dart) and the continuous curve of the dart means that the shape of the cup is less pointy.

I prefer to get my roundness from the support of a flatter lower cup sewn in stretch fabric than from the pre-defined projection of a cup sewn in fabric with low or no stretch. Lucky for me, I'm small enough that the former works.

Therefore, my next trick is either going to be a mash-up or something completely different, to cleanse my sewing palate.

Oh Harriet, I'm not sure about this

I've had a lingerie explosion in my sewing room. And I've been sewing bras for days. Am I closer to that perfect-fitting bra? In one sense, yes. In another, definitely not.

Let me explain. When we last spoke, I had sewn up two Q&D muslins of two different patterns, and decided to go all out and sew up a real version of the Harriet bra pattern.

However, based on my fit test (sewn out of hideous pink duoplex), I refined the pattern pieces for the bridge (and side) and the cup. For the bridge, I kept the narrow top, but angled the bottom more, making it a wider triangle. This was based on my TNT bra pattern. It was kind of dumb to even try a new bra pattern without adjusting the bridge right out of the gate, in retrospect. For the cup, I trimmed the upper cup and inner lower cup (the triangular piece) slightly because I'm flatter towards the centre than some people (for whom Harriet is designed, I have concluded).

At this point, we may usefully ask whether The Sewing Lawyer thoroughly read and understood ALL the instructions for this bra pattern. The answer is "not really".

Now that I read all the instructions, I see that you are supposed to cut the cups and cradle out of "low-stretch knit fabric designed for supportive bras, such as duoplex, simplex or stable tricot". My tester was duoplex. So far, so good.

However, I hate duoplex but I have a bin full of nice stretchy lacey fabric for bras. So I cut my first "real" tester out of a firm but stretchy lace fabric. I lined the bridge and cradle pieces to stabilize them with some random non-stretchy and sort of thick fabric from stash. I lined the cups with some fairly firm but stretchy stuff, which is also sort of thick. I went nuts topstitching, with a two-stitch zig-zag built into my sewing machine. It sort of stretched out the seam lines. I steamed them into submission and got to the point where I could try the bra on (bottom elastic and wire channels installed, wires in, straps and fastenings pinned on).

Bra #1 - outside
Bra #1 - inside
What did I learn?

Well, I might have steamed the cup seam lines into submission, but the combination of aggressive topstitching and stretchy fabric meant the cups were still too big.

Also, the combination of my fabric choices made for a pretty lumpy bra.

And I didn't like the fabric all that much.

On the plus side, the band fit really well, and the wire line was totally in the right place. But those cups!

I decided to cut my losses and salvage what bits I could and move on.

For my second outing, having learned a thing or two, I made some further changes.

First, I used thinner fabric (a stable tricot) to stabilize the frame.

Second, I shaved still more from the cup pieces in the same centre area as before to flatten them some more.

Bra #2
But I cut the bra pieces (all of them) from a thin but firmish stretch lace. Based on previous bra-making experience (but without truly having understood the instructions) I figured that this fabric had enough oomph for the cups without lining.

I again got to the point of being able to try this on, and realized I was wrong on the last point. I should have lined the lower cup pieces with the stable tricot. This wasn't going to work.

On the plus side, the bra looks great. It's pretty, in a non-ostentatious beige lace kind of way. The band totally works. And it does fit in the sense that there isn't excess fabric in the cups.

I could recut and restart with due attention to reducing the stretch factor in the lower cup pieces. However, I have also come to the conclusion that the cup shape on Harriet is just not me. It isn't only the stretchiness of the cups that is bugging me. Based on other bras I have made, this same fabric, unlined, would be fine for my TNT bra. The fabric gives me enough support. What is bothering me is the way that the cup as designed wants the breasts to be distributed. It's not that the cups force them in and up (like a push-up bra). They are, as other reviewers have noted, designed to give quite a round shape. That shape doesn't match mine.

What I should really do is do a further mash-up of the Harriet band and my TNT cups. But first, I need to get the right size rings and sliders...

Friday, May 12, 2017

Also interesting - bra geometry

I sewed up quick and dirty muslins of both the Maya (L) and the Harriet (R). I am happy to have used up this horrid pink duoplex!


Ignore the obvious fitting problems on this plastic torso...

Things I learned from trying these on:

  • The cups on both are OK. Volume is more or less right, although I have provisionally pinned out a bit of volume in the cups of the Harriet so that it will fit me even better. 
  • The Maya cups focus volume inward, whereas the Harriet is engineered for a more natural shape for me (YMMV) with more volume at the sides. The Sewing Lawyer, like the plastic torso, has zero cleavage.
  • Both bras are the right size. However, the fit is slightly off for me on both of them. I think this is because of the bridge orientation (very upright).
  • Maya has less height (in both cups and band) and doesn't feel as secure. The wire line is shorter, especially at the sides. I really like the feel of how the side of the cup on the Harriet is pulled up near the wire line by the cup extension that will attach to the strap. 
  • Obviously, the band on the Harriet is wider, but the actual difference on the finished bra would only be about 2mm. They look different here because the Harriet has much wider seam allowances at the bottom band. However, the wide band of fabric on the Harriet sits well on the rib cage and feels pretty darned good. 
Harriet and Maya - direct comparison
(click to enlarge for better detail)

Taking to comparing the pattern for the band, I taped them up on my window (ignore the background scenery). More things I learned:
  • Maya is slightly higher at CF but much lower at the side of the cup. The Harriet feels much more secure.
  • The bridge as designed on the Maya is almost 2x as wide as that of the Harriet sample I sewed. I narrowed the bridge on the Maya muslin by about 1cm to compensate. If I had sewn the bridge as designed, the cups would have been very far apart - much further apart than the cups on my partial band bra, which fits really well. 
  • The orientation of the bridge to the cups is almost identical in both patterns. 
  • The cup seamlines are almost exactly the same too.
  • So is the orientation of the band - the CB lines on the patterns are parallel to each other when the CF lines are parallel. The CB and CF are not parallel to each other, however. The back of the band points at a downward angle when compared with the front. (A downward pointing back band supposedly provides more support; maybe I don't need much of that.)
So then I compared the Maya to my self-drafted pattern, which I had modified for a full band using the instructions in the Bra Makers' Manual. (Disclaimer - I have never actually made my self-drafted full band pattern.) 

Maya and self-drafted pattern - direct comparison
 (click to enlarge for better detail)
Observations:
  • The most obvious point of difference is that when the CFs are matched, along with the outline of the cup, the orientation of the back band on the two patterns is very different. While the Maya points downward, my self-drafted pattern is pretty flat. 
  • But the most important point of difference is the bridge. My self-drafted bridge is less upright and more triangular. The cup is as a result pushed slightly away from CF. 
Conclusion:
  • If I was truly being scientific I would adjust both the Maya and the Harriet to accommodate my different bridge. 
  • However I am more interested in getting quickly to a good result, and the Maya cups felt skimpy whereas the Harriet was immediately far more comfortable. 
  • Therefore I will adjust the Harriet and make a real bra. 
Onward!


Wednesday, May 10, 2017

Flower power bra - put a bow on it

I'll keep this short. I finished the bra. It fits (better on me than on my duct tape double). You get the picture - but this picture only.

The outer fabric is a stretchy nylon lace purchased in a favourite store on Queen Street in Toronto. It's the one with the Russian proprietor. I don't know the name, but if you have been in there, you know him.

The bra is ivory, less pink than it looks in this photo. The stash came through with elastic in two widths, hooks/eyes, sliders/loops and fold-over elastic, all in matching ivory, and little rosebud bows.

The straps are cut from the strap-elastic-roll-that-will-last-forever. It is a firm shiny-faced and plush-backed elastic with a firmly rounded picot edge.

Detail at left.

There is a reason bras have decorative bows.

They cover up the awkward spots where things meet, possibly not perfectly.

The lace is very thin/flimsy so the bra is fully lined with a light stretch mesh. That and the elastic seems to be enough support.


Up next? The Maya bra, in this firm lace.

Monday, May 8, 2017

Lingerie

I think I'd like to make a bra (or maybe several). I cut one out about (mumble) months ago and the pieces are still lying around. This is a personal pattern that I have made a few times (see here and here for the first two examples). So then I went on Pattern Review because I was wondering about other styles. Much clicking later and I have downloaded the *Free* Maya bra pattern from AFI Atelier and purchased the Harriet bra pattern from Cloth Habit because it is so pretty!


Future bra
In one of my other bra making posts, I mentioned that I have a lifetime's supply of lingerie findings and fabrics. So off I go...

Saturday, November 16, 2013

Etherial squared

Since I was on a roll I made another bra from the remains of the blue stretch lace from Merckwaerdigh.  I had enough to cut the entire bra from lace, and even to match the motifs.  It's fully lined with the same light nude coloured fabric that has found its way into several bras here recently.


I promise not to clutter up these (virtual) pages too much with lingerie sewing, but here are some photos showing the inside, and how it's made.

Giant roll of
strap elastic
The straps are cut from my giant roll of silvery strap elastic.  I sewed them between the upper band elastic and the front of the bra to secure the ends at the top of the cups.

I let the scalloped edge of the lace be the lower edge of the bra band pieces, which meant I had to finish the band elastic a little differently.  First, I attached the lower band elastic to the lining only.  Then I basted the lace and lining (wrong sides together) at the top edge, folded the lower elastic to the inside, and finished the lower edge with triple stitch zig zag through all layers. The stitching is practically invisible on the face of the lace.

The top of the cups is finished similarly with very narrow but very snappy elastic from Merckwaerdigh since they supplied enough for two bras.  I'm pretty sure I've never seen similar elastic here so will have to give some thought to different ways to finish the cup top edge if I'm using lace again.  And I might; I'm pretty pleased with the look of this bra.

I attached the strap to the inside of the back band at both top and bottom for stability since the band is fairly narrow and the fabric fairly flimsy.

This is the end of the blue lace, but I still have quite a lot of the paisley mesh, and some blue elastic, and 1,000,000 metres (minus about 1) of strap elastic for some more bras.  And some more fabric from my ample stash.

I actually have another bra cut out, but think my blog audience might have had it up to here with the underwear by now.

I do promise to make something to wear on the outside soon.

Monday, November 11, 2013

Not utilitarian

Etherial, more like.


This is quite unlike The Sewing Lawyer's usual undergarments.  It's more colourful and lacier.  More ... delicate?

But still sturdy enough.  Here is a shot of the inside.


The mesh fabric and stretch lace (ordered on-line as a bra kit from Merckwaerdigh in Rotterdam) are pretty flimsy, when you get right down to it.  So I lined the entire bra with a light stretch mesh acquired a forgotten time ago from a forgotten source.  Luckily, I have lots.  Because I think I've been bitten by the lingerie bug. There was enough of the lace to cut out another bra.  The next one will be entirely blue lace, but lined like this one.  I have a RTW bra that uses stretch lace, with scalloped edges intact, for the side pieces.  I'm copying that.

A word about the supplier - Merckwaerdigh's supplies are reasonably priced and (I hate to say it) less expensive even including international shipping than Bra-Makers Supply in my home province. The kit included enough lace for two bras - even enough to mirror the motifs for both, enough printed mesh for at least one pair of panties plus bra(s), elastic - 4 kinds including for straps, stable mesh to line the bridge (you can sort of see it in the second photo) - enough for dozens more bras, a little piece of crotch lining, hooks & eye for the bra, loops and sliders for the straps, and wire casing.  And the shipping was quick, and you can save on shipping (relatively) by combining items.  I also bought a set of findings in white and wire casing in 3 colours (white, black and nude).  I'm a satisfied customer.

That said, I'm pretty sure I have enough lingerie notions now to last the rest of my natural life so they may not get much more of my business.  Especially since I came across about 9,000 metres of 1cm wide elastic at the Value Village on the weekend (exaggerating, but only slightly). See previous post re SABLE.

And a word on the pattern.  It's totally customized.  The cups are from an ancient Burda WOF (as it was) swimsuit pattern, much tweaked.  The side piece is from a Bra-Makers pattern.

And because I want to reward you for reading this far ...


Thanks to the skin-tone lining, it looks even more etherial than it really is.  But it's really not see-through.

Thursday, September 12, 2013

Progress

My last post that was actually about sewing involved the architecture of a bra.  Thank you to those who commented and provided food for thought.

I overthought the whole bridge thing and tried making it even wider.  Wrong!

I did some internet research, and read into the details of Beverley Johnson's book.  I also borrowed the Lee Ann Burgess book Making Beautiful Bras.  (Horrid picture on the cover.)

Recall that my problem was that after I widened the base of the bridge, I had a flat area inside the wire at the CF and lower edge of the cups.  The first comment was to the effect that because the widened bridge had the effect of rotating the cups down and towards the outside of my body, I might need to remove fabric from the cups.  The flattening could be a symptom of too much fabric.

Similarly, Johnson wrote that "too much depth in the bra cup will manifest itself as a flattened area of fabric right above the middle of the bottom of the cup".

Promisingly, the Burgess book had a section on "An Underwire that sits Down on the Front of the Chest". Her diagnosis?  "This annoying problem can be caused by a number of factors: either the wires are too deep a U shape, ... and/or the cup volume may be insufficient, and/or the cup shape may be too shallow and/or the breast may be drooping within the cup due to a very loose, slack lower cup."  Oh boy, even the experts may not know where to start!

Long story short, I pinched out fabric inside the wire to make the lower cup smaller, and I think it worked. I'm wearing the second and most modified bra now, and it's pretty comfortable, and it is not slipping downward in front.

The most you are going to get are these crappy pictures on my DTD.  Please believe that both bras fit my flesh and blood much better.

First bra, in white.  The ruffly trim was leftover from a BraMakers' Supply kit.  For straps, I used a strip of extremely firm power net covered with the fashion fabric.  They are kind of thick, but they work. I did not bother with rings and sliders (I'm making it the right length, right?).  This bra has some depth taken out of the cup next to the bridge but the lower curve of the cup is still a bit too deep.  However, it's not bad.
 Second bra, in nude (the next pic shows the colour better).  This is a lightweight type of power net with random satiny spots.  I used fold over elastic to finish off the upper edge of the cups and wide strap elastic for straps (again left off rings/sliders).  The band is slightly snugger and the straps slightly shorter than bra #1 and I like that snugness.

The pattern for this bra is close to being just right.
Inner construction.  The cups are lined with a very lightweight flesh-tone mesh.  The bridge is stabilized with firm fusible attached to a lining.

All materials for these were in my (ahem) extensive stash.  However I am now out of wire casing.

This weekend I'm headed to Kitchener Ontario to visit my cousin and his knitter wife.  On Saturday, she and I are going to the Knitters' Fair, reportedly the largest event of its kind in Canada, with "35,000 square feet dedicated to the craft of knitting, offering an incredible display of a diverse variety of yarns in an explosion of colour, knitting books, patterns and accessories." 

I'm expecting it to be a lot of fun!


Friday, August 30, 2013

Building bridges

Bra bridges, that is.  Both Beverley Johnson and Norma Loehr recommend starting with the bridge.

So of course I followed their instructions, sort of.  In fact I did dutifully make the cardboard bridge they both talk about, but then I kind of did my own thing with my fitting bra which involved starting with the bridge pattern from my pink bra that doesn't really fit properly (top), narrowing it at the top for better fit and lengthening it (I forget why - middle), and finally accepting reality and also widening the base of the bridge substantially for better fit (bottom).

Guess what?  The last bridge is extremely close to my cardboard version.

Since swapping out these bridges involves unpicking the channel for the wires and the stitching that attaches the bridge to the cups, and taking out the line of stitches above the channeling at the CF that prevents the wires from poking out in the wrong place, and reinserting the wires, making the new bridge, sewing it in, re-sewing the channels, and trying the whole thing on again (times three), it would have been quite a bit faster to just follow the learned authors' instructions.

So here is my fitting bra.  It's single layer, made out of some lycra fabric I have a lot of, and basted together in pretty rudimentary fashion.

It fits me a lot better than my DTD, but this is all I'm willing to show the world.

In the next picture, I've highlighted some of the haute couture construction information, but also the problems that also appear when I put this beauty on. I've not highlighted the problems, such as the rippling cup seam, that disappear when it's me wearing it.

Questions for you experienced bra makers (or others with opinions):

  • Should I be worried about the fact that there is a flattish area of the lower cup near the bridge, below the pink dotted lines?  It is less pronounced on me than on the DTD, which is why I'm even asking this question instead of being sure that the answer is to change something to fix this.  My logic for doing nothing is that angling the lower bridge so it is even wider will just push the wires up into my under arm area.  Further, the bra looks good and on a try on it feels pretty comfortable.  The wires are sitting nicely where they are supposed to. 
  • If I was going to fix this, what should I do?  It occurs to me that maybe the wires I have are too long and/or too small, and the cup is too deep?  But I'd also have to make the bridge wider at the base, right?  The bra might look pretty wonky if I did that...
  • Should I be worried about the vertical wrinkles below where the strap attaches?  There is no elastic at the arm edge of the cup, and my thinking is that if that was stabilized and snugged in somewhat, these wrinkles may go away.  
  • If I was going to fix this, what should I do?  


I am already very grateful for the advice in the comments on my last post!  I have taken Liana's advice and for now I'm working on a mashup of my pink bra (which was already a mashup of an ancient Burda WOF (as it then was) swimsuit pattern and a PinUp Girls bra pattern...).  So weigh in and give me your best ideas and advice!


Monday, August 26, 2013

This may take a while

I have Beverley Johnson's Bra Makers Manual. I have this pattern from Merckwaerdigh.  I have Demystifying Bra Fitting and Construction by Norma Loehr (of Orange Lingerie) on my iPad.  I have some mixed experience at making things that look like bras. There is this one which, truth be told, is too big and has wires that dig in at CF. And this pink one, which is tantalizingly close if only I pin 2cm out of the length of the upper cup.  I have lots of lycra fabric and elastic.  I think one of my New Years resolutions was to make a proper bra that actually fits.  I am ready to go.

What do you mean, it's almost September?  It's still 2013.

My first outing, the so-called "sports bra" from the Merckwaerdigh pattern, was a bust (pun intended).  A bust nothing like mine.  As you can see.

 I kind of like the back, but this is really the wrong size (and shape) for me.

This one will not ever be finished.

By the way, bra pieces are very easy to sew together wrong.  Ask me how I know :-)

For my next effort, I have pinned out 2cm approximately from the upper cup of the pattern I used for my pink effort.  At the same time, I've traced a smaller size from the Merckwaerdigh pattern.  This scattergun approach may come to grief.  Time will tell.

Neither of these is getting lining or elastic edging.  I wasted some good FOE on that Merckwaerdigh bra.  I'm making fitting muslins per the Orange book.

Wish me luck...


Sunday, October 16, 2011

Two pink things

First, please admire the perfection of the pink cashmere, neatly wound into a ball (or is there another name for one of these?) using my new wool winder.  Though my husband says I should be sure to mention what a headache it was to make the #*%# thing, I think it's brilliant.

The wool should unwind neatly from the centre.

No doubt this is all old news to you knitters out there, but it's new technology chez The Sewing Lawyer.


In other breaking news, I successfully changed my second bra (the front closing one) into a standard back-hooking bra with a closed bridge in front.  It actually wasn't that hard and it fits so much better.  Before, the wires were not only too far apart, the bridge was too low which meant the wires were not at the right angle.  Now, as you can see, they come up higher at CF where they are more vertical.  
After

Before
I sewed on 3 of the little pink/écru bows that I bought at the Fabric Flea Market yesterday.  I think they look kind of cute!

Sunday, October 9, 2011

Pretty in pink

Following hot on the heels of yesterday's post, here is The Sewing Lawyer's latest custom-made bra - all done!  It is not perfect but definitely wearable. 

Inner bra cup - in progress
The cups and straps are made from shiny and stretchy pink satin.  It has a lot of stretch in the width and hardly any in the length.

Inside the straps (cut on the lengthwise grain) is a layer of duo-plex to ensure they won't stretch.  It pads them very nicely.  The bridge is also underlined with duoplex since you absolutely don't want any stretch there.

Inside the cups is a layer of flesh-tone power net.  I used a triple-stitch zig-zag to flatten the lining seam. The outer cup seam is flattened with the traditional line of straight stitching about 2mm away from the seam, on either side.  

The least satisfactory part of this bra (construction-wise) is the seam along the top of the cup.  I used a stretch stitch to join the satin to the power net, and understitched with a straight stitch to keep the lining from rolling to the outside.  This edge would look better if it was finished with elastic to stabilize it.  It stretched slightly in construction, even though I cut the upper cup with the DOGS (direction of greatest stretch) perpendicular to the edge and seam to minimize the likelihood of unwanted stretching.

The fit would be better if the bridge (the little piece at CF between the cups) was narrower.  I don't know if this is possible, since it has to accommodate the plastic clasp and it would be even more difficult to sew if it was smaller.  Future bras will close in the back so I can better control the bridge dimension.

This bra is a modification of the Sharon front closing bra from the Pin Up Girls line of Bra-Makers Supply but, as explained yesterday, the Sharon cup wasn't doing anything for me so I subbed in the cup from a bodysuit pattern in the June, 1996 issue of Burda Magazine.

Before starting I read up on converting styles in the Bra-Makers Manual (also available from Bra-Makers Supply) and I added 1/4" (7mm) to the lower edge of the cup pieces to ensure there would be enough room for the wires inside the cup.  This is needed because the Sharon is a partial band style (the cups are not sewn into a fabric piece) whereas the front of the Burda bodysuit pattern functioned like a band in relation to the cups.  In a full band bra, the wire sits outside the cup below the seam joining the cup to the band, but in a partial band bra, the wire must be accommodated inside the lower edge of the cup itself.

The band is cut from pink power net which was in the pink bra kit I bought.  Unfortunately I had to cut it with a CB seam since the piece supplied wasn't long enough to put the full length in the correct direction (the DOGS need to be horizontal so the bra band stretches comfortably around your ribs).

An aside:  In a comment on my review of the Amanda bra pattern, Squirrelypoo (of FehrTrade) wondered why there was a side seam in the band on that pattern.  I think it's because the front band of a full band bra cannot stretch but the back band must, so they must at least be cut in different directions even if you use the same fabric.  The pink bra doesn't have a front band and the back band connects directly to the cups with no extra seam.

I notice there's a new pattern on the Bra-Makers site designed for foam cups - the Anita, which is made with stretch lace.  But there's definitely another pink bra in my future before I need to buy new supplies.

Saturday, October 8, 2011

Why I keep old Burda magazines


Too pointy!

I started to tackle the Sharon pattern (at left) from Bra-Makers Supply and I can already tell that the cup design is just not me.

Exhibit A.  My padded-out duct tape double is not precisely me, but close enough.  Erm.

I pinned the wires in place for these pictures so the cup would maintain its shape.  It sure does.  It's shape isn't mine.

So to plan B.


One of my favorite old Burdas is from June, 1996.  This issue included some great summer clothes (including the long tunic-shirt I showed you here)  but it also had a great lingerie section, including 2 bodysuits (one also doubles as a swimsuit) and a boned bustier.  All in all there are patterns for three different styles of seamed cup garments in this single issue.  Bonanza!

Bodysuits from 1996-06 issue
And I had made the swimsuit before, and remembered being pretty impressed with the fit of the cups.

Against my better instincts I'm posting a picture.

The fabric was a border print, nylon and lycra.  Purchased at the late-lamented Textile Outfitters store in Calgary.  I remember it was fun figuring out how to use the border print on the cups.  Putting the upper cup on a gold stripe meant that I ignored the grain line on the pattern.  I did not use wires although the pattern is perfect for them.  I like the wide straps which are pleated into the extension of the upper cup.

Sadly, the elastic in this suit has disintegrated but I'm glad I kept it for today's examination.  I like the line of the seam in this cup much better than the more horizontal Sharon seam.  And it's not pointy.

I think I'll just sub the Burda cups into the Sharon band.  Why wouldn't this work?  The Sharon pattern is designed for low or no-stretch cups and the Burda is designed for stretch fabric, but the cups are lined so they are reasonably firm.  I don't think it should matter.  I cut the Sharon cups out of Duoplex, a fabric included in the bra kit which, I have to say, is the most hideous stuff ever.  I have some lovely stretchy satin in pink in my stash.