Saturday, October 27, 2018

My head is exploding

The Sewing Lawyer has never been one to shy away from technically difficult projects and has continued the trend with computer-controlled machine knitting.

Selbuvotter Pattern (Ravelry)
There are so many fabulous stranded knitting patterns on Ravelry and lots of them are free. The wonderful liberation from 24 stitch repeats that AYAB promises had me itching to try one of the many stranded mitten patterns where the palm is one design and the back of the hand is another. I found a free pattern called Selbuvotter and I was off.

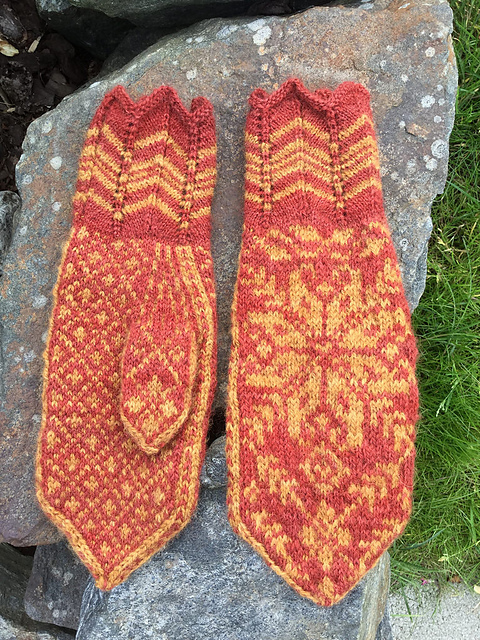
The details of this pattern are similar to the mittens traditionally knit in Selbu, a municipality near Trondheim in Norway. As explained in the page I linked, they have a lace cuff, a repeating pattern for the palm and a centred motif or complex pattern that covers the back of the hand. There is a knitted border marking the transition from the palm to the back of the hand. The thumb starts narrow and grows in a gusset. It is like a miniature version of the mitten with its own fancy centred pattern on the outer side of the thumb and the repeating pattern from the palm on the other side, separated by the 3 stitch knitted border.

If knitting these by hand, you would definitely do them in the round. For machine knitting they need to be done flat, and although I suppose I could hand manipulate the lace, I am fine with ribbing.

I had to modify the pattern chart a bit for flat knitting. I added a seam stitch at each edge, attached the thumb gusset to the thumb instead of having it as an integral part of the mitten, and fiddled with the pattern to make it more symmetrical (centred on the palm). I also added some contrast stitches with the goal of reducing the number of long floats on the back.


Here are my modified charts (made in GIMP).

Sorry they look so fuzzy; for AYAB each stitch is one coloured pixel so in original size they are microscopic.

I decided that the 3 stitch border should be attached to the back of the hand as the decreases are made. I couldn't get my head around charting this in GIMP so decided to manually select the needles for this feature. It is not complicated, every second row the middle stitch is in the main colour.

Throwing caution to the wind I set off, making many discoveries about AYAB in the process.

  • In hand knitting you knit from the right side but on the machine it is reversed. AYAB nicely flips the pattern automatically, making it imperative to remember which side the thumb is being made on. If knitting the chart as displayed above, the thumb has to be made on the left hand side of the needle bed. AYAB has a feature to mirror the pattern if you have already set up your knitting, as of course I had, with the thumb to be knitted on the right.
  • I managed to knit up to the top of the main pattern, having taken the palm stitches off the machine once I needed to decrease to continue knitting them separately later. I made some mistakes in the border pattern but it looks decent. Continuing to knit the palm in the pattern was a challenge. I learned how to resume on AYAB, but managed to pick the wrong row to start on so there is a duplicate row there. It is hardly noticeable (I hope). 
Technical knitting problems were also encountered, like how to add the stitches above the space for the thumb, and how to increase the gusset stitches so the stripes marched continuously up instead of in steps and stairs fashion. I am working on that.

Here are some in progress photos. It is going well enough that I am encouraged to continue. I'm using junk yarn and the gauge is wrong but it is sort of looking like it could some day be a mitten.

In the right hand photo, the orange line on the palm is the life line. You can see the duplicated row above it.

I started the thumb (4 thumb stitches are on a safety pin in the photo at left) but that's when my head exploded. I'm going back to it now.


Saturday, October 6, 2018

New technology

Hanging around the machine knitting forums on Ravelry can be dangerous. You learn that you could, if you only had this or that bit of technology, accomplish amazing things.

So it was that I heard of the mysterious AYAB (All Yarns Are Beautiful) - a little computer board and custom program that with an Arduino can instruct a Brother electronic knitting machine to do just about anything. I did not own a Brother electronic knitting machine. I had not seen a second hand one for sale in my area. But late in the summer I finally found a KH950 with ribber for a reasonable price and I pounced.

Hacked at the U of O Makerspace
Long story short, I bought it, I acquired the board thanks to the help of a very generous knitter on Ravelry, I went to the local university maker space (very great resource, if you are looking to 3D print or laser cut something and lack the machinery BTW) and with the help of a great on-line tutorial and an engineering student, my 950 was successfully hacked.

My delight at producing this dumb little swatch was almost as great as the amazement of the 20-something student who helped me install the AYAB at how fast the machine could produce actual knitting. (Quite a few 20 somethings came over to ask what the heck that machine was, anyway...)

As I was engaged in this exercise, news of the amazing Australian knitter/software engineer who literally knitted a map of the universe hit all the sites, and friends kept sending me links. She uses AYAB!

So my late 1980s knitting machine technology was brought up to date and can now be controlled by way of a graphics editor running on a modern laptop. Goodbye, 550 random built-in 1980s patterns, hello unlimited knitting potential!

I downloaded GIMP which is free and seems pretty powerful although for my purposes I only need the most basic function (making pixels black or white). I found a video tutorial on YouTube that explains it very clearly.

Chart made in GIMP
My next step was to find some interesting stranded knitting patterns. I found a free pattern on Ravelry for fingerless gloves (Latvian Blooms). It's a hand-knitting pattern but who cares? It has charts! I entered the pattern into GIMP pixel by pixel. One pixel correlates to a stitch in AYAB. Then I copied the chart multiple times, somewhat randomized, into a bigger document (approximately 4x as wide). I uploaded that bigger image into AYAB and knitted it. It is knitted on 137 stitches and 90 rows and it took me no more than an hour to set it up and knit. The machine beeps as each new row is ready to be knitted. It's pretty brainless knitting, all things considered, and the machine works really well.

Once I finished knitting the chart, I set the machine to knit plain and continued for an unknown number of rows for a lining for my tea cozy (the stranded pattern has some really long floats that would get caught on things). This was super approximate.

AYAB automatically reverses the design so the knitted piece is the same as the original chart, not reversed left to right. This would be very handy if knitting text, for example.

Today I steamed the piece to control the curling edges and sewed it up with my sewing machine. It is basically a lined tube that is gathered at the top with a length of machine-knitted I-cord.

If it was the right size it would make a dandy hat, or a very warm cowl.


Sunday, August 26, 2018

Where has The Sewing Lawyer been all this time? And a shirt.

It's almost the end of summer here - Labour Day is the official start of fall even though (as my mother would invariably point out) summer is still on until September 21 or so, and in fairness the weather can still be quite warm that late in the year. Where have I been?

Here's a clue: it wasn't summer there.

OK, here's another clue:


I was in Australia! As a Canadian I can tell you this: their winter is for sissies. You can go to the beach and swim in the ocean in the middle of winter, for heaven's sake. You can wear shorts outside. The sun shone almost every day, and it was not even a bit humid. It was glorious! For my money, July is definitely the time of year to go to Australia.

Work took me there; I was lucky enough to get approval to attend two excellent legal conferences being held at the University of Melbourne so I was there for two weeks. After that, a holiday ensued. My husband and I headed north to Cairns and then to Sydney before flying home. We ate, we drank, we walked (a lot!), we swam in the ocean (well, we snorkeled), we went to rainforests, on beautiful coastal roads, to mountains, on a wine tour, we saw wildlife, many colourful fish and birds, fabulous tropical flowers and much gigantic foliage. It was a lot of fun!

My being a tourist has nothing really to do with sewing, but I did find time to do a bit of fabric shopping in Sydney. I bought wool jersey and gorgeous guipure lace at The Fabric Store (good timing on the Sale!) and some Liberty at Tessuti. My good intention is to sew it all up in the medium term.

But my first project from my fabric purchases down under is this shirt made from humble quilting cotton that I bought in downtown Sydney. I went looking for yardage in prints by aboriginal artists after seeing tourist items made out of this type of fabric, and seeing aboriginal art in museums.

This print is a design called Water Dreaming by Audrey Martin Napanangka for M&S Textiles, Australia. I just googled it and find that it is available for sale by that name on the internet (for example here, in a different colourway). According to the M&S website, "The long curved lines indicate the movement of water in the area. Dotted lines and smaller circles indicate various soakages, broken roads, sands, etc." There are a lot of different aboriginal prints available and most of them relate to features of indigenous life on the land - water, food, animals and plants. 

So the shirt. This is one of the newest Jalie patterns, "Rose" (3881). It's a straightforward sleeveless shirt with a lined yoke, stand collar, back pleat and subtle shirt-tail hem. I participated in the testing of this batch of patterns (14 new ones were released in the spring) and this is one of the patterns I sewed up before it was fine tuned and released for sale. 

The testing was an interesting process. Our job was to make up the patterns according to the instructions, and to provide detailed comments back to Jeanne, Émilie and Mel so they could tweak the designs, fix typos, improve the instructions, and generally get everything exactly right. When I tested the pattern I used a relatively tightly woven cotton from stash - results at right (this style works well in bold ethnic prints!). You cannot tell from these photos but the finished pattern is quite refined compared to the version I tested, especially in terms of the collar shape and dimensions. Jalie is nothing if not attention to details! 

I was particularly skeptical of the instructions for making the stand collar. I've seen different methods illustrated in various patterns over the years and for a long time the results I got when making these collars was a long way less than stellar. In particular I would get lumpy bumps right at the key point where the stand meets the shirt front, right below your chin, right where it will be noticed and scream "loving hands at home". 

Being a perfectionist, I had worked hard to overcome the problem and recently, I had been using a method David Page Coffin wrote about in his book on shirt making. This gave pretty good results but his method is a little ... complicated ... and a bit counter-intuitive. Nevertheless I was reluctant to abandon it and so I chickened out when I tested the pattern. I did not use the method that the Jalie instructions suggested. Which, I now realize, was a missed opportunity.

LOOK, no bump!
I am not sure why I decided to give it a go with this version, using my precious Australian fabric. Maybe it is because Mel demonstrated it live at PR Weekend and it was fast and simple. Maybe it was because Émilie was wearing her beautiful Rose and the collar was flawless. Whatever the reason, I am glad I did and I am here to tell you that this is THE way to make stand collars - easy, quick, and produces a truly smooth and professional looking result. 

I had enough fabric to make a completely self-fabric collar and stand and had thought to make a completely contrasting white one but when someone whose style you respect tells you that it might be a tiny bit too Wall Street, you reconsider. In the end, the contrast is there but also sort of undercover. I kind of like it. 

Anyway, the bottom line is not only is this a refined little shirt that is very easy to wear, it is worth buying it for the collar instructions. What are you waiting for? 

Thursday, June 21, 2018

I'm a shameless copycat

At Pattern Review weekend, Deepika (founder of PR) wore this gorgeously simple dress on our shopping day. She paraded up and down the aisle of our bus doing her thing, and every time she passed me I coveted the dress more and more. The colour! The EMBROIDERY! The shape! So casual, so comfortable looking, but so stylish. Everything about it was perfect and it made Deepika look like a million bucks (well, she could look like a million bucks in a paper bag, but you get my drift).

Wonderfully thick border
embroidery, hi-lo hem
Deepika told me she had found the fabric at a Fabricville store (Canadian chain found in Quebec and maritime provinces, of unknown connection with Fabricland which is found in Ontario and other Canadian provinces) and that she had some leftovers which (with very little pressure on my part) she offered to me. It arrived in the mail a few days later.

So with the shameless objective of slavishly copying Deepika's perfect solution for this fabric, I bought the Named Clothing pattern for the Inari Tee dress. Named Clothing is an indie pattern company based in Finland that's new to me. I had seen very positive reviews of the Inari dress on blogs and PR. But until I saw Deepika's version it hadn't clicked that I needed it. 

What can I tell you about Inari? It's always helpful to have access to the experience of others which allows you to make needed or potentially needed adjustments before cutting into your precious fabric. 

From my reading, I had learned that the pattern combined a low/deep armscye with a fitted (narrow) sleeve and high sleeve cap. Such a sleeve creates a tube that is pretty much fixed at a fairly steep angle (graphically explained at Lorenzo's Workshop). The garment looks trim, tailored and fantastic until you try to raise your arms beyond the point at which the angle of your arms can be accommodated within the angle of the sleeve tube. Beyond that point you get bunching at the shoulder and the body of the garment is pulled up, as your body movement forces the garment to move in ways it's not engineered to accommodate. 

The quick and very easy fix for this is to flatten the sleeve cap. Carolyn explains it very well in this post and I just did what she did. The only point I will add is that (unlike the pattern piece in the photo on Carolyn's blog) the original sleeve in my size on the pattern has very strange, non-square corners at the underarm seam. This is contrary to all the normal rules of pattern drafting since, once the seam was sewn, it would generate an unsightly and awkward point at the lower edge of the sleeve. While it would create more room in the sleeve (at the hem) it would put that room in a place (under the arm) where it is completely unhelpful! It would also make it hard to attach the separate cuff piece, which is exactly rectangular. 
Quick & dirty sleeve fix

All of which to say that when I added the wedge to flatten the sleeve cap, I also fixed this problem by squaring the underarm seam (see photo). The result was to move the extra hem width from underarm to under the sleeve cap, keeping the sleeve hem dimension matching the original cuff piece but in a flatter capped sleeve. This is a totally invisible but very functional alteration. 

I also dithered about length. The picture on the Named Clothing website is of a dress that is very much above the knee. Carolyn's dress is also very short on her. Deepika's dress is knee length (but I am taller than her). The pattern says it is designed for a person who is pretty tall at 172cm (5'-8") - I'm 2 inches shorter. I liked the knee length look. I non-scientifically decided to add 3cm to the pattern, and the fact that the border would not be hemmed means that my dress is probably a total of about 6cm longer than the original pattern. It turned out the perfect length so ... phew!

To continue the saga, I failed to read the instructions through (bad bad Sewing Lawyer!) and so did not notice that the pattern pieces incorporate a 1cm seam allowance until after I had cut it all out. I had assumed, fresh from my experience of sewing the also-European Audrey dress, that I'd have to add allowances. Luckily I realized this before I sewed it all up, and it is always feasible to cut off the unnecessary allowance! However I kept the extra at the side seams both for fitting insurance and to make these seams more substantial, which helped at the hem slit, since it's finished by just turning back the seam allowances which at 1cm would be a pretty skimpy finish.

The finished dress is just lovely - the weight of the embroidery gives it a bit of presence and it's super easy to throw on but looks great (in my opinion anyway). I think I'll wear it to my cousin's wedding this weekend.

Sunday, June 10, 2018

Stash/sewing speed record!

Some of the thousands of  theatrical costumes
at the warehouse - waiting their turn...
I had a lovely time at Pattern Review Weekend in Stratford Ontario - me and 100 of my best sewing friends! The special activity for Friday morning was a visit to the Stratford Festival costume warehouse, which was fantastic! But there was also early morning running, much chatter and convivial gatherings at dinner or brunch time, and in the hotel bar. We admired each others' clothes (most were wearing me-made throughout), learned tricks for better pictures courtesy of Gillian (Crafting a Rainbow), watched Jeanne and Mel of Jalie Patterns sew up some of their newly released styles, and had a presentation by the folks from Bra Makers' Supply. And then we went fabric shopping...

Some of the pretties
at Ann's Fabric
I had been on a fabric diet but fell off the wagon fairly hard. This was inevitable when I realized we were going to Ann's Fabric in Hamilton. I had heard about this store but for some reason (even though my parents live in the same city) I had not visited it before. I was feeling like I wanted new choices for sewing active wear and I knew that Ann's specialized in such choices. Most of my current workout wardrobe is from fabric picked up at the last PR Weekend I attended, in 2010!
Fabric haul - coordinating
lycra on the left. 

So I may have acquired 6 coordinating fabrics for my active wear needs for the next 8 years ... And I will definitely be visiting Ann's Fabric again.

Another new-to-me store was Len's Mill Store. This is a chain of 11 stores but they are very localized; mostly in southwestern Ontario. I see there is one in Hamilton (which I may have to check out), but we went to Woodstock. That store is massive! I had fun shopping in the bargain bins, where I found a length of scuba knit printed in an appealing free-hand "plaid" of bright colours. I figured I had enough to make a dress of some kind. But it had to be super simple to avoid breaking up that print.

Then this morning I got an email from MariaDenmark telling me of a 50% sale on her patterns. I realized her pattern for the Audrey dress was just about perfect for my scuba. No darts or seams in the front and only two vertical darts in back. The reviews on PR were very positive. I had a day to sew. I figured I could get the PDF taped together, cut the dress out and have it finished before dinner, and I was right. I even had time for a little outdoor photo shoot.

The sewing was quite straightforward; the only tricky part being attaching the shaped neck band. I really like the shape of that band, which is deeper at CF. I cut the neckband and sleeve cuffs on the "bias" for interest and because due to fabric shortage there was no way to match the pattern.

The dress looks OK by itself but I decided I like it with a belt.

Then I took some selfies.


With construction site
next door
With peony
Indoor selfie


Sunday, May 27, 2018

Pink Minoru - done!

There's nothing like a little peer pressure to get me sewing efficiently. I'm off to Pattern Review weekend next week and I decided to make this jacket. It might rain...

Crazy quilting cotton pockets
I like the finished product but there are some strange things about this pattern.

Can we start with the serious problem that it had no pockets? Well, it had 2 inner patch pockets, but that simply won't do. I drafted slant pockets with a zipper closure.

I did not realize until I was making the sleeves how weird they are. The cut of the actual sleeve is gorilla length but spider width. I exaggerate. I do have short arms but I took at least 6cm of length out, between shortening the piece, whacking some off at the end during construction, and using narrower elastic at the cuff.

But the real weirdness is the cuff. I have never seen a coat with elasticated cuffs that are actually wider than the sleeve hem itself. Huh? I guess they look ok but a wider sleeve gathered into a cuff looks better to me than a wider cuff gathered into the sleeve.

Zipper shield
More minor adjustments were to line the hood and to insert a zipper shield because who wants rain coming in a straight line right down their front?

I made only one of the inner patch pockets, and sewed it slightly higher than designed (to be clear of the waist elastic).

I used a longer length of elastic at the waist to make it less tight.


The outer collar is a retro-reflective fabric. Nobody will miss me in this bright jacket, day or night!

I think it's pretty. 

Saturday, May 26, 2018

Barbie-pink rain jacket in the making

I recently found a good chunk of waterproof nylon in hot pink at the spring Fabric Flea Market, which is held in my neighbourhood. $10. How could I resist?

Parenthetically, it was fun to go to the event. I hadn't been for a few years (trying not to buy) and it was much bigger than previously. So many of the vendors were familiar from my days of running the fall Fabric Flea Market (even bigger, longer running). I ran into so many neighbours and acquaintances! I didn't buy much because (a) SABLE* and (b) so many of the vendors were selling fat quarters which to a garment sewer is just tragic. But it was definitely worth the $2 admission. I found this fabric and a fabulous African batik print!

I have had the Sewaholic Minoru jacket pattern in stash for so very long. I'd get it out and ponder it periodically, then put it back. But suddenly, I figured I should make a hot pink Minoru. With mesh lining and added pockets! (What was she thinking in not putting outside pockets on this jacket?) I'm making the hooded version and am lining it with scraps of colourful quilting cotton. (The pattern should really include this too!) The collar is cut from a scrap of retro-reflective fabric.

I was nervous about fusible interfacing on this fabric so I fused the interfacing to quilting cotton which I'm sewing in (gives some softness to the front bands).

Gotta go. It might rain at PatternReview Weekend next week and I have to be ready...

* Stash Accumulation Beyond Life Expectancy.

Friday, May 18, 2018

Patterns from my past - resurrected

This Willi Smith pattern has been in my collection since it was brand new in (cough, cough) the 1970s. I seem to remember a pair of pink cotton pleated pants. Very summery, I'm sure.

I also vaguely think I made the jacket at some point but the details have faded from memory. 

I pulled this pattern out as a contender for a "camp shirt". I'm attending the PatternReview weekend at the end of May, in Stratford Ontario. Among the many delights of this 3 day fabricalooza is a camp shirt contest. I understand a camp shirt to be a loose fitting shirt with a convertible (rather than stand) collar. This pattern seemed close, although it has a back yoke. The simplest camp shirts wouldn't have one. 

It also has nicely curved shirt tails rather than the straight hem mentioned in the Wikipedia article. What do they know?

Anyhow, my shirt. It is loose. It is made from a woven rayon Hawaiian print that I got from a lady who spent 6 months of every year there, happily buying fabric to the point where she was well beyond having enough time to sew it all up. It's a wonderfully exuberant floral, don't you think?

It should be nice and airy for the hot days to come. 

Can you spot the yoke with pleats? I thought not.

The curved shirt tail hem is always a challenge, I find. To look nice, it has to be turned twice, but each bit to be turned up is bigger than the bit above it, making it hard to (a) press and (b) topstitch the hem so it looks nice and lays perfectly flat.

Behold the hem. I controlled the fullness by running a line of basting just below the hem line and another in the hem allowance, and easing the hem in (twice). It was a bit of a pain but the result looks pretty good, if I do say so myself. 

Serendipitously, I had perfect pink buttons in stash. 


How many ways do I love Vanessa?

Proving that the Vanessa pants pattern from Jalie is very versatile, here is my third version from the pattern. This time they are dressy, made from black wool crepe and lined to the knee. (Previous versions were drapey rayon woven and cotton knit PJ pants.)

I was very happy to get these cut out of a leftover piece of wool crepe. I had two pieces in stash but the other one is big enough to do a dress, or at least something more elaborate than these pants. It waits its turn.

The lining is also a remnant from other projects. It's bemberg, my favourite lining fabric. I didn't have enough to cut the front and back in the same direction. The back hem is actually the selvedge whereas the front hem is serged and turned/stitched.

I cut the lining to the notches on the leg seams, figuring that was the knee point. It makes the pants very nice to wear.

I also cut these longer than the pattern, by about 5cm (2.5"). It turns out that is a bit too long for these narrow legs. The finished pants are 2.5cm longer than the pattern.


I decided that the back (left) needs adjustment to remove some fabric in the seat area. I've already done a small flat behind modification and cut out another pair (in ponte knit).

To the right is a close up (and very lightened) shot of the front waist, showing details. The stitched down elastic waist is very comfortable and because the CF is flat, also flattering (or at least not extra lumpy at that point). Because my elastic is white, I fused the waistband pieces with a very lightweight black interfacing so there would be no show-through.

That's all - this was a quick and satisfying project.

Friday, April 27, 2018

Jalie leggings and top

I was going to call this post "Jalie duds" (i.e. clothes) but then I realized that the first dictionary meaning of "duds"  (a thing that fails to work properly or is useless) is the exact opposite of how I feel about my new Isabelle leggings and Pika exercise top.

I actually made the leggings a while ago but hadn't worn them because (a) they are capri length and it's still cold around here and (b) the tops I thought would go with them really didn't. Today I finally finished the Pika and now I have an ensemble. I continue to be the best dressed person at the gym I go to.

This is the first time for the Isabelles but my third Pika (the other two are the sports bra without the overlay).

I bought the Isabelle pattern even though the Cora leggings fit really well because I was lazy about how to shorten Cora to capri length (seriously?). And I like to support Jalie.

Between the two patterns, I find that Cora is more straightforward to sew. The pattern pieces for Isabelle are strangely shaped and several look almost identical, making it imperative to pay close attention when assembling it. The only part of the Cora pattern that is slightly complicated is the colour-blocking on the lower leg. I also prefer the pocket in the Cora (at centre back) than the CF pocket in the Isabelle, which I did not make. Both of them fit really well, although I thought the Cora was too low-waisted as designed. The Isabelle is very slightly higher I think.

Pika is a fantastic pattern - I love the firm fit that never shifts around. I opted for the overlay this time to get some midriff coverage. I'm not 100% convinced I love it, in part because the fabric I used is seriously nasty stuff (poly-cotton burnout knit). My machine had fits with skipped stitches, and it just did not want to behave. I had nothing in stash that would do, colour-wise, and this was on offer at the local Fabricland when I went looking.

I cut about 7.5cm (3") off the bottom of the overlay which seemed way too long to me. I was dreading sewing the hem on it (those skipped stitches) but I fused it first and then sewed over the layers with no problem.

3d blankie and the cutest hat in the world

The fact that one of my young colleagues and his wife are expecting a baby was the impetus for me to make this wonderful baby blanket pattern, the Amazababy 3d Baby Blanket.

The pattern is really well written - it can be used on any gauge or kind of knitting machine that is capable of making a tuck stitch (probably all machines), whether it's a punchcard or electronic machine, or completely manual. I made it on my Singer 360, a punchcard standard gauge machine.

The pattern has all the information needed to punch a card to produce this pattern. It is a bit tedious to knit if you don't have a colour changer (I don't) because you have to change the yarn every two rows.

Believe it or not, this is actually a black and white STRIPED knit. The magic happens because the tucking needles don't knit off, leaving the stitch from the row below on the needles. Tucking for two rows of white stitches leaves black stitches on the needles, and vice versa.

The pattern for tucking is diamond-shaped, another mind-bending fact. It's quite similar to the pattern on page 2 of this Studio/White pamphlet. The photo to the right shows the back of the fabric, where the diamonds of tucked stitches are more evident.

As the pamphlet says, the fabric produced by this pattern is "very raised". The author suggested it needed "firm blocking", but that would only be if you wanted it to lie flat. I didn't. This blanket is wonderfully bumpy and that is a big part of its appeal, along with the hallucinatory effect of the black and white pattern.


See what I mean? Amazing!

Because this is for a baby I made it from 100% acrylic yarn so it will be reliably machine washable and dryable. The bumps survive the machines quite nicely since they are built into the very structure of the fabric. Woolike is an extremely economical acrylic yarn from Michael's, but it's also really nice and soft, and machines love it. To make this blanket I used less than one skein (about 80g) of each of the main colours.

The pattern also provides clear instructions for finishing the edges of the blanket with a simple strip of stockinette, in a contrasting colour. Initially I was a bit unhappy with the fact that the binding was pulling the top and bottom edges in a fair bit, as well as curling under on the long edges. The above photo was taken before I somewhat aggressively steamed the long edges to make them stop curling under, and the short edges, to stretch the edging longer. Acrylic can be "killed" using heat (a process to permanently block the stitches, making it lie flat). I only wanted to beat this up since I needed those peaks and valleys to remain. I was able to convince the edges to behave  with steam from my iron delivered from a few inches away.

The finished item is more of a blankie than a blanket. It measures 50 x 70 cm (20 x 27.5"). I am hoping the baby will love it and carry it everywhere. See my project page on Ravelry for more info.


Then I decided I needed to make a little hat to coordinate with the blankie. It is the first project made on a new (to me) machine, a Brother 892 punchcard, also standard gauge. I used more of the Woolike.

This is a super simple project. As you can see, it's just a rectangle with some loops at the top. You knit a long strip for a tie, thread it through the eyelets, sew the seam and voila, a cute baby hat.


I got the idea from a blog post which gives the method but no details. You have to figure stitch and row counts based on what size of hat you want and the gauge of your yarn.

These I fudged, since I had no model to measure, based on some other baby hat patterns. My finished hat is 35cm around (13.75") and about 15cm (6") deep. I suspect it is way too big for a newborn although by rolling up the brim it can be made shorter at least. Given the roll and the stretch, the sizing could work for years if the hat lasts that long.

My colleague very nicely said he would bring his new son/daughter (still waiting to find out) around to the office and I hope to see these items in use fairly soon.