Once again, I fell for a new Closet Core pattern. This time it is the Jo Dress & Jumpsuit. The dress immediately appealed to me, but as I'm about to retire (no more office clothes!) I decided maybe I shouldn't be sewing a structured dress that I would have very few occasions to wear. So then, the pants...
But an actual jumpsuit????? No way.
I think jumpsuits and I passed each other on fashion street when I was in my 20s or 30s (?). I cannot actually remember but I know that I didn't want to wear them then either. Their immense impracticality is a deal breaker.
But then I thought - I could make a top using the Jo pattern and some matching pants! Two pieces would be so much more versatile.
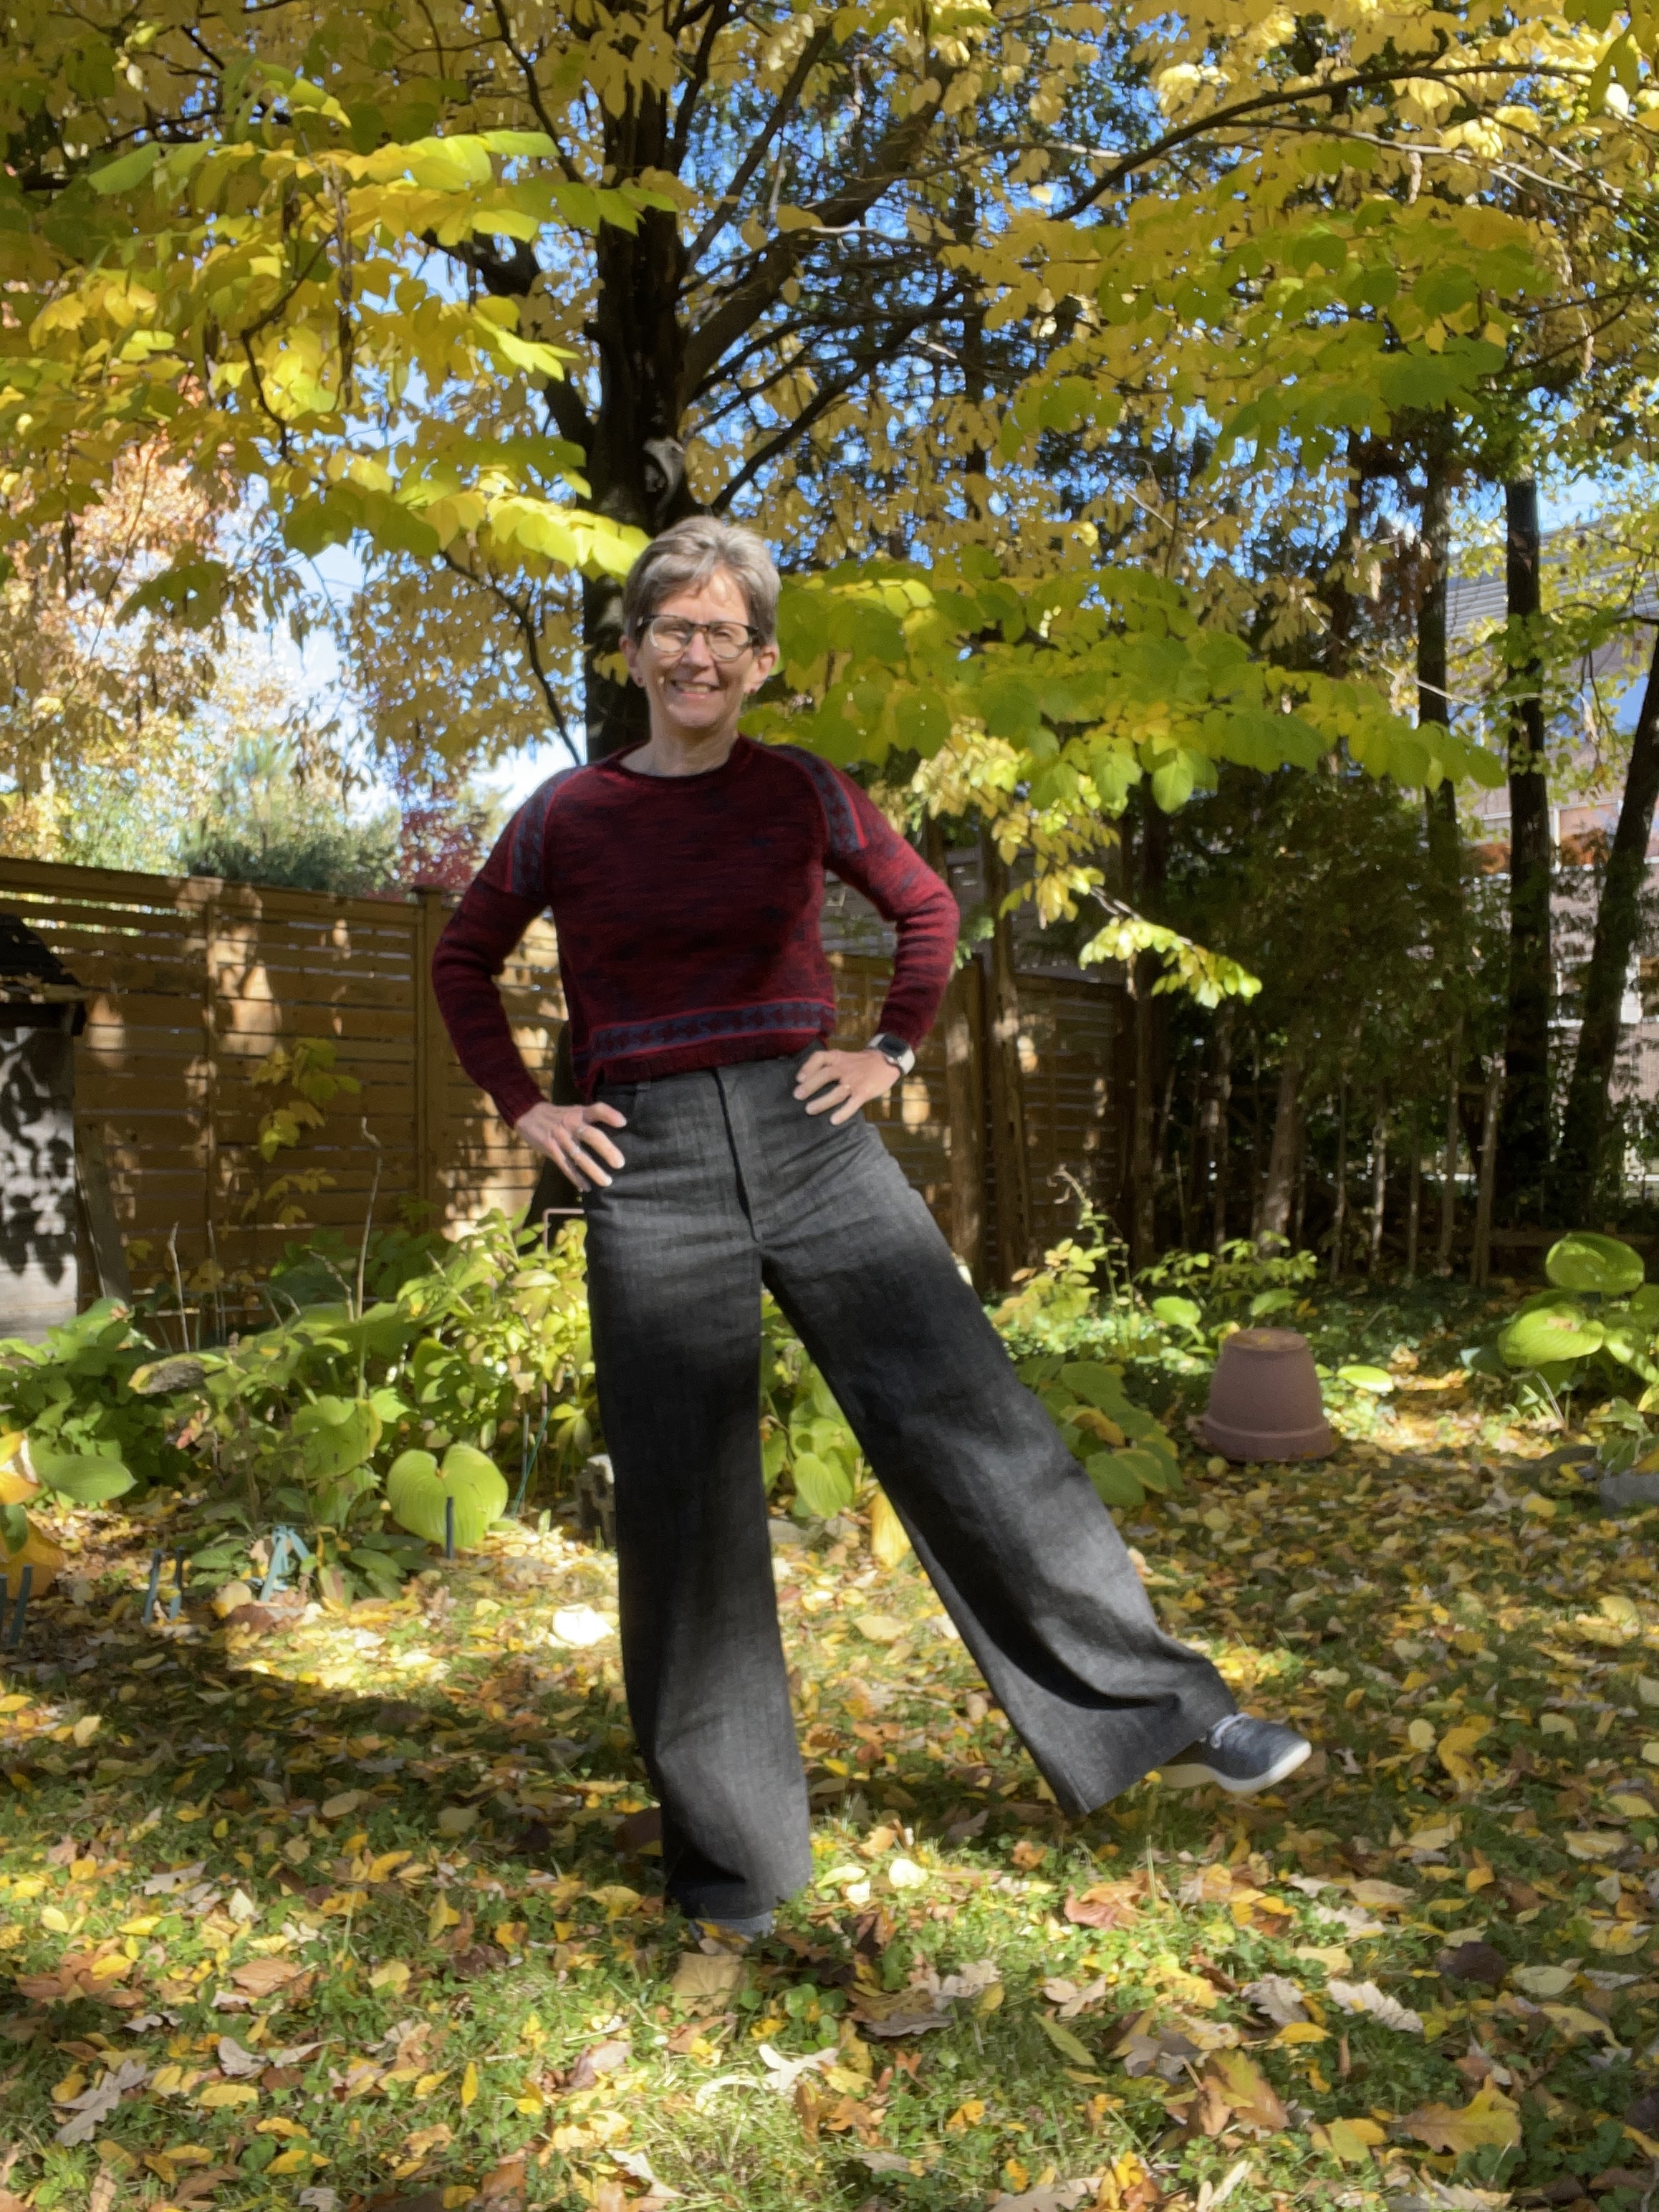
So that is what I did. I had this linen print in stash and there was enough of it to make my outfit.
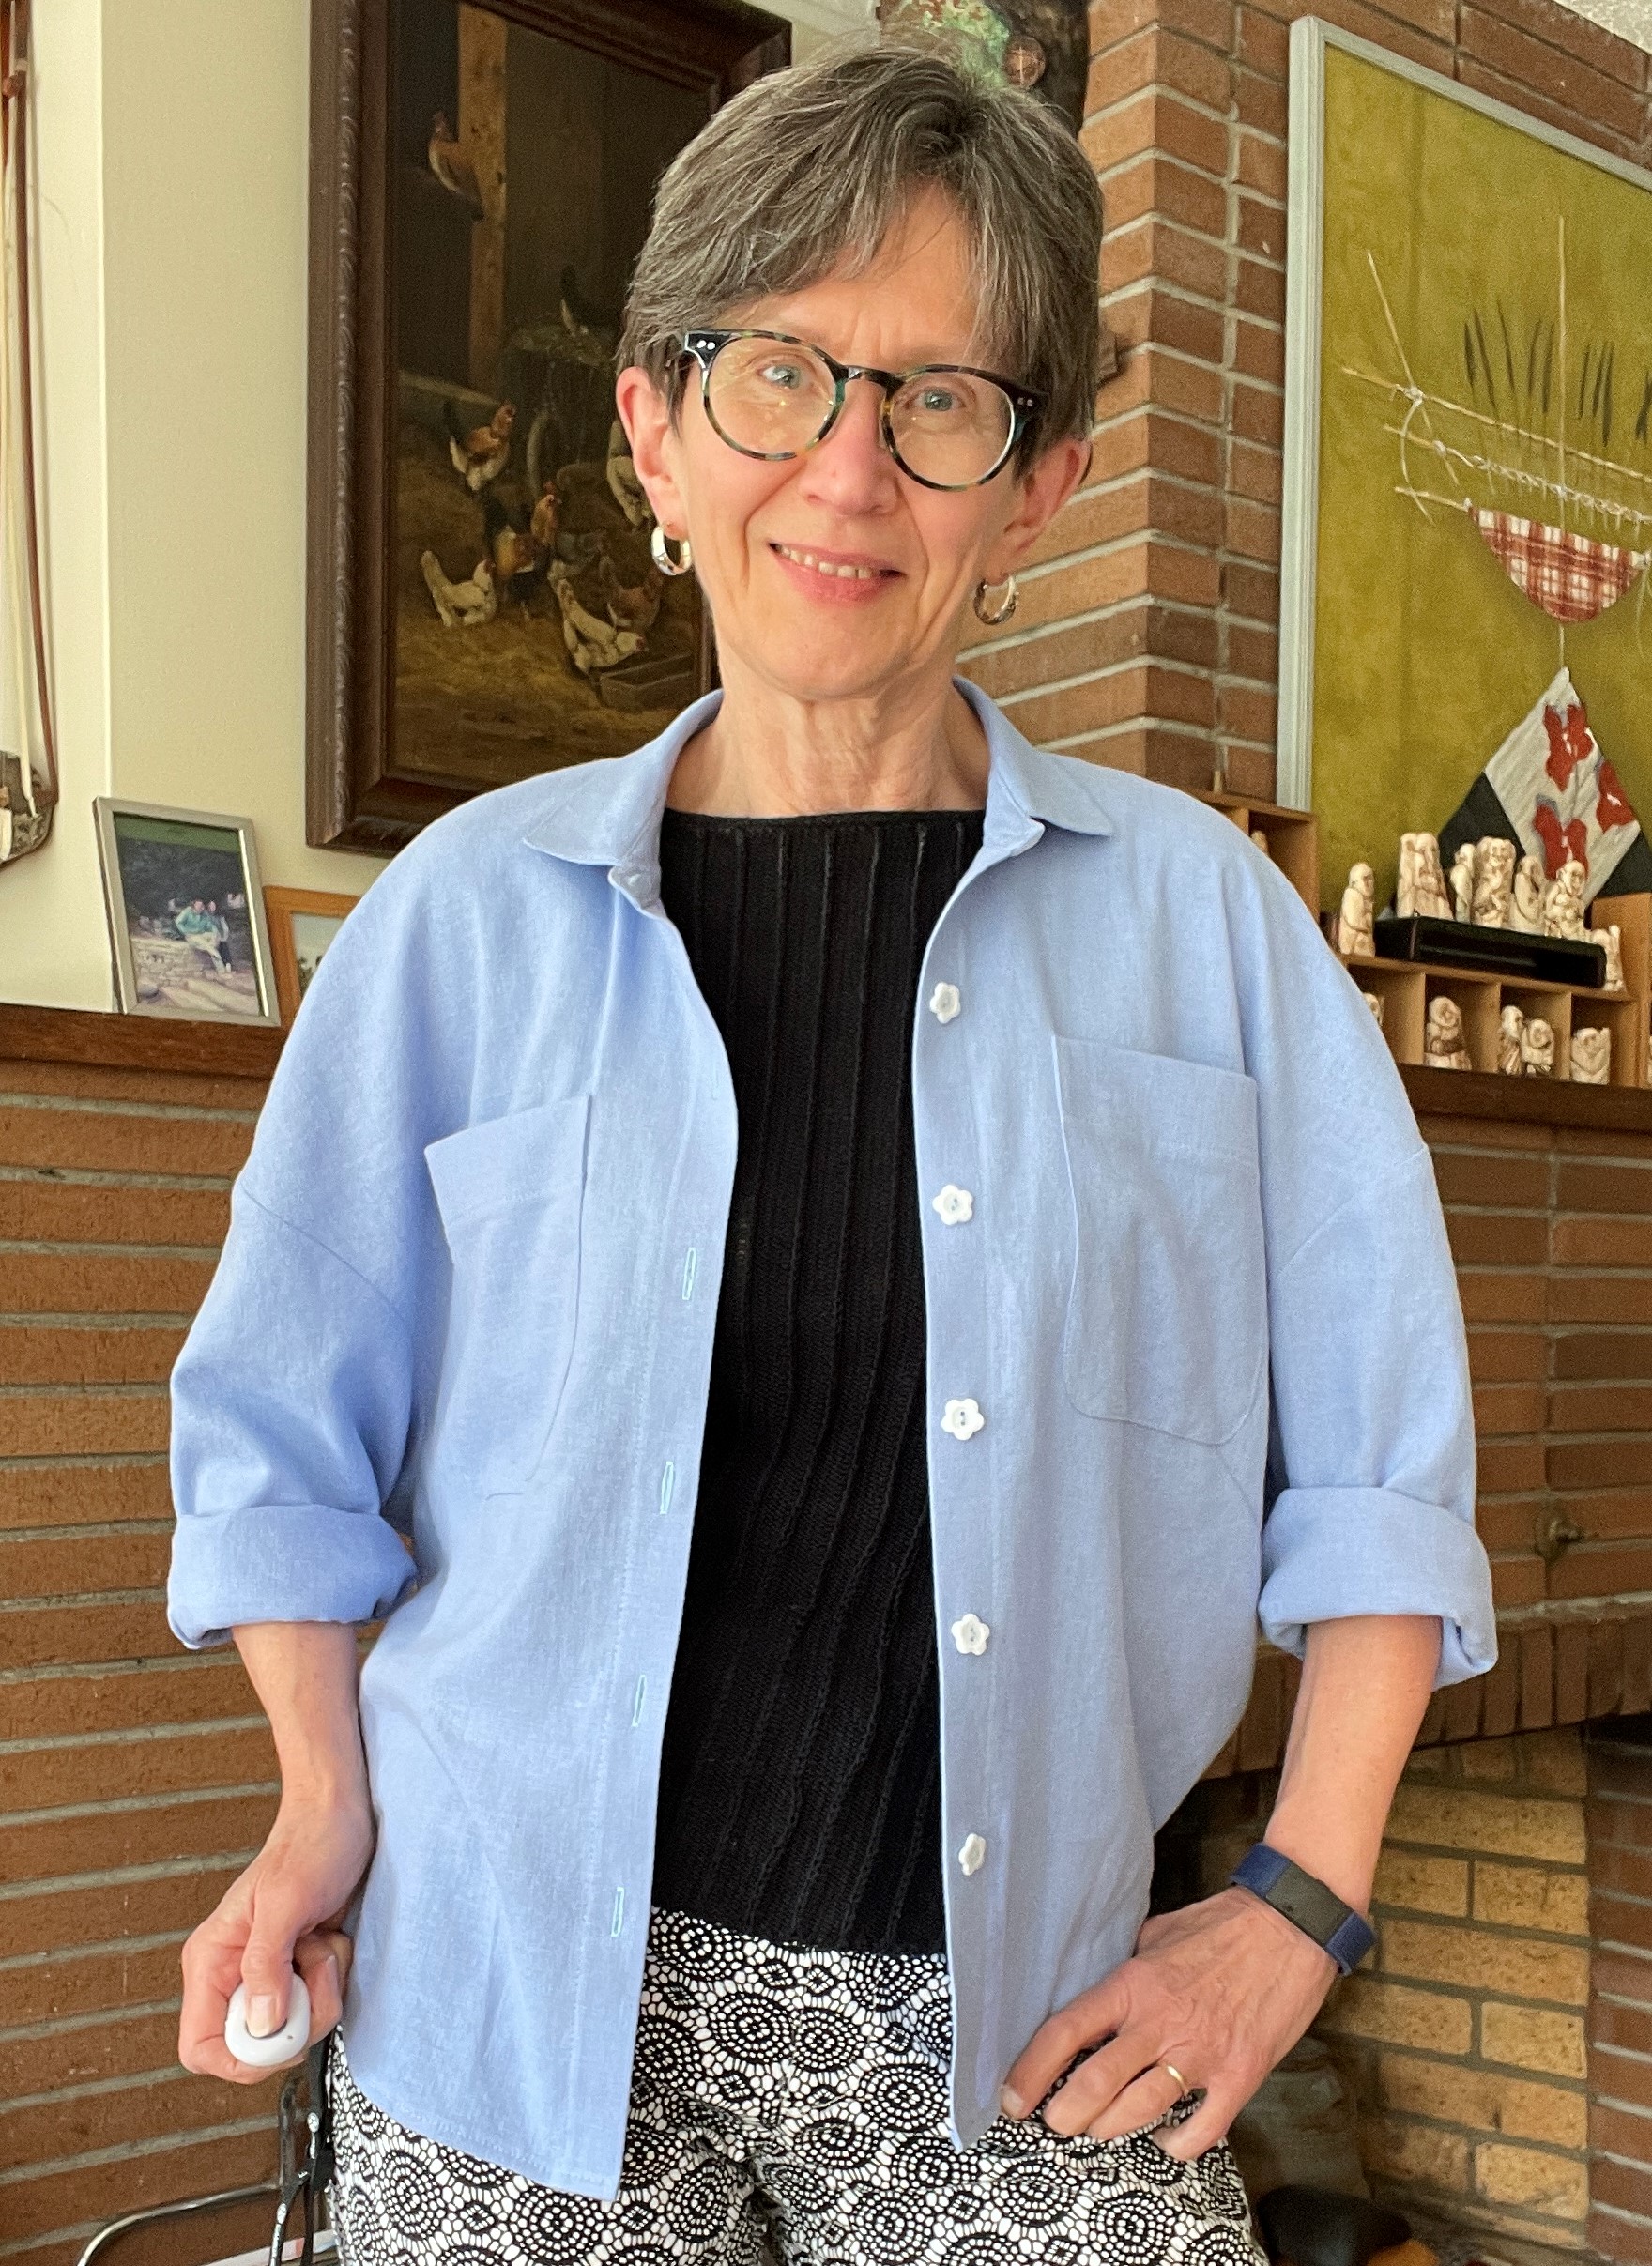
Let's talk about the top first. It is, almost straight-up, the Jo bodice.
In the olden days (long pre- pandemic) I would obsessively test every pattern before cutting it out in my "good" fabric. Somehow I've lost the desire for that, and have become more willing to live dangerously and prepared to adjust on the fly.
This was not a fantastic strategy for the top of the Jo pattern. Based on my measurements I cut a size 6 but I could easily have gone down to 4 or maybe even 2.
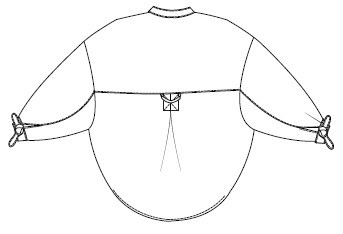
There are two main pattern pieces - a front and a back. The sleeves are cut on. Because of this, you cannot really alter the size once cut.
The top is interesting because of the way these pieces are connected at the top of the shoulders and centre front. The pattern describes the joining seams as "slot seams" but in my opinion they are not. A typical slot seam is structurally similar to a centred (non-invisible) zipper but instead of a zipper that's hidden, it's a contrasting strip of fabric.
The seams of the Jo top do have a separate strip of fabric that connects the main pattern pieces, but the overlap, which is formed by bias binding, is very firmly stitched down to the strip underneath, rendering it all but invisible.
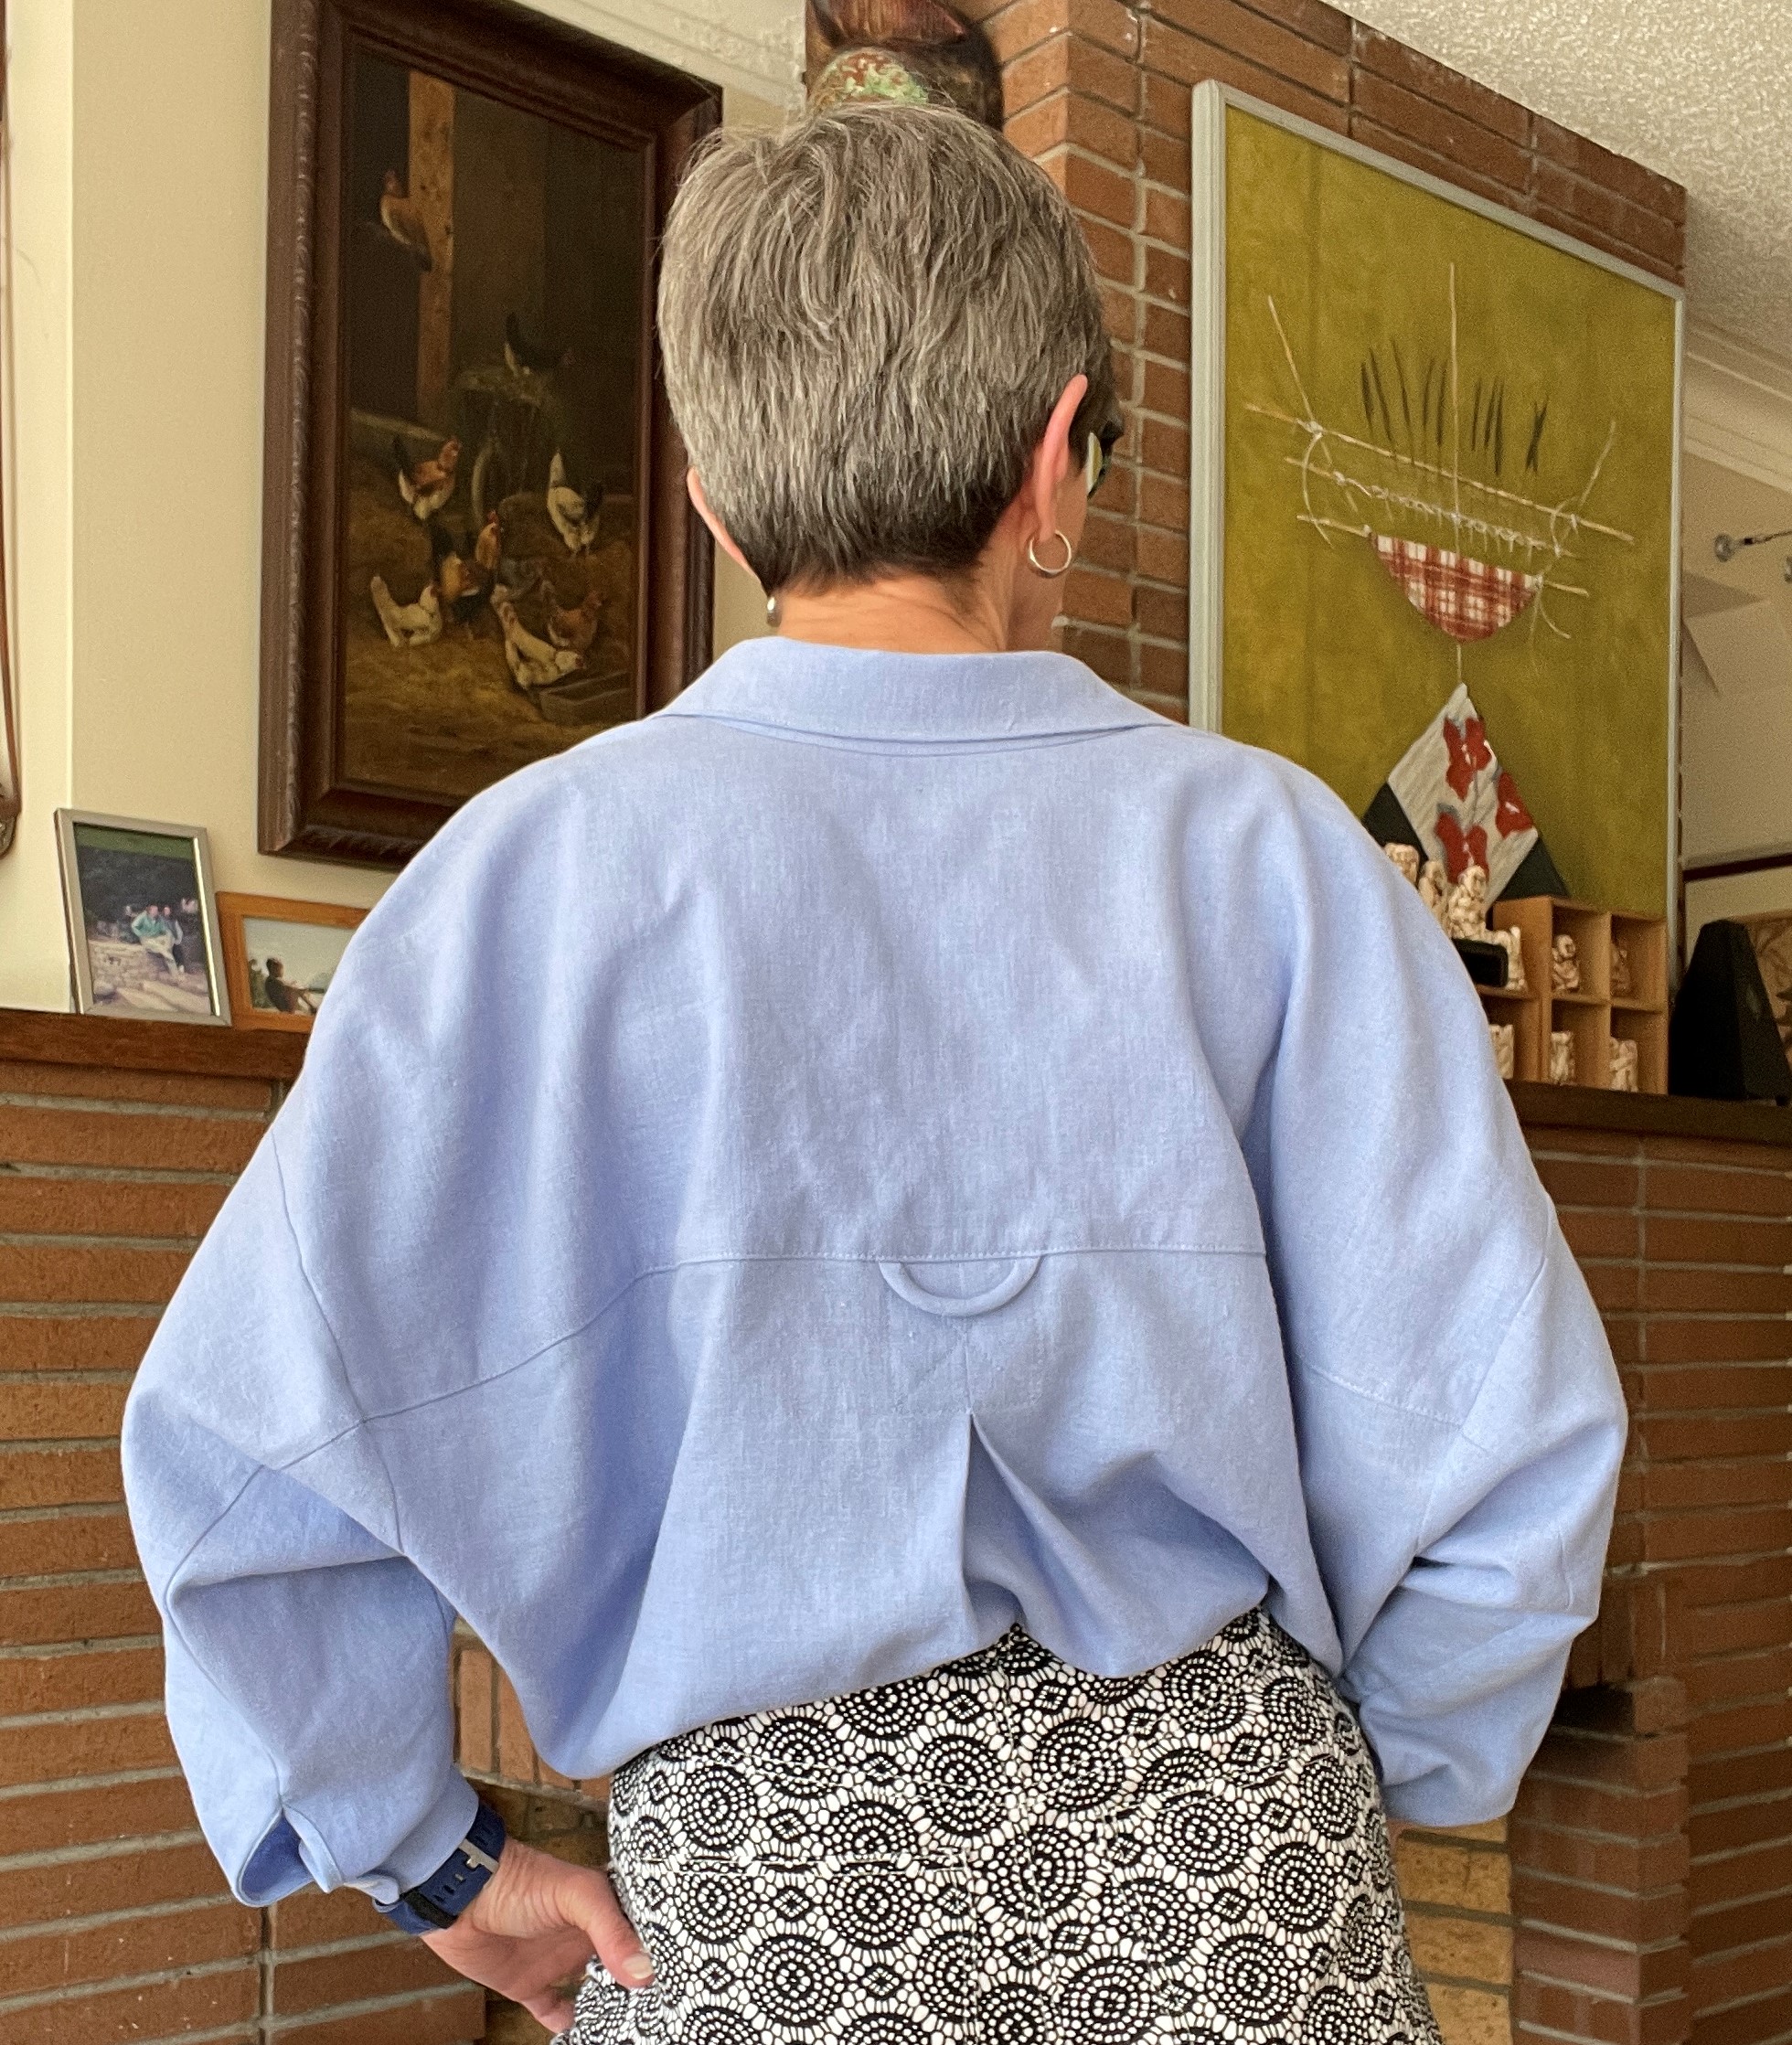
In the photo at right, you can see that the bias binding continues above the sleeve seam and finishes the front and back neck. At centre front, it curves again into another "slot seam" that continues down to the waist of the dress or jumpsuit (and to the hem of my top).
You can't really try this on before it is all constructed, mostly because the centre back seam (a zipper if you are actually making the Jo pattern as designed) is the very last step. I wasn't sure I would need any kind of back opening to get this on as a top, and I was hedging my bets on this up until the end, i.e. until it was essentially fully constructed.
Oh who am I kidding? I could have slammed it together enough to try it on before I did all the bias binding. But what I could not have done was any serious adjustment at that point. Because, of course, the size and shape is pre-ordained once you have cut out the main pieces without alteration. So I continued on a wing and a prayer.
Only to find out that the neckline was HUGE. Too low and too wide, especially at the back.
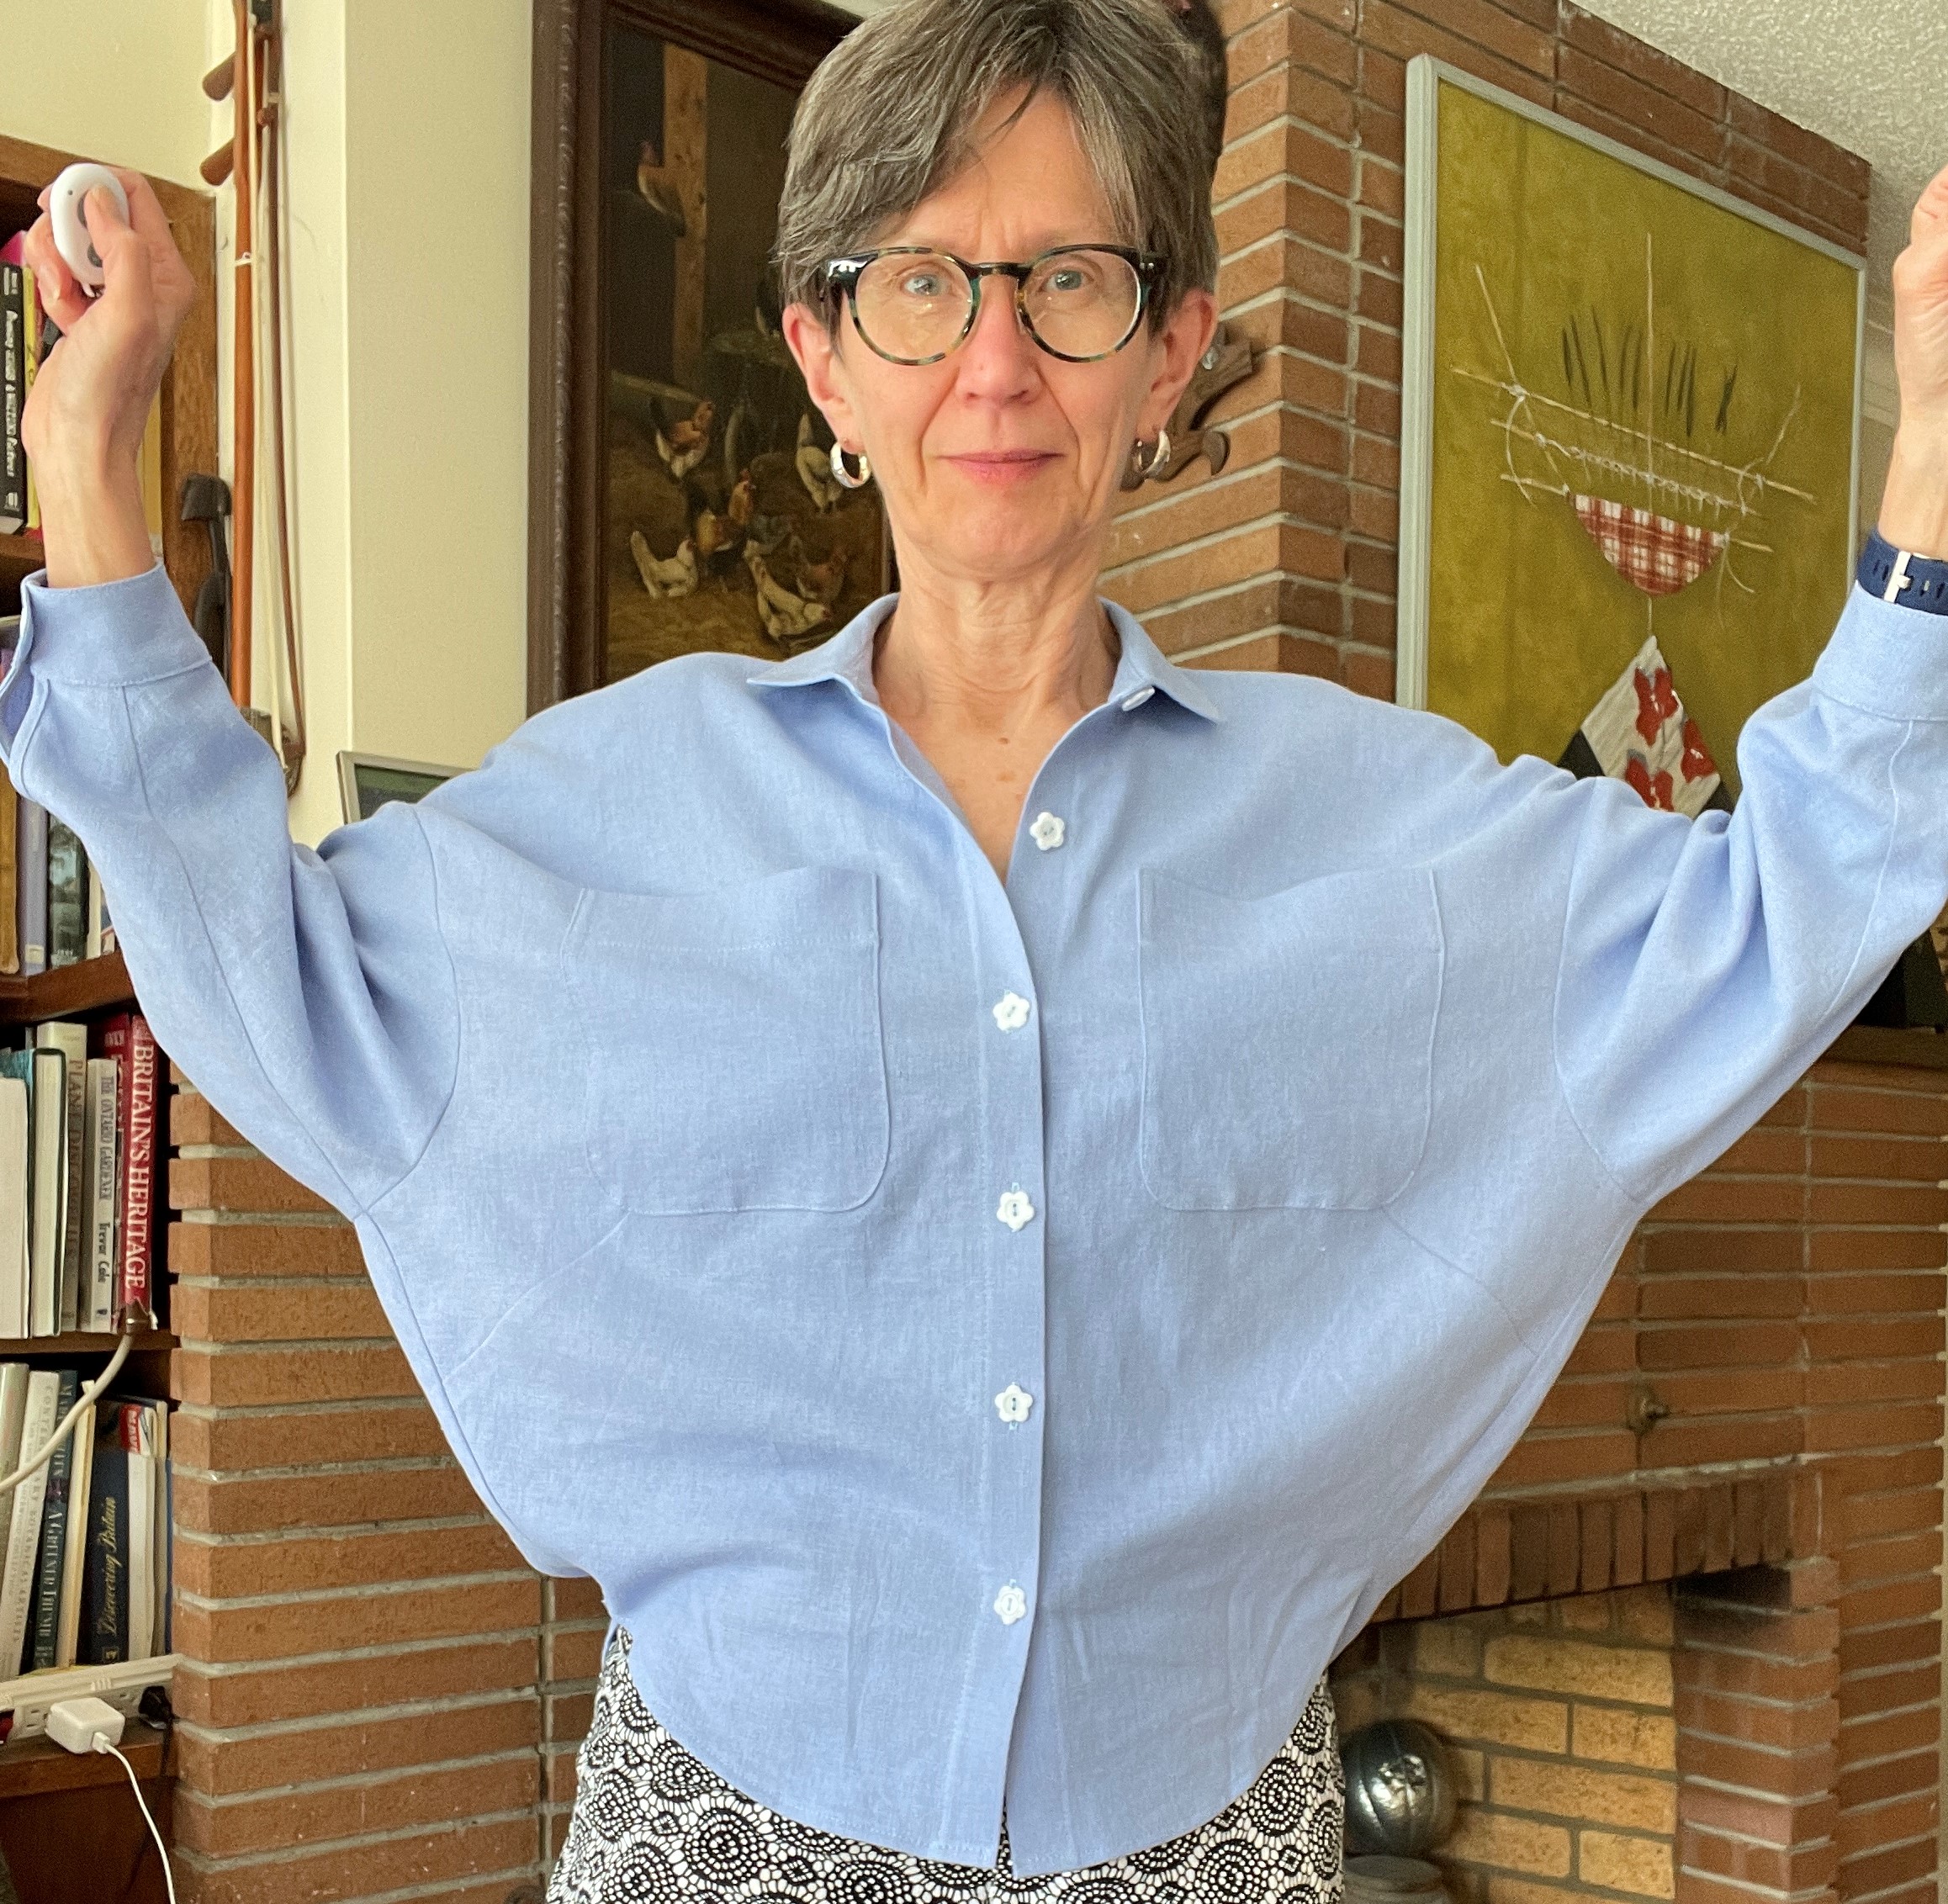
In order to make this wearable, I added the little orange linen triangles you can see in the photo above. These not only bring the deep V of the front neck up, and the wide Vs of the shoulder points in, they also stabilize those joins and keep them from spreading out. Since I had cut orange joining strips in the faint hope that a bit of orange would shine through my "slot seams", I am very happy with the aesthetics of these little triangles as well as with their functionality.
I did not need a zip at the back. The pattern has a zipper there, and a ruler-straight centre back seam. I took a good 4-5cm out of the CB at the neck edge, tapering out to the original seam by mid back. This helped with the falling-off-my-shoulders feature of the bodice as designed. It's easy to pull the top on over my head.
What else? I obviously lengthened the pattern pieces to top length and I ignored the darts in the front of the Jo pattern.
I made the bigger sleeves (go big or go home?). The bias strip construction gives them lots of structure.
The sleeve hem was far too wide for my frame. I sewed the underarm sleeve seam in by at least 5cm at the hem, tapering back to the original seam at the point where it pivots to become the side seam.
If making this again (assuming I need more than one top shaped like this, maybe questionable) I would start with a smaller size, fold out some length in the upper bodice/sleeve at front, and shorten the sleeves by a couple of cm. As made, it tends to fall back at the shoulder. I think the upper front is too long.
If I had thought about my experience over decades of sewing for myself, I ought to have predicted all of this.
Onward to the pants.
The bottom of the Jo jumpsuit is a cropped pant with a flat front and elasticated back waist. The crotch depth is ... baggy (jumpsuit, another reason not to like them). I wanted pants with a similar look but that would actually fit me. Pietra to the rescue. I picked View B (the slim legged, cropped pants).
I do not like clothes that are too tight, and it's a tiny bit possible that I think I am bigger than I am. So my tendency is to err on the large side, and then I have to adjust in the sewing once I can see how things are going to fit.
My hip measurement these days is exactly in the middle between size 8 (94cm) and 10 (98cm) on the Closet Core chart. According to the pattern, the garment hip would measure 98.4cm, only 2.4cm of ease. Not enough for my liking, I thought. So I graded out to a size 10 at the inner and outer leg, and to size 12 at the hip (105.4cm finished). Which is what I got, and it was very baggy especially in the back.
I retrofitted them by taking them in at the hip by about 4cm. Back to a teeny bit bigger than size 8. Now they fit OK, although I think they would have benefited from darts in the back, and to have the elastic a bit snugger at the waist.
No mind, they are comfortable. I can definitely see myself making this pattern again.
It remains to be seen if I will wear this outfit more than I would have worn the dress...