Monday, December 28, 2015

Guess what? Another TS Christmas knitting project!


This one is more complicated. I made a zipped cardigan for my son (details on my Ravelry page). The yarn is Briggs & Little sport in a dark grey. It's a one ply with a manageable tendency to bias. It is very rustic, complete with bits of what looked like wood and straw, and wild hairy bits. Off the skein it's oily and stiff but washed, it has a fluffy but very seriously woolly quality that I like. It left my Passap full of lint. Maybe I should plan to do a deep clean once a year...

A nice variety of things went wrong with this project:
  • I made a PDF of the pattern quite a while ago (from a library book) but when I went to start my project, I only had the last of five pages. I still have no idea how that happened.
  • I requested the book again and it took days and days and days to get to my branch.
  • My parents visited. (This isn't really anything "going wrong" but it was another source of delay.)
  • Stitches delighted in jumping off the needles.
  • (This is totally just between us.) I knitted an extra rib up the side of one front. Didn't notice for the longest time that one piece has 4 ribs instead of 3...
  • In converting my hand-knitting pattern for my machine using basic knitter's math, I failed to note that the sweater is supposed to be 45cm from the bottom of the sweater to the armscye, including 6cm of ribbing. I knitted 6cm of ribbing and then 45cm of stockinette. And then I washed and blocked the first front and DID IT AGAIN before noticing.
That last one cost me a good night's sleep. My inner dialogue at 2AM: "Leave it as is?" "He'll hate it if it's too long." "Cut 6cm out of the middle and kitchener stitch?" "Frog back, rehang and reknit?" "Leave it." "But if I do he'll never wear it." "Cut 6cm out and kitchener?" "Frog back?" (Repeat endlessly.) 

By the light of day it was obvious I should frog back because he would not like a sweater that was too long and let's face it - if you have a knitting machine, reknitting is a lot easier than connecting two bits of knitting invisibly by hand. And in the end it was really fast; so not worth losing hours of sleep over.

Given all of this, I'm really pleased with the finished project. I managed to go straight from the ZZ cast on row to a 3x2 ribbing pattern (this involves lots of transferring stitches between beds). I managed to knit ribbing up through the body of the sweater without any obvious gauge problems (I knit the back bed purl stitches on stitch size 6 when the front bed was SS 8). 

Front
Sleeve
I accurately (subject to my mistake noted above) graphed the pattern and worked from these diagrams. 

I can knit anything!


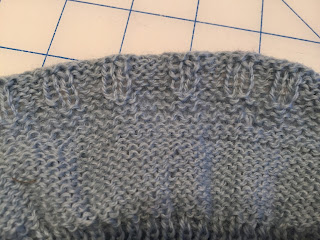
But the source of most happiness is how well the collar turned out. The pattern called for a standard hand knitted collar which in part (at CF and CB) was knitted straight from the body pieces rather than from cast off edges. The collar is in the 3x2 rib pattern and doubled (i.e. knitted 12cm, then the cast off edge is sewn to the neck edge on the inside). This would make a facing to hide the top of the zipper tape on the inside. 

Cashmere turtleneck sweater 
I wanted a single layer collar (2 layers of Briggs & Little would be too much), and I wanted it to attach the same basic way as the turtleneck of a commercially made cashmere sweater I own. See, there is a single layer of ribbing, and it is knitted directly to a few rows of stockinette - both inside and out - and those stockinette stitches are neatly sewn together through the body of the sweater. Neat huh?

Except I am lacking the machine (a linker) that does this kind of sewing, and I wasn't 100% sure how to knit the little stockinette flanges directly onto the ribbed collar. 

But I did it! I'm so chuffed! For anyone with a Passap, here is how. After knitting the number of rows of ribbing I needed for 6cm, I filled in the missing 2 stitches of each purl column on the front bed by hanging the purl bump (from the row below) for the adjoining stitches on the empty needles. I did the same re the missing 3 stitches of the knit columns on the back bed, but I left the centre needle empty. Then I set the lock to knit circularly (CX/CX) at a stitch size between that of the ribbing (6) and the main knitting (8) - just to keep it a bit firm. I knit three rounds (6 passes) and then some rows of waste yarn. 

Right side
Wrong side
To attach the collar, I hand basted the wrong side flange to the inside of the sweater neckline. Then I very carefully chain stitched the three layers together with a crochet hook, making sure the hook went through the matching loops of the last row of the Briggs & Little. I had to fudge a tiny bit at the CF edges to keep them relatively straight. Subject to that, IT WORKED PERFECTLY!

I sewed the sweater together and installed the zipper with my sewing machine. To keep the inside of the neck neat and make it soft, I added a little fleece facing.  


Top secret Christmas knitting - 3rd edition

You know Cidell? She and I egg each other on about machine knitting. I really like that simple striped cowl she made (four times) for the women in Jordan's family. I really like the same yarn; in fact I had used it for TS Christmas project the second. So I riffed off her project but instead I made a scarf for my dad.

I decided to knit my scarf flat but double width, and seam it along the long edge. I used the same needle pattern that I used for my mom's shawl; 3 in work, one out of work, etc.  I did a 1x1 rib at each end, and the fact that the ribbing is also in a tube is a little weird, but not unacceptable I like to think.

I went with five colours: chocolate, denim blue, sage green, grey and black and calculated how many stripes I'd need to get my desired length (not too long, said my husband) of 54"

I think it took longer to cast off (my achilles heel of machine knitting) and seam it than it did to knit.

Sunday, December 27, 2015

Top Secret Christmas knitting - take two

You already know that I made my mother-in-law a machine knitted shawl. Flushed with my success, I decided to make a second one for my own mother for Christmas, but to "improve" the pattern to get rid of the curling edges.

Curl is built into any item that has any version of stockinette stitch right to its edges, where those edges are not stabilized by being sewn into seams. It's structural, and it causes the bottom and top edges to roll towards the right side of the item, and the side edges to roll towards the wrong side. (TechKnitter wrote on the subject, if you wish to study it in detail...)

Purple swatch - Wrong Side
So anyway, shawl #1, while lovely and purple, had ends and edges that rolled to an extent that (in The Sewing Lawyer's opinion) was excessive.

A swatch told me that if I added ribbing at the ends, and along the edges, I could cure the curl.

Compare the left and top (curling) and right and bottom (ribbed) edges.

I made the entire shawl like this. I will not bore you with the technical difficulties overcome, or the mistakes that had to be fixed/fudged. There were several of each. In the end, I had a cushy, seafoam greeny blue coloured shawl, with more or less flat sides (we can live with their occasional tendency to fold back to the wrong side), lovely corners and ribbed ends.


Top secret Christmas knitting

I compulsively scan the newly published patterns on Ravelry. That site is so addictive! I am embarrassed to tell you how many patterns I have faved. So I won't.

There are SO many new ones every day. Most of them (between you and me) are supremely awful. Patterns for dishcloths and boot toppers, coffee cup cosies and ugly, chunky cowls. Sorry if you like making such things - I think life is too short. I'm always most interested in the sweaters. Most of them are also very forgettable, but every so often one comes along that almost takes my breath away.

And so it was with "Graphic Sweater" from the Fall 2015 edition of Vogue Knitting. See?

Breathtakingly, riotously patterned. I would never in a million years make such a thing by hand. But I have a knitting machine and I know how to make it knit me a crazy stranded pattern.

And so I made it. Out of 50-50 cashmere cotton yarn in ecru and darkest navy from my favourite yarn pusher supplier, ColourMart. I would have used wool but the recipient has sensitive skin. Well, this stuff is so soft, you have no idea.

Needle Selection Tool
What a fun project! Contemplating it led me to get my ancient KnitKing out of the closet and clean it up. It is really an amazing machine, though completely manual. It has a straightforward if somewhat time-consuming way of patterning that is infinitely variable. Unlike people with more complex, more sophisticated machines that use punchcards or other automatic patterning systems, you have to hand-select the needles for knitting with each colour. I have a wonderfully simple tool to make it easier with repeating patterns like the ones in my sweater.

At about the 2 minute mark in this enchantingly antique video, you can see the knitter using this tool; she's knitting a Norwegian style of patterned sweater on a machine that, so far as I can tell, is just like mine except branded "Knittax" (the brand name was different for Europe).

Contemplating this project also led me to get out my brand new version of Excel to plan out the charts because (a) Vogue Knitting editors are apparently incompetent at publishing charts without mistakes and (b) the designer and/or VK editors paid scant attention to the flow of the patterns into each other or their placement on the body. I shifted things around until I was satisfied that they flowed and were more or less centred. Not that you can probably tell, but I also completely redesigned the first chart so that it repeated on the same number of stitches as the second chart above it. This satisfied The Sewing Lawyer's persnickety perfectionism.

KnitCompanion Screen Shot
And finally, making this project confirmed me in my love for KnitCompanion, an iPad app that allowed me to easily follow the charts through 80 rows front and back (and 27 on each sleeve) while making only one patterning mistake. You will never get me to reveal where it is.

There is something so very charming about making a crazy patterned sweater using computer technology assists for a 50 year old 100% manual knitting machine.

And I'm so pleased to report that the recipient really, really, really likes her sweater :)


Sunday, November 22, 2015

My fun Friday

I spent the most amazing day machine knitting on Friday, learning from a master (Dresda on Ravelry) who lives quite near to me in a charming converted two room schoolhouse. Her knitting room is in the old teacher's room above the front entry. I noticed there was an open grill between the back wall of the teacher's room and the former classroom below. Miss Smith would miss NOTHING that went on, even when she was upstairs and well out of sight of her pupils. 

But I digress.  

Dresda had offered to show me how to use my U100E, a fancy shmancy device that promises to transfer stitches from the front bed to the back bed, or vice versa, or only some of them (every second one or the specific ones you tell it to transfer) in a single pass. You save precious minutes that otherwise would be spent moving one stitch at a time by hand. 

I had bought this thingy with great enthusiasm shortly after I got my Passap Duomatic 80 double bed knitting machine because: Texture! I could do interestingly patterned textured knitting on my machine! Not to mention transfer from ribbing to plain knitting easily. 

Full of hope, I tried it. Hmmm, not so easy. It transferred most of the stitches, but dropped others. And it got stuck. And I mangled a latch or two in the process. I bought 50 insurance needles. Every time I tried the U100E the same thing happened. So it went back into the box. Which apparently is the same thing that happens to most of these devices. But Dresda said that she could unlock its mysteries for me. 

 And looky! I made an ugly twisted little swatch. But: garter stitch! Rib to stockinette! Stockinette to rib! Stockinette to chosen stitches purl! This is a tour de force people!

Sunday, November 15, 2015

A sewing lawyer can never have too many sheath dresses, right?

I'm lagging behind so much that I can't even remember if I previously mentioned my idea of making the "seamed dress" from the August, 2012 edition of BurdaStyle magazine.

No? Nor can I remember what initially drew me to this pattern. It probably wasn't the shininess or the bird cage...

However I looked it up on PatternReview and there were a couple of very nice versions. Then I let the idea percolate in my head for a few months before taking the next step of tracing the pattern.

And then I cut a muslin and let it sit for a few weeks while I did other things (secret machine knitting).

And yesterday, finally I finished the muslin. Behold my version of the shiny dress.

It's too tight. I did a very slap-dash job of grading the hip curve and this fabric has zero give.

It's also too long - this pattern is in Burda's "tall" size range (72 instead of 36, 76 instead of 38, etc.). They unhelpfully did not print the measurements for the tall sizing in the magazine but the charts are available on line. I'll save you the trouble. There is a 2cm difference in back waist length, and
an 8cm difference in the overall height between the size ranges. I traced without adjusting and (surprise!) I need to pinch out 2cm above my bust.

What do I like about this pattern? The interesting diagonals. They show up on the line drawing, and I hope to be able to make them pop in the concrete grey wool double crepe I've got lined up for this dress.


Thursday, November 5, 2015

An easy machine knitted shawl

It may surprise you to learn that there are some extremely active machine knitting groups on Facebook. A few months ago, people started to post photos of a faux-ribbed shawl that became known as "Christine's Shawl" after its designer, Christine B. Linfield.

The instructions are posted in the group's documents, free for anyone who's a member of the group to use. There's a link on the Ravelry pattern page.

Basically, you knit a long piece using the full bed (180 needles) of a standard gauge machine. Every 4th needle is out of work, which creates the ribbed appearance.

Then you do short rows, by putting the first group of 3 needles out of work and knitting 4 rows, and repeating with each successive group of 3 needles.

Then you bring all the groups of needles back into work in reverse order. This creates a line of eyelets and makes your shawl turn a corner.

The shawl has 3 such corners - one over each shoulder and one at CB.

The pattern is extremely easy and I originally thought it wasn't a very interesting shawl. However, I started to think about what to make for my 90+ year old mother in law who's in a nursing home, and realized that this shawl in her favourite colour could be just the thing.

I started it on Sunday and would have finished it in one go, but for the fact that I realized I was going to run out of yarn. I did the second half on Tuesday evening.

It took me longer to finish the ends of the shawl, which I did with a sort of backwards single crochet.

I may make another one of these. It's very cozy!


Monday, November 2, 2015

And I knitted a hat

Oh yeah, I also made a hat.


This is based somewhat loosely on Wurm, a free pattern on Ravelry. I used the second half of my rainbow skein of Kauni Effectgarn. It's totally a trick, that yarn. It shifts colour very leisurely so that before you know it, you've gone through the whole rainbow spectrum.

The second half? Oops, I guess I must have forgotten to blog my Rainbow scarf/shawl. I finished it in early summer but now, I'm finding that it goes with just about every single thing I own.


The pattern for this one (not free) is written specially for the Kauni's long colour changes.

Back to the hat - I made some changes to make it better than the pattern. Specifically, I knitted the first row of each of the purl ridges as a knit row (to hide the transition better), and I hid decreases in the dark rounds so that my hat has a pleasant beehive shape rather than being long and kind of square at the end.

Unfortunately my skein of Kauni only had one bit that was truly purple so the colour transitions at the back of my hat (which are engineered; I have a lot of tiny skeins of the intermediate colours) are not as gentle as they could be. But I am pretty well satisfied with my new hat. It'll add a pop of colour when I wear my severe navy coat, once the weather turns really cold.

Saturday, October 31, 2015

What I've been up to

Neither sewing nor blogging, evidently!

I have been doing a lot of machine knitting but it's a top secret project that I can't blog about yet. Be patient and eventually all will be revealed.

And no, nobody has offered me a book deal. Which is just as well because I have enough hobbies already thank you very much. As well as a full-time job.


I finished my golden cowl, which was mostly done in the last post in which I tried to explain to you, my loyal readers, why I hadn't been posting very much. I even got to wear it a few times, as we had some unseasonably warm temperatures in early October.

As I had hoped, it looks good with my most recent suit. Hmm, I finished that in March? It must be time for another one soonish.

My husband and I had a mini-vacation in Quebec City. What a magical place! We stayed right in the old city, in a house that was occupied, before 1855, by Joseph Légaré, one of the first landscape painters in the region. We saw some of his paintings in the Musée de beaux arts.

Parc de l'artillerie
The place had stone walls that were about 3 feet thick. It was right across the street from the Parc de l'artillerie.

There are cannons everywhere in Quebec City!


And cobblestones and steeply sloped streets - sometimes in combination!


And cute metal-sided houses.

We climbed hills, walked and ate good food.


And we went to Montmorency Falls. Wow!


There has also been some walking in the woods.


During which this sort of thing could be seen, if you looked up.


I'll leave you with a couple of more blog-relevant photos. This has been a good week at the thrift stores. First, my friend Gail got in touch to alert me to a major pattern find.


Yes! Those ARE Jalie and Style Arc patterns!


And this: 4+ metres of a nice rayon print.


Sunday, September 20, 2015

Miscellany; mostly knitting

I was certainly on a sewing roll in August! I wonder what happened in September?

I need to pick a new project.

So much fabric, so many patterns, so little time!

A dress would be nice.

In the meantime, I have been hand-knitting.

At right my "Golden Cowl" made in an extremely skinny 100% silk yarn from my favourite on-line yarn purveyor, ColourMart.

The pattern is Bonny.

Almost done. I knitted up the back first, saving the best for last.

I wanted to make this on my knitting machine but the yarn kept breaking. I think I will try it again with wool, which has more "bounce" and more tensile strength.

And I have been machine knitting too.

I've branched out into colour/pattern in socks.

Although these look complicated, they are actually pretty easy to knit.

Watch out world, for more loud socks from The Sewing Lawyer!

(Incidentally, do you know how hard it is to take a photo of your own foot wearing a sock?)

At least I have a colour-coordinated chair for background.

And finally, I'm gearing up for a very patterned sweater, also on the knitting machine. Unlike my sock (slip pattern, only one colour per row), this is stranded (two colours per row).

I made this sample. I love it!

Monday, August 31, 2015

Éléonore pull-on jeans from Jalie

As you may be able to tell, The Sewing Lawyer is on a Jalie kick these days. This is the third of three patterns I chose from the new collection the company recently released - the Éléonore pull on jeans. We're 3 for 3, but if (when) I make these again I'll make some modifications.

Because I'm really not completely comfortable in jeans that hit me a good 3" below my actual waist, especially when they are tight enough that the back pulls down further when I'm doing anything other than standing up straight. Which is 90% of the time I figure.

Maybe if I was 20 years younger.

On the other hand, with the top of them and my belly button and all decently covered, they look not bad, if I do say so myself. In particular, this camera angle makes me look like I'm all legs, which is assuredly not the case. So let's just go with it.

And it was a really fast pattern to make up, even though I was fitting on the fly.

Here's the always-popular rear end view.


And because this extremely busy print simply swallows up the details, here is a closer view of the front.

Front - extreme close up
What? Not close enough?

Back
In my continuing quest to make friends with my coverstitch machine, I used it to do the topstitching. It worked! Soon we will be best friends. I find that it does best when the fabric is a constant thickness - it didn't always catch the looper thread when I was stitching over seams. I fixed this with a needle and thread but does anyone have tips to avoid this?

Really, the only way to see the details is to look at these inside out.

That square of interfacing? Fixing
an "oopsie" from my serger
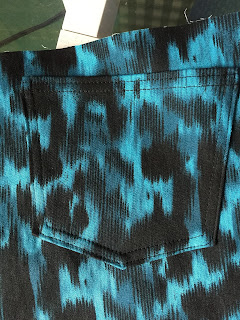
I'm super proud of my stitching on the back pockets. I went around the corners with my coverstitching in about 3 steps, turning the wheel to advance the stitches by hand, and rotating the pocket to turn the stitching with the left hand needle still in the fabric but raised enough so that the right hand one was free to move.

Topstitch expert - me?
The fabric I chose is a woven cotton/lycra with plenty of widthwise stretch - I could stretch 4" of fabric to more than 5", so more than the 20% minimum that Jalie calls for.

I traced size T based on my hip measurement, but I added 1cm of insurance at the side seams on front and back (total of 4cm) because I wasn't sure of the tight fit. A try on while sewing indicated that I didn't need all of that. The final seams are 1.5cm so I have an extra 1cm on each side. They are plenty snug enough for my taste.

The only serious problem was at the waistline. My waist is size R (a 2cm difference between the sizes). I figured that because the pants are low rise, the waist measurement wouldn't matter that much. As with the Jalie stretch jeans pattern, however, the waistband was going to gap on me - badly - if I made it up according to the instructions. In part this is because of the size differential, but it's also the draft which is really straight at the back. I don't have a gigantic behind or a really pronounced sway back either.

The instructions say to attach the waist band elastic 1:1, that is do not stretch to ease in the fabric at the waist line. Dawn found that for her, pulling the back waist elastic out a tiny bit on either side was enough (total of 1/2" or 1.25cm). I used wider elastic (Jalie says 2.5cm or 1" elastic, mine is 3.75cm or 1.5") and I had to pull it in both in front (total of about 2.5cm) and in back (total of about 4cm). Between the stretch of the fabric and the elastic there is no problem at all getting them on and the waistband looks smooth enough when I'm wearing them.

Next time I make these I think I will add more to the rise - not a lot, maybe 1cm all round, plus cut a small wedge in back to give myself more sitting room and enough back height so I'm not at risk of exposing my unfashionable undies when I sit or bend over.


Saturday, August 29, 2015

Jalie hits it out of the park - again!

More new workout clothes for The Sewing Lawyer. And this is a great workout top! I know because before I took photos this morning, I did an hour of yoga, and the top performed like a champ.

Jalie 3463 has 2 basic shapes - a flared mini-length dress or top, and a slimmer fitting top. This is the slimmer fitting top.

I'm not totally sold on my colour-blocking choices. When worn with black bottoms, the black lower side panels disappear and make it look like I'm wearing an odd apron.

There's an elastic-topped pocket in back, which I may never use.

Hmmm don't get the idea that I'm less than thrilled with my new Anne-Marie. That would be wrong because it is actually a perfect design - it fit me right out of the envelope (size R per my bust measurement) and it's supremely comfortable. I'll be making this again, soon.

Don't forget, The Sewing Lawyer has an extensive stash. I've got a black/red combo in mind for my next effort.


Sewing details, you ask?

Inside front
Inside back
It has a built-in bra which due to my fabric choice (power net) and the fact that I doubled the front with the 2 pieces cut in opposite directions) is extremely secure. I also lined the upper back with the power net to ensure it had the same degree of stability as the rest of the shoulder area.

The instructions to put the top together are pretty incomprehensible until you have the bits in your hands. Just follow the words and don't try too hard to decode the drawings. They are accurate, but I didn't find them that helpful because it just looks complicated.

The trickiest part is when you are sewing the second shoulder seam and arm opening. There is a definite risk that you'll end up with something that is literally impossible to turn right side out. In these situations I find it helpful to lay the item down flat on a table or my lap with the right side out and all the bits you have to sew together (in this case the side front, strap and back parts along with the inner bra structure) in the configuration you want them to be in after you have sewn them. Then I pick an easy spot on the garment (I picked the princess seam in front) and its matching spot on the thing you need to sew it to (the inner bra), turn them RS together at that point, and pin. Then you can work your way along the seam you have to sew. In this case you end up, as the instructions say, with the garment "sandwiched" inside the strap you are sewing. Just go with it and keep pinning. Then sew (if you don't trust it, sew a straight stitch that can be pulled out if it didn't work).

I used my serger (3/4 safety stitch with woolly nylon in the loopers) to sew the seams and my coverstitch machine for the under-stitching. Hopefully practice will eventually make perfect - I'm not there yet but the hem worked pretty well.

The only change I made was to under-stitch the elastic at the side/back as I found it was not lying flat without this. If I was seriously considering using the pocket I might try to make it into two compartments because it's pretty big.