Showing posts with label Passap Duomatic 80. Show all posts

Friday, August 30, 2024

Taking on a technical challenge - Tide Loop Top knitted by machine

At left, my latest machine knitting project. This is a mostly self drafted top that is based on a hand knitting pattern that references the ripples left in wet sand by departing waves.

At right is the inspiration, the Tide Loop Top pattern by Other Loops. 

But I wanted to make it by machine, to use different yarn and to reimagine the shape.

The original pattern called for two yarns to be knitted together - one alpaca, the other a blend of linen and cotton. I chose a mystery cone of yarn from stash, which I think is cotton. It wanted to be knit at a much smaller gauge (30s x 41r in 10cm) than the pattern called for (24s x 32r), but it was more or less the colour of sand. 

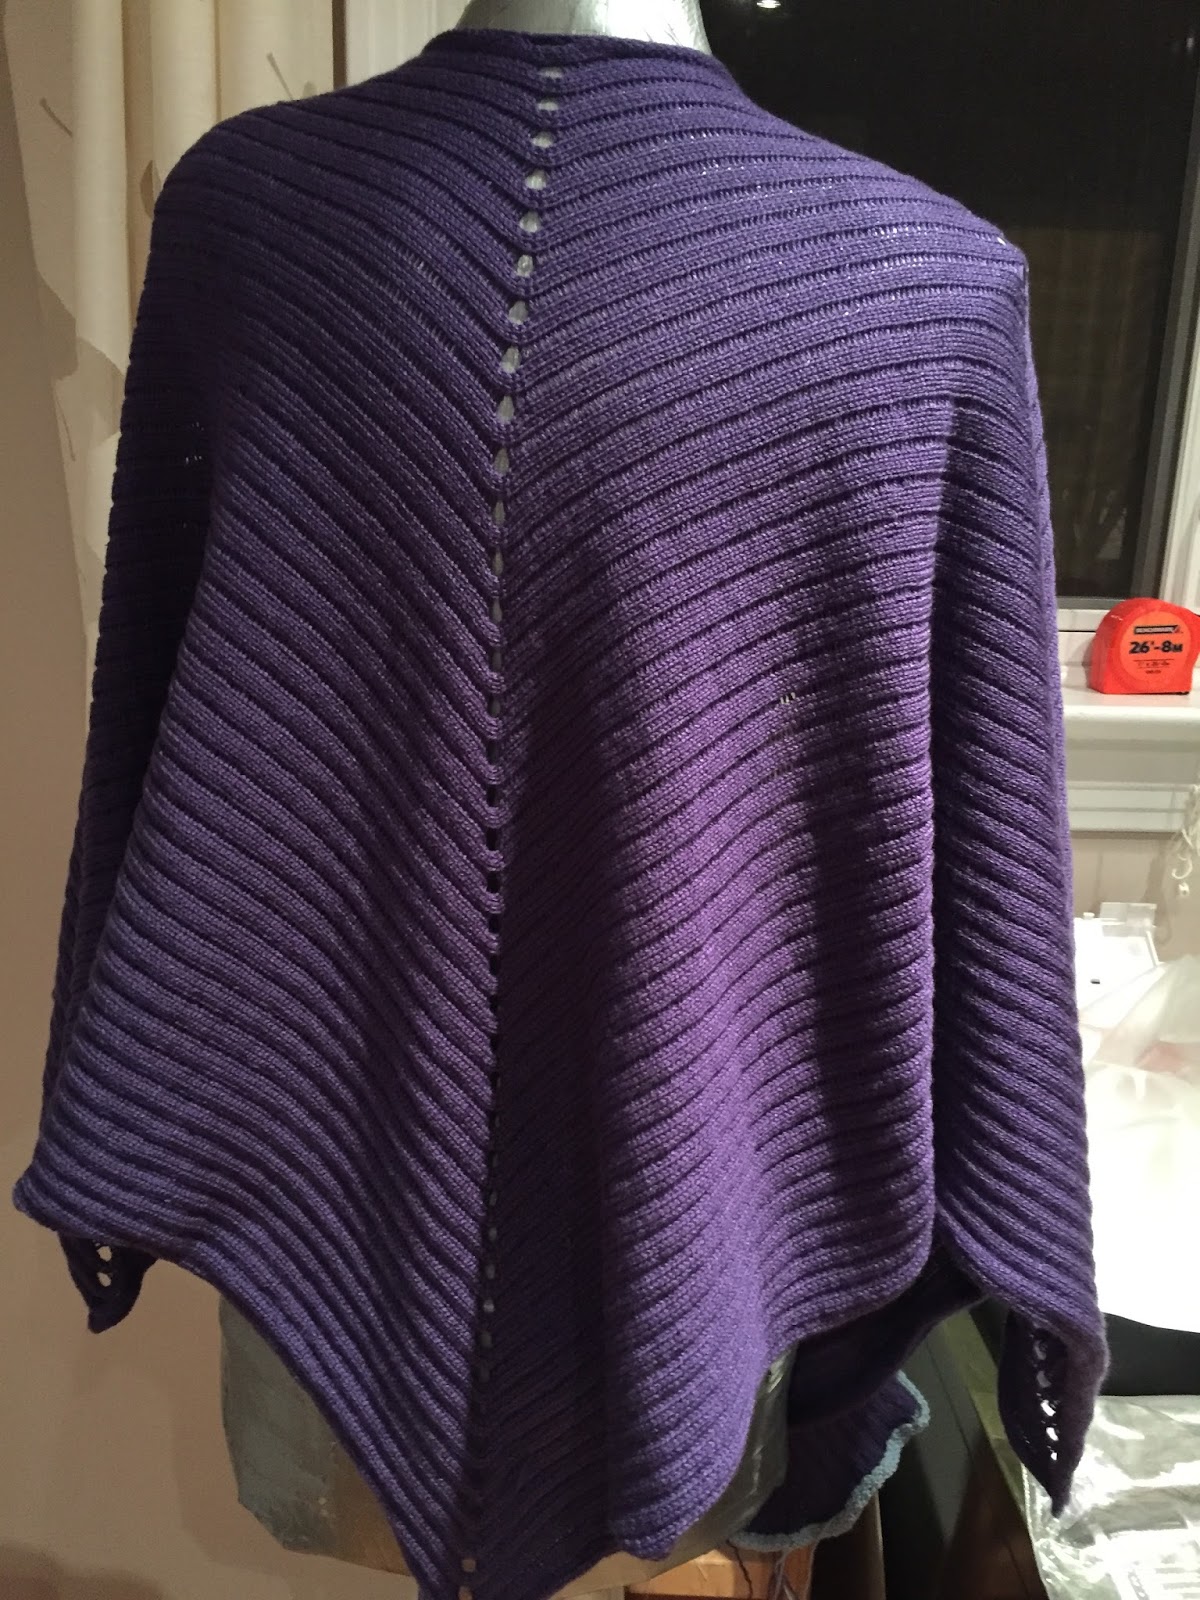
I completely redesigned the shape of the top. The original has a deep scoop at the back and is quite high in the front. Mine has a reasonable scoop at front and is quite high in the back.  

I used the pattern (sort of), knitting size XL to get a circumference approximating size S. But above the armholes, I made up the shaping as well as the patterning. 

My edges are also different from the pattern. It called for a sewn hem and I did ribbing. It called for the neck and armhole openings to be finished with 3 rows of stockinette that would roll towards the RS. I finished these edges with iCord, knitted by machine.

Knitting it took a while (read on to understand why) but I am super satisfied with this project!

What was the technical challenge?

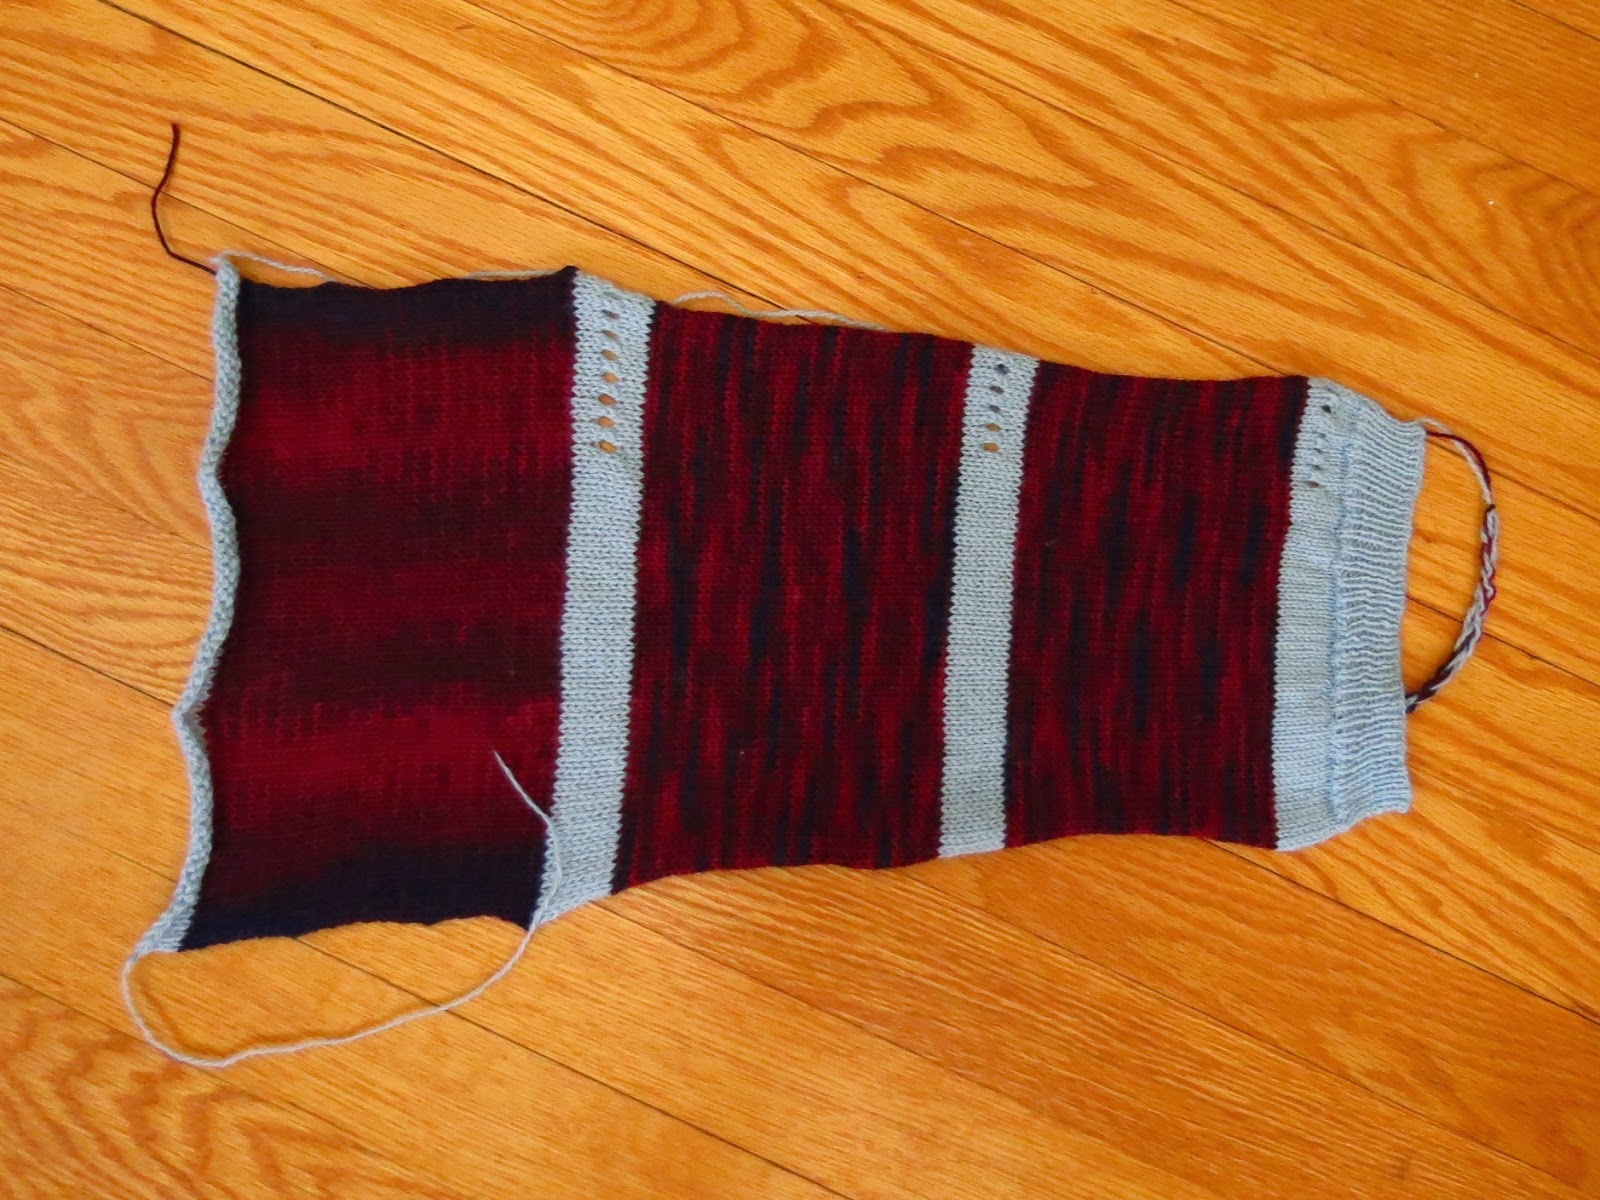
The defining characteristic of the fabric of the Tide Loop Top is the uneven horizontal stripes of reverse knitting, creating irregular textured stripes or ripples. In this top, most of the stitches have their purl side facing out, but the recessed stripes are the opposite (knit side facing). This apparently simple texture is quite hard to create on a knitting machine. Purls have to become knits, but not an entire row at a time. And the patterning is quite irregular across the rows as well as between the rows of recessed stripes. The in and out texture combined with the irregularity means that this is the hardest type of fabric to knit on a domestic knitting machine.*

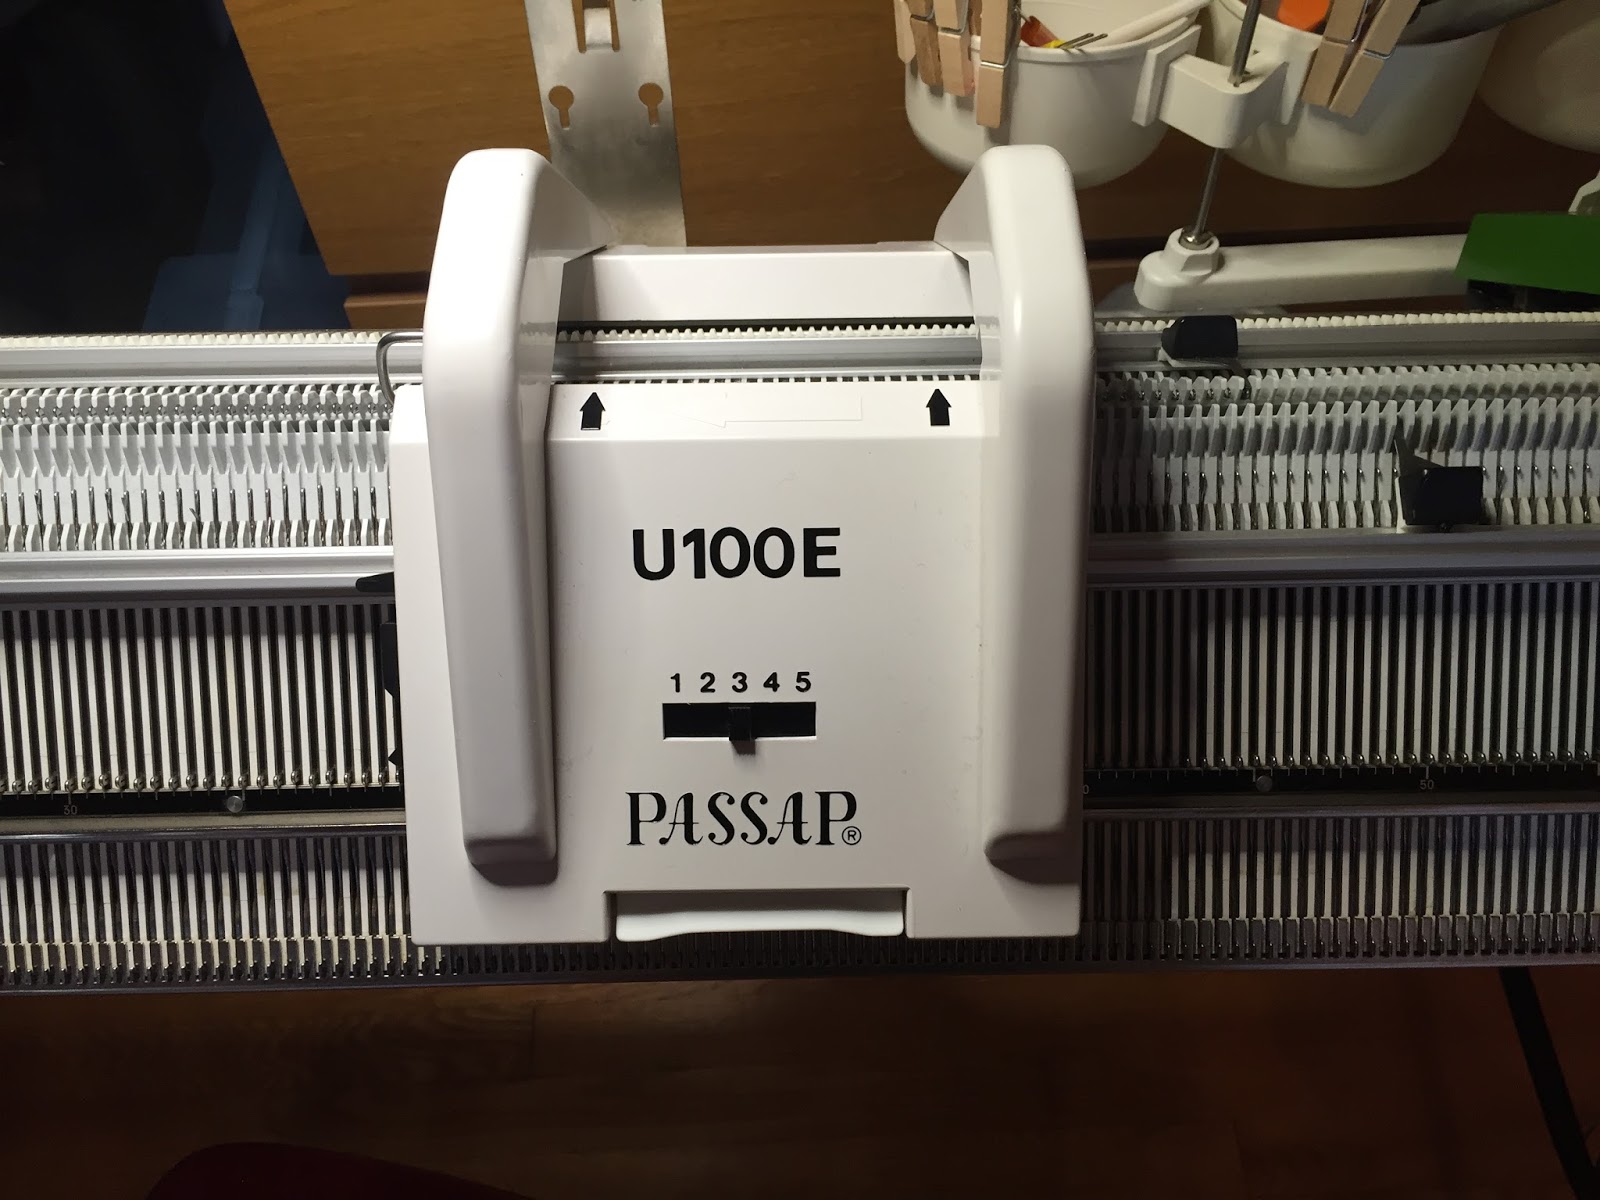
The U100E is a tool that helps make this type of texture. It is a transfer carriage. All it does is move stitches from needles on one bed of the machine to needles on the opposite bed. Once moved, the (formerly) "knit" stitch can be worked as a "purl" or vice versa.

It works with Passap knitting machines. It didn't come with my machine, and I no longer remember where/how I purchased it or, for that matter, how long it had sat on a shelf. I had bought it, but I had never used it.


In more detail (possibly TLDR, you can skip to the next section if you want)

The Passap is a "true" double bed knitting machine, which means it has two functionally identical beds of needles that sit at a fixed angle. Each bed is equipped with almost 200 latch hook needles. 

The beds are oriented as in this diagram.


Because the hooks of the needles on one bed face in the opposite direction from those on the other, stitches made on one bed are the physical reverse of the stitches made on the other. One side makes the knits and the other side makes the purls. 

On a double bed machine, you can use needles on two beds (as in the diagram) to knit a tube - first the machine knits all the needles on one bed and then it knits all the needles on the other bed, and then it repeats. This is the same as knitting in the round in hand knitting. 

Or you can use both beds at the same time to make a ribbed fabric. This involves knitting a few stitches on one bed and then a few on the other and repeating so that the yarn zigs and zags between the two beds along a single row. You can do the same thing with hand knitting needles. There will be some knits, and then some purls, and some more knits and purls along the knitted piece. 

When knitting by hand, it's quite easy to make fabric that isn't ribbing, but has a texture created by both knits and purls in a single row. You can work either a knit or a purl into any stitch along the needle. You can do this either in the round, or when turning the knitting between rows. Garter stitch is made with only the knit stitch, but when you turn the knitting and work knitted stitches on the back side of the fabric, you are always working a knit stitch into a purl stitch (the back of a knit stitch).  

Making some knit/some purl fabric (other than ribbing, which lines the knits and purls up vertically) is not at all straightforward on a machine. You need a mechanism for transforming a stitch (physically turning it around so what was front is back, or vice versa). This can be done completely manually - unravel the knit stitches that you want to be purls, hook them up backwards and rehang. Or you can use a double eye transfer tool to switch stitches, one by one, from one bed to the other. 

If you want to knit garter stitch (knit rows and purl rows alternate) you can use a garter bar to flip the fabric, physically, before knitting every single row. Other, more complex types of patterning can be done automatically with a garter carriage (only Brother machines). Or, if you have a Passap, you can use the U100E to transfer all the stitches in a row to the opposite bed, or just some of them.

For all readers

This knitting project provided a perfect opportunity to finally learn how to use my U100E. 

This wasn't entirely smooth, at first. The U100E initiates a physical process requiring some pressure and determination. There are a series of steps that had to be completed in order to do the transfer. There were a series of things that could go wrong. It liked me when I approached the task with confidence. Even pressure, proper alignment of the beds and assertive movement of the carriage from side to side, and the U100E would bend to my will. Any hesitation, and I, or the stitches, or the needles themselves, could be lost. After the transfer was complete, I had to make sure that all empty needles were removed from working position. Then I had to remember to actually knit a row before setting up for the next one. 

My swatch (at right, especially the first bit at the bottom) looked pretty bad. 

But it turns out that repetition does eventually turn into knowledge and/or skill. I dropped fewer stitches, had to un-knit fewer rows, and generally got a better result as I continued to use the U100E. 

At the end of the day, I have a nice tank top with an interesting texture. 


* Of course, there are knitting machines used by manufacturers that have automated knitting for this type of thing. They are far out of reach, price wise, of the average hobby knitter. 


Sunday, October 16, 2016

Serious machine knitting progress

I was sewing through the summer but as the days started to shorten and cool, my thoughts turned to lovely wool and knitting. Since my last post I finished a hand knitted pair of socks that I started while on holidays, three pairs of socks by machine, and today I finished a cardigan. Phew!

Knitting socks by machine is a super easy thing to do and serves as a tune up or reminder of how my Passap feels and functions. The pattern from the machine manual works pretty well, and I can turn out a pair in a day (if all goes well). I have lots of sock yarn in sock quantities, so...

First tune up pair. These were made with Paton's Kroy yarn, easily available everywhere. The main challenge was matching the striping.

Yay me!

Pair number two (at right) were made for my 90-something mother in law. Her feet are bigger around and longer than mine. so on me these are looooose. I hope they fit her! I was super happy to have matched the striping in this yarn too! Yarn is a mystery sock yarn - a part ball found by my husband in a thrift shop.

Pair number 3 is another pair for my M-I-L. I used Paton's Kroy yarn again, but for some reason the yarn in these balls was thicker. One was a part ball (thrifted again) and I did not have enough to make full height socks. To get this pair, I had to knit three socks - the first one told me that I needed to make them shorter if I was going to get two!

It is easy and fast to rip out your knitting when you are using a machine. It's very liberating!

Yarn shortage prevented me from matching the striping - in fact one of these balls was wound in the opposite direction, as it turns out! So these are merely fraternal twins, unlike the identical pair that went in the same package.

So the main event (for which these socks were the tune up) is a cardigan that I just finished today. I used the same method I wrote about earlier, except this time instead of starting with a hand knitting pattern, I took measurements from a cardigan I knit by hand. I like the shape and style and thought I'd see if I could duplicate it. (Forgot that the armscyes were a bit too low, though...)

As usual with machine knitting, a swatch is absolutely critical. I used 4 ply 100% camel hair yarn from ColourMart (marinated in stash for 3 years). Based on my swatch and the garment measurements, I made up my charts.


And fussed over them quite a bit (as you can tell, with the blue and red markings). And then I knitted the pieces.

I feel most proud of the front button band. I wanted a 2cm wide band in full needle rib but with a little stockinette edge that would curl and be firm and smooth. I knitted the bands on 20 stitches with a 3-stitch stockinette edge. I had to make buttonholes and based on my samples I calculated the number of stitches between buttonhole rows and the total number of rows and I knitted (back and forth times approximately 550) and miracle of miracles, the band turned out Exactly Right!

It took me as long to mattress stitch these pieces together by hand as it did to knit them (I exaggerate just a bit) I am super happy with the result.

Without further ado:

Standing next to the Passap
Wondrous Machine
Back - ribbing is a touch too low


Sunday, May 29, 2016

Knitting on my Passap

Burnt
A while ago I ordered a book of knitting patterns by a very prolific UK designer, Kim Hargreaves. There are 1,574 of her patterns on Ravelry! This is a knitting superstar who comes up with endless pretty, simple, feminine designs. An on-line bio says she was "responsible for creating the image and philosophy of Rowan" as its head in house designer and the person who oversaw design, photography and styling for the Rowan magazines and chose many of the designers. Now she heads her own company and she publishes these books, one of which (Indigo) I own.

I bought it because I was smitten with one of the patterns (Searing), which I have in mind for a hand-manipulated machine knitting project, but that is not what I am working on this weekend. No sirree - I'm making Burnt (Kim Hargreaves has this thing for one-word names).

Such a simple but classy little top. The slip-stitch rib is a cinch on the Passap (CX/N, a rib every 5 stitches).

Making it a bit more complex for machine knitting are the vertical darts (3 per side, front and back), and the back slit opening which is faced with garter stitch.

I figured out the technical issues and have knitted the front and the back. As usual I had to do some fixing up of the knitting with a needle and yarn, but I will not reveal where and my hunch is that no one will notice.

If they do I shall freeze them with an icy stare.

My top is black, which is hard to machine knit with (god help you if/when you drop a stitch and have to go fishing for it) and hard to photograph. The pieces are now blocking and I'm resting up for the next phase which will consist of machine knitting the neck and arm opening bands (reverse stockinette, which will roll nicely I hope).

Now I have a hankering for a sewing project.

Methinks a shirt dress for summer. Uncharacteristically, I just bought two McCalls patterns and one of them is 6885. I would never have considered it except when I saw Goodbye Valentino's gorgeous version I realized that abandoning the kiddy sunhat and exaggerated shirt tail hem left a pretty, classic dress.

I'll be back when I finish Burnt - in the meantime please excuse me while I go stash-diving.


Monday, December 28, 2015

Guess what? Another TS Christmas knitting project!


This one is more complicated. I made a zipped cardigan for my son (details on my Ravelry page). The yarn is Briggs & Little sport in a dark grey. It's a one ply with a manageable tendency to bias. It is very rustic, complete with bits of what looked like wood and straw, and wild hairy bits. Off the skein it's oily and stiff but washed, it has a fluffy but very seriously woolly quality that I like. It left my Passap full of lint. Maybe I should plan to do a deep clean once a year...

A nice variety of things went wrong with this project:
  • I made a PDF of the pattern quite a while ago (from a library book) but when I went to start my project, I only had the last of five pages. I still have no idea how that happened.
  • I requested the book again and it took days and days and days to get to my branch.
  • My parents visited. (This isn't really anything "going wrong" but it was another source of delay.)
  • Stitches delighted in jumping off the needles.
  • (This is totally just between us.) I knitted an extra rib up the side of one front. Didn't notice for the longest time that one piece has 4 ribs instead of 3...
  • In converting my hand-knitting pattern for my machine using basic knitter's math, I failed to note that the sweater is supposed to be 45cm from the bottom of the sweater to the armscye, including 6cm of ribbing. I knitted 6cm of ribbing and then 45cm of stockinette. And then I washed and blocked the first front and DID IT AGAIN before noticing.
That last one cost me a good night's sleep. My inner dialogue at 2AM: "Leave it as is?" "He'll hate it if it's too long." "Cut 6cm out of the middle and kitchener stitch?" "Frog back, rehang and reknit?" "Leave it." "But if I do he'll never wear it." "Cut 6cm out and kitchener?" "Frog back?" (Repeat endlessly.) 

By the light of day it was obvious I should frog back because he would not like a sweater that was too long and let's face it - if you have a knitting machine, reknitting is a lot easier than connecting two bits of knitting invisibly by hand. And in the end it was really fast; so not worth losing hours of sleep over.

Given all of this, I'm really pleased with the finished project. I managed to go straight from the ZZ cast on row to a 3x2 ribbing pattern (this involves lots of transferring stitches between beds). I managed to knit ribbing up through the body of the sweater without any obvious gauge problems (I knit the back bed purl stitches on stitch size 6 when the front bed was SS 8). 

Front
Sleeve
I accurately (subject to my mistake noted above) graphed the pattern and worked from these diagrams. 

I can knit anything!


But the source of most happiness is how well the collar turned out. The pattern called for a standard hand knitted collar which in part (at CF and CB) was knitted straight from the body pieces rather than from cast off edges. The collar is in the 3x2 rib pattern and doubled (i.e. knitted 12cm, then the cast off edge is sewn to the neck edge on the inside). This would make a facing to hide the top of the zipper tape on the inside. 

Cashmere turtleneck sweater 
I wanted a single layer collar (2 layers of Briggs & Little would be too much), and I wanted it to attach the same basic way as the turtleneck of a commercially made cashmere sweater I own. See, there is a single layer of ribbing, and it is knitted directly to a few rows of stockinette - both inside and out - and those stockinette stitches are neatly sewn together through the body of the sweater. Neat huh?

Except I am lacking the machine (a linker) that does this kind of sewing, and I wasn't 100% sure how to knit the little stockinette flanges directly onto the ribbed collar. 

But I did it! I'm so chuffed! For anyone with a Passap, here is how. After knitting the number of rows of ribbing I needed for 6cm, I filled in the missing 2 stitches of each purl column on the front bed by hanging the purl bump (from the row below) for the adjoining stitches on the empty needles. I did the same re the missing 3 stitches of the knit columns on the back bed, but I left the centre needle empty. Then I set the lock to knit circularly (CX/CX) at a stitch size between that of the ribbing (6) and the main knitting (8) - just to keep it a bit firm. I knit three rounds (6 passes) and then some rows of waste yarn. 

Right side
Wrong side
To attach the collar, I hand basted the wrong side flange to the inside of the sweater neckline. Then I very carefully chain stitched the three layers together with a crochet hook, making sure the hook went through the matching loops of the last row of the Briggs & Little. I had to fudge a tiny bit at the CF edges to keep them relatively straight. Subject to that, IT WORKED PERFECTLY!

I sewed the sweater together and installed the zipper with my sewing machine. To keep the inside of the neck neat and make it soft, I added a little fleece facing.  


Top secret Christmas knitting - 3rd edition

You know Cidell? She and I egg each other on about machine knitting. I really like that simple striped cowl she made (four times) for the women in Jordan's family. I really like the same yarn; in fact I had used it for TS Christmas project the second. So I riffed off her project but instead I made a scarf for my dad.

I decided to knit my scarf flat but double width, and seam it along the long edge. I used the same needle pattern that I used for my mom's shawl; 3 in work, one out of work, etc.  I did a 1x1 rib at each end, and the fact that the ribbing is also in a tube is a little weird, but not unacceptable I like to think.

I went with five colours: chocolate, denim blue, sage green, grey and black and calculated how many stripes I'd need to get my desired length (not too long, said my husband) of 54"

I think it took longer to cast off (my achilles heel of machine knitting) and seam it than it did to knit.

Sunday, December 27, 2015

Top Secret Christmas knitting - take two

You already know that I made my mother-in-law a machine knitted shawl. Flushed with my success, I decided to make a second one for my own mother for Christmas, but to "improve" the pattern to get rid of the curling edges.

Curl is built into any item that has any version of stockinette stitch right to its edges, where those edges are not stabilized by being sewn into seams. It's structural, and it causes the bottom and top edges to roll towards the right side of the item, and the side edges to roll towards the wrong side. (TechKnitter wrote on the subject, if you wish to study it in detail...)

Purple swatch - Wrong Side
So anyway, shawl #1, while lovely and purple, had ends and edges that rolled to an extent that (in The Sewing Lawyer's opinion) was excessive.

A swatch told me that if I added ribbing at the ends, and along the edges, I could cure the curl.

Compare the left and top (curling) and right and bottom (ribbed) edges.

I made the entire shawl like this. I will not bore you with the technical difficulties overcome, or the mistakes that had to be fixed/fudged. There were several of each. In the end, I had a cushy, seafoam greeny blue coloured shawl, with more or less flat sides (we can live with their occasional tendency to fold back to the wrong side), lovely corners and ribbed ends.


Sunday, November 22, 2015

My fun Friday

I spent the most amazing day machine knitting on Friday, learning from a master (Dresda on Ravelry) who lives quite near to me in a charming converted two room schoolhouse. Her knitting room is in the old teacher's room above the front entry. I noticed there was an open grill between the back wall of the teacher's room and the former classroom below. Miss Smith would miss NOTHING that went on, even when she was upstairs and well out of sight of her pupils. 

But I digress.  

Dresda had offered to show me how to use my U100E, a fancy shmancy device that promises to transfer stitches from the front bed to the back bed, or vice versa, or only some of them (every second one or the specific ones you tell it to transfer) in a single pass. You save precious minutes that otherwise would be spent moving one stitch at a time by hand. 

I had bought this thingy with great enthusiasm shortly after I got my Passap Duomatic 80 double bed knitting machine because: Texture! I could do interestingly patterned textured knitting on my machine! Not to mention transfer from ribbing to plain knitting easily. 

Full of hope, I tried it. Hmmm, not so easy. It transferred most of the stitches, but dropped others. And it got stuck. And I mangled a latch or two in the process. I bought 50 insurance needles. Every time I tried the U100E the same thing happened. So it went back into the box. Which apparently is the same thing that happens to most of these devices. But Dresda said that she could unlock its mysteries for me. 

 And looky! I made an ugly twisted little swatch. But: garter stitch! Rib to stockinette! Stockinette to rib! Stockinette to chosen stitches purl! This is a tour de force people!

Thursday, November 5, 2015

An easy machine knitted shawl

It may surprise you to learn that there are some extremely active machine knitting groups on Facebook. A few months ago, people started to post photos of a faux-ribbed shawl that became known as "Christine's Shawl" after its designer, Christine B. Linfield.

The instructions are posted in the group's documents, free for anyone who's a member of the group to use. There's a link on the Ravelry pattern page.

Basically, you knit a long piece using the full bed (180 needles) of a standard gauge machine. Every 4th needle is out of work, which creates the ribbed appearance.

Then you do short rows, by putting the first group of 3 needles out of work and knitting 4 rows, and repeating with each successive group of 3 needles.

Then you bring all the groups of needles back into work in reverse order. This creates a line of eyelets and makes your shawl turn a corner.

The shawl has 3 such corners - one over each shoulder and one at CB.

The pattern is extremely easy and I originally thought it wasn't a very interesting shawl. However, I started to think about what to make for my 90+ year old mother in law who's in a nursing home, and realized that this shawl in her favourite colour could be just the thing.

I started it on Sunday and would have finished it in one go, but for the fact that I realized I was going to run out of yarn. I did the second half on Tuesday evening.

It took me longer to finish the ends of the shawl, which I did with a sort of backwards single crochet.

I may make another one of these. It's very cozy!


Thursday, June 4, 2015

Passap progress

It's a funny thing - learning a new skill. You're so bad at it, at first. Everything takes seventeen times as long as it ought to, and you get caught out by every potential glitsch.

That's The Sewing Lawyer and her new knitting machine, the Passap Duomatic 80.

But on the theory that you will  never learn unless you try, I made a top! This was a journey since I didn't exactly have a pattern. I had an idea of the shape I wanted and some yarn.

Scientific graph
I'm not going to try to reproduce here my thinking process. There are more details on Ravelry if you're interested. The short version is that it involved knitting a sizeable swatch, and then it took a lot of measuring, calculation and graphing of the outlines of the pieces on gauge-specific graph paper (such a cool idea, you can get it here). And all that has to take place before you get the machine threaded up and going, because once you're at the machine, it's far too late. Unlike hand knitting it is really hard to adjust on the fly. (At least for a beginner like me.) Hopefully it will get easier with time.

Upside down - not sure why (but not material)
And then there's the fact that on the DM80, once you get going you can't really tell how it's going. The stitches form and disappear down the gap between the two beds.

As you can see at right, it's confusing. And that is only a dozen or so needles. I was knitting on about 135 of them. And I had lowered the front bed (which is the one at the top) to get a better view. While knitting, pretty much all you can see is the loops on the needles.

This yarn is really skinny - a 150g cone has about 2,300 metres of yarn (I knit two strands together). But so luscious! It's 54-46% cashmere and cotton, from ColourMart. In a deep and complex purple called Juniper. There is still some left on the site. I have no idea why it's not sold out; it's so beautiful.

The colour is pretty accurate in this photo
So my top. It's a sleeveless shell with a slight cowl at the front.

I made the cowl by increasing - you can see the line of eyelets to either side of the neck point where this happened. Increasing at this point keeps the cowl in the centre of the top and avoids distorting the shoulder/armscye area.

Unlike the pattern for this top, which placed the increases at the armscye edge, and left me with an awkward triangle shape at the front shoulders.

I left the cowl neck edge to roll but finished the armscye edges with a row of single crochet. This (ahem) enclosed some little mistakes.


My top is not perfect but it's definitely wearable. In fact I wore it today with my recently-completed cardigan - it has a single strand of the cotton/cashmere held together with some alpaca, so I like to think the pieces coordinate well.


Sunday, May 3, 2015

Slow

And look - I had the perfect buttons in stash!
I started knitting a cardigan in July of 2014 and I just finished it. Holy cow it took me a long time! In between starting and finishing, I went to work just about every day, a place where knitting is frowned upon. I sewed, an activity the doing of which is incompatible with also knitting at the same time. I also did a lot of curling, during which it is impossible to knit. Although I did a bit of traveling and they let knitting on planes and trains, I am pretty sure it's illegal to knit while driving. But the real reason it took me so long? Knitting acres of stockinette stitch is truly rather boring.

Last week, I'd had enough. I was within spitting distance of finishing the body (this cardigan is knit from the neckline on down to the hem). But the sleeves! Sleeves are not little tiny things; they're almost as big as the back of a sweater. And there are two of them! All stockinette; OMG I wasn't going to finish this thing until 2016.

In desperation I grabbed the life line offered by my knitting machine. I was delighted to find out that the Passap DM80 would handle my sport weight yarn (like a champ, really) and so I held my breath and carefully and with much cursing managed to transfer the live sleeve stitches from my project to the slippery little latch hook needles of my Passap, which can knit a tube, and very carefully and with much cursing knit two sleeves in two evenings.

They are not perfect. No sirree, not at all. The yarn (a strand of kind of dull purple alpaca held together with a strand of lively purple cotton/cashmere yarn) formed subtle stripes (which it didn't do when knit by hand). I managed to slip (not drop) a couple of stitches and didn't notice until it was too late to fix them. The machine left some loops of excess yarn when changing direction (4 times per sleeve, if you want to know). The gauge is not 100% spot on my hand knitting gauge. However, these defects are as fixed as I could make them, or are pretty subtle. The sleeves are good enough. And this puppy is finished.

Just in time for the warmth of summer, during which The Sewing Lawyer will certainly not be wearing an alpaca cardigan with long sleeves. However, 4 months in the magic closet will do its work, and in October or so, this thing actually will be perfect.

Do you know what knitting machines are really good at? You guessed it: stockinette. I have a lot of this cotton/cashmere yarn left. I could make a smashing light weight top to wear under this cardigan, when the weather cools off.

More details?

OK, here's the back. I like the bit of ribbing; it was so interesting to knit (not really, but it was more interesting than stockinette).

Knitting is so organic, and the construction of this sweater was super interesting (or would have been if it hadn't been all stockinette). But you know? You end up with a really floppy product. In particular, a top down and seamless sweater has zero structure in the shoulder and armscye areas. And knitting stretches, and it droops. The rate at which you increase, in this pattern, dictates the width of your sleeve caps and of your sweater body. You can't separate for the sleeves whenever you want. If your row gauge isn't perfect you can get an armscye that's not the right length. Mine was too long, and it would only stretch more with wear. This happened.

In the photo at left, one armscye was fixed and the other wasn't. No prizes for guessing which one.

Two armscye "seams" - the one
on the left is fixed


The fix is to get a crochet hook and crochet a chain, picking up the back of the knitted stitches along the armscye line (i.e. the point where I was increasing). This can draw the knitted fabric up, easing it invisibly so the line is shorter, and it also doesn't stretch so it provides stability.

The armscye is still a bit too low when coupled with the rather slim sleeves, but I will be able to live with it and this defect might even disappear in the magic closet.


Monday, February 16, 2015

There's good news and there's bad news

Right off the bat, I'll get this off my chest:  there has been some sewing (the lining is mostly inserted in my coat and the facings are done) but there has been more knitting.  Of the machine variety.

It's a lot of fun.

I made two pairs of socks. Yes it is possible to make socks in the round on a double bed knitting machine.  And it's so fast!  I'm cranking them out (4 so far) at about 2 hours per sock.  And I'm a raw beginner.

I made a colourful pair for myself.


And I made a sober grey tweedy pair for my husband.  He's already investigating the rest of the sock yarn in stash for his next pair...


In the above photo, the sock isn't quite finished.  Because you have to knit the ribbing on both beds at once, there is a seam to sew up at CB.  And the final stitches at the toe have to be finished with Kitchener stitch.  So much easier on a machine knitted sock than doing it from stitches on needles! At left you can see there is a little light blue - this is scrap yarn knitted in a narrow tube to keep the last live stitches safe until they can be grafted together by hand.  I just follow the path of the light blue yarn and snug up my stitches until they are truly invisible.  Magic!

So then I decided I'd make a sweater for myself.  I chose a pattern designed to be knitted by hand, top down, seamlessly (Boxy and Buttony by Joji Locatelli).

I carefully read the pattern and made a schematic so I would understand the structure.  And then I knitted a swatch and mentally rehearsed how I would knit it by machine, bottom up, with seams. Because that's the way the The Sewing Lawyer rolls.

Behold:

It makes perfect sense, no?

My swatch revealed that I had to knit on the loosest tension possible on my machine, and also that at that tension and over 60 stitches, the yarn colours pooled vertically.

Pooling at SS8.0 but not at 7.0 or 6.0
Hmmmm I wonder if I should have thought about the fact that I'd be knitting, at that tension, over exactly three times that many stitches at the widest point?

Well I didn't.  Cast on (three times before being satisfied, not noticing that I'd dropped a stitch) at about 10PM yesterday, and zip-zip-zip knitted the back up to where I had to increase for the sleeves before bedtime.

Didn't I say that it was fast?  See the hole at lower left...

I decided I could latch the missing stitch up by hand and fix it invisibly so I continued.

And then I ran into problems at the shoulder (which involves short rows and a band of ribbing).  So I decided to unravel the whole shebang and start over.

I learned a lot.

  • At a loose tension, you really do need weights.  Without them (as I discovered at the shoulder) the stitches just leap off the needles.
  • When doing short rows, ditto.  The most precarious stitches were the ones at the high side where the length was building up relative to the front neck stitches that were holding.  
  • Ribbing should be knitted tighter than stockinette.  I knew this at the hem (used SS 7.5 instead of 8.0) but forgot by the shoulder.  
  • Increasing six stitches at the end of a row is possible, using a crocheted chain... AND WEIGHTS!  
And if the yarn pools over 60 stitches, it will pool similarly over 180.  Sigh.

Here, for posterity, is the back which will be unravelled shortly - hopefully before the yarn is too kinky and needs steaming or something.  


The actual colour is a lot darker (more maroon than bright red).