Sunday, November 26, 2017

Dress and jacket combo

I could start by noticing how neglected this blog has become but I won't. It records my projects, and they have been few and far between since my last post. The blog is accurate.

We went on a European holiday. It was wonderful. We came back. It was busy. It still is, come to think of it. So my sewing and knitting have taken a back seat to other things. But I am still sewing and knitting. I just have a lot of WIPs.

But today I finished a dress, and last week I finished its coordinating jacket. Or at least I hope they coordinate. I will wear them together anyway.

Both are patterns I have made before. I feel like I have less time and energy for fitting new patterns. So I am turning to ones I have made before and still wear, so I know the fit is OK.

New one
Old one
The jacket is a Burda Fashion Magazine pattern from 2006 - the August issue from that year was a winner. This is pattern #108 from that issue - the zipper jacket. I made it some months later, in the spring of 2007. The version on the right is 10 years old (link to Pattern Review)! I still wear it! I have enough stash to make a million new things, but I still like, and wear, the things I made 10 years ago. This is why I have reached SABLE (stash accumulation beyond life expectancy).

But the new one - the lovely, wooly, tweedy, rosy new one. It is so different from the old one - the smooth, muted, understated old one. I love them both.

I got the fabric in one of my favourite Montreal fabric stores - Couture Elle on St. Hubert Street. I know I was shopping with sewing friends. They encouraged me. I am glad they did. The tweed is predominantly rosy but has lots of warm brown, and undertones of blue, grey and green. It is surprising.

The sewing was uneventful. So nice to make a pattern that doesn't have to be second-guessed.

Jacket innards
Inside, I used fusible interfacing on the front and facings, etc. and underlined everywhere else with silk organza.

I made shoulder pads from hair canvas (top layer), cotton quilt batting (bottom layer) and wool quilt batting (in between). I just wanted a bit of lift at the sleeve cap seam and nowhere else.
Zipper facing

To the right is the zipper facing construction. I like this method. Basically, you set the zip into a window in the facing, with the back of the zipper nicely framed by the window (as shown in the photo). The right side of the zipper is concealed at CF. I sewed the zipper in by hand because I didn't want a line of machine topstitching. I also sewed on the pockets by hand for the same reason.

To the left is the inside. I had this nice patterned Bemberg in stash that coordinated well enough.

All the materials for this jacket came from stash. I even had the thread. SABLE (sigh).

The jacket is lovely and warm. I wore it with a brown tweed sheath dress (7 years old) last week because my other project - a coordinating dress - was taking longer than expected. 

However next week I will be able to wear it with my new dress - another version of V1183, a Kay Unger dress pattern. I see I made it almost exactly four years ago. But if you read the whole story of that dress, you will see I first got the pattern in 2010! Things do move slowly chez The Sewing Lawyer. Sigh.

The fabric could have been a light coat, it's so dense. Is it weird to make a sleeveless dress from such a fabric? I decided not, especially since this piece came thanks to the second-hand shopping chops of my husband. The piece was at least 4 metres and I think he paid $4 for it all. The dress is practically free!

I won't go into the sewing process, since I wrote about it last time. I did the same again to make sure that I could fit at the side seams if needed. It wasn't, but it sure was satisfying to outwit Vogue's instruction writers, once again. I used the triple straight stitch on my machine. It is not perfect but I count on time and distance to make it seem perfect.

I had to buy two spools of thread since I was short on magenta/fuchsia thread. Otherwise, again, it was all stash. I had a good colour zip in the right length and the lining stash also came through.

Bodice lining
This dress is a party on the inside, as you can see at right. I had this amazing LOUD fuchsia flowered silk brocade (husband again) which I used to line the bodice, and a plain red Bemberg for the skirt.

Faced hem
I wanted the skirt to be as long as the cut pieces and so I made a faced hem using a cross-grain strip of the silk. I folded it lengthwise and sewed a 1cm seam at the bottom edge. The folded edge of the strip is then hand sewed to the skirt. The fabric is so thick the stitches disappear.

I will try to take modeled photos next time I am at home during daylight. That could be a week from now. November - not my favourite month!

It is now time for my annual Xmas sewing/knitting to commence. I had my bulky machine out experimenting this weekend. Talk later!

Sunday, September 17, 2017

Last minute sewing

I'm about to go off on a European vacation. Packing is in progress. And I decided that I should make a new top. Jalie 2804 to the rescue.

I made it before. It is easy. I have fabric. Go!

Done in a few hours.

This is a delightful print that unfortunately is printed on crappy fabric. That soft rayon knit. You know the one. It it soft and delicious and then it stretches, and stretches, and before you know it you have to throw your top, dress or skirt out because it is a hot mess and your bra is on display. But while it is new and fresh, so soft, so stretchy!
Yeah, it will be perfect for my vacation. Afterwards? We will see.

Not much to report on the sewing. I remembered to attach the upper fronts to each other before sewing to the lower front (gap control). I continue to struggle with my coverstitch machine (sigh).

Here is me, looking FORWARD to a trip to Italy, Slovenia and Croatia!

Saturday, September 9, 2017

Yet another cardigan!

Every time I mention to my mother that I'm knitting something, and she asks what it is, and I tell her it's a cardigan, there is a moment of silence. Then she asks: "How many do you have?"

The true answer is that I don't know, but that one more always seems like a great idea.

This particular one promises to be a Very Useful Garment, in the appropriate season. Which would be summer, or at least warm spring or fall. There is a possibility of more days like that in 2017, but let's be realistic. Here's another garment for later.

The technical details are that it's machine knitted, using my Singer 360 and its lace carriage. The yarn is silk (originally Loro Piano) from Colourmart. It's grippy and not shiny, but feels finer and crisper (better quality) than silk noile. The fabric is light but (as I sit here wearing it on a coolish September day) warm and comfortable.

I actually punched a card to get this nice regular eyelet fabric. Every fourth row, the lace carriage forces every 8th stitch onto its neighbouring needle and then knits all of them, leaving holes on those emptied needles. It's the machine-knitting equivalent of YO, K2Tog. But faster!

The part of Summer Move On
I really liked
I think she's got it!
I was inspired by a hand knitting pattern called Summer Move On. It has a similar eyelet fabric and a drapey waterfall front. The transition from the sleeve to front drape and collar is really lovely and that was what attracted me to the pattern, along with the fabric.

When I purchased the pattern and analyzed it, however, I realized I would not like the garment at all. It's basically a modified shrug back, with two big rectangular pieces for fronts.

I'm not a fan of shrug knitting patterns. (For non-knitters, think of a rectangle whose length is as long as you want your sleeves on your outstretched arms and across your back. Sew the long sides to each other until the seamed tube is sleeve length. Put on.) The geometry of a shrug forces the sleeve seams to the front, where they are then visible. Seams in knitting are not all that beautiful. This is why the vast majority of shrug knitting patterns feature the back or side view of the garment, and don't show you the front view.

To see how the shape of the Summer Move On pieces fit together to form the garment, I mocked up the back/sleeves piece using some nasty woven fabric.

Shape of back piece
With sleeves pinned
Back


Bienvenidas
As you can see, while the T shape produces a nice diagonal line, this makes for some pretty horrible bagginess in back. I went looking for some more inspiration, and found a free pattern with a waterfall front called Bienvenidas. It has a closer fit with raglan sleeves. Its diagonal waterfall front is a bit neater than you would get with a big rectangle.

My made-up pattern uses a shape modeled on Bienvenidas with the collar line of Summer Move On.

Front blocking
I'm very happy with the technical aspects of this cardigan. The knitting went well. I learned how to fix the lace when it didn't knit properly (mostly it did).

I managed to do a clean knitted finish on the "lapel" area, which looks pretty good. If you click on the photo of the front blocking you will be able to see that the stitches from the front edge turn the corner and continue horizontally along the top edge of the lapel, before heading up the side of the neck.

I'm happy with the fit too, although I probably should have knitted about 3cm additional length in the sleeves. They are "bracelet length" which, to be fair, is perfectly fine for a warm weather cardigan. For fun, I made some tucks at the sleeve cuff. Maybe they will stay pushed up, maybe not.

I wonder what I should make next? It may be time for fall sewing, but first there will be yet another non-blogged interlude while the Sewing Lawyer goes on a trip!


Sunday, August 6, 2017

I have also been machine knitting

You can look away if you're not a MK enthusiast.

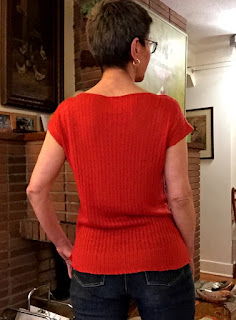
I liked my fiery orange top quite a lot, and because it only took one spool, I was able to exchange the second one I had bought for another in a different colour. Behold my swimming pool blue top.

Even though it's the same yarn and the same stitch pattern, I changed things up by making it on a different machine - my Passap DM80 (the previous one was made on a Singer 360). I had to figure out all the tensions all over again, and I also made some design changes.

This one is knitted narrower and longer and it's a better fit. I ditched the short rows that shaped the shoulder area of the orange top. It's a subtle feature that isn't needed so badly with this very drapey Tencel yarn. But to compensate and make the neck area fit better, I knitted the back 4cm longer than the front so that the shoulder seam and neck opening rolls more to the front, as you can see in the flat photo. I have a low front neck and there is no neck shaping at all - the pieces are simple rectangles. So anything that lowers the front neck opening is a good thing. I think it works pretty well.

The top isn't quite as see-through as these photos make it look. I think the camera was catching a bit of shine on my bra.

More details on Ravelry.

Betcha can't find the pocket ...

No? I can barely find it myself, if I'm honest. It is there though - on the right (left side of the photo). 

Invisible details
And what about the placket? 

Nope. Not that either. You can tell it's there, but only because there are buttons. Why yes, of course the placket underneath also matches.

SO.MUCH.FUN! (Well, for sewing geeks like me.)

I had a length of wax print. The selvedge says "Guaranteed Angler Wax Made for Nigeria". I wanted to make something that wouldn't chop it up, as the scale of the print is rather large. So I turned to McCalls 6885 again. It's a simple shirtdress that is a great item to wear on a hot summer day. Not only does it have minimal seaming, it's also suitable for a beefy cotton like my wax print. 

This time I made the hi-lo shirt tail hem. It's growing on me. 

Because of fabric-matching imperatives and because I only had 2.0 metres (less than the pattern called for) I had to make a seam in the upper back. I was very focused on matching the upper and lower pieces and did not even consider trying to get the side seams to match. However, as you can see, the sewing gods were totally on my side on this project because the side seams matched *perfectly*. It was a very fun surprise.

There is not much to say about sewing this. It is a joy to sew with well-behaved fabric like this cotton. 

I wore the dress twice before making a couple of changes. First, I sewed down the bottom pointy end of the placket. As designed that tab end is not supposed to be attached to the dress. On my first version of this pattern I didn't realize this and just sewed it down. This time I made it as intended and ... nope ... it just stuck out. So I topstitched it down making sure that the little CF pleat is perfectly centred at the point of the placket. 

Reinforcement
The other change I made was to add a little piece at the side seams to reinforce the top of the side slit. Without these, it felt like there was a lot of stress at that point. I cut squares of fabric on the straight grain, approximately 5cm square, folded them diagonally, and sewed them in place. They form little triangles. The lower edge is long enough to give movement but not long enough to allow any strain on the lower end of the seam. Plus, it adds another 2cm or so of thigh coverage at the side.

Saturday, July 22, 2017

And so the Vanessas... (also red)

I am not only on a Jalie kick but also on a red one apparently.

I went stash diving for the Vanessa pants too. First I found some rayon challis I had forgotten about and decided to try this pattern in my least favourite of the prints.

So I present (at right) my red Bird of Paradise Vanessas that are TOO SMALL. I did not finish them. I found out (Facebook Jalie group, very helpful) that there is a big difference in the rise between the size R (my waist) and bigger adult sizes. I had cut the T at the hip but graded to the R at the top edge. My mistake.

For my second try I cut some mystery sueded woven which is very drapey and also seems to be mostly rayon. This time I was cautious, perhaps overly so, about the sizing. I cut a U as my hips are between T and U, figuring I could take width out at the side seams if it was too big. I did take some out near the waist. I probably should have just cut the darned T (next time).

I didn't do the waistband cord.

I added 2cm to the length because I thought the pants as designed are on the short side.

They are comfy but not beautiful. Too hot for July, but come fall I could see these as go-to weekend pants. I could also definitely imagine more pairs of these...

Red rover red rover

I went on a Jalie spree recently. I fell for several (actually 5) of the newest pattern releases. And I've made four of them! I reviewed the Rova dress most recently, but in the intervening month and a half (bad blogger!) I also made the Pika top and the Loulouxe skort for working out in. And the Vanessa pants - for the next post.

I would not normally think of making myself a skort like the Loulouxe, cute though it is, but I took up "running" and I thought a little skort would make me a little bit happier about this activity.

("Running" is in quotation marks because I don't like it and I am very bad at it. However I got a 5K run app and let it lead me from short run-walks to a full 5K run. I still don't like it, and I'm still not good at it, but I am able to do it. I am doing it because I think it's good for me. I work out regularly and I eat sensibly but I was noticing some flabbiness creeping in and some clothes were getting tight, and we cannot have that. No sirree! But I digress.)

I dug deep in stash and found some RED nylon/lycra (I think it is "Italian lycra" because one side is quite shiny; I used the more matte side) and some red/black fiery print nylon/lycra (very beefy) and some black stretchy stuff of greatest mystery. I don't consider myself a natural colour blocker but the Jalie workout patterns are designed for it so they make it relatively easy. You can judge for yourself; I think my choices are fine.

There is not much to say about the Pika top except that it is fantastic! Easy to make, fits great, very secure, all the instructions are perfect. This is a very comfy sports bra.

As you can see, I didn't make the tank overlay. I don't love how it looks and for working out in summer, it would be hot. I may do another version with a mesh overlay. Thinking about it. (HAHA maybe next year.)

As for the skort, I have a few comments. First of all, the fit. Compared to other Jalie tights/shorts (like the Coras, which I have made a couple of times), the shorts under this skort are much less snug. This is not a problem but it was a bit of a surprise given how other Jalie bottoms fit. The shorts are also very short. Based on how I felt about the length of the Coras (I lengthened them the second time I made them), and knowing that these shorts were a lot shorter, even with the leg band, I lengthened them by 2cm. I didn't want them to be longer than the skirt and figured they would be ok. They are in fact ok. If making this again, I might lengthen them another cm however.

I decided to leave the hem of the skirt raw to maintain length. I would if making this again add 2cm to the skirt and turn up a hem. When I first made it the lycra was behaving well but after washing it a couple of times, it is rolling up at CF. It is not bothering me enough to make me decide to hem it though (yet). I like the length as is.

For the waistband of this skort, at least in my fabric and because of my pocket (described below), 1cm elastic is not sufficient. This thing is a lot heavier than shorts or tights, and it moves more because of the design and the ease, especially if you are "running" in it. Jalie calls for 1cm elastic at the waist, and because their instructions have always been excellent on elastic, I followed it to the letter. But when I wore it, it was definitely sagging unattractively at CB. Today, I retrofitted the back waist by adding a length of 2cm elastic from side seam to side seam. It's ugly but I hope it works. If I make this again, I am using 2cm elastic inside the waistband instead.

So the pocket. As designed, there is a pocket in the leg of the shorts. This would be fine if I was stashing something in it that I didn't need access to, but I am using my iphone when I "run" and need earbuds, and they have a wire. So I wanted a more accessible pocket. (I did not make the leg pocket.)

Dawn put a pocket in the centre back portion of the Loulouxe skort. This is totally the right place for a pocket and I was going to copy hers slavishly, but I did not have a long enough zipper. So I improvised with a shorter skirt length zip.

I cut two of the piece instead of one (inside is black, outside red). I added some fusible knit interfacing to stabilize the area where the zip would go. Then I made a cut parallel to the curved upper edge, just a bit shorter than the zipper, and two angled cuts into the notional corners of the curved but vaguely rectangular opening I was planning.

Basically this is a window opening for the zipper. Check out this tutorial, for example. Except I did not make a "facing" for the window. (You could of course, but I was winging this.) I just sewed the edges of the zipper tape to the edges of my cut opening, and fudged the ends by turning the little triangles under and then topstitched it all to keep everything in place.

Once the zipper is installed, then baste the edges of the outer pocket piece to the back pocket piece and thereafter treat them as one. It works perfectly ... except my phone pulls down the back of the skirt, which meant the elastic wasn't enough to keep it in place, which meant I had to retrofit the waistband. But it's all good.

Saturday, June 3, 2017

Oh summer, where art thou?

I'm pining for warmer weather so I can wear my new duds. Like this little tank dress. It's the Rova dress from Jalie's latest published offerings (pattern 3678). In a fit of enthusiasm I bought four of these, PDF versions. I spent an enjoyable evening assembling the patterns and then immediately cut this dress out of a bit of rayon woven that I had picked up years ago so I could test the pattern.

I'm calling the test a success.  Now if only the weather would cooperate, I'd make some more of these.


Monday, May 22, 2017

This is what I was working on


Why yes, it's crazy bright!

But also thin and drapey. Should be perfect for summer, if summer ever comes to these parts. (The furnace came on this morning!)

There are lots of details in my previous post and more serious information can be found on my Ravelry project page.

The short form is:

147g
100% tencel
44cm x 60cm, approximately

The colour is more accurate in the other photos
I always like to see knitting laid flat so I can assess how it is constructed. As you can see, this top has a very simple shape.

There are some short rows at the top of the stripey lace portion and below the band of ribbing at the top of both front and back. This serves to introduce a bit of slope at the shoulder, so the cap sleeve isn't too big and floppy.

I added some subtlety to the construction by making the back a tiny bit (1.5cm or so) longer than the front. This is in the top ribbed band only. The point is to allow the shoulder seam to shift forwards in wearing. This does two things at once. It lowers the top of the front neck, and it prevents the back from riding up. Basically, I think the shoulder seams would have shifted forward anyway; this just lets them lie there naturally.

The arm openings are finished with a line of single crochet. This helps the edges lie flatter, and simultaneously takes care of some (ahem) knitting imperfections.

The back is otherwise identical to the front.

I like it! Since it took less than one cone, I'm hoping to exchange the other for a different colour. I may need two of these.

But it won't be for a while. I had to put the 360 away. Company's coming next weekend, and I have to go back to work after my five weeks off. Blogging will become less frequent, I'm sorry to say.


Sunday, May 21, 2017

What The Sewing Lawyer thinks while working on a machine knitting project

"I should use the special features of that SK360 that I've never used in an actual project, like a stitch pattern that requires a punch card."

Gets manual out. Considers drive lace. [Drive lace is a kind of lace that forms open areas where stitches that are selected by a punchcard are allowed to run. Susan Guagliumi talks about it here.]

Compares cards. Wonders which ones would work with drive lace. Picks a card.

Studies manual in detail (see this video). There are So.Many.Steps!

Gets out cone of icky synthetic to try it. Plods through steps.

"The P Carriage is FUN!"

Picks another card to try. Forgets to set card to advance. Notices that the first row (on which the card is stuck) selects the same stitches to knit and drop over and over, and that this allows vertical lacey stripes to form.


"OOH PRETTY!"

Decides to knit a top with all-over vertical lacey stripes. Knits swatch, measures swatch.

Knits another swatch to try out ribbing.

Knits another swatch to try out a different kind of ribbing.


"OOH PRETTY!"

Looks on Ravelry for a pattern that is vaguely similar to what she has in mind.

Bingo!: Yamamichi-mon.

Bonus! It's a free pattern and it has a schematic drawing with measurements.

Prints out gauge specific graph paper and charts shape of Yamamichi-mon top.

Counts itty-bitty boxes to determine numbers of stitches and rows.

Agonizes over how to cast on for the chosen ribbing.

First step in casting on - the zig-zag row

Congratulates self for figuring it out.

Knits ribbing. So far, so good!

Starts knitting pattern. Edge stitches are not knitting. Tries to fix stitches. Catches yarn on gate pegs.

"Gate pegs are evil!"

Figures out how to get edge stitches to knit. [Sometimes, you have to pull the needles out to D position. Generally, you need more weights.]

Knits back and forth, back and forth, back and forth. Repeat over 200 rows, more or less.

Time for short rows!

Consults manual.

"Where are the Russell levers?" (And why are they called that, anyway?)

"Better drop those stitches down while I have the chance."

"The P Carriage is FUN!"

Figures out how to knit short rows while simultaneously keeping pattern going.

Congratulates self.

Figures out how to continue knitting on all stitches, and how to convert the pattern back to ribbing. Knits ribbing.

Remembers to increase stitch size on very last row to enable stretch bind off. Congratulates self.

Remembers to remove all weights before casting off. Congratulates self.

Sore back from hunching over machine while casting off 185 tiny stitches.

"Done!!" Congratulates self.

Wet block overnight.

The next morning: "OOH PRETTY!"

Rinse and repeat.

Realizes at some point (irony) that this particular form of drive lace doesn't require a punchcard at all.

Soon there will be a new top!


Wednesday, May 17, 2017

Sewing sorbet


A knit top is so quickly made and so hard to mess up that it works as a sort of sewing sorbet - a palate cleanser after or between more difficult projects.

I had extracted this thin drapey knit (poly-lycra I think) from stash because I liked the colours, which coordinate with my teal skirt and also somewhat surprisingly well with my striped cardigan.

The print is nevertheless kind of dark, so I suppose I am continuing with my seasonally backward-looking sewing here. It'll have to end soon as it's quite hot today.

This is a version of Jalie 2449, which I see is out of print. It seems to date from 2004.

I would have made 2804 again, but I didn't want a horizontal seam on the front, which turns out to look kind of awful just above the top of my high-waisted skirt.

I've made 2449 twice before - once from a beefy cotton-lycra and once from one of those disappointing rayon knits. The cotton version (which I am still wearing after many, many years) is pretty snug. The rayon version, which didn't last, became quite loose after it had been washed a few times. I actually preferred the fit as the fabric deteriorated. It didn't reveal all the bumps of my body and undergarments.

So, as I did when making 2804, I cut this top out outside the lines, adding about 1cm to the vertical seams and leaving the waist area, in particular, less fitted than the pattern.

Original try - ca. 2006
I wasn't sure how the looser fit would work with the neckbands. On my cotton-lycra version (at left), I have to pin the layers together at that cross-over point to avoid revealing any more of my person than intended. Further, the snug fit leads to all sorts of pulling.

It turns out that the top works much better if it's not so snug on the body. The bands are cut with quite a bit of negative ease so the fronts are eased into them and this holds them against the body while the looser fit means that movement doesn't cause the fronts to spread apart.

Another one for my wardrobe. Next, I shall get back to my knitting machine. I am inspired to try something called drive lace. Stay tuned.

Tuesday, May 16, 2017

Shapes - mine and not-mine

A picture is worth 1000 words. Therefore, behold:

Marked up ineptly in Skitch

The yellow outlines are the cup pattern pieces for Harriet. The pink outlines my TNT cup pattern. There are two things that occur to me.

  • The shape at the bottom is very different. 
  • The "dart" at the top is very different.

Bottom Edge

The lower edge of the Harriet cup is relatively flat (black arrow) whereas my TNT pattern has quite a curve (red arrow). Harriet curves up, but only a bit, at the seam between the lower cup and the upper cup. My TNT pattern curves deeply and smoothly throughout the entire bottom line of the cup.

Dart

When I say "dart", I mean the space between the top edge of the lower cup piece and the bottom edge of the top cup piece.

To assist, I marked the ends of the dart on the Harriet pattern with orange exclamation markers (the marker should actually point at the little dot on the upper edge of the lower cup) and those on the TNT pattern with green check mark markers.

Imagine the two marked shapes sewn together in three dimensions. We have a lightly darted cup with a lot of curve in the lower edge of the cup (TNT) and a deeply darted cup with a relatively flat lower edge (Harriet).

What is the effect of these differences?

Harriet cup projection - side view
When the lower edge of the Harriet cup is sewn to the frame of the bra, the lower cup projects outward. Because the lower edge is so flat, it's like sewing a cylinder into a flat piece with a circular opening. If you think of the frame as a flat plane, the cup pieces would emerge from it almost at a 90 degree angle. This can be seen at left.

Harriet cup projection - view from the bottom of the band
The big dart in the Harriet cup is formed at the top edge of the lower cup (notice that the seam between the two lower cup pieces is quite flat). The apex of the dart is more or less where the two cup seams converge. Have a look at the photo to the right.

By contrast, when the already-curved edge of the TNT cup is sewn into the same frame shape, it is not forced upward at a right angle, but rather forms a slope. The highest point of the cup is lower (less of a dart) and the continuous curve of the dart means that the shape of the cup is less pointy.

I prefer to get my roundness from the support of a flatter lower cup sewn in stretch fabric than from the pre-defined projection of a cup sewn in fabric with low or no stretch. Lucky for me, I'm small enough that the former works.

Therefore, my next trick is either going to be a mash-up or something completely different, to cleanse my sewing palate.