Monday, August 31, 2015

Éléonore pull-on jeans from Jalie

As you may be able to tell, The Sewing Lawyer is on a Jalie kick these days. This is the third of three patterns I chose from the new collection the company recently released - the Éléonore pull on jeans. We're 3 for 3, but if (when) I make these again I'll make some modifications.

Because I'm really not completely comfortable in jeans that hit me a good 3" below my actual waist, especially when they are tight enough that the back pulls down further when I'm doing anything other than standing up straight. Which is 90% of the time I figure.

Maybe if I was 20 years younger.

On the other hand, with the top of them and my belly button and all decently covered, they look not bad, if I do say so myself. In particular, this camera angle makes me look like I'm all legs, which is assuredly not the case. So let's just go with it.

And it was a really fast pattern to make up, even though I was fitting on the fly.

Here's the always-popular rear end view.


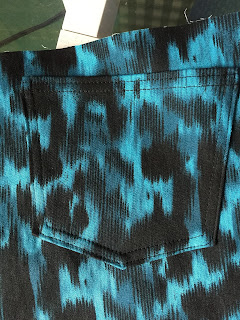
And because this extremely busy print simply swallows up the details, here is a closer view of the front.

Front - extreme close up
What? Not close enough?

Back
In my continuing quest to make friends with my coverstitch machine, I used it to do the topstitching. It worked! Soon we will be best friends. I find that it does best when the fabric is a constant thickness - it didn't always catch the looper thread when I was stitching over seams. I fixed this with a needle and thread but does anyone have tips to avoid this?

Really, the only way to see the details is to look at these inside out.

That square of interfacing? Fixing
an "oopsie" from my serger
I'm super proud of my stitching on the back pockets. I went around the corners with my coverstitching in about 3 steps, turning the wheel to advance the stitches by hand, and rotating the pocket to turn the stitching with the left hand needle still in the fabric but raised enough so that the right hand one was free to move.

Topstitch expert - me?
The fabric I chose is a woven cotton/lycra with plenty of widthwise stretch - I could stretch 4" of fabric to more than 5", so more than the 20% minimum that Jalie calls for.

I traced size T based on my hip measurement, but I added 1cm of insurance at the side seams on front and back (total of 4cm) because I wasn't sure of the tight fit. A try on while sewing indicated that I didn't need all of that. The final seams are 1.5cm so I have an extra 1cm on each side. They are plenty snug enough for my taste.

The only serious problem was at the waistline. My waist is size R (a 2cm difference between the sizes). I figured that because the pants are low rise, the waist measurement wouldn't matter that much. As with the Jalie stretch jeans pattern, however, the waistband was going to gap on me - badly - if I made it up according to the instructions. In part this is because of the size differential, but it's also the draft which is really straight at the back. I don't have a gigantic behind or a really pronounced sway back either.

The instructions say to attach the waist band elastic 1:1, that is do not stretch to ease in the fabric at the waist line. Dawn found that for her, pulling the back waist elastic out a tiny bit on either side was enough (total of 1/2" or 1.25cm). I used wider elastic (Jalie says 2.5cm or 1" elastic, mine is 3.75cm or 1.5") and I had to pull it in both in front (total of about 2.5cm) and in back (total of about 4cm). Between the stretch of the fabric and the elastic there is no problem at all getting them on and the waistband looks smooth enough when I'm wearing them.

Next time I make these I think I will add more to the rise - not a lot, maybe 1cm all round, plus cut a small wedge in back to give myself more sitting room and enough back height so I'm not at risk of exposing my unfashionable undies when I sit or bend over.


Saturday, August 29, 2015

Jalie hits it out of the park - again!

More new workout clothes for The Sewing Lawyer. And this is a great workout top! I know because before I took photos this morning, I did an hour of yoga, and the top performed like a champ.

Jalie 3463 has 2 basic shapes - a flared mini-length dress or top, and a slimmer fitting top. This is the slimmer fitting top.

I'm not totally sold on my colour-blocking choices. When worn with black bottoms, the black lower side panels disappear and make it look like I'm wearing an odd apron.

There's an elastic-topped pocket in back, which I may never use.

Hmmm don't get the idea that I'm less than thrilled with my new Anne-Marie. That would be wrong because it is actually a perfect design - it fit me right out of the envelope (size R per my bust measurement) and it's supremely comfortable. I'll be making this again, soon.

Don't forget, The Sewing Lawyer has an extensive stash. I've got a black/red combo in mind for my next effort.


Sewing details, you ask?

Inside front
Inside back
It has a built-in bra which due to my fabric choice (power net) and the fact that I doubled the front with the 2 pieces cut in opposite directions) is extremely secure. I also lined the upper back with the power net to ensure it had the same degree of stability as the rest of the shoulder area.

The instructions to put the top together are pretty incomprehensible until you have the bits in your hands. Just follow the words and don't try too hard to decode the drawings. They are accurate, but I didn't find them that helpful because it just looks complicated.

The trickiest part is when you are sewing the second shoulder seam and arm opening. There is a definite risk that you'll end up with something that is literally impossible to turn right side out. In these situations I find it helpful to lay the item down flat on a table or my lap with the right side out and all the bits you have to sew together (in this case the side front, strap and back parts along with the inner bra structure) in the configuration you want them to be in after you have sewn them. Then I pick an easy spot on the garment (I picked the princess seam in front) and its matching spot on the thing you need to sew it to (the inner bra), turn them RS together at that point, and pin. Then you can work your way along the seam you have to sew. In this case you end up, as the instructions say, with the garment "sandwiched" inside the strap you are sewing. Just go with it and keep pinning. Then sew (if you don't trust it, sew a straight stitch that can be pulled out if it didn't work).

I used my serger (3/4 safety stitch with woolly nylon in the loopers) to sew the seams and my coverstitch machine for the under-stitching. Hopefully practice will eventually make perfect - I'm not there yet but the hem worked pretty well.

The only change I made was to under-stitch the elastic at the side/back as I found it was not lying flat without this. If I was seriously considering using the pocket I might try to make it into two compartments because it's pretty big.

Saturday, August 22, 2015

Negative! (Ease, that is)

I've been working out regularly for 6 years or so. With a personal trainer. And with weights. I wish I had started earlier because it would have helped to prevent my bones from deteriorating (which they are doing, damn them). You younger ladies, pay attention! There's lots of good information here.

But I digress. Working out is not a lot of fun in my opinion, but it is ever so much more bearable if you are wearing comfortable and stylish workout clothes. There are so many more options now than there were the last time The Sewing Lawyer made such items in 2010. The shorts and tops I made then are still in regular rotation and look pretty good, but to be honest they don't fit all that well (since I lost 15 lbs a few years ago) and I just want new stuff.

I still have my Kwik Sew patterns from the 80s but last week, I bought two of the newest Jalies - the "Cora" tights and the "Anne-Marie" top. It was definitely time. Plus, I have to keep up my relationship with my Coverstitch machine.

Stash diving was productive - in 2010 I bought quite a lot of stretchy stuff at Susie Spandex at PatternReview weekend Montreal. Plenty to cut out a new pair of shorts to test out the Cora pattern.

Back - inside out
Front - inside out
They are very plain given the number of seams and opportunities for colour blocking, but I decided to make these mostly black. The only shot of colour on the outside is the pocket backing, in turquoise. My little surprise.

The inside shots do a better job of showing the construction of these shorts than the modeled photos, because my wooly nylon thread is grey rather than black. There seems to be a little shaping built into the seams, but most of the fitting work is done by the lycra.

I'm pretty chuffed at my stitching on these for two reasons. First, I stuck with the woolly nylon in the loopers through numerous tests (during which the upper looper thread broke again and again) until I figured out that I had to loosen the looper tensions ... a lot ... to keep the thread happy. No breaks were experienced during actual construction (YAY!).

Second, I maintained my state of non-intimidation with respect to my coverstitch machine. I started with the black on black shorts rather than the more colourful Anne-Marie top (to come) so that my mistakes would be totally invisible as indeed they are. Stay tuned to see if I can maintain my track record with the top, where I've chosen to use more colour.

I made size T based on hip measurements and was pretty skeptical that I'd be able to fit into these as they appear, off the body, to be big enough only for a child. I kept the faith in the negative ease though, and look!

The only change I made to the basic pattern was to cut 25" of elastic for the waist rather than the 22" Jalie thought would be A-OK for a size T person with a 29" waist. Seriously? A 6 year old has a 22" waist (according to Jalie's size chart). The extra 3" was a little bigger than the actual circumference of the waist band piece so it was a little awkward to sew, but once I put it on it all expanded nicely and without cutting into my much more than 6 year old flesh.


Friday, August 14, 2015

Lace (?) jeans

Yes that is my latest V1440 shirt
Well, they look like lace. However, the fabric is actually a cotton-lycra twill. Pretty standard stuff, but the print mimics black lace, as you can see at right. I thought it was kind of fun.

Back view - spot the pockets?
This is the Jalie jeans pattern ... again. Why not, once you know they will fit (if you remember to think while constructing the waistband)? Although I did buy the new Éléanore pull on jeans pattern last week and I'll have to give it a try too.
Innards

As usual, I used a firm (non-stretch) woven cotton fabric for the pocket bag and to face the waistband, to reduce bulk. This fabric was left over from some particularly spectacular pajamas.


My sole innovation on these was to add a little button with loop so I can fold these up. I really wanted pedal pushers but I also really wanted long pants. This way, I got both! We'll see if it's a good idea as I wear these...


Vogue 1440 - take two

I was so taken with my new Donna Karan shirt that I decided I should immediately alter the pattern and make another. This time, a white one as per the pattern envelope.

Extreme close up - woven pattern
matching at CF placket
Fabric came from stash (natch!). I got it at the Fabric Flea Market and had thought it was cotton, but having worked with it, I'm not so sure. It has a really soft hand and loses the crispness of a recent press really fast. As you can see at left. It has a really interesting woven-in pattern that's somewhat shiny. With typical Sewing Lawyer compulsion, I matched at CF and CB. Not that anyone will ever notice...

The alterations I made were, in the end, just three:

    • Took in side seams, about 2cm on each side at underarm and more at the hem.
    • Shortened it by 5cm.
    • Raised centre back neck slightly.
I originally thought the underarm was way too low, but taking it in took care of that problem. 

I took a few photos of the construction of the back yoke/arm opening bands. Ignore the Vogue instructions and do it my way instead!

 Front and back bands are seamed and attached to shirt at arm opening, RS to WS, turned and pressed. The other edge of the band is turned under and pinned down.

I've left the last few cm unattached at the front shoulder edge. This will allow you later to sew the shoulder seams of the shirt body and bands separately for a better shoulder finish.

Vogue says to complete all topstitching at this point but don't! Topstitch the back to side seam only.
At right, I've sewn the shirt shoulder seams (French seams) and attached the back triangular yoke, WS to WS. It helps if you've left the CB seam unsewn in the seam allowance area.
In the photo at left, I have also sewn the shoulder seams of the bands (regular seam, trimmed and pressed open) and I've attached the back V shaped band to the back yoke.

With this construction order, you can sew the bands continuously from in front of the shoulder, over the shoulder and down to the point of the V. You do have to do this in two passes.

The trickiest part is the V point itself. Precision sewing and lots of trimming are essential.
In the shot to right you can see the preparation for final toptitching. This construction method allows you to start at the right underarm and topstitch continuously through the V and to the left underarm. 

You'll see this shirt again on this blog ... soonish.


Monday, August 10, 2015

New Look 6470 ca 2005

The Sewing Lawyer is a bit late to this party. New Look 6470 was published in 2005 but it's still in print on the Simplicity website, so it's an oldie but a goodie, as they say. A two piece knit outfit - skirt and top (2 views). Easy. Just the ticket.

It seems fitting that the last fabric in (purchased in Montreal at our July meetup) has been made into this well-aged pattern.

It's also fitting that I used this easy pattern to get reacquainted with my Janome Coverstitch machine. I'm a little embarrassed to confess that we didn't bond instantly. However, this pattern helped me to get past my unease.

Look! An almost perfect coverstitched hem!

Deeper cowl facing attached at shoulder and
arm opening
I made the cowl neck top and improved the pattern by extending the cowl facing (which was really skimpy and would forever have been flipping out) so it is about 10cm (4") deep. It's sewn to the arm opening at the sides, so it's very secure.

I also improved on the pattern by cutting strips of fabric on the lengthwise grain to stabilize the back neck and armscye openings. This is such a vast improvement over the pattern instructions to turn the seam allowances under and topstitch. In this very stretchy knit I think the strips are 80% or even less of the length of the openings. I didn't measure, just pulled until it seemed about right.

The skirt has an elastic waistband. I made a loop, serged the elastic to the top of the skirt after taking about 2.5cm (1") off the top to make sure it would be the right length since I didn't want to do a hem. Then I turned the elastic over and coverstitched.

What else? I cut a size 10 for the top and 14 for the skirt. Who needs tight clothes? Not me!

Sadly this is a soft rayon knit so the outfit won't last all that long, but it took a day to make the two pieces and I am no longer scared of my coverstitch. I call that a win!


Saturday, August 8, 2015

Vogue 1440 - the shirt

When Vogue had one of its pattern sales earlier this year, I scooped up V1440. My online acquisition decisions are ephemeral it seems. I have to assume I bought it for the shirt because (a) fringe trim (UGH) and (b) The Sewing Lawyer does not need a Vogue pattern to make leggings (oh sorry, "close fitting tapered pants").

I figured I'd use the remainder of the happy print I used to line my trench coat to try out the shirt pattern. (Happily I had just enough left after cutting out the shirt to re-do the waistband of my Jalie jeans.) I have only scraps left. Stash busting at its best.

I cut the shirt out in a cutting marathon along with my two pairs of pants. That was in June sometime. But I wasn't going to let myself start sewing it until I had redone the waistbands. The bad news is that it took me weeks to get around to doing that little retrofit. The good news is that it was much worse in the contemplation than in the execution. Too bad the delay meant that my shirt wasn't ready for the super hot week we had at the end of July.

So the review.

This shirt is not for a cool day. It feels like a halter top. There is a good reason. Basically it is a halter, with extremely cut in shoulders, a shirt collar that totally does not hug the neck, and really big openings at the arms.

Here's the back and side views. See what I mean?

You really need a racer back bra with this shirt, and if you don't want it to show in the arm opening (as mine does) you need a non-sports racer back bra.

I am very tempted to alter the pattern to raise the under arm by about 3cm and generally make the whole opening smaller. I'd leave the back yoke the same and reshape the arm opening at the front and side. Other alterations that seem advisable to me to make the shirt a bit easier to wear would include:

  • Shortening it. The model on the pattern envelope is clearly an amazon. I'm not super short but would have to lop off about 7.5cm (3") to have the hem at the same level relative to her body.
See?


  • Reducing the flare. I could take in the side 5cm at the hem on each side and it would still be loose fitting.
  • It could also stand to be taken in 2cm on each side at the armscye. 
  • Raise the top button even more. It is extremely low - as designed I think it would sit just a bit above my bra's bottom band. I raised it 1.5cm (5/8") but it could easily sit even 5cm higher. It's only not a problem because the fly front band is relatively firm and the collar keeps the edges close together.
  • I'm unconvinced by the CB opening at the hem and might skip this in a future version.
Now for the construction information. In my opinion, the sewing instructions for making the back yoke are less than ideal. In effect, this shirt has the armscye facings on the outside, and they wrap around in a lovely continuous line with a V at centre back. But Vogue tells you to sew them in two completely distinct parts. The instructions for sewing the facings to the back yoke involve topstitching the facing on both edges. Try getting a precise and even facing with all seam allowances neatly enclosed doing that, I dare you. Then they want you to sew the shoulder seams through all layers last, and then to fake a French seam. This means you have a lumpy and possibly also uneven edge at the top of your shoulder. 

If you are making this shirt, do the following instead:
  • At step 13, stop sewing the facing about 2.5cm (1") away from the shoulder seam. 
  • At step 14, only topstitch the back part of the facing. Stop the topstitching at the side seam.
  • Complete step 14 as instructed, but do not press the seam allowances towards yoke.
  • Complete step 16 but not 17. Clip and press down upper seam allowances of the back facing as instructed. I reinforced the V with tiny stitches before clipping. 
  • Sew the lower edge of the back facing to the lower edge of the back yoke by machine, stopping about 2.5cm away from the shoulder seam on both sides. I did this in two passes to get the sharpest possible point at the V. I also trimmed the seam allowances in the V, a lot. Check that the finished assembly lies very flat, i.e. that you're not throwing the back off balance. I am pretty sure that a tiny imperfection in my yoke-back seam is making my shirt flare out at CB. 
  • Now do a French seam at the shoulders on the shirt body only, making sure you don't involve the loose ends of the front and back facing pieces.
  • Sew the facings together at the shoulder with a regular seam. Trim and press it open.
  • Make sure your facing edges will lie flat over your shirt body at the shoulder. 
  • Sew the final bit of the seam joining the facing to the armscye edge of the shirt at the shoulder.
  • Topstitch the inner edge of the facing starting at one side seam and continuing through the back V to the other side seam.  
This gave me the nice clean and fully machine done finish I like in a cotton shirt. 

Here is the finished result from inside (L) and outside (R)


One more detail shot.

I have some nice white cotton that might look pretty sweet in this pattern, once modified.

But in the meantime I'm getting reacquainted with my Janome Coverstitch machine. We've been estranged for a bit. I'll show you the results soon, I promise.