Showing posts with label Burda high-waisted skirt. Show all posts

Friday, March 11, 2011

Ho hum (?) basic

After the mink-lined coat, I needed a seriously simple throat-plate cleanser before I tackle my next "real" project (which I haven't actually decided on yet, but is probably going to be a dress and jacket combo).  So I made the turtleneck from the September, 2010 Burda Magazine.

Three pattern pieces.  And two of them are almost identical.

I had 1.5 metres of a luscious wool/lycra jersey in the stash, purchased from my favorite Montreal store, Couture Elle.  In about an hour, it was transformed into this top.

I decided to sew the top on my sewing machine since the fabric is a little beefy and serged seams would have been a visible ridge.  I used a tiny zig-zag to keep the stretch factor.  1cm seam allowances pressed open makes for a sleeker garment.

There's something about the cold hard reality that the digital camera finds but is invisible in the mirror... It's a little wrinkly looking as is my high-waisted black skirt after a full day at the office.

In part the wrinklies are caused by the fact that this pattern has super-long sleeves.  I normally shorten all sleeves by 2.5cm (1") given my short arms, but I decided to see how I liked these, since I can always make them a normal length (they are in fact cut shorter by about 3cm, due to fabric shortage, but you'd never know).  The jury is still out.

I was wondering how I'd like the cut-on high neck, since I have a sort of a forward neck, and always worry about a neckline that cannot be lowered.  There are horizontal wrinkles but I find the top very comfortable.

Here's how I wore my new turtleneck yesterday.  The jacket is Vogue 1098, an Anne Klein pattern.  I reviewed it here.

Sunday, May 30, 2010

A potpourri

Like a potpourri, this is a mixed bag.  

First, I'm sorry for being absent - last weekend we were entertaining house guests and then Mother Nature decided that we should all be reminded what it is like to suffer through a heat wave (in May!!).  So not much sewing has been going on here in the Nation's Capital, and since this is a sewing blog, there hasn't been anything to blog about.

Second, I have now finished the woolly skirt to go with my woolly jacket which I could only model today because Mother Nature decided that today would be slightly overcast with more seasonable temperatures.  Needless to say, I won't actually be wearing it for months until Mrs. Nature returns us to the fridge.  (If any of you notice me tending to want to sew tailored wool suits next spring, could you pipe up to tell me I'm falling into that trap .... AGAIN??  It would be a great service to the Sewing Lawyer to be reminded that the seasons do change; she seems to forget annually.)


So here it is - the completed ensemble.  I am going to love wearing it!

The skirt is a reprise of the high-waisted skirt I made recently.  I am thrilled with how it looks and, more importantly, with how comfortable it is.  Remember I added an inner structure with 4 pieces of spiral steel boning?  I did it again and it is like magic, I tell you - the waistband is not tight but it doesn't flop down, ride up, twist around my waist, or do anything it is not supposed to do.  Totally secure, totally comfortable.  Boning rules!  The next time I run into this stuff, I'm stocking up.  

This one was made in identical fashion, but I used a sturdy muslin for the inner structure.  It is lighter and more flexible but will do the same job. 

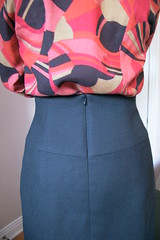
So here's the skirt with high waist revealed (worn with my recently-completed Jalie lace T).

The wool fabric almost totally hides the princess seams in the skirt and waistband, and I like how the lower edge of the waistband is visible mainly as a change in texture. 

Last, in other sewing news, I'm working hard on my Kay Unger Dress (Vogue 1182).  I completed a muslin which was blissfully free of bad surprises (in other words, all the usual things had to be done, including taking 2 cm out of the front neck length).

I have purchased the most amazing silk dupioni for this dress which shall be revealed in the fullness of time.  So far, the dress is cut out and underlined with silk organza.  I'm going back to it now.

Saturday, March 13, 2010

Black high-waisted pencil skirt & lined vent tutorial

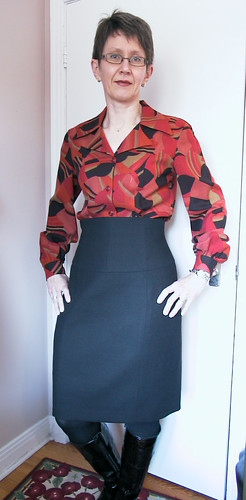
Goodness me, I'm slow these days.  This is a fairly simple skirt, which I managed to complicate immensely.  It really is black although it (and my black tights) may appear dark blue in some of the pictures.  

This is based on skirt #112 from the January, 2009 issue of Burda WOF as it then was.  For some reason, even though the pattern is more than a year old, it didn't get reviewed a lot until very recently.  As of this moment, there are 7 reviews on PR (mine to come shortly) plus Christa's review of related skirt #113.  It's a winner!

However, I Frankenpatterned the skirt - only the waist pieces come from Burda - the rest is a version of my PMB (PatternMaster Boutique) princess seamed skirt.  My shape doesn't do well with a 2 seamed pencil skirt because there are 2 sizes difference between my waist and hip measurements, plus I have (ahem) "athletic" thighs.  Trust me - plain skirt patterns and my lower half do not play well together.  The princess seams, on the other hand, provide plenty of opportunities for subtle shaping including pegging the hem.  I think I'll be making some version or other of this skirt for the rest of my days.


My first step was to muslin the waistband pieces.  This has plenty of places for fit alterations too - since it comprises a total of 8 pieces.  I found it  fit at the waist, but was a little too exaggerated above the waist at the side seams and side-back seams, and a little too snug as it flared to go over the hip.  My goal was to have the waistband follow my shape and not be tight anywhere.  The needed adjustments were easy.

Once I had altered these pieces I did the necessary changes to my PMB pattern.  This mostly involved moving the princess seams so they would intersect the seams in the waistband.

Then I made a muslin of the skirt to check that the fit was as good as expected.  Imagine how chuffed I was to realize that my working out (with a personal trainer) since September is paying off - I had to take it in quite a bit.  The muslin also let me check the length.  This one is shorter than most of my other skirts, at 57cm (about 22.5") below the waist.  It hits me just above mid-knee. 

I already mentioned I was going to bone the waistband.  Actually, I decided to go all couture and create an inner structure or corset to hold the boning and give structure to the entire waistband, underline the skirt with silk organza, and fully line it with Bemberg, including a properly-finished back vent.

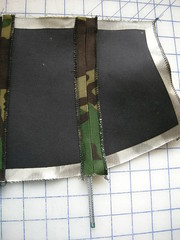
For the inner boned structure, I wanted a firm fabric that wouldn't be too bulky.  In my stash, I found this camo printed pantweight cotton.  Don't worry, it's inside the skirt and will never be seen.  I interfaced it (only inside the seam allowances) with a substantial woven fusible interfacing, as you can see in the next photo.

I had found really inexpensive packages of 4" lengths of spiral steel boning in a great store in Vancouver called Dressew.  This was my chance to use some of them. I used the seam allowances at side fronts and side backs to create a casing. 

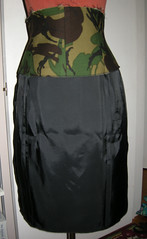
This inner corset thingy was then basted to the constructed lining at the top and centre-back.  The lower edge hangs free.  If I ever decide that the boning is too much, I'll easily be able to remove it.

Below is a photo of the lining with corset attached.


Construction of the skirt itself was uneventful.  There are only a couple of things to note.  I used Italian black wool crepe (acquired for a song at the Fabric Flea Market, 2009).  I interfaced the waistband but with a light and lofty type of fusible.  This is more for cushioning the fairly thin wool crepe over the skirt innards than for actual structure.

The skirt pieces I underlined with silk organza.  I find this provides a little crispness to a wool crepe skirt.  It means the skirt will crease less and that creases will fall out faster.  Further, having underlining means you can sew a hem and vent which are truly invisible because all the stitches holding them in place are in the organza only and don't touch the fashion fabric. 

I used a long invisible zipper since  a standard skirt-length zip would have been too short given the high waist.  I left it a generous length (28cm or 11") and this makes such a huge difference in terms of ease of getting into and out of the skirt that I may always do it in skirts from now on. 

In attaching the lining to the skirt at the waist and zip, the lining/corset layer is treated as one (just as if it was only lining).

At the hem there is a vent at CB which I lined "properly".

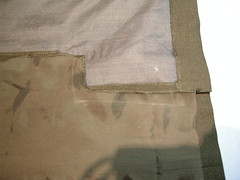
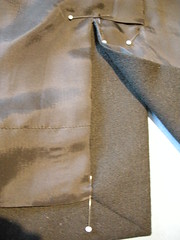
Here's the vent, prior to lining.  Notice the navy blue silk organza underlining.  I hand-tacked the top of the vent to the underlining so it won't collapse - as noted already, this is entirely invisible from the outside.

Notice as well that I pressed back the edge of the vent underlap, and that the overlap is mitered at the hem. 


To prepare the lining for the overlap, you must cut off a piece corresponding to the vent but don't forget to leave seam allowances.  I marked the finished edge in chalk, and cut accordingly.


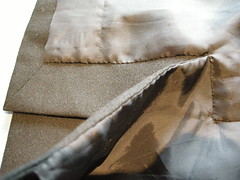
Then finish the edge and clip into the corner.  Here you can see the other side of the lining which will cover the underlap from the inside.


Fold the lining under at relevant seam lines and pin it in place.  Make sure that the lining is not too tight.  In addition to leaving a bit of horizontal ease, leave a little vertical slack in the lining before you sew it to the skirt so that it will be a little longer above the vent than the fashion fabric layer.  This ensures that the lining will never pull the CB of the skirt up. 

Then invisibly hand-sew the lining to the vent edges, and across the top of the vent. 


In the final picture you can see the little bubble of extra length, just above the top of the lined vent.  

And here are some more photos of the finished skirt:


And last but not least:  With the famous Orange Plaid Jacket!

This skirt should make a very versatile addition to The Sewing Lawyer's wardrobe - so far (judging by the fact I've been sitting in it while I wrote this blog entry) it's comfortable as well as (if I do say so myself) rather good-looking.  

Sunday, February 14, 2010

High Waisted Skirt - in progress

I'm in the midst of auditioning two different Burda Magazine patterns for my next project, a high-waisted black wool crepe skirt.  One of them is in the current February, 2010 edition (skirt 124) and the other is from a year ago - the same edition (January, 2009) that my orange plaid jacket came from - skirt 112. So far I'm liking the older pattern better.

Before I go on, a word about Burda.  I am really irritated that they are seriously mucking up their on-line magazine archive.  At least it still exists in accessible form in English, although who knows for how long.  The German version has gone all to H**L as a result of being "updated" or "improved".  I don't know how they would explain it, since they didn't respond to my e-mail asking about it and pointing out some of the problems with their new site.  For a while, they had two images for most patterns - the artsy posed version from the magazine, and a plain, mannequin shot from straight on so you could actually see the detail in the garment.  They also consistently had technical drawings for all sewn garments.  About a year ago they cut out the mannequin shots and now I notice that the February, 2010 pages omit any link to the technical drawings.  And it's no longer up to date.  The January, 2010 edition is lost in some sort of internet limbo.  Honestly! 

Rant over.

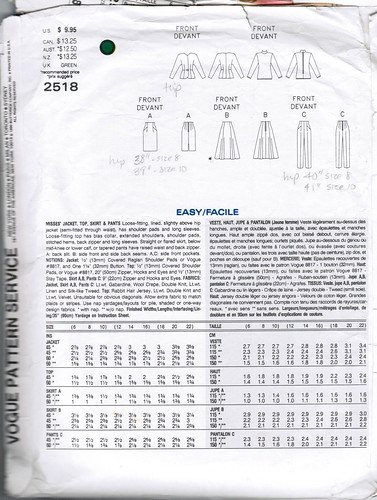
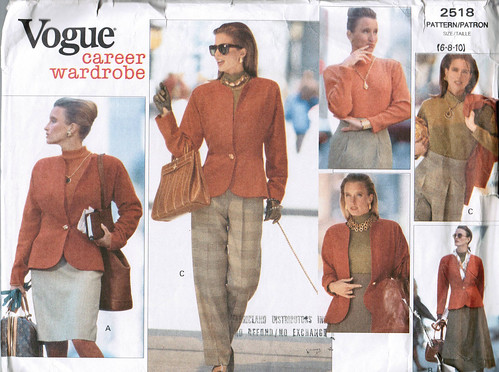
Anyhow, quite a few years ago I had a high waisted skirt pattern that I made over and over.  It was from long-defunct Vogue 2518, a "career wardrobe" pattern that I believe was a cheaper knock off of a then-current designer pattern (Anne Klein I think). 


As you can see from the line drawing, the straight skirt has a high waist coupled with 2 front pleats that the side pockets tuck into.  Back when I was using this 1990 pattern I was a bit trimmer than I am now and sadly, it would no longer fit.  But now that higher waists have been seen often enough that they no longer look odd, I am really hankering after a new version to replace my old TNT pattern. 

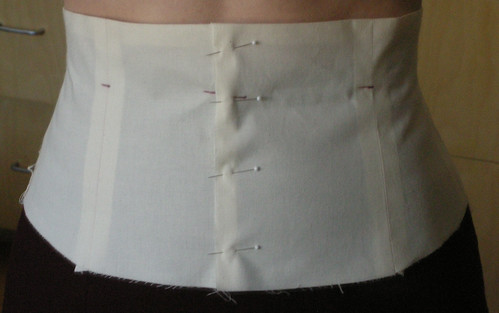
With that very long-winded intro, here's my muslin version of the waistband of 2009-01-112:

I left it open at the front for ease of use while fitting.  I traced a 38 which is my waist size, but had to let it out at the lower edge, and take it in at the upper edge (I guess I have a really small ribcage). 

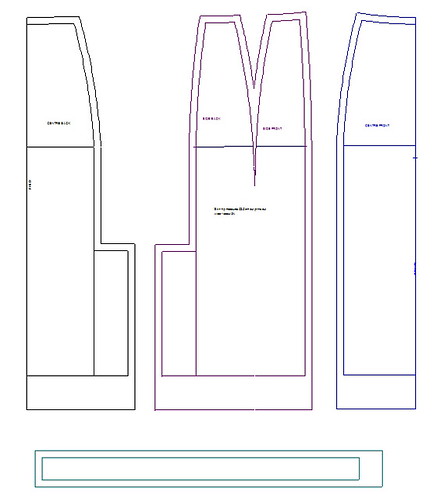
I'm going to morph this waist onto the skirt pattern I developed using PatternMaster Boutique (PMB).  I've already made this pattern in at least 4 different versions and it will lend itself to this waistband very well, since the PMB skirt has princess seams.  Here's a pic of one version of the pattern.

This skirt had only side front and side back seams - the princess seaming and a deep side dart took care of my low curves. 

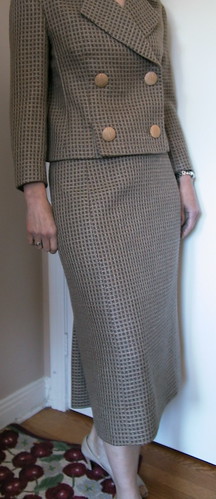
Here it is in action - the fit is the best I have ever achieved (which is why I've used this base over and over and over).

This particular version was long but for my current project I'm shortening to knee length and pegging the hem slightly. 


So here's my question for all you gurus out there.  Since the waistband on my skirt-in-progress is high, should I bone it to keep the high waist from collapsing?  I have some spiral steel boning (4" length) which I bought for a song at Dressew when last in Vancouver.  The seams in the waistband are longer than 4" but I thought perhaps I could make channels that end 4" down from the top of the waistband.  I would use an inner layer made of something substantial so the channels won't be seen on the outside.  What do you think of that idea?  If I do it, should I place the boning at the side-front and side-back seams or at the actual side seams?  The Sewing Lawyer is a bit embarrassed to confess that she has never ever sewn a garment with boning in it before and this seems like a possibly-good experiment.  If it won't work or you know of a fail-proof trick for making it work, please speak up!