Monday, May 19, 2014

Because, really I don't already have enough hobbies?

Way back in the mists of time I purchased a very elderly knitting machine.  It's a Knit King M3, according to a Ravelry discussion thread.  (The manual has no model number anywhere, but rather quaintly starts out "May I introduce myself?  I am KNITKING.")

I made exactly one sweater on it before putting it away for about 25 years.  In the younger Sewing Lawyer's usual fashion, the sweater was (a) without any instruction on the use of the knitting machine and (b) multi-coloured. This machine, my friends, is completely and utterly manual.  I can hardly believe I did it.
Behold.  (Yes, it's rather loud.)  I made it from many colours of Regia sock yarn.

My son (not born when it was made) has appropriated it for his own, and claims to even wear it occasionally.  

Some years later, I found another only slightly less elderly knitting machine at a yard sale.  I forget how much I paid but it wasn't more than $20.

Into the closet it went with KNITKING.  Until something prompted me to get them both out a few weeks ago.

Here I was on Friday night with my "newer" knitting machine, a Studio SK-303.  It's only slightly less manual - it has knobs that select certain needles.

I managed to turn out a credible sample by going through the manual.  I now have plans to make a much plainer lightweight merino sweater for my husband.  Stay tuned.

In the meantime, I finished my hand-knit project.

It's a very luxurious blend of baby llama and mulberry silk.  The pattern is Windswept and all details are on Ravelry. It was a pretty fun knit, all things considered.  Since it is made top down I was able to weigh how much yarn was left after I had completed the body, so as to confidently make the sleeves as long as possible.  I got to 8", which isn't too bad, even using most of my unravelled swatch.

Too bad I'll have to pack it away until fall - it's a bit woolly for summer.

Friday, May 2, 2014

Knitting progress

I've cast off the body as you can see at left.  This is shorter than the pattern intended - I like this length for a close-fitting top.  And besides, I didn't have enough yarn to make it longer AND have sleeves.

I shaped the body by decreasing at the sides rather than next to the lace panel.  I'm happy with the fit.

I used a new (to me) stretchy cast-off.  It's called (not surprisingly) "Elastic Bind Off" and it's one of the stretchy ways to finish off your knitting in the book Cast On Bind Off - 54 step-by-step methods by Leslie Ann Bestor.  I'm impressed with this method.  It's easy, and produces a very smooth and neat edge which is, as advertised, pretty stretchy.

After finishing the body, I weighed the yarn and have exactly 60g left, which means I can use 30g for each sleeve.  I'm guessing they will be at least elbow-length.

Ravelry page is here.

Sunday, April 27, 2014

A freebie

I knocked off this little skirt from the minimal remnants of the grey ponte that I used for last week's pants.

The most remarkable thing about it, really, is that it's one of the patterns from this very month's Burda Style Magazine.  Such up-to-the-minute creation is rare in these parts.

The pattern has two versions - a micro-mini skirt and a more modest knee length view with a self-fabric tie belt.  Mine is somewhere between due to fabric shortage.  The need for ingenious cutting out of about 65cm of fabric meant that the high waist had to be lowered and the hem is all but non-existent.  But 10cm above the waist would have been too high anyway (my waistband is 5cm).  As for the hem, I'm seeing how long 1/2" steam-a-seam, without stitching, will last.

The pattern is designed for woven fabrics.  I should have cut a size smaller.  I did a lot of in-progress fitting to get the waist and hip curve right.

Other than that, the only change I made was to turn the separate pockets into a single kangaroo pocket, which you can see from this inside-out shot.  I used a remnant of woven cotton to reduce bulk (and because I had no extra fabric).  I used the same cotton (interfaced) for the waistband facing.

Monday, April 21, 2014

Grey.

There's an extremely elegant knitter on Ravelry who has the most lovely white hair and knits a lot in grey.  It looks fabulous.  For many years, I never even considered wearing that "colour" (if it really is one).  But recently I've taken to it.

I have made two grey suits - the Akris knock off from the summer of 2011 and my most recent tailored creation.  I'm enjoying both of them quite a lot.


And now The Sewing Lawyer has made another pair of comfy but hopefully not unattractive stretch pants in ... grey.

They are the same as the black ones.  Which I wear all the time.

So far I have had them on three days in a row, including for two very serious meals.  They remained very comfortable throughout.

And, in knitting news, I'm working on a grey top!  It's the Windswept Pullover.  I will keep knitting until my yarn runs out. I only have 300g of my yarn, which is 70% baby Llama and 30% Italian mulberry silk. (Yum!) I'm going to block it so the lace panels along the neck line lie straight.

Stay tuned to find out if it will have short or 3/4 length sleeves.  Ravelry notes are here.


Sunday, April 6, 2014

Baby hems done - voilĂ  a completed silk blouse

After posting yesterday, I gave myself a talking-to and just finished those baby hems.  It didn't take very long.  Of course.

I posted a review on Pattern Review, where you can read all about the things I did differently and what worked and what didn't.  But here's the bottom line:

Spray starch.  It works.


It tamed the shifty static-prone and flimsy silk like nobody's business.  It made making this top (complete with French seams, continuous lap placket, bias collar and baby hems) a piece of cake.


I managed to find perfect buttons in stash. They are a bit like gold nuggets. Closed with teensy bias loops, which would actually have been impossible to sew without my friend spray starch.

And the entire ensemble.  Don't ask me why my camera refused to focus for this one.

And the weather may finally be warming up.  For once, The Sewing Lawyer's latest project is going to be seasonally appropriate!


Saturday, April 5, 2014

Mitred hems made easy

Working for a living has its good and bad features.  On the plus side it provides an income with which to purchase fabric, patterns etc.  And it gives The Sewing Lawyer a venue in which her custom-made suits, dresses and other items of clothing can be worn.

The negative of course is that working full time means The Sewing Lawyer has less time for sewing and knitting and ... blogging.  Even though the skirt to match the latest jacket creation was in fact complete before work resumed (3 weeks ago) and this blog post planned well enough that all the in-progress photos were taken, life intervened and you all had to wait.  I'm sorry about that.

The skirt is really profoundly uninteresting as a fashion object.  It's made from the same OOP Vogue pattern as the skirt in this post.  Except I did not shape the waistband so it's even plainer.  However it makes a good foil for the jacket and someday, I promise pictures of the entire ensemble along with the silk blouse to match that is stalled and waiting only for its baby hems.

In the meantime I offer a photo tutorial on mitering corners.  It's my preferred method for a super-neat finish on a skirt with a back slit, but it can be used any time you have to sew a corner where two folded or faced edges, such as the slit facing and the skirt hem, meet.  No pattern fudging required; you do it on the fly.

Start by pressing the facings that are going to be mitered.  At right is the inside of my skirt hem at the CB.  I've made sure the corners are exactly in line.

Next, mark on each fold separately the point where the inside edges of the two facings intersect.  In the photo at left, I've done this with pins.


Unfold the edges, and refold with right sides together so that the pins meet.  As you can see in the photo to the right, the pressed corner is exactly on the fold line.  That is where you want it to be.


The line between the pins and the pressed corner is your stitching line.  Mark it.

Sew along the line.  Do the other side of the slit.  Then turn the corners right side out and press.  I find that I do not need to trim away the parts of the facings that are  inside the mitered corner, unless the fabric is very bulky.  On this skirt, they fit in there very neatly and give weight to that part of the hem.


Saturday, March 15, 2014

Burda 7576 jacket ... done and dusted!

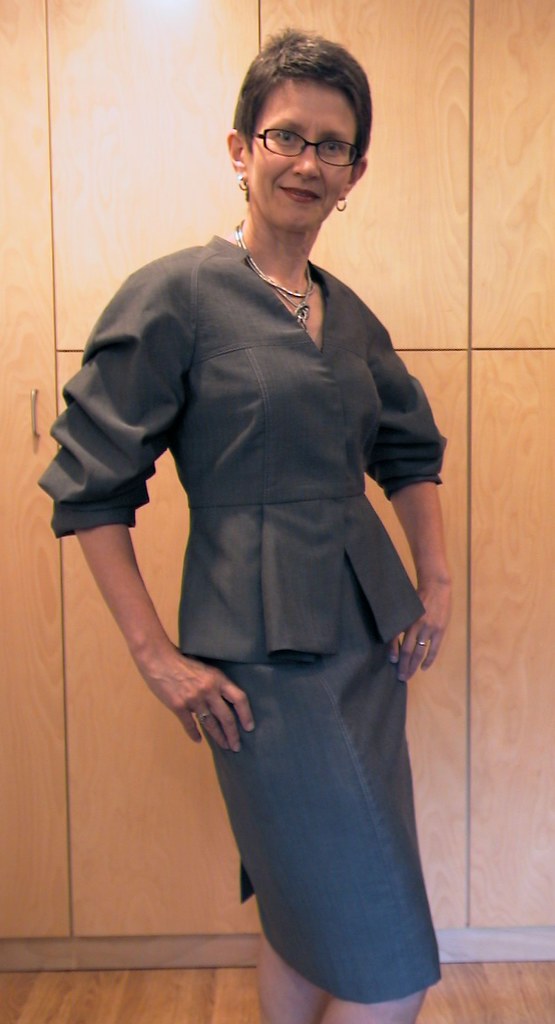
The Sewing Lawyer totally failed to comply with her self-imposed schedule for her five weeks of leave.  However, she did finish this jacket.


And the skirt is underway and will be wearable pretty soon.  But not yet, which is why I am modelling this with jeans.

Blouse and lining fabric
As for a new top ... well, time will tell.  I purchased the silk chiffon (or maybe it's georgette, I never know the difference) in Hamilton when I was there last month.  It coordinates beautifully!

I'm in search of a simple pattern, and might even use the top from Burda 7576.  But I'm not sure about the high neck.

More details.

I made numerous fitting adjustments to this pattern based on what my muslin told me.

  • To adjust for my narrow frame (which seems to be affected by my constant seated-at-the-computer posture i.e. my shoulders roll forward making my front narrower than my back), I took 7mm (.25") of width out of the front shoulder.  I pinned the excess fabric out of the muslin and then slashed the pattern tissue in that area, overlapping it and slashing as needed.  This sounds very sketchy, but it actually works.  
  • For the same reason I took a horizontal wedge out of the jacket front above the bust, reducing the length at CF but leaving the side length undisturbed.  The wedge measures about 1cm (3/8") at CF.  In sewing, I reduced the length in this area further by easing the front fabric to a fusible tape along the roll line (i.e. the tape was about 1cm shorter than the roll line).  
  • I lowered the bust dart by 2.5cm (1").  
  • Like other reviewers, I wanted 2 buttons instead of a single one.  I adjusted the roll line and moved the under-lapel dart accordingly.
  • You already know that I blunted the extreme corners of the collar and lapels.  I brought the points in by 2cm (.75").  
  • I added width at the waist.  This was a surprising fitting issue for me.  This jacket has very little or possibly no ease built in at the waist.  
  • I flattened the curve of the back peplum to adjust for my flat seat.  I took a 1cm wedge, i.e. reduced the hem length by a total of 2cm but leaving the waist seam the same length.
  • I ditched the extreme cuffs on the sleeves.  In sewing, I decided the sleeves were a little floppy so I narrowed the front sleeve seam by bringing in the curve approximately 1cm at the elbow level, bringing the new seam line back to the original location at the hem and armscye.  
Lined to the hem

  • I lengthened the peplum by 2.5cm (1").  
What else?  In sewing, I did the following things not instructed by the pattern:
  • I did not cut the side pieces on the bias.  I couldn't see why the pattern called for this.  The corresponding lining piece is identical but cut on the straight grain.  I didn't want the visual distraction of the bias panel.  
  • I added a back shield as you have already seen.
  • I interfaced the peplum and sleeve hems with my softer interfacing.  
  • I made a chest/shoulder shield from the pattern pieces, and a sleeve head, all cut from one layer of cotton quilt batting (this technique is illustrated here).  I also installed shoulder pads. 
  • Peplum lining - in progress
  • I cut the peplum lining the same length as the peplum pieces and lined the peplum to the edge with a normal seam allowance.  
  • The order of sewing the body lining was:  First, construct the body pieces and peplum pieces separately.  Second, sew the two together near the front edges, but leaving most of the seam open.  Third, sew the lining to the facing in a continuous pass.  Fourth, sew the lower edges of the jacket and facing/lining together.  Fifth, sew the upper edge of the peplum lining to the waist seam allowance, making sure it all lies smoothly.  Finally, attach the bodice lining at the waist by hand.  
Everything, down to the buttons and thread, came from my extensive stash.  The bemberg satin lining was left over from a dress I made quite a few years ago.  I had enough for the jacket body and skirt.  I cut the sleeve lining from striped bemberg, also in stash. 

The buttons were purchased at (I think) Button Button in Vancouver many many many years ago.  

That's about it.  Stay tuned for the next piece.  
 

Sunday, March 9, 2014

Sleeve cap ease

Sleeve cap ease is bogus?

I don't think so.

The geometry is simple. Imagine that the boxes in the diagram at left are a small check pattern in a woven fabric.  The sloped sleeve cap seam line within one rectangle in this checked pattern (line A) is slightly longer than the more vertical line of the armscye seam line in the same sized rectangle (line B) even though they both cover the same vertical distance.

The sleeve cap seam line must be made shorter (eased) so that the horizontal lines in the check can match in the finished garment.   If there was no ease at all, the stripes would not match because the distances between them along the seam lines in the two differently-shaped pieces are different!

(Sorry for the klutzy diagram; someone equipped this struggling neophyte with a vector drawing app.)

The proof of my theory is that I can ease a sleeve into an armscye and yet match the horizontal stripes perfectly (or as close to perfectly as matters based on the six foot rule).

True enough, you don't need a lot of ease.  But you have to have some to match horizontal lines in a checked woven between the garment body and sleeve cap. Happily, Burda 7576 seems to have just the right amount of sleeve cap ease.

I basted the sleeves of my muslin on the jacket body and then marked them up to assist in placing the pattern piece on my fabric, in much the same way I did in this post.

Once cut out of the fashion fabric, the sleeve cap is supported with a lightweight fusible interfacing, and eased using a bias-cut strip of wool.

The verdict?  The horizontal matching is pretty good, but I still haven't figured out the vertical.  Close though...


Friday, March 7, 2014

Matchy matchy

Sometimes The Sewing Lawyer actually remembers to use those neat tips and tricks she has heard or read of, or even possibly dreamed up independently in the long-distant past.  Here is one of those.

Waaaay back in 2006 I made a jacket out of fabric that had a little woven pattern.  It was so tiny that it was basically impossible to cut the pieces so they would match, but nevertheless I decided it would look best if it matched horizontally at prominent seams.  I cannot remember where I came up with this idea (or if I got the idea from someone else) but I wrote a PR tip that even got published in Deepika's book (1,000 Clever Sewing Shortcuts & Tips).  It's tip #742 on page 115, if you have the book.

Today, I was trying to figure out how to match the lines in my fabric at the seam between the bodice and the peplum.  Of course, it is impossible to match everything but I had attempted to cut the peplum so it would match vertically and horizontally at CF and CB, where both pieces are on a straight grain in both directions.  However, when I provisionally pinned the pieces together in the conventional way (lining up the cut edges), I discovered I hadn't done such a great job.

My first problem was that I had to re-sew the CB seam in the jacket bodice near the waist/peplum seam so that it would lie exactly in the middle of a square and match the peplum, which has no CB seam, horizontally.  The second problem was that my cutting was off vertically.

Then I remembered this tip.  I'm happy to report that it worked even better today than it did in 2006.  Here it is, for you to use.  That is, if you remember it when you need it.

Start by folding back and pressing the seam allowance on the lower edge of one of the pieces you want to match (here, the jacket bodice).  Make sure that the folded edge looks right in relation to the pattern.  My goal was to have the seam at the same point in the pattern on each side of the jacket at key points (like the side front and side back seams, and both front edges).  I think that as long as you make a good effort in cutting to keep the pieces symmetrical in relation to the pattern, the tiny variations in the width of the SA that may result from this are not that important.

Then lay the pressed edge over the other piece (here, the peplum), and pin them together from the outside through all layers so that they match.  At left is the back.  If you click on the photo you can see how the matching is done.  I started at CB and pinned outward from there, matching the lines vertically and horizontally until the curve of the peplum took over, and then keeping the seam line at the same point in the check pattern of the peplum on either side.

In doing this I pretty much ignored the 5/8" seam allowances on the peplum edge.  The visual symmetry seems more important to me, and I can keep the peplum of a constant width by adjusting the hem line later.

Then, I went to the sewing machine and sewed the pieces together from the right side, using a zig zag stitch that is centred on the seam line.  You can see my stitching was 2.5mm in width and 3.0mm in length.  The goal is to have the needle piercing the folded edge (the jacket bodice) on one side but only the flat piece (the peplum) on the other.  You can do this by eye, but I used a presser foot that has a blade lined up with the needle (I think it is called the narrow edge foot).

Then check your results.  I ripped out some of the stitching where the matching wasn't to my liking, and re-sewed.  Once I was satisfied, I flipped over to the wrong side and unfolded the bodice seam allowance.  The zig zag stitching will allow the piece to lie flat, but the fold and (if you are lucky) a dotted line from the zig zag stitches are both visible.  Sew along the fold, over the visible stitches.

Finally, rip out the line of zig zag stitches.  Now it would have been better if I had researched my tip BEFORE I started because I overlooked one point that would have made this easier:  for the zig zag stitching, use thread of a contrasting colour!  Oh well.

Front - the pocket flap also matches

Back


Behold the results.

Thursday, March 6, 2014

Moving right along

I have to go back to work in a week and a bit.  This reality has pushed me to up my rate of creative output. Remember Burda 7576?

Well, I finally started it.  Now it looks like this:


More or less (I later sewed the side back seams).  But the point is - I did the collar and lapels!  A big step, as anyone who has made a jacket will attest.

By the way, I did reduce the size of the collar and lapels but not as much as I was toying with in my previous post on this jacket.  In the end, I was convinced by my friend G that big lapels would make the jacket.  However, they were so out of proportion on me.   I compromised, and brought the points in by 3/4" (2.8cm).  

The construction is interesting.  The jacket has a dart under the lapel.  Its function is to help the lapel (front facing) roll properly over the under collar (jacket front).

See how the dart continues into the seam between the jacket front and undercollar?  That is a neat feature.  To attach the under collar to the jacket body, you first slash the upper inch or so of the dart, then sew the collar end to the lapel at the gorge line (starting and stopping at the seam intersection point rather than the cut edge).  This is the blue line in the marked up photo on the right.  Then you sew the seam that starts with the dart point, goes around the back neck, and ends at the dart point on the other side.  (I actually sewed the darts first and then joined them to the collar seam; it seemed safer somehow.)  This is the pink line in the marked up photo.

Other info.

To assist me in maintaining complete symmetry, as well as in plaid matching, I cut the bodice pieces single layer.  I left the pocket flaps and sleeves to be cut later once I could see how the bodice was shaping up.

Front interfacing
This is a quick fusible tailoring project.  I used a weft insertion interfacing for the entire front and under collar, and cut an extra layer for the lapel and the collar stand.  You can (maybe) make these out in the next photo.

I used a softer fusible for the facings, upper collar, and side piece.

Back shield
The back is not interfaced, but I decided it needed a little something to beef it up in the shoulder/back neck area.  I used some leftover wool from this dress to make an upper back shield.  I sewed it in by hand because I had already sewn the shoulder seams and installed the collar by the time I decided it was needed.  I got the idea to install the shield in two independent pieces that overlap somewhere-or-other.  It's cut on the bias.  It does help pad the upper back in a nice way.

So far my plaid-matching plans are working out.

More later.