
Wednesday, March 5, 2014

Tuesday, March 4, 2014
Just this.

As I mentioned here, the yarn is a blend of cashmere (8%), merino (47%), polyamide (15%) and viscose (15%) in an aran weight. The pattern is from the winter 2012 edition of Twist Collective. The colour is dark green, not blue as appears in this picture. More knitting info on Ravelry.
As a sewing audience, you may be interested in the modifications I made to the shawl collar. This is knitted on by picking up stitches all the way from the hem on one side, past the lace yoke, around the back, and down the other side. The pattern states that one knits in k2p2 rib for 3.5", then the fold over shawl collar is shaped by knitting short rows.
For the uninitiated, knitting short rows adds length and shaping by going back and forth on less than the full row. There is an exceedingly good description of the theory of short rows on the TECHknitting blog (which I highly recommend for all sorts of useful knitting information, copiously illustrated and clearly described).
Anyhow the short rows called for in the pattern started around the back of the sweater (even with the outer edges of the ribbed panels on the back) and moved outward slowly (by 2 stitches per row) so that the back width of the collar would increase radically before one got to the intended stopping point for the short rows. The result was a collar that was very high at the CB. I calculated that the collar would be a total of 57 rows high at CB (about 9"). I also thought the collar was a little loose-looking at CB, i.e. it does not hug the neck at all.

 At the same time, the collar looked rather skimpy from the front. (These images are from the Twist website.)
My modifications aimed at moving the starting point for the short rows towards the front, to keep the collar visually wider from the front, and to lengthen the collar more gradually.
I also snugged the back neck in by decreasing stitches in a band in the centre back.
 Here is a picture of my modified collar.

Monday, March 3, 2014
Proud as a peacock?
The Sewing Lawyer cannot resist making a (bad) pun considering that her latest sewing creation is made from fabric featuring a peacock feather motif. I think it may be Liberty, it's certainly a beautiful lightweight wool. My husband, the intrepid thrifter, found it for me for a song. I had enough, carefully avoiding the moth holes, to cut out this BurdaStyle shirt pattern.

 Voila. My version (sans umbrella).
I think it looks OK with my recently-completed tweed skirt. This is another view from the versatile 1990s Vogue Basic skirt pattern (#1762) that I also used for my white linen summer skirt. The tweed is left over from my Donegal tweed cape project. Including the lining, although using the leftover scraps necessitated some creative cutting!
Anyhow, the shirt. I made this up in the smallest available size (36), and the fit is tolerable although slightly loose. I took the side seams in a bit. It looks bigger/looser from the back.
.jpg)
 I didn't have enough fabric to actually match the pattern across the front, but it is mirrored, more or less.
Hmmm - what else to say?
If you noticed that the bottom button looks different, give yourself a pat on the back. I chose small metal domed buttons with a shank, but picked a flat button for the lowest position so it would be less visible when I tuck the shirt in.
 The sleeves are finished with a tiny little band. It's about 1cm wide. Burda thought I could sew a buttonhole in that. Hah! I made a thread loop instead. Much easier! (See klutzy video how-to here.)
Next appearing on this blog will be my just-completed Ratana cardigan. But it's still damp from its washing/blocking.
Voila. My version (sans umbrella).I think it looks OK with my recently-completed tweed skirt. This is another view from the versatile 1990s Vogue Basic skirt pattern (#1762) that I also used for my white linen summer skirt. The tweed is left over from my Donegal tweed cape project. Including the lining, although using the leftover scraps necessitated some creative cutting!
Anyhow, the shirt. I made this up in the smallest available size (36), and the fit is tolerable although slightly loose. I took the side seams in a bit. It looks bigger/looser from the back.
I didn't have enough fabric to actually match the pattern across the front, but it is mirrored, more or less. Hmmm - what else to say?
If you noticed that the bottom button looks different, give yourself a pat on the back. I chose small metal domed buttons with a shank, but picked a flat button for the lowest position so it would be less visible when I tuck the shirt in.
Next appearing on this blog will be my just-completed Ratana cardigan. But it's still damp from its washing/blocking.
Friday, February 21, 2014
I'm also knitting...
My Ratana cardigan continues to grow.

 The lace sleeves were a giant pain but the ribbing is going quickly in this thick aran-weight yarn.
I have decided to make a slightly shorter cardigan as I like the higher-hip length on me.
If you are curious, the safety pins are an easy way to count rows.
I am almost finished the lower ribbing. The collar and front edges (more 2x2 ribbing) will complete the garment.
The lace sleeves were a giant pain but the ribbing is going quickly in this thick aran-weight yarn. I have decided to make a slightly shorter cardigan as I like the higher-hip length on me.
If you are curious, the safety pins are an easy way to count rows.
I am almost finished the lower ribbing. The collar and front edges (more 2x2 ribbing) will complete the garment.
Golden time to sew
I work for an enlightened employer - one of the benefits we are offered is to take leave (unpaid) for five or more weeks. The reduced salary is then averaged over the entire year. Having felt for the last few years that the main commodity I am missing in my life is time, I finally decided to sign up. I'm currently in my second week of a five-week leave. My original plan was to be very active - skiing, swimming and curling - but I find to my frustration that I am still recovering from a fall in January so have had to take it a bit easy.
The silver lining is that I have time to create, while still being moderately active. And the Olympics are on!! So my set up for this afternoon is ...

The men's hockey semi-final game against the US is on. At the moment of writing (end of the second period) Canada is up 1-0.
This after the women's gold medal curling match yesterday (Canada's Jennifer Jones continued her perfect record by winning over Sweden) and the men's game this morning, which Canada's Brad Jacobs won handily after only 8 ends against Great Britain (Scotland, really).
Go Canada Go!!!
By the way, I am working on a shirt (blouse?). It's this pattern from the September, 2012 issue of BurdaStyle Magazine.


 I know it's wool because I had to cut carefully to avoid the moth holes. (And because it washed beautifully and presses like a dream.)
The silver lining is that I have time to create, while still being moderately active. And the Olympics are on!! So my set up for this afternoon is ...
The men's hockey semi-final game against the US is on. At the moment of writing (end of the second period) Canada is up 1-0.
This after the women's gold medal curling match yesterday (Canada's Jennifer Jones continued her perfect record by winning over Sweden) and the men's game this morning, which Canada's Brad Jacobs won handily after only 8 ends against Great Britain (Scotland, really).
Go Canada Go!!!
By the way, I am working on a shirt (blouse?). It's this pattern from the September, 2012 issue of BurdaStyle Magazine.
My fabric is a lovely lightweight wool - I think it's a Liberty print. (It was a thrift store find - my husband's very good at finding me quality fabric!)
I know it's wool because I had to cut carefully to avoid the moth holes. (And because it washed beautifully and presses like a dream.)
Gotta go ... the third period has just started.
Saturday, January 4, 2014
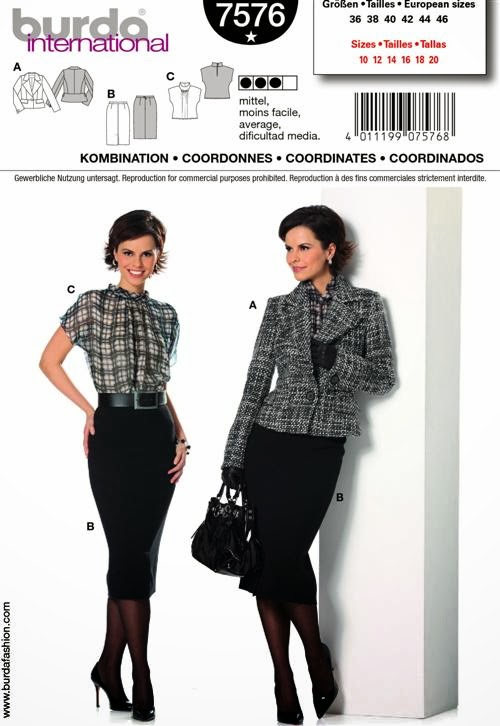
Holy lapels, Batman!
This, people, is a muslin of Burda 7576.
 My alterations To Do List (in no particular order):

 So I changed gears. I am now making this. It's Ratana by Carol Feller. I plan for mine to have more of an overlap so I won't have to clutch it to myself, as the model is doing.

The back is quite lovely too.
This pattern calls for aran weight yarn, which is what I have. The other patterns call for worsted weight, which is a smidge lighter.
 Here's an in-progress shot of the back and right sleeve. After I wash the oil out of the yarn, it will be a lot fluffier. The lace pattern is not exactly a relaxing knit, but the rows add up fast enough.
My alterations To Do List (in no particular order):- lower bust point
- increase waist circumference slightly
- shorten bodice above waist by about .5"
- shorten sleeves (get rid of ridiculous pointy cuff objects)
- further reduce length at CF by folding a horizontal wedge from nothing at armscye to approx .5" at leading edge of lapels
- lengthen peplum by about 1"
- reduce overall size of collar and lapels
It's looking better already, even though I've only pinned out some of my planned changes.
In other news, thank you so much for your input on my next knitting project. I tallied the votes and swatched away with my chosen yarn and realized that it was too thick for both of the leading candidates!
So I changed gears. I am now making this. It's Ratana by Carol Feller. I plan for mine to have more of an overlap so I won't have to clutch it to myself, as the model is doing. This pattern calls for aran weight yarn, which is what I have. The other patterns call for worsted weight, which is a smidge lighter.
Here's an in-progress shot of the back and right sleeve. After I wash the oil out of the yarn, it will be a lot fluffier. The lace pattern is not exactly a relaxing knit, but the rows add up fast enough. Sunday, December 29, 2013
Swatching
Carpe diem, as they say. Since Adam's Rib and the Sunburst cardigans are more or less tied in your voting I decided to go to the next step before deciding finally. (Though one commenter suggested I could "whip up" both of them, the pace of my expected progress means I really must choose one...)

I have therefore spent some of my day making a swatch, the phase of any knitting project that follows provisionally choosing a yarn and a pattern and precedes some critical decisions. For non-knitters (and some knitters) this seems to be a tedious and useless task that serves only to use up some of your precious time and materials, producing a scrap of fabric that is good for exactly nothing.
They would be wrong. Swatching is a highly educational step that tells you the answers to some or all of the following questions:
- How do I make this stitch pattern?
- Do the recommended needles, with my yarn, produce the gauge (the number of stitches and rows in a square of knitted fabric) that will allow me to knit a garment from this pattern that will have the right dimensions?
- What are the characteristics of the fabric that I can make with this yarn on these needles, following the stitch pattern?
- Do I like the results?
- How does the fabric change, if at all, after I wash it?
The last question is of particular importance with ColourMart yarns, since they are oiled for machine knitting and can change quite a lot after washing removes the oil and the yarn "blooms".
So here is a photo of my unwashed swatch. This is the stitch pattern from the Adam's Rib cardigan plus some stockinette. I made some mistakes in the stitch pattern, because the chart was a little unusual. However by working through it I can see what the pattern is supposed to look like, which will help me knit it correctly when (if) the time comes.
Unwashed, the yarn feels dry and the ribbing is a little crunchy. I hope that will wash out and the swatch will become more drapey. I wouldn't want a wrap cardigan that is as stiff feeling as this swatch.
The good news is that the unwashed stitch pattern is almost exactly the size that it should be for the Adam's Rib cardigan.
Saturday, December 28, 2013
One more to vote on
The voting on my last post is interesting because it's so clearly pointing to one design - the Sunburst cardigan. A reminder - it's this one:


Some comments are giving me pause, especially my wise cousin who notes that it's more gimmicky - well, she actually said I'd probably get sick of it faster than other, presumably more classic, designs. Good comment! But I love Sunburst too.
The thing is, I left one possible design out of my line-up! I want you to tell me what you think of this one:
Adam's Rib by Carol Sunday
I would make it shorter.
Opinions, please!
Vote on my next knitting project
The Sewing Lawyer clearly needs help. She is dithering. There are 1350 yards (1240 metres, more or less) of a lovely dark blue-greeny yarn, aran weight, in stash. Its composition is 8% cashmere, 47% merino, 15% polyamide and 30% viscose. It needs to be a cardigan. Would you choose:


Little Wave by Gudrun Johnson


Girl Friday by Mercedes Tarasovich-Clark
Burdock Cardigan by Maura Kirk
Or
Sunburst Cable Cardigan by Erica Patberg.
There is enough yarn to make any of these. Tell me what you think!
Friday, December 13, 2013
Keeping the kid's head warm
I'd like to say that I've been too busy sewing to blog, but it would be far from the truth. However, I have just finished a project and I'm so pleased with it that I am presenting it publicly to you, even before I give it to its intended recipient for Christmas.

It's a shearling trapper's hat.
 I had a skin of lamb shearling and a finished hat to use as a model, as well as all the information that could be gleaned from the pictures of the various versions on the www by UGG, among other vendors. They're expensive, these hats!
 So I made a pattern, and then I made a "muslin" using some leftover very thick Berber style fleece fabric, and then I made a hat.
And because of some online interest when I posted an in-progress shot of this hat on Facebook, let me try to give you the pattern so you can make your own.
I tried to take the photos of the pattern pieces from straight above, but if I messed up, you can use the 1" square grid of my cutting board for guidance. (Click on any picture to make it a lot bigger.)
Sizing
The Pattern
Centre Crown - This piece started life as a rectangle measuring 7.25cm (2 7/8") by 31cm (12 1/4"). As you can see, I added some shaping by slashing it in 4 places and spreading to add 1cm (3/8") at each point.
You need two of these.
Side Crown - To complete the crown of the hat, cut two of these side pieces. The important measurements are the base of 19cm (7 1/2"), the height of 11cm (4 3/8") and the outer curved seam line of 31cm (12 1/4") which is identical to the length of the concave edge of the centre piece of the crown. Curve the ends of the base up slightly as you can see in my photo.
By the way the seam allowances shown in the photos are 1cm (3/8") . No seam allowances are needed along the lower edge of the ear flap piece or the outer edge of the brim if you are using shearling leather.
Lower Back/Ear Flaps - This piece measures 46cm (18 1/8") along the top edge. The flap is 20cm (7 7/8") deep at the longest point (measured from the seam line) and 7.75cm (3") deep at CB. The upper edge is very slightly curved by slashing in two places and overlapping the tissue by approximately .6cm (1/4"). You could overlap more, in which case you might not need the elastic I added at the lower CB to cinch the hat in at the back neck.
Brim - Finally, you need a brim. The base should be the difference between the complete bottom circumference of the crown, minus the top length of the ear flap piece. In other words, it should completely fill the gap at the front of the hat from ear flap to ear flap. Add a bit for insurance. As you will read below, I had to do some fudging to fill in a little gap. The height of the brim doesn't matter so much. Mine is about the same as the side crown pieces.
Sewing Tips
I referred to an article in Threads 104 (January 2003), p.42, on sewing shearling.
I used ordinary thread, and had the best luck with a jeans needle. Lighter needles caused skipped stitches.
Mostly I used a 3mm stitch length.
To topstitch, cut away as much of the fleece as you can in the seam allowance of the side that is being turned under, to reduce bulk. You can topstitch on either side of the seam or (as I did) fold both seam allowances to one side. If your topstitching will cross intersecting seams (i.e. the seam attaching the ear flap piece to the crown) do additional trimming to reduce the bulk of 7 layers at these seams.
If you have a Teflon presser foot, so much the better. I don't and my topstitching is less than even.
Uneven stitches are happily quite invisible. They sink into the leather and totally disappear in the fleece. To further hide the stitching in the fleece, use an awl to pull the hair out of the stitching and fluff it up around any stitching.
This hat took less than one lamb skin and scraps of lamb leather.
Sewing Instructions
1. Sew the two centre crown pieces together along the outer convex curve. This seam runs up the CF, along the top of the head, and down to CB. Topstitch this seam.
2.Sew the crown side pieces to the crown top. Topstitch, folding the crown pieces under (i.e. toward the top of the crown).
3. Make the brim. Because I wanted the brim not to be limp, I cut one layer from shearling and one from some leftover lamb leather that I interfaced with fusible weft interfacing (use clean paper as a press cloth, normal heat and NO steam).
Sew the shearling and the interfaced leather together along the rounded edge, WS together. I added a nice leather edging to the outer edge of the brim by cutting a strip about 2.5cm (1") wide, sewing it (stretch slightly) about .5cm in from the edge, and then wrap it around and sew in the ditch more or less.
4. Sew the lower edge of the brim to the front of the hat, centring it at CF. The seam allowances are between the brim and the outer front of the hat.
5. Sew the ear flap piece from the edge of the brim on one side to the other, centring at CB. The seam allowances are inside the hat (you need to clip the crown seam allowances at the point between the brim and the earflap on each side).
If you have a gap between the brim and leading edge of the ear flap (I did) you can fill it in nicely by sewing a strip of fleece (hair side out) around the leading edge of the flap. To do this, sew the strip to the flap, leather sides together, with a zigzag stitch (about 2.5mm wide). Sew at the extreme edge for a very narrow seam, with the zigs in both layers of leather and the zags falling off the edge. Then fold the strip back and around to the outside of the flap. Stitch it down at its very edge to the ear flap, using the same zigzag stitch.
 6. Trapper hats are usually made so that the ends of the ear flaps can be attached to each other, holding them up on top of or at the back of the head. This can be done with any type of buckle, snaps, or even tie ends. I had some plastic clips in stash. I made two short leather straps to fit and attached one strap to each side of the clip. Sew the straps at the lowest edge of the ear flaps. They need to be just long enough to hold the flaps securely out of the way, but not tightly.
 7. Finally, I cinched the CB in a little bit with some elastic under a leather patch. I used beefy elastic and pulled it in about 2.5cm (1").
8. Tack the brim to the crown of the hat in a few places.
That's it! If you have any questions ask away in the comments. If you make this hat, please post a comment to let me know how it went.
Merry Christmas!
It's a shearling trapper's hat.
I had a skin of lamb shearling and a finished hat to use as a model, as well as all the information that could be gleaned from the pictures of the various versions on the www by UGG, among other vendors. They're expensive, these hats!And because of some online interest when I posted an in-progress shot of this hat on Facebook, let me try to give you the pattern so you can make your own.
I tried to take the photos of the pattern pieces from straight above, but if I messed up, you can use the 1" square grid of my cutting board for guidance. (Click on any picture to make it a lot bigger.)
Sizing
This is a VERY roomy hat, if you make the pattern to the dimensions below. I made it without the recipient available for measuring or try-ons. It is too big so I am spending part of Christmas Day taking it in. For your info, his head measures 23.75” (60cm) and I am reducing about 1.25" (3cm) of width through the seam at CB, tapering back to the original seam line smoothly over the top of the hat.
Definitely the easiest place to take it in (or let it out if you have a truly gigantic head) is the seam at the centre top of the crown. Just remember that if you do this you should divide the amount to take in by 4 and reduce the width of each crown piece by that amount (that is, my 3cm reduction would translate to a narrowing of .75cm on each seam allowance for a total of 1.5cm at CB and the same at CF). I am taking it in at CB only and leaving the front alone because I am not taking the entire hat apart! Of course you will also have to change the length of the ear flap piece at CB and perhaps the brim at CF (though here you can fudge) to correspond.
The Pattern
 |
| Crown - Centre piece - cut 2 |
Centre Crown - This piece started life as a rectangle measuring 7.25cm (2 7/8") by 31cm (12 1/4"). As you can see, I added some shaping by slashing it in 4 places and spreading to add 1cm (3/8") at each point.
You need two of these.
 |
| Crown - Side piece - cut 2 |
By the way the seam allowances shown in the photos are 1cm (3/8") . No seam allowances are needed along the lower edge of the ear flap piece or the outer edge of the brim if you are using shearling leather.
 |
| Ear Flaps - cut 1 |
Lower Back/Ear Flaps - This piece measures 46cm (18 1/8") along the top edge. The flap is 20cm (7 7/8") deep at the longest point (measured from the seam line) and 7.75cm (3") deep at CB. The upper edge is very slightly curved by slashing in two places and overlapping the tissue by approximately .6cm (1/4"). You could overlap more, in which case you might not need the elastic I added at the lower CB to cinch the hat in at the back neck.
 |
| Brim - cut 1 |
Sewing Tips
I referred to an article in Threads 104 (January 2003), p.42, on sewing shearling.
I used ordinary thread, and had the best luck with a jeans needle. Lighter needles caused skipped stitches.
Mostly I used a 3mm stitch length.
To topstitch, cut away as much of the fleece as you can in the seam allowance of the side that is being turned under, to reduce bulk. You can topstitch on either side of the seam or (as I did) fold both seam allowances to one side. If your topstitching will cross intersecting seams (i.e. the seam attaching the ear flap piece to the crown) do additional trimming to reduce the bulk of 7 layers at these seams.
If you have a Teflon presser foot, so much the better. I don't and my topstitching is less than even.
Uneven stitches are happily quite invisible. They sink into the leather and totally disappear in the fleece. To further hide the stitching in the fleece, use an awl to pull the hair out of the stitching and fluff it up around any stitching.
This hat took less than one lamb skin and scraps of lamb leather.
Sewing Instructions
1. Sew the two centre crown pieces together along the outer convex curve. This seam runs up the CF, along the top of the head, and down to CB. Topstitch this seam.
2.Sew the crown side pieces to the crown top. Topstitch, folding the crown pieces under (i.e. toward the top of the crown).
 |
| Leather edging strip on brim |
Sew the shearling and the interfaced leather together along the rounded edge, WS together. I added a nice leather edging to the outer edge of the brim by cutting a strip about 2.5cm (1") wide, sewing it (stretch slightly) about .5cm in from the edge, and then wrap it around and sew in the ditch more or less.
4. Sew the lower edge of the brim to the front of the hat, centring it at CF. The seam allowances are between the brim and the outer front of the hat.
5. Sew the ear flap piece from the edge of the brim on one side to the other, centring at CB. The seam allowances are inside the hat (you need to clip the crown seam allowances at the point between the brim and the earflap on each side).
If you have a gap between the brim and leading edge of the ear flap (I did) you can fill it in nicely by sewing a strip of fleece (hair side out) around the leading edge of the flap. To do this, sew the strip to the flap, leather sides together, with a zigzag stitch (about 2.5mm wide). Sew at the extreme edge for a very narrow seam, with the zigs in both layers of leather and the zags falling off the edge. Then fold the strip back and around to the outside of the flap. Stitch it down at its very edge to the ear flap, using the same zigzag stitch.
7. Finally, I cinched the CB in a little bit with some elastic under a leather patch. I used beefy elastic and pulled it in about 2.5cm (1"). 8. Tack the brim to the crown of the hat in a few places.
That's it! If you have any questions ask away in the comments. If you make this hat, please post a comment to let me know how it went.
Merry Christmas!
Subscribe to:
Posts (Atom)


