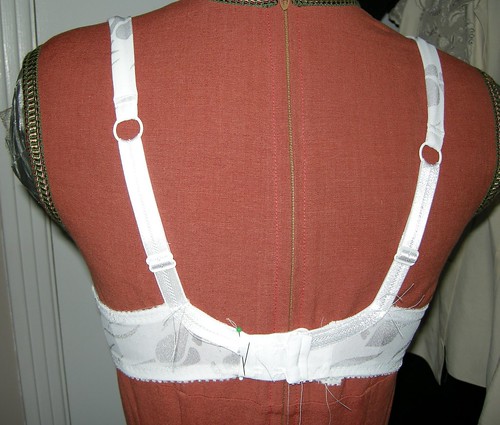
This morning the front was done, more or less, and the back was at the point of paralysis where I needed to know (a) how big around it should be and (b) how long the elastic straps should be. I managed to get it whacked together in an approximate sort of way, but definitely unpickable, so I could try it on.
I'm using one of Beverley Johnson's patterns - "Amanda" of the "Pin-up Girls" line. This pattern uses a foam cup and is pretty similar to some RTW bras I wear. The website says it has dramatic push up effect but that remains to be seen. I also bought the "Sharon" which is a front closing partial-band "demi-cup" style. It's going to be the next one I make.
Let me introduce you to Amanda, finished enough so that I could verify its wearability, and make some informed decisions about band and strap length.

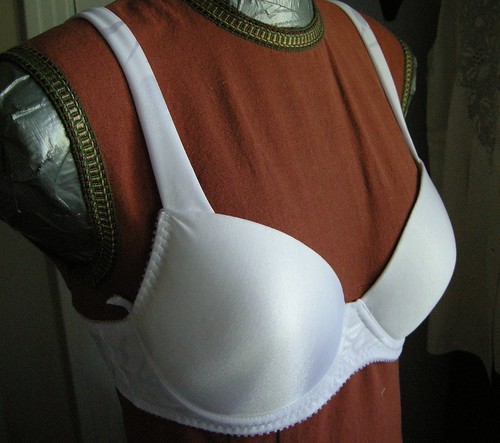 When I was at the store, Beverley turned her practised gaze to my upper half and guessed, correctly, that a 36 cup would be right. She checked the 34 too (what I thought would be my size) and indeed they were noticeably too skimpy.
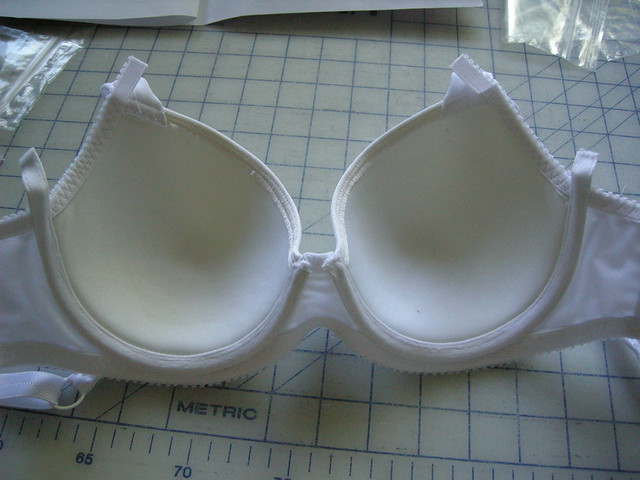
 I did not purchase underwires, thinking I could repurpose some wires from old RTW. Wrong! Do you know what? 34 wires just won't go around a 36 cup. The curvature is definitely not the same. So I bought size 36 wires from Fabricland, but they are too long for this cup, and stick out about 1cm. I am going to have to cut them off and attempt to file/cover/treat them in some way so the ends are not razor sharp.
Below you can see the inner construction. Washable Wonder-tape is an essential tool in attaching the stretchy fabric to the cup. The instructions are very clear and good for this process. The band/bridge piece is stabilized with a very non-stretchy layer (the pattern does not suggest this but I intuited that the piece should be as stable as possible and my fabric had, I thought, too much stretch). The sticking-out ends will be resolved, some time soon I hope.
Sewing a bra is a little tricky but not as intimidating as it may look.
However, the sizing thing is really confusing. All my life I've worn a 34B bra and here I was confronted with a 36 cup. Not only that, but the band size and the cup size can be mixed and matched. I measured myself according to the instructions in the Amanda pattern, the Sharon pattern, and for RTW as described in Beverley's book which I also purchased.
Amanda puts me at 36. In actual RTW I am a 34B. The book and the Sharon instructions put me at 32B (??!!). I know these are just numbers, but for heaven's sake!!
Anyway, there is an error in the pattern. The instructions say to trace the band size according to the cup (36) but with its length based on the under-bust ribcage measurement. They say: "If you measure 75cm (34"), trace the 75/34 line on the pattern size. If you measure 78cm (35"), trace the 80/36."
Okey dokey. I measured myself: 72.5cm around my ribcage. And checked my tape measure which conveniently has both metric and imperial measurements printed on it. 72.5cm is 28.5". I stared at the pattern and the instructions, and then back at my tape measure.
So here's the problem. The numbers in the instructions are wrong in every way. 75cm is not 34", it's 29.5". 34" corresponds to 86.5cm. And these numbers don't match what is printed on the pattern pieces. The pattern piece for size 36 has lines on it which are labelled 70/28", 75/30", 80/32" and 85/34". These number combinations somewhat closer to real metric/imperial equivalents but they are still off by enough to make your bra fit badly. Which number to choose? Accurate metric? Accurate imperial? Measuring the pattern pieces does not help because the bra has negative ease and the band length will be extended by the hook and eye pieces, in some hard-to-verify amount.
To make a long story short, I initially cut the band pieces on the 85/34" line, based on the theory that I could make too-long pieces shorter. Then in construction, I compared the in-progress bra to a RTW bra and got all over-confident and cut the bands down 2 sizes. Then later in construction, I realized the band was sure to be too short, and added a little extender piece at CB on the right side (to which the shorter hook bit will be attached). I figure the extender piece adds back almost as much as I cut out in the over-confident part of this story, and based on my almost-done fitting, I have to take most of it off again. But not all of it, so I still don't know what size I should have cut.
Next time (there will be one; I have another set of the foam cups) I should ignore the numbers and re-trace the pattern piece based on the length I actually needed for this one.
There is a similar dithery story that goes with trying to figure out how long the elastic strap extensions need to be. I won't bore you with the details. However, the principle which is guiding me in relation to both band size and strap length is that the bra will not get snugger as time goes on, all other things being equal. Therefore, I should determine lengths based on what feels reasonably snug but comfortable now, with everything positioned so I can tighten it up in future, if needed.


OH I am SOOO impressed - that's for the tips - I think I am going to wait for a bra-making class - those number completely scare me (among other things!) But I love the result - great job! On with the lace, right!
ReplyDeleteWow, so complicated! But it looks great and it sounds like it works well.
ReplyDeleteI've all but given up on bras - my cup size is far above a B and, from quite a bit of experimentation, I believe that the lingerie materials we can find are not up to the structural challenge of the "above D cup" (36 D to be exact). At that point, you need more leverage than the materials can provide. I'm jealous you'll be able to make a go of this. I'm sure you're going to make some great bras.
ReplyDeleteIf 36 seems to fit you, and you intend to wear this thing, it's worth acquiring some real 36 wires. You can cut and you can try to patch, but even if they don't slice right through your lymph nodes in the first day, you'll still lose the bra pretty quickly..
ReplyDeleteOh, and k-line, you can get exactly the same materials as you'd get in a commercial bra. You just can't get them at Joanne's.. If you're in Canada, bramakers is totally the place to go for them.
ReplyDeleteI love that you are doing all this. I took a bra class with Ann St. Clair last year and love the idea of making my own bras. What I hate is the stitch she has you sew them with - they look so "made with loving hands at home". Yours, however, do not. What stitches are you using to construct your bras?
ReplyDeletethank you. g
This style of custom bra is the only one I'd consider wearing. Very nice work so far!
ReplyDeleteYour bra looks great! I hope it fits well too. I too am confused by metric vs imperial bra sizes.
ReplyDeleteTo finish the cut end of your underwire, maybe treat it as you would a steel bone. I've heard of fingernail polish or electrical tape. Some sort of waterproof seal may be necessary to prevent rusting.
Wow! Before I read the post, I thought the photos were of a RTW bra!
ReplyDeleteSo far so good - but does the garment 1. fit, 2. push where it's meant to?
ReplyDeleteThe nerd in me nudges all & sundry with a teeny reminder that 1" = 2.54 cm by definition. Conversion from one to the other is therefore a cinch (and no hooks required!).
I think the difference in measurement of band size in inches and cm on the patterns stems from the difference in the way commercial bras are sized. In the US they tell you to measure under your bust and add 4 inches to get your band size. In Europe (except maybe in the UK where they still often use inches), you just take the straight measurement in cm and that is your band size. So you can’t make a direct conversion from cm to inches on your pattern and expect it to be correct. As you can see from your figures, the cm measurement x 2.54 is about 4 inches less that the band size in inches.
ReplyDeleteThat said, it is completely beyond me why you should ever have to add 4 inches to get your band size. In my case I am a AA cup, my under bust measurement is 32”, so my band size is 36 (and what I really wear). But my bust measurement is only 33.5, so less than my band size. So what size cup does that make me considering a AA’s bust measurement should be an inch bigger than her band size but mine is 2.5 inches less? A “minus B”?
Anyway, I would love to make my own bras and your look great, so I think I am now going to look for supplies!
The 34, 35, 36 numbers refer to band size.
ReplyDeleteInfo taken from Beverley's book.
1. measuring for RTW, North American Method.
Measure snugly around the rib cage, directly under the bust (in inches). Expel all the air from the lungs so the measurement is as small as possible. Pull the tape snug but not tight. If this measurment is an even number, add 4". If it is an odd measurement, add 5". This is the band size.
2. Measuring for RTW, international measurement. Take the same measurement as above, in centimetres. Don't add anything to the number. Round to the nearest 5 cm. This is the band size.
72.5 cm is the cut off point between 32 (70) and 34 (75).
For underwires, the length is a function of both band and cup size. 32C = 34B = 36A in terms of wire length and diameter; 32D = 34C = 36B. I have noticed that wire length and shape varies significantly between brands for the same sizes. Some wires angle out from the curvature of the diameter more than others. The length will also depend on the bra style (demi cup, full cup etc)
I would make the elastic straps adjustable.
I wouldn't try to file off the wires, as any non smooth bits will quickly wear your bra. I would just buy new wires. They don't cost much.
Oops, forgot to mention that I have made the "Sharon" bra. Each to their own, but it wasn't my favourite pattern. My review is here.
ReplyDeletehttp://sewblooms.blogspot.com/2011/07/getting-pattern-i-wanted.html
I like to read negative reviews as well as positive reviews before I start a project and the negative reviews don't always put me off, depending on the reason for the negative. So I don't mean to put you off, am just offering a perspective that you are free to disregard.
I do like the "llinda" bra and I have also bought the classic full band bra pattern, which I would like to try next.
There is no standard sizing for bras, either manufactured or in sewing patterns. While there are various techniques for measuring to determine cup size and band size, it is not an exact science - as you've all ready figured out. Also, cup volume is proportionate to band size - meaning a 34 C cup is equal in volume to a 36 B. Confusing, huh? My Kwik Sew Bra size is 33 D and the bra I made during a class with Anne St. Clair of Needlenook Fabrics (her Queen Elite pattern) was a 33 F. Both used size 38 wires and both fit perfectly! Go figure. My suggestion is not to over think the process. Just make the bra size you think is closest to your size and go from there. It will be quicker in the end!
ReplyDeleteAnd I think your bra looks great!
Kay...a big THANK YOU for bringing this problem to my attention. A student told me about this blog entry and I checked it out. You are so right - the Amanda band is incorrect. No one else had pointed that out to us. I will go and change the pattern right away, as well as put a correction in the patterns that have been printed but not yet sold. Again...thank you for mentioning this problem.
ReplyDeleteAnd btw...your bra looks amazing!
Just for everyone else's information - the foam cup patterns (there are 2 now) are not sized like regular bra patterns. That's because the foam cups can be used for multiple sizes. The pattern is sized by the foam cup size, which may or may not be anything close to your RTW bra size. For example, yesterday I fitted a #38 foam cup on a lady who wears a 34E in my Classic bra pattern.
You're right. You can't just stop with one. From that initial kit at my first class, I've collected two boxes of lingerie possibilities and scraps. Now, when I sew a t-shirt, I use the scraps to make a matching bra. How over the top is that.
ReplyDeleteSew Tawdry had a great blog posting a while ago about the straps and about using the same lining for the cups to keep sizing consistent. You might find it interesting.
http://sewtawdry.blogspot.com/2011/06/bravo.html
How fabulous to be able to go right to Bra Makers Supply. I'm envious.
Kay, It looks great! I've always wondered whether Epoxy wouldn't be the thing to try on a wire that needs an end? Messy, but it should work. Can't wait to see your next one. :)
ReplyDeleteFor coating the ends of your underwires you need to purchase something called Tool Dip - I will get the can later to verify the name. It's for dipping the handles of tools in to give them a rubberized coating. You can get it at home hardware stores in Canada, right off the shelf in many colours. I just bought a can of white because there is so much of it, I couldn't commit to a big can of any other colour. Besides who is going to see the ends of the underwires that close up to complain about colour - am I right?
ReplyDeleteIf you give the end of the underwire a quick file to get the major sharpmess toned down and then dip it in the tool dip several times letting dry between, you get a nice safe round plasticized end!
Kay, I had no idea you could make a seamless bra at home. It looks very RTW. I even have Beverly's book but I've never tried her patterns.
ReplyDeleteOh my, oh my sounds like too much trouble for me all those measurements... That said, the result is impressive. You are now a member of a club I do not intend to enter soon ;-)
ReplyDeleteHello Kay,
ReplyDeleteHere is the URL for the product I mentioned in the URL above.
http://tinyurl.com/5vgopoe
If I can recall correctly, Bev from Bramakers used to buy this very product and repackage it into small "suitable for bra makers" sized bottles. The name of the product is "Plasti Dip". I purchased it in the form you see in this link, i.e. a liquid that is dip-able. The new format seems to be a spray product and I'm not sure how it would work in the bra wire type of application. Dipping works perfectly but they only have a few (4) colours left in the dip-able form. I guess I'd have to see the instructions on the spray type in order to see if it would work. The dip-able form works perfectly and I in fact use it to tip the ends of the spiral steel bones that I use quite often. I put the tip on that they sell from Farthingales, securing it the best I can, and then dip the whole unit into the Plasti Dip. That way the tip stays on and the plastic coating makes sure it is all held in place and smooth at the ends. You really notice how helpful it is when you try to slide the bones into the channels. Smooth as glass and no more poking through the channels with the sharp ends.
HTH
Connie
Sorry for deluging your comments with multiple posts but this just came to me as I watched a goofy Plasti Dip video on YouTube:
ReplyDeletehttp://www.youtube.com/watch?v=dgwJriR8R4g&feature=player_embedded
I could use all the extra Plasti Dip to dip washers to use as pattern weights. In fact, I suppose I could dip those lovely round rocks that the dgk's brought me for pattern weights. Just about anything can be dipped as you can see in the YouTube videos. There are more applications for this stuff than for duct tape!!
Your bra looks so professional!
ReplyDeleteThank you for commenting on my baby news, and thank you for introducing me to your blog by the same token - you make such great projects!
Wish I was having as much success as you are with your bras!
ReplyDelete