Sunday, April 24, 2011

Kids coats

Making garments for little kids is very liberating.  You can test out new skills and techniques and the recipient, if little enough, appreciates the end result (or at least can't refuse to wear it) and always looks cute.


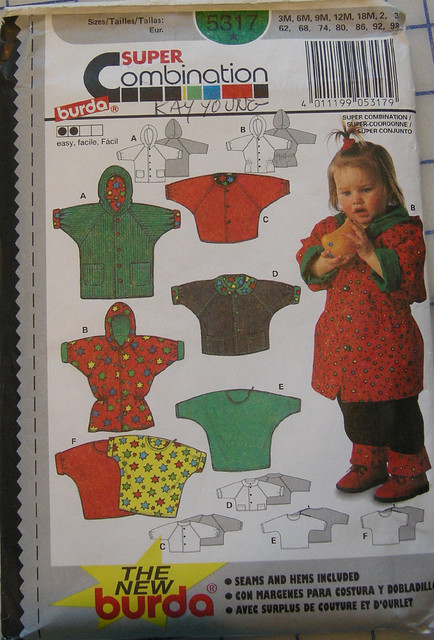
This is a pattern I bought when my son (now almost 21) was an infant.  I made many little jackets for him until he grew out of it.

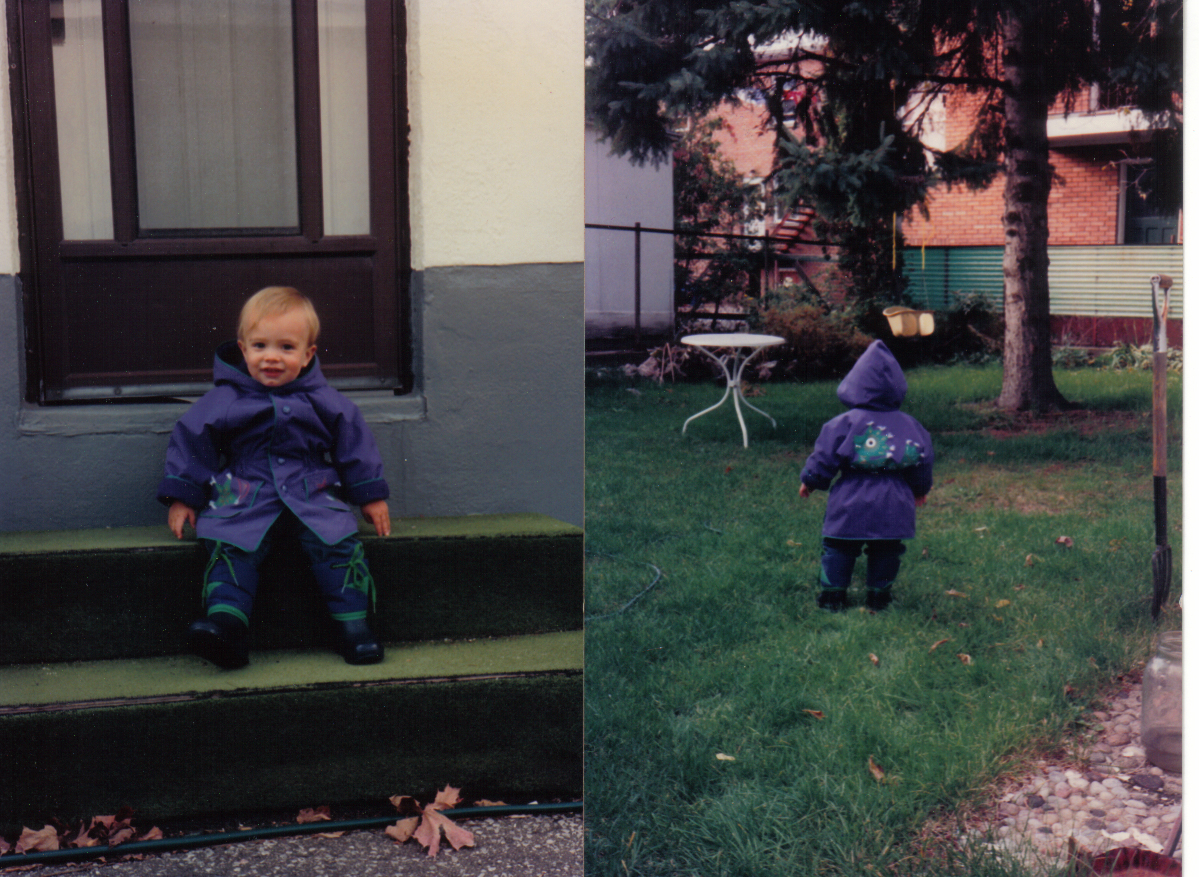
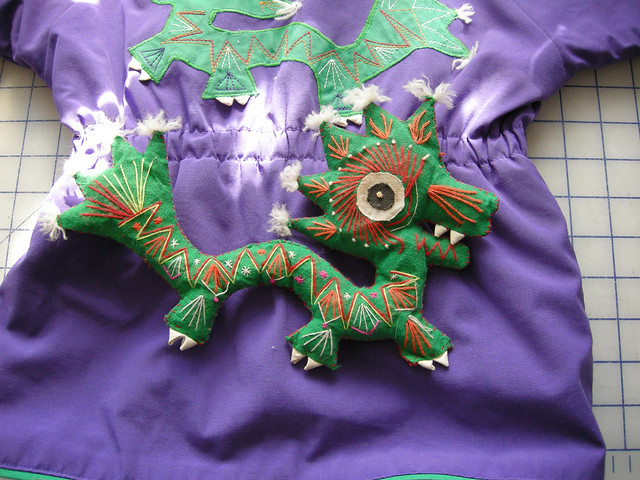
Here's one I made when he was 2 years old.  I realized that on little kids' clothes, I could combine colours that really popped - here, purple and green.  I'm not a big embellisher but I had fun making the dragon appliqué for the back of his jacket.

The dragon design was lifted from a strange little stuffed object, which you can see at right.  I have no idea what its origins might be.  I think it was mainly red on the other side.


I traced the shape from the original and cut it from some sturdy green fabric.  I must have interfaced before applying the eye and machine stitched decorative zig-zag pattern since there is no puckering at all.  The teeth and nails were little folded pieces of white fabric, and the tufts were made from some white yarn.  The eye is a black button.

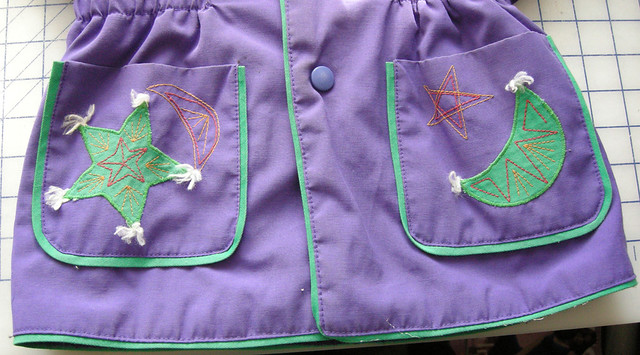
I balanced the back's fanciness by making up a star and moon for the front pockets.

The coat itself is super simple.  For the shell, I used an outerwear fabric called Commander (according to the MacPhee Workshop site, it's a 75-25 poly-cotton blend).  To line, I used a 200 weight polar fleece.  With a pair of bib-front overall snow pants (from a Kwik-Sew pattern, also much-used) in the same fabric, the suit kept my two-year-old warm and dry all winter.

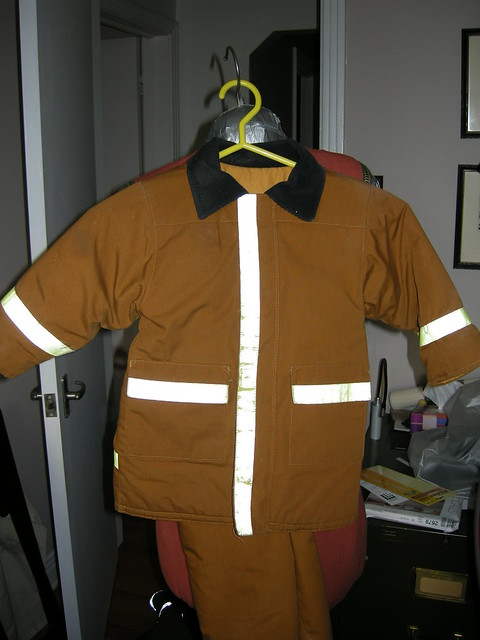
The following winter, my toddler had turned into a little boy who was pretty interested in fire trucks.  He told me he wanted a snow suit that looked like the uniforms then in use by Ottawa firefighters.  I found the guys on the trucks quite willing (after they had verified the call to our street was a false alarm) to talk about the features of their suits so was able to take notes and sketch the details, including the distinctive pattern for the retro-reflective tape.  It's different for the front and back which is useful in a dark and smoky environment.   The hardest part was locating yellow retro-reflective tape but somehow I did it.

Again, the outer shell was some sort of cotton-poly water resistant stuff.  This coat was insulated with Thinsulate.  The collar is black corduroy, apparently traditional.  The matching snow pants have red elastic shoulder straps, repurposed from a pair of men's braces.


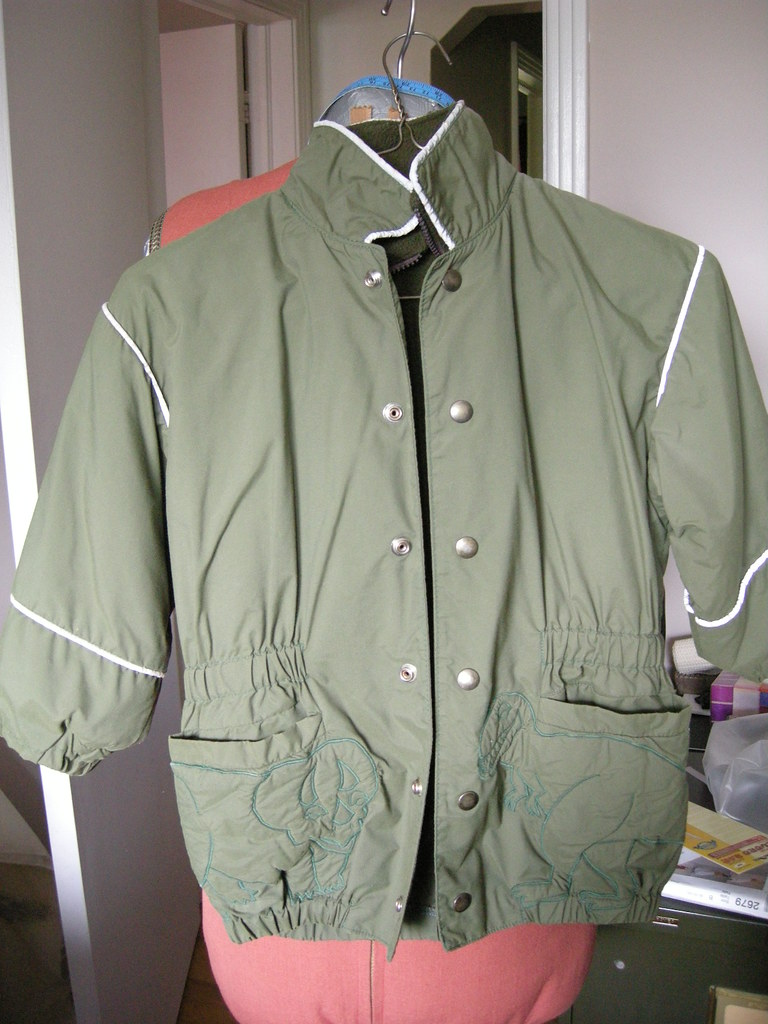
The year after that, dinosaurs were the all-consuming passion.  You've already seen his Hallowe'en costume.  Well, his winter jacket had dinos on it too, but they were pretty subtle... (click to enlarge).

This coat also incorporated retro-reflective features - piping at the collar, shoulder and forearm.  I probably put some in the back too.  It's a really great safety feature during our long dark winters.

If you have a little one, experiment and enjoy!


Sunday, April 17, 2011

The exception that proves the pressing rule

Mary left a comment on my last post asking why I don't press the seam (attaching the garment piece to facing or lining) before understitching.  Isn't this inconsistent with the usual rule that you must press every seam before going on to the next step?

Great question!  Like Ann (Gorgeous Things aka The Pressinatrix) I am a firm believer in pressing.  During construction.  Pressing while you go makes a HUGE difference to the look of the finished project.  Not pressing will 100% guarantee that your finished garment will look home made in the worst way.  This is why I've invested in a great iron, a ridiculously expensive ironing board, and a lot of pressing equipment.

So yes, Mary, always press a seam before doing anything else to that seam.

Except ... experience tells me that you get a better result if you do not press before understitching, and that in this specific situation, pressing is a waste of time.  They say an exception proves the rule...

Why?  Well, bear with me as I return to the goal of understitching, which is to exactly preserve the shape of the sewn seam by allowing you to easily fold the two pieces along their curved edge.  The finished edge will ideally be perfectly curved with no rippling, unevenness or other distortion, and it will lie perfectly flat with no bulk.

The problem is that the cut edge inside a sewn oval (such as the neck or arm opening) is always smaller than the seam line, as illustrated.  This means the seam allowances have to be stretched (distorted) to be folded back, and will always want to unfold themselves.  They will take the thinner (lining) or shorter (facing) edge with them.

Pressing this edge without understitching just doesn't produce as good a result.  Understitching is more aggressive with the pesky seam allowances than pressing.  It sews them down flat in their stretched position, rather than just folding them back.  Sewing the seam allowances to the lining or facing also firms up the curved edge.

OK, so why not press first and then understitch?  Well, because you just don't need to.  It's an inferior way to achieve your ultimate goal.  And pressing first does not help you understitch.  In fact, it tends to make the job a little bit more complicated.  It's hard to press this type of opening without building in some distortion.  This can be from stretching the fabric as you try to open the curved seam exactly, but more typically in my experience you will find that you have pressed in a fold which is not precisely along the stitching line.  If you are going to understitch (always!) you end up having to correct this fold as you understitch.

So pressing (but ONLY in this one situation) is (1) unnecessary as well as (2) difficult and (3) counterproductive.

Clear as mud?

Saturday, April 16, 2011

More about the sheath dress

Thanks to those of you who signed up to follow my blog (now at 209 210, woo hoo!), and for all the very nice comments on my last post!!  Getting your comments and feedback is the nicest part of blogging so please keep them coming!

 I was going to write a tutorial for how I finish a facing around a zipper.  However, there are several excellent tutorials already illustrating this technique on Sigrid's sewing tutorial site (which is a superb resource, if you don't already know it), so I decided not to reinvent the wheel.  

In particular, I recommend Sherry's clearly-illustrated tutorial.  This technique can also be used to finish the top of any zipper opening.  Kathleen Fasanella has published a great set of instructions for finishing a lapped zipper and centred zipper in the same basic way.  Another variant is the faced fly front zipper - I shamelessly recommend my own tutorial for that, which is also linked at Sigrid's site.

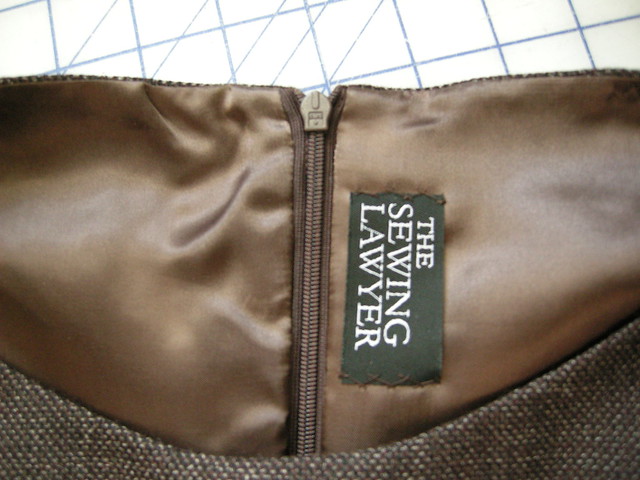
To the left, you can see how neat and clean the inside is, as a result of this easy technique.

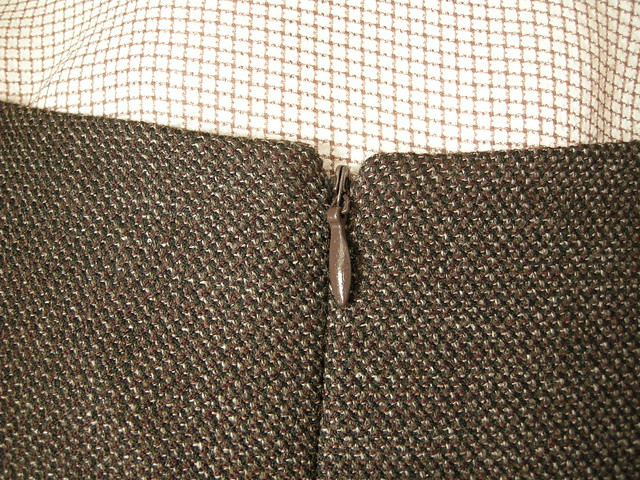
The zipper looks as clean from the outside.  This photo also shows the fabric from my sheath better.  At least on my monitor, the colours are accurate.  The fabric is slightly tweedy.  It's got the extremely dark coffee colour of my leather jacket embedded in it along with a tan and a rich reddish brown.  The fabric is a suiting weight wool, with a tiny bit of lycra (not useful in this sheath, since I underlined it with silk organza).


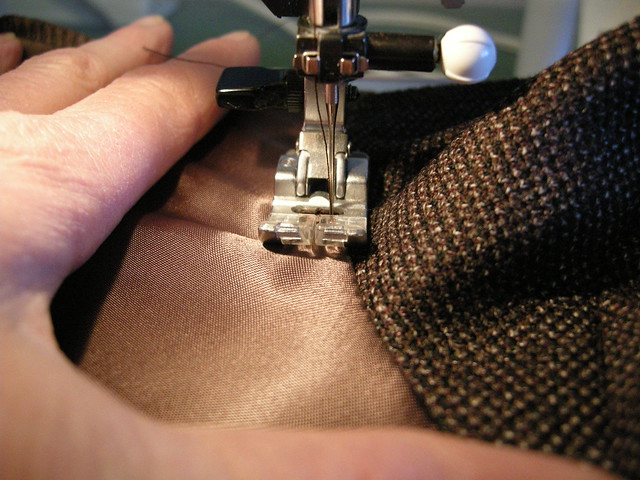
Here's another detail from my dress.  Understitching at the neck and arm hole edges ensures that the lining never shows.  (Topstitching does the same thing, but understitching is invisible from the public side of the garment.)  If not understitched, the inner layer, especially if made from a light-weight fabric as here, would roll to the outside.  Once understitched, the seam attaching the lining to the dress fabric naturally rolls instead to the inside, as you can see at left.  Understitching is also great for a faced edge, since facings also tend to roll to the outside.

Understitching securely attaches the enclosed seam allowances to the inside layer.  To understitch a curved edge like the neck or arm opening of my dress, first trim and grade the seam allowances.  I'm not a fan of clipping because little corners may form where the clips release the tension.  Trimming results in a smooth curve.  If you trim aggressively (leaving about .7cm or .25", or even less) the seam allowance will easily stretch enough so that the edge won't pucker or refuse to press flat.  If you are understitching, there is no reason to worry about the small seam allowances compromising the strength of the seam.

The secret of understitching is to keep the lining or facing as flat as possible on the bed of the machine, forcing the seam allowances underneath to stretch into the curve.  Don't sew straight ahead.  Instead, rotate the piece as you sew around the curve, keeping the stitches close to the seam (and checking to ensure that the seam allowances lie under the inside layer so they will be caught in your stitching). In the photo at right, as I sew I am spreading the lining flat with my left hand, and guiding it through the needle by rotating the garment clockwise.  I do not press the seam at all before understitching.  While sewing I keep spreading the lining away from the garment fabric to ensure the lining isn't folding over on itself.  The goal is to ensure there is no distortion in the curve.


I used the triple stitch zig-zag on my latest sheath dress.  This stitch really ensures that the trimmed seam allowances are well-attached to the lining.  Of course it's a pain in the neck if you have to pull it out (ask me how I know!!).  You can also understitch with a straight stitch, ordinary zig zag, or by hand if you are so inclined (as I apparently was when making my 2nd last sheath, shown to left).

If you don't already use this technique in your sewing, I highly recommend it!

Friday, April 15, 2011

Another sheath dress

The Sewing Lawyer cannot have too many sheath dresses, since she has a pattern that fits.  For years, a simple dress with no waist seam that fit everywhere was an elusive goal, given a hip measurement that is about 2 sizes bigger than the waist or bust.  PatternMaster Boutique to the rescue.

PMB produces a pattern that is a decent but not excellent fit.  It needs tweaking in the pattern editor (CAD) component of the program.  My goal for the program is to produce basic blocks, like this dress and my princess seamed skirt, that I can make over and over as is, or adjust for different styles.

For this sheath, I started with a princess seamed dress.  This is a simple shape that as originally drafted, had both a shoulder princess seam and a second seam that corresponds to the second waist dart in front and back.

To the right are the finished pattern pieces.  One of the standard changes I make is to take a little wedge at the CB waist, since PMB drafts with a dead straight CB seam.  I'm not straight there, are you?  As you can see, I converted the second princess seam back to a fisheye dart in the front.  In the back, it's a long dart that ends in the armscye.  The hem is also slightly pegged so it looks less blocky.

So this is at least the third sheath dress I've made from the pattern.  You last saw it here.


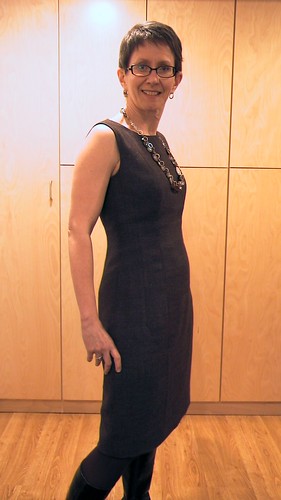
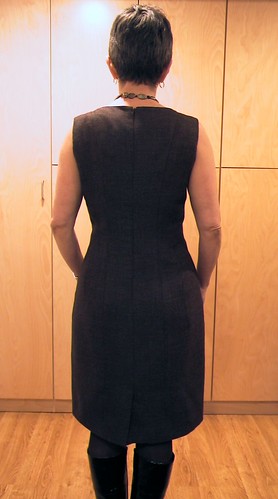
Here are the pictures of my most recent iteration of this dress.  So comfortable!  It has about 2" or so of ease at the hip.  

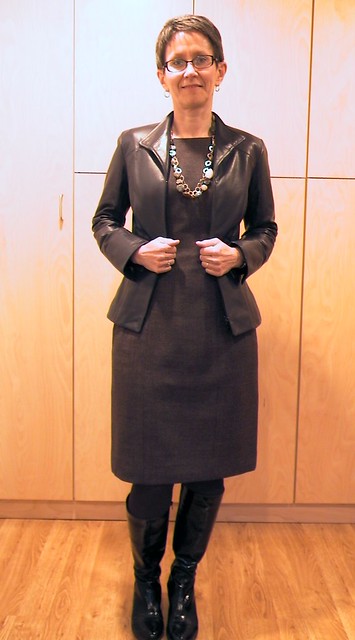
I think it looks pretty good with my leather jacket.  

I wore this to the Haute Couture Club of Chicago luncheon and fashion show last Sunday.  But I had not correctly anticipated the weather.  It was 85 degrees F (29.5 C)!    

Thursday, April 14, 2011

Just one more?

I know those of you waiting for more sewing news, or perhaps pictures of my fabric purchased in Chicago, will just be annoyed by this but I can't help myself.

Look to the right of your screen.  How many followers do you see?

I see 199.

Just one more will make 200, a nice round number don't you think?

I promise to post something more interesting soon!!

Monday, April 11, 2011

Chicago! (the weekend, not the movie)

The weekend has already been written about. We descended upon Chicago from far and wide - Nebraska, New Mexico, Boston & Ottawa.   I was curious to meet Liana, Ann, Nancy & Patti in real life after corresponding on e-mail and reading blogs and pattern reviews.   I had the best time!  Good food, good company, good weather, and great sewing-related activities.  Who could ask for more?

One highlight of the weekend was a walking tour in downtown, guided by Patti's friend Harry, a docent with the Chicago Architecture Foundation.  The day turned out gloriously sunny but still cool in the shade.  Perfect for a couple of hours on foot.


The warm air and cold water produced an ethereal mist, up high.   
Throughout downtown, planters featured painted branches - too early for flowers, though we saw some of those too.  
 This building will look familiar to anyone from Toronto
 - the Federal Center designed by Mies van der Rohe.  
 And the Flamingo by Calder.
In the background, the Willis Tower (formerly the Sears Tower).  It's still the tallest building in Chicago.
Our group studies a Chagall mosaic.
  Formerly the home of Carson, Pirie & Scott.
The El.  A great way to get downtown.  


Overheard (teenaged girl):  "I love the bean! I want to hug the bean!!"

It turns out everyone wants to hug the bean!!


 The mist vanished but the ethereal quality of the day remained.

Sunday, March 27, 2011

Balancing a dart

I just checked Sigrid's fantastic sewing tutorials website and so far as I can tell, this trick, which I picked up from Claire Shaeffer's book Couture Sewing Techniques, isn't there.  So here goes.

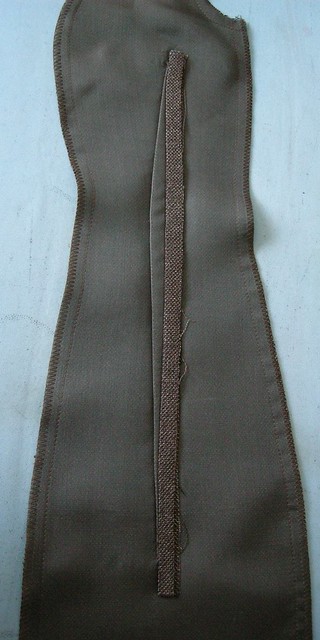
What is a balanced dart?  It's a dart which is, when pressed flat to one side, balanced by a strip of self-fabric which is stitched down the middle along the line of the dart, and pressed flat to the opposite side.  The two layers of fabric sewn into the dart are of equal thickness to the folded strip of self fabric.  The desired result is that instead of a visible ridge at the dart, which has one layer of fabric on one side of the stitching line and 3 on the other, this pressed-to-one-side dart leaves an outer surface that is as flat and smooth as a seam that has been pressed open.  

Clear as mud?  To the right is the inside of what you are aiming for:

This dart is pressed to the centre and the strip towards the side seam, but I don't think it really matters which goes which way.

Balancing the darts is unnecessary if your fabric is thin and will press very flat.  For my dress, however, I'm using a suiting weight wool which is underlined with silk organza.

Start by cutting strips of fashion fabric which are about 2.5cm (1") wide and the length of the dart plus 2.5cm.  They are cut on the straight grain.  Even if you only have shreds of fabric left, you'll have more than enough to do this.

Then go ahead and stitch the darts.

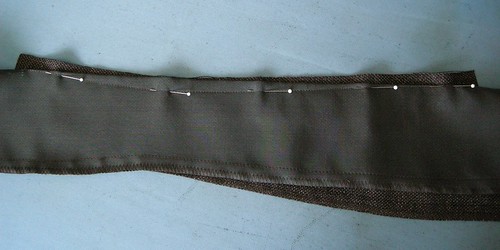
Take the strip of fabric and pin it under the stitched dart, like so:

Place the strip so that the stitching line of the dart runs (approximately) down the centre line of the strip of fabric, and so that the ends of the strip are a little bit beyond the pointy end of the dart.  More of the strip is  visible at the thin ends of the dart than in the thicker middle, as you can see.

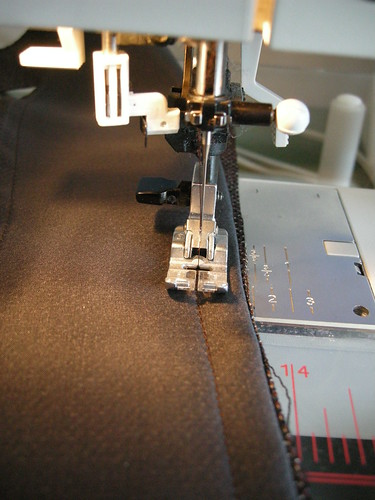
Then stitch along the already-sewn line of the dart.

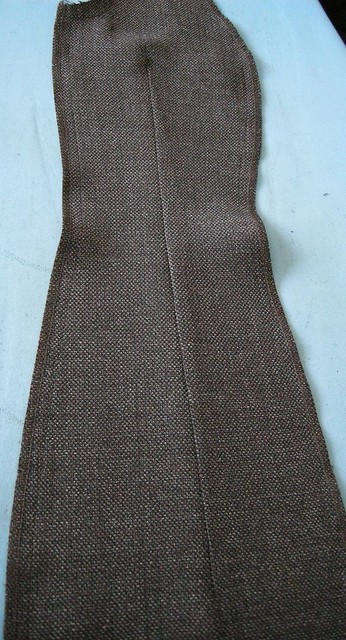
Press carefully, with the dart going one way and the folded strip the other (as shown above).


From the right side, there is no ugly ridge.

Voila.

Saturday, March 26, 2011

I like a pattern that's a fabric miser

I had a smidge under 3 metres of wool.  There are only shreds left.  I have cut out 3 garments:  a dress, a pair of pants, and a top.

My sheath dress takes just over 1 metre.

Thats it.  All of it in one width.

To the right is the top (Vogue 2683).  I cut it single layer from what was left after I cut out the pants (.75 metre).  The spaces at lower left and in the middle are for the other side piece and back piece, respectively.

I've got to get sewing now.

Tuesday, March 22, 2011

Extra! More leather jacket photos

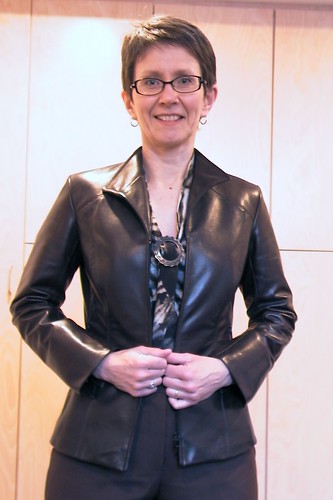
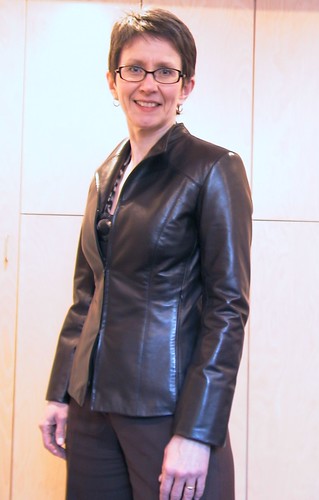
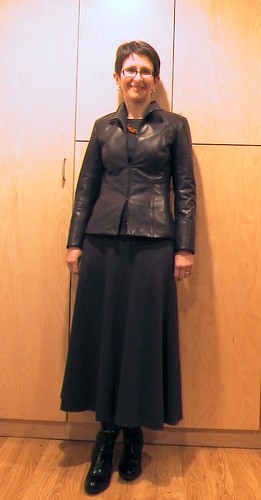
My model washed her hair and consented to try on the jacket with a few existing and possibly coordinating pieces.  She's looking forward to the new pieces promised, however.

This is with the Jalie tie-top in darkest brown and blue tie die print, and a pair of lighter brown wool cuffed trousers (Simplicity 4366, a Threads pattern now out of print).

Kathryn was right, I think, to have me take it in at the shoulders and upper back.  However, the waist area is where I think it's a little over-fitted.  The seams would look smoother if it wasn't quite so nipped in.


I like separating zippers with a pull at each end.  It makes it possible to wear the jacket zipped up and still move around, sit etc. without the jacket riding  up.

I keep my eyes open and buy nice zippers on spec.  I was lucky to have, in stash, a very light weight separating zipper with pulls that are exactly the same as the invisible zippers used at the pockets.


To the left, here it is with Vogue 2683 (one of my TNT patterns).  The colour is a little dull in the picture.  In real life, the fabric is a wonderfully soft heathery mix of grey and rust.  Writing it out, it sounds dreadful.  However it's one of my favorite dresses to wear in the winter (with a jacket, since it's sleeveless).


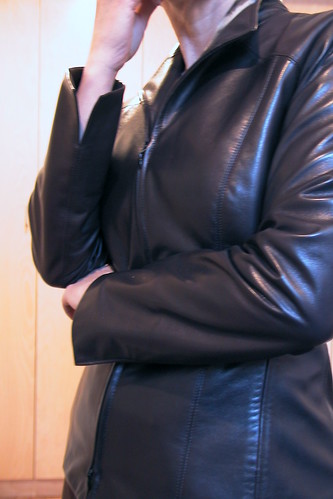
To the right is a detail I didn't think to photograph before.  The sleeves are split at the cuff so (theoretically) they can be turned back.

Sunday, March 20, 2011

At last

There's a new luscious leather jacket ready to hang in The Sewing Lawyer's closet!  Just in time for crisp spring days and for an early April long weekend in Chicago.  Where no doubt there will be intense scrutiny of the wardrobe, inside and out, since the itinerary includes real time with Liana and Ann among other prestigious and prodigious creators of beautiful sewn things, including the entire membership of the Haute Couture Club of Chicago (or so much of it as attends the annual fashion show and luncheon on April 10.  Phew!  I've got to get back to it!

But not before leaving you with some photos.  Sadly (for now) none of them actually include the jacket being worn.  It needs (a) coordinating objects and (b) a model who's having a better hair day.  I promise more later.

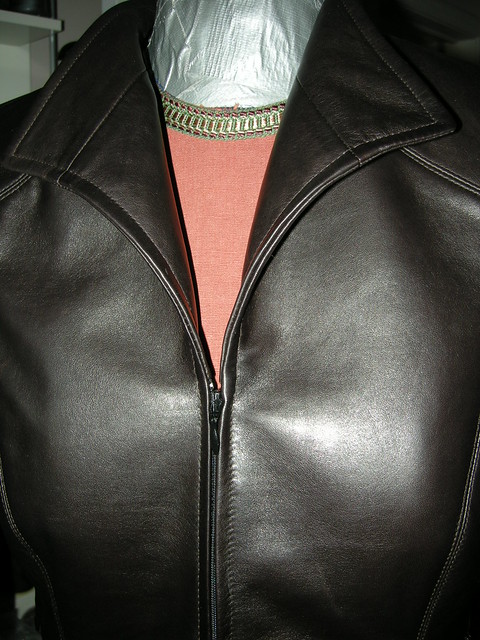
I have no excuse for not having taken a full front photo; except to force you to open my blog again hoping for better pictures.  Oh, and to allow you to admire (again) the invisible zipper pockets set into the side front seam.  Below right is a close up showing that the lapels are indeed symmetrical and the topstitching worked pretty well.

As instructed by Kathryn Brenne, I laboriously paid attention when topstitching to the fact that the upper thread should always be on the public side, and the bobbin thread side is always hidden.  This meant stopping and starting again (by inserting the needle in the hole left by the last stitch before stopping, if you please, and pulling the thread tails to the inside for knotting) at four separate points, since the facing side is outermost for the lapels but inner at the back neck.  I'm pretty pleased that I placed the stopping/starting points quite well, just at the point where the leather is into the curve, so they are not visible.  Because they are not perfect.  (Let's hope that the ladies at the Haute Couture Club of Chicago won't be all over it looking for my boo-boos!)

One thing that is really great about this pattern (and let's not forget that there were lots of things that weren't) is the drafting at the collar/lapel.  There is a perfect amount of extra length built into the under collar and front facing so that once you match the edges and sew them together (carefully stretching the other pieces to avoid any puckers) the lapel just does what it's supposed to.  There is no guessing about where the roll should happen because it rolls automatically.

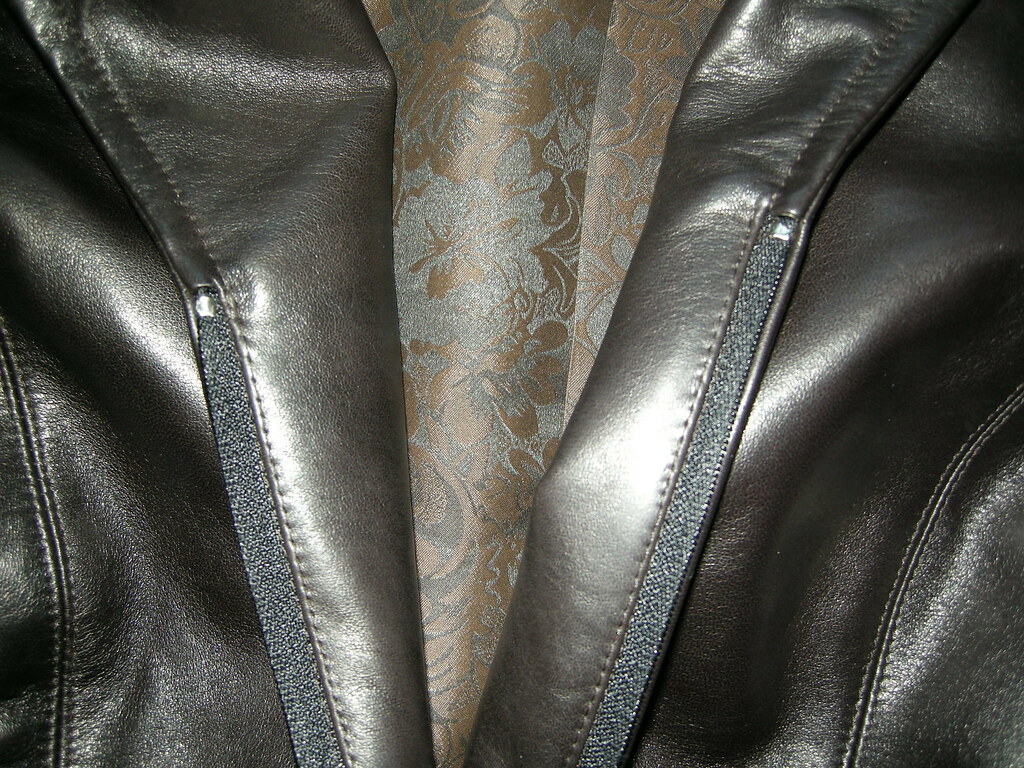
Here's the inside showing how the facings are sewn around the zip (click to biggify the photo to see it better).  On the outside, the leather meets at CF to cover the zipper, but on the inside the facing cuts away above and below the zip.  I thought Kathryn told me that the pattern instructions (which I have ignored in making this) gave directions for how to do this, but they don't, now that I look at them.  Kathryn had worked out an ingenious way to make this inset box in leather after sewing the facings to the jacket above and below the zipper, but I did not take pictures and I think it would be too complicated to describe.  Another way to do it, which would also work in fabric, is to sew the inset box using a thin, flat facing (silk organza is ideal) before attaching the facings.  If anybody is interested, I'd definitely consider doing a photo tutorial on it because it is a super nice way to finish a separating front zipper on a jacket.

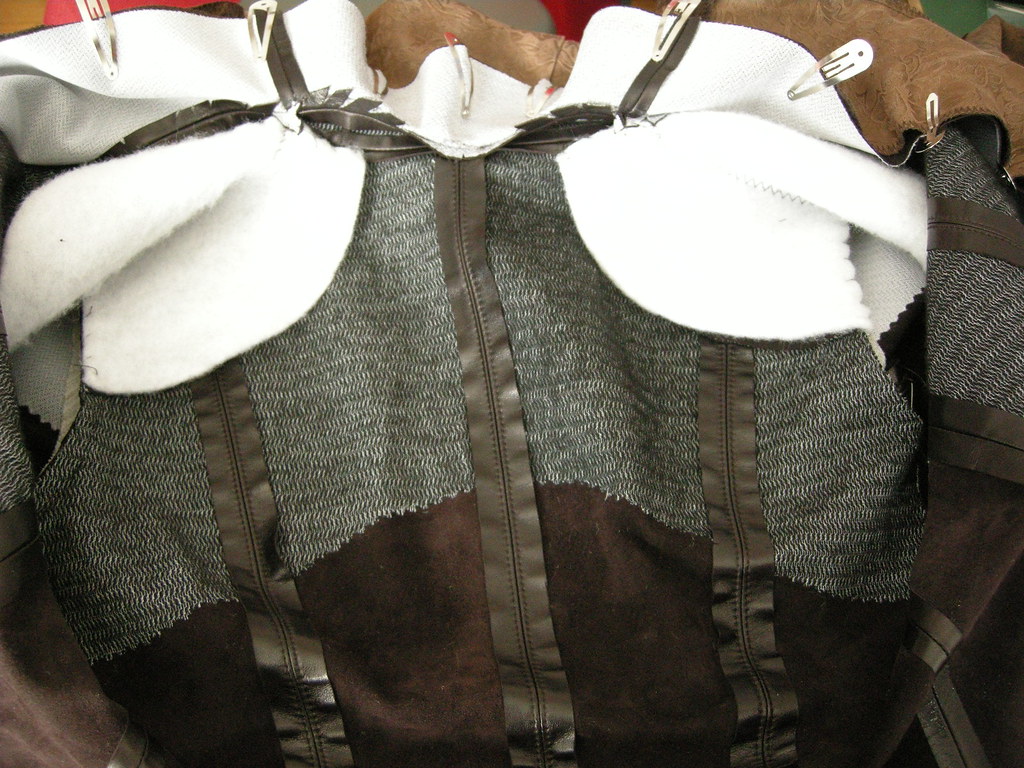
Inner construction:

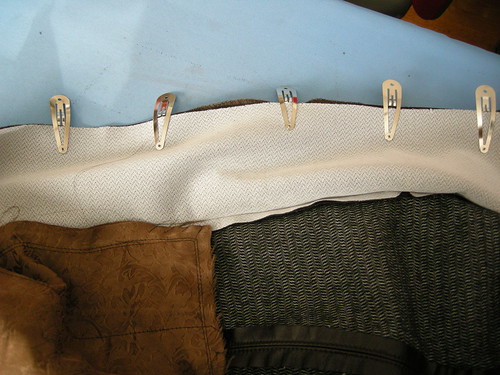
I used these nifty metal clips to hold the leather for sewing, since you can't use pins.  I think they are the same as a sort of hair clip, but I bought them in a fabric store.  To the left, you see the facing clipped to the lining fabric.

To the right is the inside of the back and shoulder area.  At the top, notice how the curved jacket-collar seam is clipped diagonally.  I normally trim rather than clip, but was following Kathryn's directions.

The upper back (and the fronts) are interfaced with a fusible weft insertion interfacing.  The lower edges are pinked to avoid a show-through ridge.  (But if you look hard, you may be able to see a show-through pinked line.  Anyway, I could see it right after fusing. My lamb leather is truly thin, but lusciously soft.)  The collar and facings are interfaced with a lighter but slightly crisper fusible knit.  I did not have room in the jacket for shoulder pads, but inserted a single layer of synthetic batting just to cushion the shoulders and prevent bony shoulder show-through.  I used the shoulder pieces from the jacket, and hand stitched the padding to the armscye and neck seams (using a glover's needle).

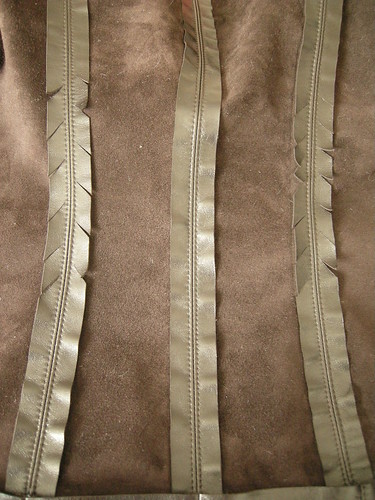
The  back seams are very curved (if I am truthful, they are slightly over fitted).  They are edge stitched to keep them flat (leather seams have to be treated with glue or stitching; pressing doesn't make them lie flat).  I followed Kathryn's instructions to clip diagonally to flatten the seam allowances.  All body seams are sewn at 1.3cm or .5" rather than 1.5cm or 5/8".
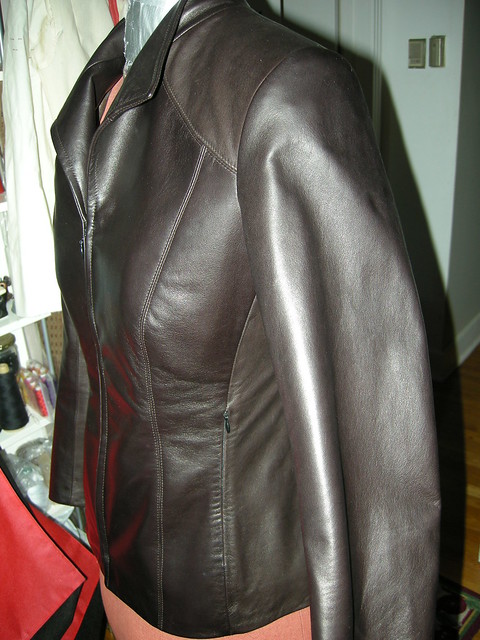
Oh - I should have said all body seams except the side seams, which were the last ones sewn and due to edgestitching, zipper pockets or other treatments the only ones still available for adjustment once I had the jacket sufficiently put together so I could try it on.  It would have been slightly skin tight if they had been sewn as designed.  I'm not sure what went wrong.

Let me correct that - a few things happened.

One.  When Kathryn saw my muslin, which I thought was pretty good, she recommended that I reduce shoulder width (by something like .7cm or about 3/16") and take in the back seams even further.  She pinned out the amount, and I faithfully transferred these further reductions to the tissue and then ... cut right into the leather.  (There's something about being the student in a class taught by a trained professional that makes you just trust the said professional when she repeats, reassuringly, "It'll be fine".  If I had been doing this at home I would have done some serious agonized thinking, and maybe sewn another muslin, before tackling the leather.)

Two.  I sewed my muslins on my trusty treadle.  I used a magnetic seam guide which I placed carefully to get exactly 1/2" seams.  At Kathryn's I was using one of her Berninas, which have seam guide lines marked only in metric, I seem to recall.  I sewed the seams using 1.3cm (the conversion on the pattern) which in actual fact is slightly bigger than 0.5"; 0.5118110236", to be exact.  That extra .0118110236" works out to an extra 0.0236" (or so) on each of 7 seams, which isn't a whole lot but...  

Three.  Even the thinnest leather is thicker than muslin, so takes sort of a leisurely U turn (instead of a sharp fold) when you turn it back on itself as you must at each of the 7 seams.  It takes more width, in leather, to do that U turn, than it took in muslin, to do the sharp fold.  


All of which is to say that it's a good thing leather doesn't fray, because the side seams at my hip are seriously tiny.  


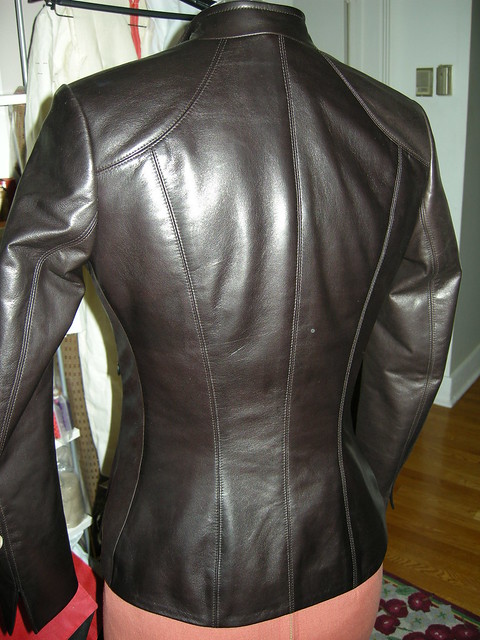
The back.  The sleeve caps are also a nice thing about this pattern.  There is very little ease (easy to sew even in lining fabric and a no-brainer in leather).


It really is very nice with all those curved seams.  But, as I said, maybe a bit on the over-fitted side.  


Leather does stretch, right?


I already wore it out to a birthday party last night (with jeans).  After I take care of my bad hair, I'll post more photos.  I promise.