I thank you all for your valuable insight in the matter of buttons. The too-big brown button wins the informal poll, with the black glass one in second place. I will now disclose that I like the big brown button but my husband voted for the glass. I've decided to hedge my bets. One of the problems with the big one is that the button hole would be ginormous. So I'm going to use a big snap for the real closure, and the button on the outside for camouflage. Then, I can change it up if I don't like it or find something I like better.
But today's subject is luscious, slightly lanolin-y wooliness. In the matter of internal padding, I'm experimenting.
In a tailored jacket, no matter how sleek and natural the shoulder line, I think SOME padding is beneficial. This need not add bulk - even a single layer of needle-punched batting will support the shoulder area and create a smoother line (I have bony shoulders). I also like to use a fleece sleeve head. I do not buy these internal padding alternatives - I make the patterns from my jacket pattern. The general approach is illustrated here.
My Vogue 2770 jacket calls for 1/2" shoulder pads (it's a 2003 pattern), and I knew from the muslin that it did need actual shoulder pads. I have a plastic tub filled with the darned things, but I really prefer making my own.
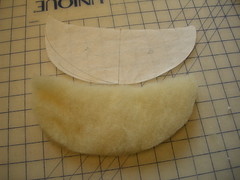
For this jacket, I'm using a cotton quilt batting called "Warm & Natural" for the base layer of padding. It is very thin and supple. I made the pattern piece for the padding from the jacket pieces, eliminating all seams and seam allowances (this process is illustrated here). The resulting piece looks like this (neck edge and front extensions are at the top):

The neck edge will be hand sewn to the neck/collar seam on the inside, and the front edge is tacked to the dart which extends down from the neck point. The armscye edges are sewn invisibly along the armscye edge, again by hand.
 But first the sleeve head. Again, I cut it from Warm & Natural, using the sleeve cap pattern. It extends from notch to notch (well, it actually ends above the notches which seem very low on this pattern). The sleeve heads need to be in place before the shoulder padding can be installed. I used my sleeve board to steam the seam allowances and sleeve head so they will stay nicely in the sleeve cap.
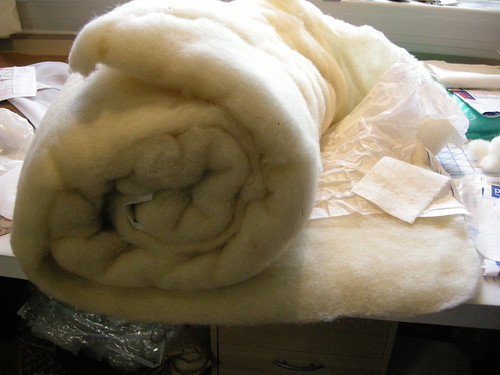
My great innovation for this jacket is that I used luscious 100% wool batting for the shoulder padding. I came across an online vendor of wool quilt batting - Cedarview Farms. I purchased a lap size quilt batting (55" x 74"). It was very reasonably priced, I thought, and they were having a 20% off sale at the time. The batting arrived very promptly, neatly packed - loosely folded around tissue paper to keep the layers separate and then rolled. It is absolutely scrumptiously woolly - soft, light and smells faintly of lanolin.
You know that I don't knit. I also don't quilt. I bought this batting to add to my considerable stash of padding-materials (though I think it would make a pretty awesome duvet). Today I tried it for my intended purpose and I am pretty happy with the results. Here's what I did.
 Then I put the fusible fleece (fusing side up) over my pressing ham and placed the wool on top. I steamed the two layers to fuse the wool lightly to the padding, and to further flatten the leading edge of the pad, as you can see on the left.
 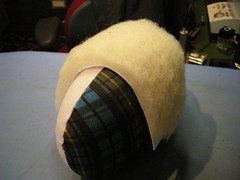 In the picture to the right you can see how thin the fusible fleece is, in relation to the wool fleece.
 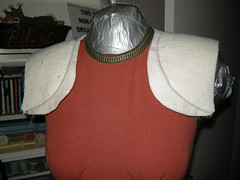 Then, I sewed this layer underneath the single padding layer shown above. I pinned the layers to ensure that they stayed curved, then zig-zagged the leading edge of the pad and used big hand stitches through all layers to loosely anchor the rest of the padding.
To the right is the finished item from the front.
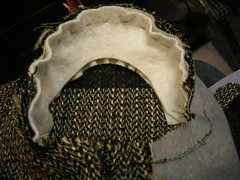
And, once installed in the jacket, this is what it looks like from the back:


Kewl post on the support system that you place in a jacket. I think this is what's lacking in mine...and I will remember this for the future!
ReplyDeleteThis is neat and gives great results. Now I suppose you will only dry clean this jacket?
ReplyDeleteYou are a freaking genius. You have a true tailor's eye for structure.
ReplyDeleteThe wool batting looks like an interesting method. I too like to make my own shoulder pads. My question, I always put the firmer piece on the top so do you have a reason for putting it on the bottom, and how much does the wool compact since it seems fairly loosely woven? I saw a posting on this blog, from a professional tailor who makes a 3 piece sleeve head that curves depending on how much of a rope, as he called it, he wants for the sleeve cap.
ReplyDeleteI have never seen this done this way, and while I don't make that many jackets I've read up on it. Here's the blog: http://tuttofattoamano.blogspot.com/
You make gorgeous jackets, so I am not criticizing just asking if you have seen his method before? I know that how you press the top seam on the sleeve head determines the look of sleeve too, but I never do it differently! Which way do you press the seam?
Wow, what fantastic information! Thanks for all the wonderful photos...the more that I follow your blog, the braver I get about embarking on a tailored jacket!
ReplyDeleteInteresting. I suppose the important thing is to get the look you are after. It doesn't matter so much what you use as it is hidden. And you do make such fabulous jackets.
ReplyDeleteBeautiful work. Interesting how you have the piece that runs from shoulder to shoulder --- does it act to stabilize the shoulders and the neck area?
ReplyDelete