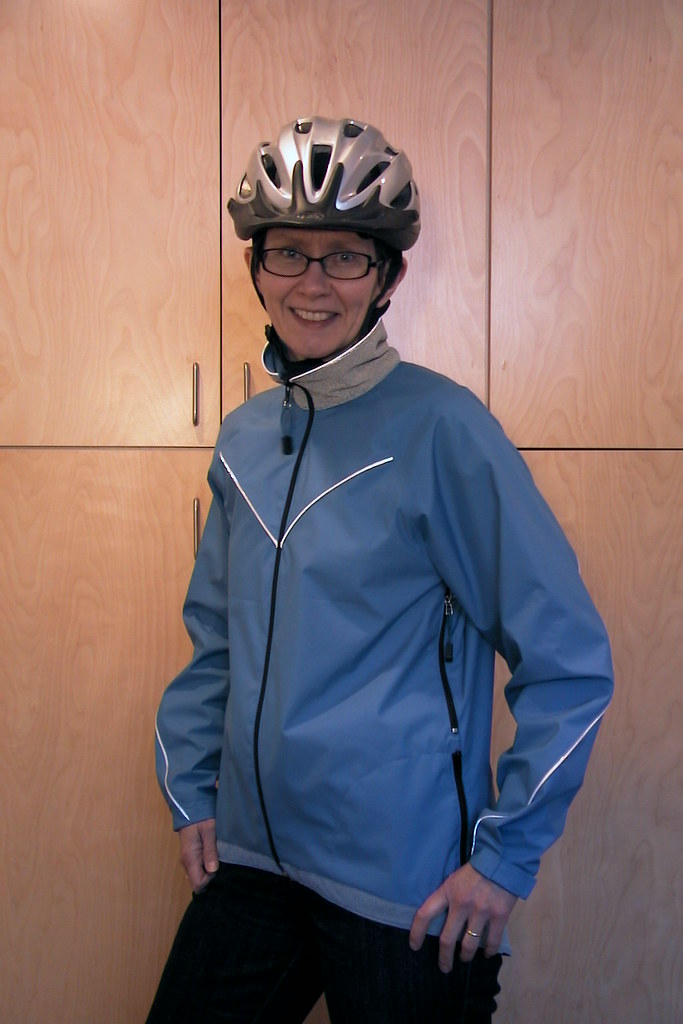
Anyhow, here it is - pretty blue goretex purchased last year from Ressy's Coop, lined with some sort of athletic mesh in white (from stash) and embellished in a practical sort of way with retro-reflective piping (Montreal, St. Hubert Street) and nylon ripstop printed all over with a retro-reflective pattern (stash). I used the retro-reflective fabric at the collar, back yoke and lower band.
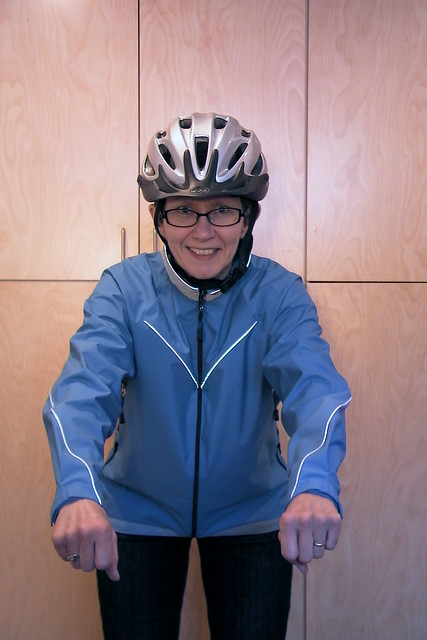

I split the front to create a yoke seam where I could insert piping, and did the same on the sleeves. The piping starts at the back yoke, and runs diagonally across the sleeve so you can see it in the front. To the right, the back, in pretend biking position. The lower back curves down so that when I'm really on the bike, there is no risk of gaposis; the hem should be more or less horizontal in that position.
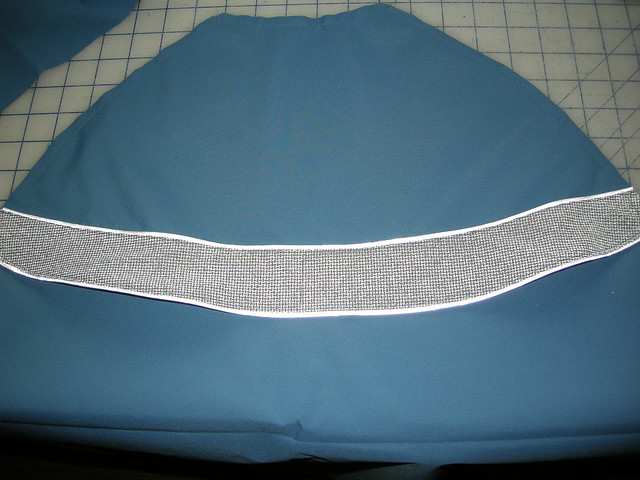
 In the photo to the left, you can see how the upper back yoke is only attached at the CB. Even though goretex is more breathable than many waterproof fabrics, I expect it to be pretty steamy on occasion and this will help. If you click on the photo to the right, you can sort of see how the retro-reflective stuff performs. Naturally it's even more startling in the complete dark, but that's pretty hard to photograph!
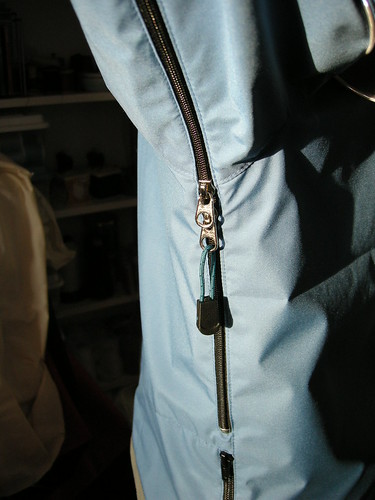
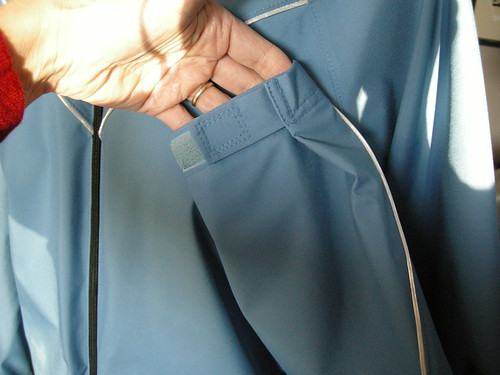
The pattern calls for a lot of fancy pockets, but I only used the lower front ones that open at the side seam. I'm strictly a practical biker (i.e. I commute to work in the 8 or so months a year when there's no snow) so I have no need for stashing energy bars or whatever the high-test cyclists put in those pockets found at the lower back of almost every cycling jersey or jacket sold around here.
I'll enter this in the PR activewear contest currently running. Vote for me!


Great cycling jacket and love how you have adapated the pattern to get the looks and safety aspects you wanted.
ReplyDeleteGreat job! Great matching helmet :-)! Isn't it wonderful you can not only get another jacket like the one you loved, but even improve it? Sewing is the best.
ReplyDeleteCan't believe you're biking EIGHT months of the year if it's -25 now.. That means you don't mind if it's only -10, right :-)? Brrrr..
How Professional is this design of yours? Wonderful!
ReplyDeleteA terrific biking jacket. Your ventilation ideas are very clever, and your construction looks impeccable. Having sewn far too much Gortex, I am suitably awed by this!
ReplyDeleteOf course I will vote for you. This jacket is smashingly amazint !!!!!!!!!!! You are great. Yet, I did not found the courage to sew active wear. I like the retail brand so much. Mine would never look as good. So for the moment Pearl Izumi is getting rich with me and so is Louis Garneau ;-)
ReplyDeleteA really amazing cycle jacket, I am sure it took a long time to construct. I have also sewn a bit of gore-tex too, so I know it is not the easiest fabric to handle and that mistakes leave a lasting impression ...
ReplyDeleteYou definitely got my vote! This jacket is amazing. I would never be able to find a jacket like that anywhere. It is well made, and so stylish as athletic wear. I love your blog! I am a career woman myself, and love to sew! Thank you for all of your wonderful sewing tips!
ReplyDeleteI'm always astonished at the work that goes into good quality leisure gear. You have done a great job.
ReplyDeleteHoly Moly. What craftsmanship. That is so well sewn and will last forever because of the quality of construction. Love the pit zips and I'm sure this will win. It looks majorly expensive to boot.
ReplyDeleteI love active wear!! Whew! I'm impressed. . .
ReplyDeleteBeautiful job, and you look so ready to 'cycle!
ReplyDeleteWOW! Amazing job and sooo beautiful. I have seen these patterns (rainshed) at seatlefabrics.com. Perhaps that is where you found this?? Any how, I wear a size med and loove blue! (Hint hint) I am inspired to now try this on my own.
ReplyDeleteAwesome jacket! So many great details. I am highly impressed.
ReplyDeleteWow you just sparkle! Take your bike for a ride in some freshly fallen snow, Kay!!!!
ReplyDeleteReally impressive! Better than professional; it fits you like a dream, and you got the features (and color) you wanted!
ReplyDeleteWOW...what a talented seamstress; love the jacket!
ReplyDeleteCongratulations I love this jacket
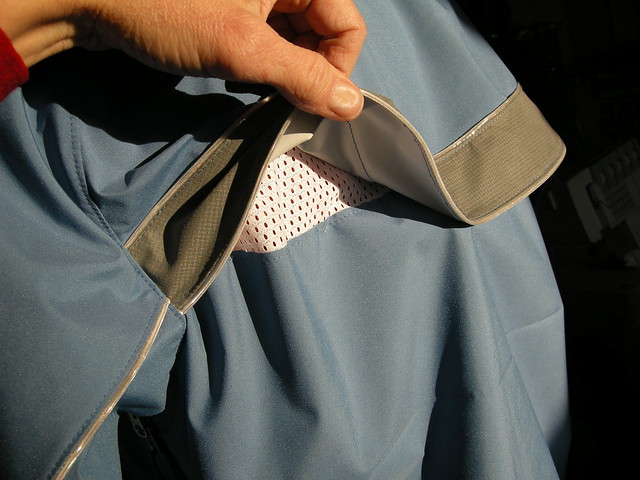
ReplyDeleteHi, I just came across your wonderful jacket since I asked Google how to sew a pit zip. Could you please show me a photo from the inside of your pit zip? Is your jacket fully lined? I am currently planning to sew a fully lined jacket and would love to have pit zips, but actually I have no idea how to fix the lining at the pit zips. Would be great if you could help me with some advice. Thank you! :-)
ReplyDeleteThe jacket is fully lined with athletic mesh. I remember puzzling over this point too. I believe that I sewed the side/sleeve seams but leaving a length (same as zip) open. Then from the inside I sewed each side of the opening to the zipper tape. It was a struggle, if I recall correctly. But it worked and produced a clean finish from the inside. I thought I might have to topstitch to prevent the lining from getting caught in the zipper, but did not. An alternative would be to sew the lining to the zipper tape by hand. Hope this helps.
Delete