- The Sewing Lawyer loves getting comments so keep them coming!
- In particular thanks to those of you who expressed an opinion as to whether she ought to be seen in public in a tunic and tights. Even when you thought not. (I did ask!) I'm going with the majority and wearing them.
- Commenting on my husband's prowess as a thrift shopper, Jilly Be wondered if he has a brother who's single and her age. Sorry...
- There was a question about the black pumps I was wearing to model my two dresses. This made me laugh (and may have prompted my later observation that if you keep stuff long enough, it rolls back into style). Those shoes were purchased in 1979 or so. Maybe I should start wearing them for real again?
- Thimbles - leather ones with a metal tip? I can't find any to match the mental image your description prompted in my mind. I bought some like these once - they really didn't work (I have really small fingers). There's a pattern on the Threads website for very snazzy ones. Clover seems to make two different ones (here and here). I would worry about them being loose.
- Last but not least, a comment this week on an old post asked about what fusible interfacings I recommend. I'm really a bad person to ask because I stash interfacing, I buy almost all of it in Montreal or Toronto in stores where labels are non-existent or unreliable, and I have a habit of picking up new kinds whenever I see them. I usually have no idea what the brand name of the interfacing I just used might be. That said, I can recommend Pam Erny's interfacing which is high quality and dependable, if you don't have access to my kind of sources. Get her sample pack. Even if you have a stock of great interfacing, you can't just assume one kind will work for all applications. Test scraps (7-10cm or 3-4" square, or thereabouts) on your fashion fabric. Try more than one kind. See what they do to the hand and drape of your fabric. Is it too crisp or stiff, or too limp?
Monday, June 27, 2011
Time out to respond to commenters
Saturday, June 25, 2011
More patterns from my past
Let's get something right out in the open - the Sewing Lawyer is not above shopping in thrift stores or accepting into her life items that were picked up at the curb. It's astonishing what people will give or throw away.
As has been mentioned in these virtual pages before, the Sewing Lawyer's parents seem to have tossed out many of her cherished sewing patterns from when she was a teenager. This happened so long ago that it ought to have been forgotten (those teenage years were in an era now known as "vintage"), and in reality of course I'm just having a bit of fun with the idea of wistfully yearning towards those semi-ancient styles. However, truthfully I would welcome many of those patterns back into my over-stuffed pattern drawers, for old times' sake.
So imagine The Sewing Lawyer's delight when her husband (who thrift-shops so effectively he is practically a pro at it) found a pattern-stuffed basket sitting beside the curb one day (a few years back). The first funny thing about this story is that he was originally attracted to the lidded woven basket, because he recognized it as the twin of a basket in the sewing room at home. The second is that the patterns it contained were, in many cases, equally the twins or close relatives of many in The Sewing Lawyer's own past, and they were her size! Cue up the theme from The Twilight Zone...
Here are a few examples.
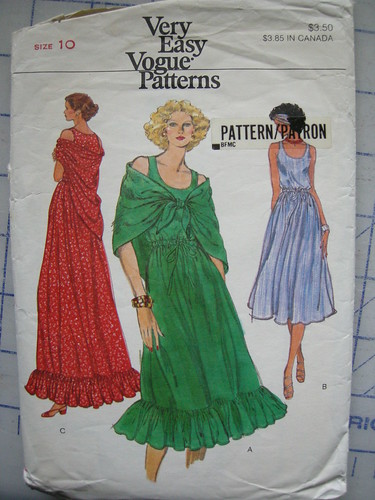
 Vogue 9301 dates from the mid-1970s, and I made the knee length culottes when I was in first or second year at the University of Toronto. That was either 1974 or 1975. They were scratchy wool, a herringbone, if memory serves, and supremely comfortable except for their itchiness. These days I'd choose to line such a fabric, but then I was all about getting it done, and outward appearances. I did not own a cable sweater with a cowl neck big enough to wear as a hood, but did coordinate them with turtleneck sweaters and high boots, as I recall.
I should make them again, I've often thought (BTW my copy is size 10).
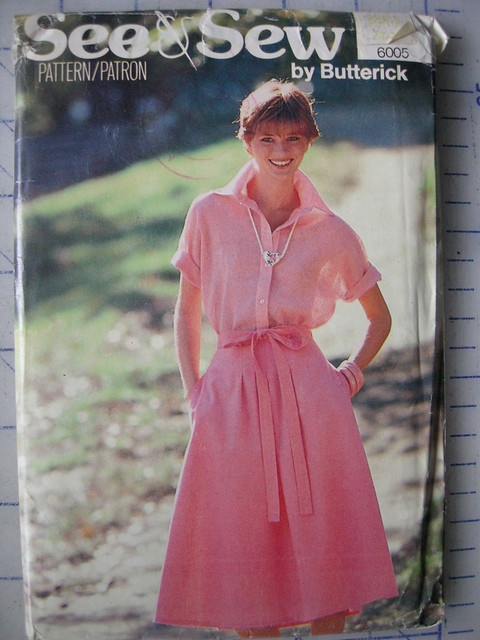 Then there is this wrap skirt. I rarely purchased "See & Sew" patterns but I adored the photo on the front of this one. I made the skirt from a light bottom-weight warm beige poly-cotton and I took it with me on my solo trip to Europe in the summer of 1978. It was perfect - went with anything, did not wrinkle, was modest enough to wear in churches and dressy enough for anywhere a backpacking student-hostel staying girl was likely to go, and drip dried in a matter of minutes, it seemed. The back wrap is generous enough that wearing it in the wind was no problem, and the ties are definitely not skimpy. What a great skirt (sigh).
I should make this one again too. The pattern from the basket is still in its factory folds.
 The third example is a simple dress gathered via elastic at the waist, which also hails from the mid-1970s. I made Vogue 9467 from a black and cream narrow-striped lightweight polyester fabric. I remember thinking it ought to look more elegant. I think my disappointment was a product of poor fabric selection and I do not think I have ever purchased such a difficult, staticky and generally flyaway fabric again. I didn't wear it a lot but I've always had the nagging feeling that it could be a fantastically wearable dress made from something more suitable.
Maybe I have such a thing in my stash.
Or maybe I ought to get back to my grey summer suit...
As has been mentioned in these virtual pages before, the Sewing Lawyer's parents seem to have tossed out many of her cherished sewing patterns from when she was a teenager. This happened so long ago that it ought to have been forgotten (those teenage years were in an era now known as "vintage"), and in reality of course I'm just having a bit of fun with the idea of wistfully yearning towards those semi-ancient styles. However, truthfully I would welcome many of those patterns back into my over-stuffed pattern drawers, for old times' sake.
So imagine The Sewing Lawyer's delight when her husband (who thrift-shops so effectively he is practically a pro at it) found a pattern-stuffed basket sitting beside the curb one day (a few years back). The first funny thing about this story is that he was originally attracted to the lidded woven basket, because he recognized it as the twin of a basket in the sewing room at home. The second is that the patterns it contained were, in many cases, equally the twins or close relatives of many in The Sewing Lawyer's own past, and they were her size! Cue up the theme from The Twilight Zone...
Here are a few examples.
I should make them again, I've often thought (BTW my copy is size 10).
Then there is this wrap skirt. I rarely purchased "See & Sew" patterns but I adored the photo on the front of this one. I made the skirt from a light bottom-weight warm beige poly-cotton and I took it with me on my solo trip to Europe in the summer of 1978. It was perfect - went with anything, did not wrinkle, was modest enough to wear in churches and dressy enough for anywhere a backpacking student-hostel staying girl was likely to go, and drip dried in a matter of minutes, it seemed. The back wrap is generous enough that wearing it in the wind was no problem, and the ties are definitely not skimpy. What a great skirt (sigh). I should make this one again too. The pattern from the basket is still in its factory folds.
Maybe I have such a thing in my stash.
Or maybe I ought to get back to my grey summer suit...
Monday, June 20, 2011
Tell me true...
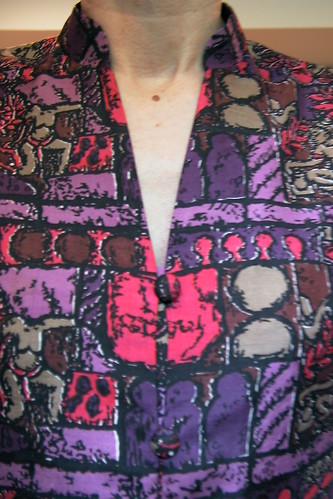
Does this look OK?
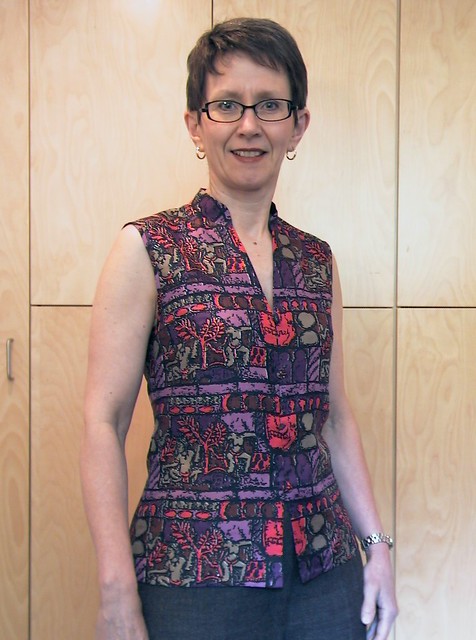
 It's a shirt I made years ago, using a Burda WOF pattern from June, 1996. I was enjoying looking through the magazine as the shift in fashion means the styles are not looking too outlandish. If you keep something long enough, it becomes fashionable again.
Anyhow, the shirt has deep side seam slits and I've always really liked it but at the tunic length it seems hard to wear it with lots of things. So I made a pair of leggings.
Having worn tunics and leggings first time around, I'm wary of going out in public in these.
It's a comfortable and cool outfit, however.
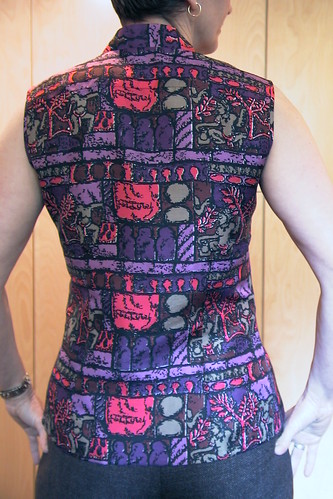
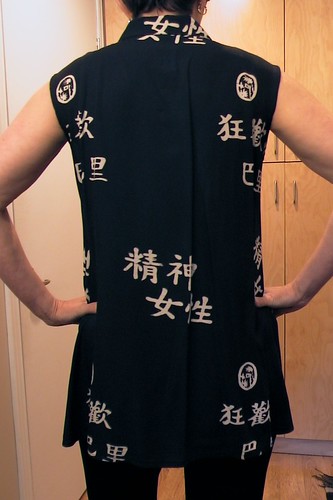 From a sewing point of view, you can readily see the mistake I made when cutting - I very narrowly escaped the BULLS EYE effect. I don't like it when there is an obvious doubling of a noticeable print element on either side of the CF, always off centre for some reason. If I was doing this again, I'd probably cut the fronts single layer to avoid this. The back worked out better.
The text probably says something inane...
Anyhow, the shirt has deep side seam slits and I've always really liked it but at the tunic length it seems hard to wear it with lots of things. So I made a pair of leggings.
Having worn tunics and leggings first time around, I'm wary of going out in public in these.
It's a comfortable and cool outfit, however.
The text probably says something inane...
Sunday, June 19, 2011
In lieu of actual sewing results ...
The Sewing Lawyer will write instead about sewing process.
I have learned over the years to take my time in the preparation of my projects. Before actually starting to sew Vogue 8718 and its coordinating skirt, I had to:


I have learned over the years to take my time in the preparation of my projects. Before actually starting to sew Vogue 8718 and its coordinating skirt, I had to:
- Choose the fabric, including all the inner layers (lining, underlining, and interfacing). I eventually decided to underling with white silk organza, even though I have some grey in stash, because the grey is a little too stiff and substantial for the tropical weight wool.
- Prep the fabric. This included steam shrinking/pressing the wool with my super-duper gravity feed iron, while checking and marking with safety pins all the little flaws. I also had to iron the Bemberg lining and the silk organza, which had been sitting in a bin folded up for quite some time.
- Cut all layers. In this process I had to pay attention to the many jacket pieces which had to be cut x 4 (the peplum and front edge pieces are self-lined), which needed to be cut x 2 in the wool and x 2 in lining, and which had to be cut as well from interfacing. I decided to underline all the body pieces that were not being interfaced with my chosen fusible, and to cut the sleeve underlining on the bias to avoid stiffness in the draped/pleated sleeves. Other decisions (like whether to use the organza selvedge to stay the front edges or a fusible tape, and whether to use the slightly stiffer grey organza to underline the peplum as well) will be made as I go.
- Go and buy grey thread. I also bought a spool of matching topstitching thread because I think I want to topstitch at least some seams and/or edges, although I haven't quite decided
Right now, I am at the stage of having pinned the organza underlining to the wool. True confession time: I am not going to hand-baste the organza to the wool along the seam line (!!) - I am going to machine-baste. So far I am still of the view that life is too short for hand-basting and thread-tracing and the like. I've had entirely acceptable results before without having resorted to these somewhat laborious techniques and I'm not convinced that the effort is worth the possibly-more-beautiful results. Feel free to try to convince me otherwise...
Despite my unwillingness to go to the trouble of thread-tracing, I have (as you may be able to tell from some previous projects) come around to the view that an aversion to hand-sewing is not consistent with my objective of producing well-sewn and properly-finished clothing. I took an on-line class from Susan Khalje last year through PatternReview. It was just in time for to give me what I needed to know for making my not-necessarily-black-not-necessarily-a-dress cocktail outfit for last year's PR Weekend in Montreal.
Two things of which I am now completely convinced re hand-sewing:
- Waxing the thread makes it a far more enjoyable process. Say goodbye to knots and tangles. Waxed thread pulls smoothly through the fabric and is less likely to break or tie itself in knots while you are trying to work with it.
- Using better quality needles will also make hand-sewing a better experience.
And there is one thing I am not completely convinced of yet, but am working on:
- Using a thimble may make one a better hand-sewer.
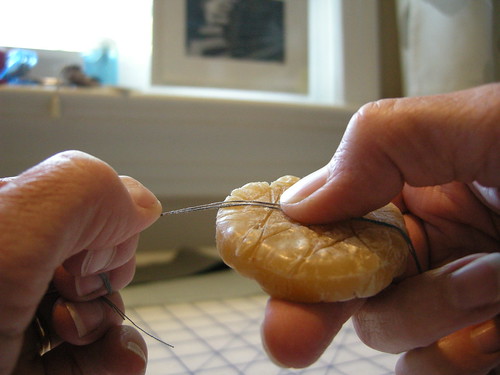
Here's how to wax thread. Cut some lengths of your chosen colour, about 40-50cm (15"-18") long. Hold them firmly at one end, and pull them through a block of beeswax. You can see I'm holding the thread against the wax block, and pulling down slightly as I pull the threads through. Repeat a few times, to ensure that there is a more or less even amount of wax on all the threads for their entire length.
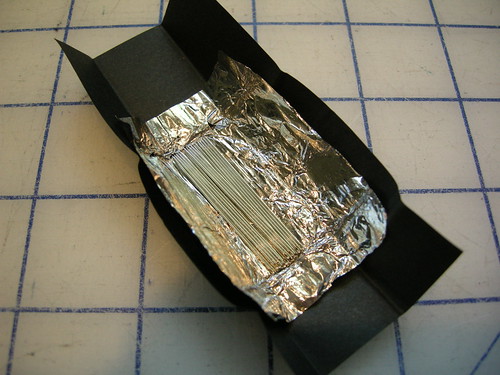
Then put the thread between two sheets of paper towel. Go over the paper towel with a dry iron. You'll see the shape of the threads on the outer sheet as the wax melts into the thread and onto the paper towel.
Simple. The result is a slightly stiff, strengthened and smooth length of thread. It's easier to thread your needles with waxed thread, and generally easier to use.
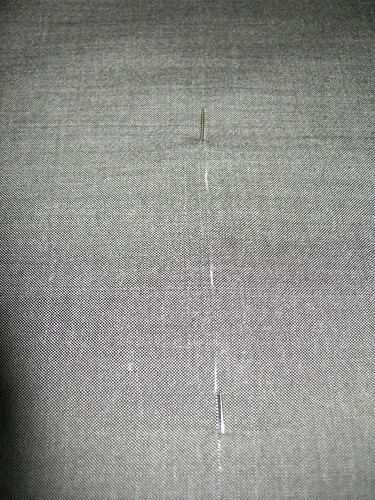
I splurged on some Japanese hand-sewing needles which I purchased from Susan Khalje. They are pretty expensive if you measure by the pound but I figure one package will last years if not my lifetime. These needles are very fine but strong, with a tiny hole (good for hand-eye coordination) and they feel very luxurious somehow.
The whole thimble thing still feels very awkward but I am going to persevere until I get the hang of it and it seems natural. I was doing some hand-sewing recently without a thimble and managed to practically shred my fingers because the fine ends of the Japanese needles are quite pointy! I do not think I could tolerate the standard closed-end thimble but in my sizeable thimble stash there was one little tailor's thimble with an open end which I like a lot better.
Googling "tailor's thimble" reveals that they are available for sale in different sizes, and how to use one. Based on the pictures on the English Cut, I clearly need to work on my technique.
Sunday, June 12, 2011
Cutting in tandem
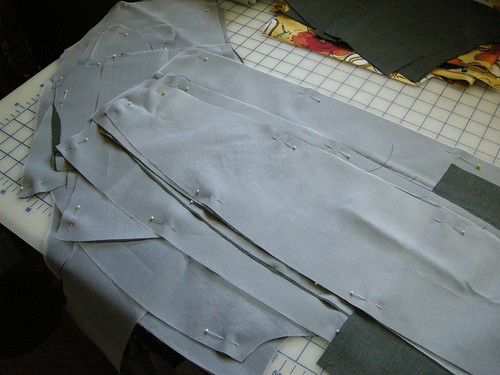
Yes indeed, that grey Vogue 8718 jacket is cut out, along with a matching basic princess seam slightly-pegged pencil skirt which is another one of The Sewing Lawyer's TNT patterns created with Patternmaster Boutique. It has already been the foundation of so many skirts (like the high-waisted black pencil skirt and its non-identical twin, but there are others from pre-blogging days). It's such a workhorse of a pattern.
 So many decisions need to be made when cutting. One problem was that my fabric had flaws - little irregularities in the otherwise smooth slightly varied grey surface - which I had to cut around. I located them all with safety pins so it is easy to tell where they are. The pins make little bumps in the otherwise very smooth surface on my cutting table.

There are about a million little pieces in Vogue 8718, plus two over-sized ones. Just have a look at this cutting diagram ...
On the bright side, this makes it really easy to avoid having the flaws show up anywhere important.
Many of the jacket pieces are cut x4, including the pieces at the front edge, and all the peplum pieces. I'll hide a few of the little flaws in the peplum lining. It'll be our little secret.
I made a muslin of size 10, which fit me almost perfectly. I cut almost all of the muslin pieces out of the taken-apart muslin for a dress: Simplicity 2648 (the sleeveless view). This illustrates that (apart from the sleeves) Vogue 8718 indeed takes very little fabric!
 Speaking of the sleeves, have a look at the pattern for the back sleeve. The corresponding lining piece is on top for comparison. The texture of the sleeve is created by tacking the two layers together at marked spots.
Another decision is which interfacing to use. The Sewing Lawyer has a big fusible stash, picked up a few metres here and there at different stores when she finds a new type to try. This is good and bad. Good because of the variety; bad because she never knows exactly what type of interfacing she used when people ask. "It's that slightly-lofty tiny-square interfacing that's good for lightweight fabric" or "It's that fuzzy non-woven with a shiny stripe in the length" doesn't convey as much useful information as, say, "It's Pam Erny's Pro-Weft in black". (BTW I have ordered from Pam - very high quality and good prices.)
I generally audition interfacing by fusing medium sized pieces to scraps to get a sense of how the hand and drape of the fashion fabric will be affected. I often use more than one type in a jacket. In this jacket, I think I'll interface the shoulder area of the sleeves along with the fronts and the collar as Vogue instructs.
I've decided on the lining - a silvery-putty coloured Bemberg from stash. However, still to determine is whether I will underline the jacket with silk organza. I think it could help keep the sleeves from even thinking about collapsing.
So I cut out both patterns - Vogue 8718 and Simplicity 2648 - today. The dress is one of the "Perfect Fit" patterns from Simplicity. It boasts different cup sizes as well as "slim", "average" and "curvy" fit. I am one of the lucky souls who wears a B cup so not having to do a FBA is my normal (don't hate me). However, I was curious about the difference between the slim, average and curvy fit, because one of my standard alterations is to grade out two sizes (usually) at the hip. It turns out that "curvy" is all about one's derrière, since only the back skirt pieces vary. (If you also have a curvy lower front, there are princess seams to modify.) The curvy back gives a finished hip measurement which is bigger than the average fit which in turn is bigger than the slim fit. The pattern envelope says there is a .5" difference between the different pieces for the same size. Also, the curvy back has 2 darts instead of one. I cut the curvy back which is not bad once I lengthened the darts.
 I haven't figured out yet if the fabric for my dress will look any good with the grey jacket-to-be. It's a cotton & lycra from Fabricland, purchased a few years ago. What do you think?
There are about a million little pieces in Vogue 8718, plus two over-sized ones. Just have a look at this cutting diagram ...
On the bright side, this makes it really easy to avoid having the flaws show up anywhere important.
Many of the jacket pieces are cut x4, including the pieces at the front edge, and all the peplum pieces. I'll hide a few of the little flaws in the peplum lining. It'll be our little secret.
I made a muslin of size 10, which fit me almost perfectly. I cut almost all of the muslin pieces out of the taken-apart muslin for a dress: Simplicity 2648 (the sleeveless view). This illustrates that (apart from the sleeves) Vogue 8718 indeed takes very little fabric!
Another decision is which interfacing to use. The Sewing Lawyer has a big fusible stash, picked up a few metres here and there at different stores when she finds a new type to try. This is good and bad. Good because of the variety; bad because she never knows exactly what type of interfacing she used when people ask. "It's that slightly-lofty tiny-square interfacing that's good for lightweight fabric" or "It's that fuzzy non-woven with a shiny stripe in the length" doesn't convey as much useful information as, say, "It's Pam Erny's Pro-Weft in black". (BTW I have ordered from Pam - very high quality and good prices.)
I generally audition interfacing by fusing medium sized pieces to scraps to get a sense of how the hand and drape of the fashion fabric will be affected. I often use more than one type in a jacket. In this jacket, I think I'll interface the shoulder area of the sleeves along with the fronts and the collar as Vogue instructs.
I've decided on the lining - a silvery-putty coloured Bemberg from stash. However, still to determine is whether I will underline the jacket with silk organza. I think it could help keep the sleeves from even thinking about collapsing.
So I cut out both patterns - Vogue 8718 and Simplicity 2648 - today. The dress is one of the "Perfect Fit" patterns from Simplicity. It boasts different cup sizes as well as "slim", "average" and "curvy" fit. I am one of the lucky souls who wears a B cup so not having to do a FBA is my normal (don't hate me). However, I was curious about the difference between the slim, average and curvy fit, because one of my standard alterations is to grade out two sizes (usually) at the hip. It turns out that "curvy" is all about one's derrière, since only the back skirt pieces vary. (If you also have a curvy lower front, there are princess seams to modify.) The curvy back gives a finished hip measurement which is bigger than the average fit which in turn is bigger than the slim fit. The pattern envelope says there is a .5" difference between the different pieces for the same size. Also, the curvy back has 2 darts instead of one. I cut the curvy back which is not bad once I lengthened the darts.
Saturday, June 11, 2011
Detour
What words ended that last post? Something about Vogue 8718? Oh yeah... Well I lied changed my mind. Only for a minute, you understand. It was just a detour. I'm still heading there. Um. Very soon. Like maybe later today.
In the meantime, I am not sure exactly why, I started auditioning blouse fabrics with the extremely lightweight wool I have earmarked for Vogue 8718. It's grey.
A grey summer suit?
Yes, it's grey.
But it's from stash.
I am NOT shopping for yet more fabric.
For this. (I made an exception for the buy-one-get-two-free Bemberg lining sale at Fabricland today ... and the black and light khaki coloured pantweight fabric for capris and/or summer-weight jeans on the same sale.)
And it's extremely lightweight.
 And I don't want to use linen because I'm worried about those crazy sleeves wrinkling and not being able to do a darned thing about it.
It will be good in the warm parts of spring and fall too.
It's a good neutral.
It will go with lots of things.
So there. I'm making a grey summer suit!
Soon.
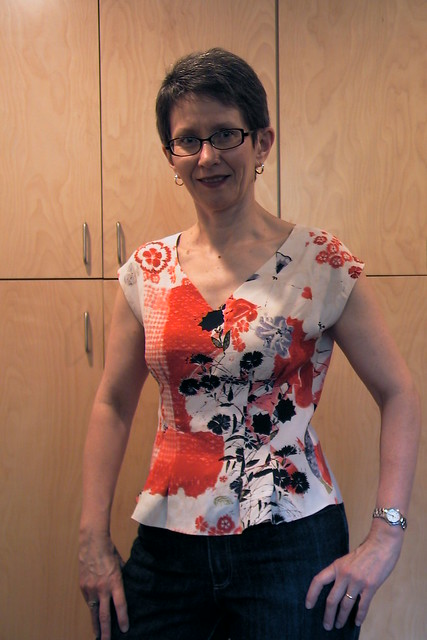 In the meantime, I was auditioning blouse fabric and I came across this little piece of rayon crepe that I picked up for next to nothing a few years back at the Fabric Flea Market. The print has a definite Japanese influence and the repeat is huge. I loved the print with the grey suiting. But I only had a little bit - not even the full width and less than 1 metre. Hmmmm what could I get out of this tiny scrap?
Enter this pattern from the November, 2007 edition of Burda World of Fashion.
 So simple.
Takes SO little fabric.
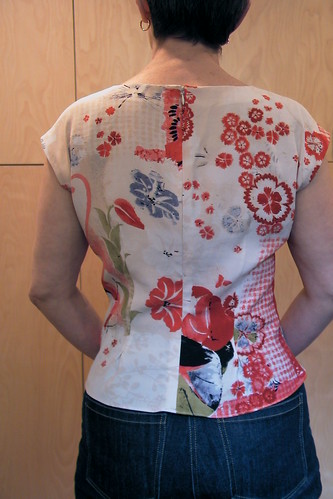 I was lucky too, because I could cut so as to spread the entire crazy motif pleasingly across the front. The back is a little less pleasing. Or maybe just more ordinary looking.
As you can see from the line drawing, the shaping is provided by tucks that release at top and bottom in the front. The back has 2 vertical darts that release at the bottom in a similar way. It's not exactly a ruffle. It should function as a subtle echo of the not-exactly-ruffled peplum of the Vogue 8718 jacket.
If you should have this edition of WOF and think of making this, I warn you that the neckline is extremely wide/deep. I added approximately 2.5cm on all neckline edges and it isn't exactly closed-in even now.
Also, that back zipper is necessary if you are not using a knit for this top.
Off I go to contemplate Vogue 8718. Really.
In the meantime, I am not sure exactly why, I started auditioning blouse fabrics with the extremely lightweight wool I have earmarked for Vogue 8718. It's grey.
A grey summer suit?
Yes, it's grey.
But it's from stash.
I am NOT shopping for yet more fabric.
For this. (I made an exception for the buy-one-get-two-free Bemberg lining sale at Fabricland today ... and the black and light khaki coloured pantweight fabric for capris and/or summer-weight jeans on the same sale.)
And it's extremely lightweight.
It will be good in the warm parts of spring and fall too.
It's a good neutral.
It will go with lots of things.
So there. I'm making a grey summer suit!
Soon.
Enter this pattern from the November, 2007 edition of Burda World of Fashion.
So simple. Takes SO little fabric.
I was lucky too, because I could cut so as to spread the entire crazy motif pleasingly across the front. The back is a little less pleasing. Or maybe just more ordinary looking. As you can see from the line drawing, the shaping is provided by tucks that release at top and bottom in the front. The back has 2 vertical darts that release at the bottom in a similar way. It's not exactly a ruffle. It should function as a subtle echo of the not-exactly-ruffled peplum of the Vogue 8718 jacket.
If you should have this edition of WOF and think of making this, I warn you that the neckline is extremely wide/deep. I added approximately 2.5cm on all neckline edges and it isn't exactly closed-in even now.
Also, that back zipper is necessary if you are not using a knit for this top.
Off I go to contemplate Vogue 8718. Really.
Sunday, June 5, 2011
Unruffled
The Sewing Lawyer is not really sure what drew her to the ruffled blouse in the April 2010 edition of Burda Magazine in the first place. Probably it was not the ruffles. Nor could it possibly be the side zipper opening, or the deeply plunging front neck. All of these features have been eliminated or significantly altered in the Sewing Lawyer's version. She did give the ruffle a try, despite knowing that it would not be satisfactory. Forty or so years of sewing experience does sometimes enable one to predict when some feature of a garment will be completely wrong. Too bad they don't always allow one to avoid going ahead regardless. The Sewing Lawyer fatalistically reacquainted herself with her trusty seam ripper.
 First, she tried cutting the ruffles down, dramatically. Remember the attack of the ruffles, take 1? Well, take 2, while marginally better, was not enough of an improvement. Off they came ... again.
 In the end, the Sewing Lawyer's version of the (formerly) ruffled blouse is both less and more. It's ruffle-less, zipper-less, and less plunging. It's more buttoned up, more in keeping with the usual style around here, and will be worn more too. It's all good!
Here's a view of the back.
I'm happy with the print matching. There is a yoke seam at the upper back...
 I'm also happy with the fact I was able to re-use the exquisite button loops and self-covered buttons from the plug-ugly skirt that this top was refashioned from. (I don't think I gave details earlier. This project started life as a thrifted floor-length skirt made from Thai silk. A button-up dirndl, floor length, is not a great thing. However, a dirndl will yield quite a lot of usable yardage, it had these beautiful tiny loops and self-covered buttons, the silk has a great hand, and I loved the quirky print and the colours. Finding that the skirt was slightly musty, after taking it apart I threw the pieces into the washing machine. It came out perfectly.)
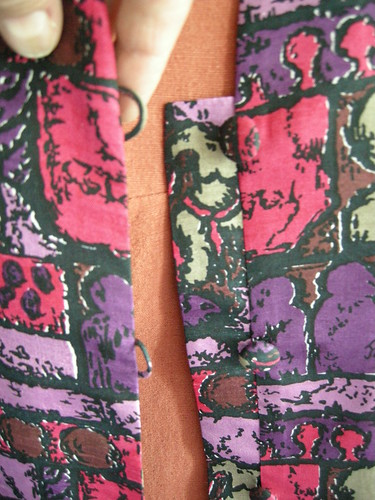 I turned the original cut-on-the-fold front into a button-up by virtue of adding a seam allowance at CF instead. Instead of an overlapping front, I added a little shield to sit behind the loops. It is barely visible, as you can see to the right, which means it was necessary.
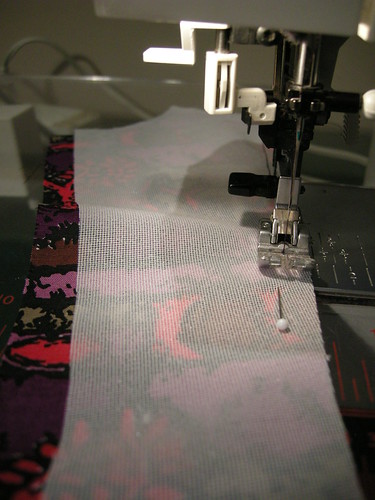
 Some additional details. First, the armhole edges are finished with a very narrow self-fabric bias strip. I didn't initially read the magazine instructions (as usual) and thought the strip would make a little facing. When I went to apply it I realized it was too narrow. Then I read the instructions which, as usual, are slightly incomprehensible. If I correctly understand them, Burda wanted me to trim off the seam allowances at the armscye and encase them in a double-folded strip which I would be sewing in one pass. Yeah right. Instead, I cut off the seam allowances, and sewed the unfolded bias strip the desired distance from the raw edge, right sides together. I then folded that over and, on the wrong side, pressed the raw edge up into the fold. Finally, I stitched in the ditch from the right side, catching the wider folded edge underneath. You can see both inside and outside in the picture to the left.
 Second, like several other bloggers of late, I clean-finished the facings using fusible interfacing. I do not know who to credit with this technique. It's fantastic - both easy and producing an obviously superior result. There is a tutorial over at Sigrid's site (from Lori V's blog, Girls in the Garden) but, thinking a few more details would help, I took some pictures while this was in progress.
First, cut your fusible as usual using the facing pattern piece. Lay the unfused interfacing on the facing, right sides together (that means with the glue side NOT against your fashion fabric). Sew the 2 together along the edge(s) of the facing which will not be sewn to the garment edge.
I think my seam was about .25" which ended up being about right, because this made the fusing a little bit easier than it might have been, I think.
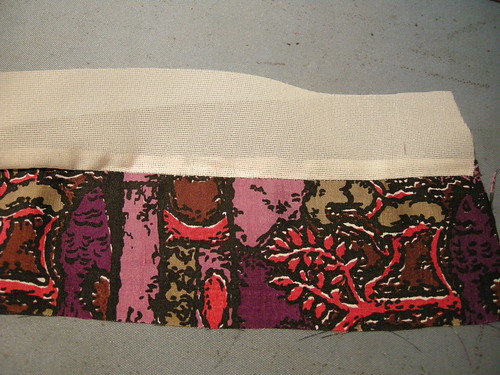 So here is the beginning of the fusing process, in which I use the seam allowance to help me open the seam completely and cleanly.
I started the fusing by opening the seamed unit, and fusing in the seam allowance only while gently holding the fusible interfacing taut and away from the facing. In the photo to the right, the seam allowance is fused to the right, unfused at the left side. Obviously you have to do this carefully and just with the tip of the iron, to avoid sticking your interfacing to the ironing board cover.
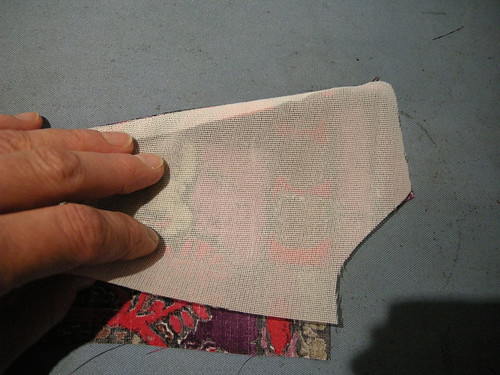 Then carefully fold the interfacing over so the seam is barely on the fused side and the interfacing won't show from the right side. Fuse, starting from the seamed edge.
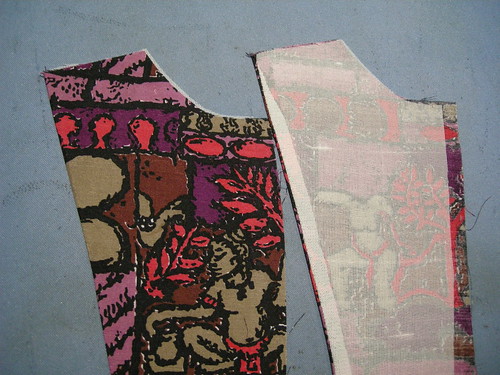 This fusing technique is trickier than the usual where you can take care of any misplacements by trimming away the fusible edges. But it's worth it. You end up with a perfectly finished edge.
My next project? I'm planning to take Vogue 8718 out of its envelop and contemplate its mysteries.
 First, she tried cutting the ruffles down, dramatically. Remember the attack of the ruffles, take 1? Well, take 2, while marginally better, was not enough of an improvement. Off they came ... again.

Here's a view of the back.
I'm happy with the print matching. There is a yoke seam at the upper back...


 I turned the original cut-on-the-fold front into a button-up by virtue of adding a seam allowance at CF instead. Instead of an overlapping front, I added a little shield to sit behind the loops. It is barely visible, as you can see to the right, which means it was necessary.
 Second, like several other bloggers of late, I clean-finished the facings using fusible interfacing. I do not know who to credit with this technique. It's fantastic - both easy and producing an obviously superior result. There is a tutorial over at Sigrid's site (from Lori V's blog, Girls in the Garden) but, thinking a few more details would help, I took some pictures while this was in progress.
 First, cut your fusible as usual using the facing pattern piece. Lay the unfused interfacing on the facing, right sides together (that means with the glue side NOT against your fashion fabric). Sew the 2 together along the edge(s) of the facing which will not be sewn to the garment edge.
I think my seam was about .25" which ended up being about right, because this made the fusing a little bit easier than it might have been, I think.

I started the fusing by opening the seamed unit, and fusing in the seam allowance only while gently holding the fusible interfacing taut and away from the facing. In the photo to the right, the seam allowance is fused to the right, unfused at the left side. Obviously you have to do this carefully and just with the tip of the iron, to avoid sticking your interfacing to the ironing board cover.


My next project? I'm planning to take Vogue 8718 out of its envelop and contemplate its mysteries.
Subscribe to:
Posts (Atom)


