Saturday, July 26, 2014

This is magic

Purple Haze Cardigan
I have a new knitting project.  It's going to be a V-necked cardigan someday.

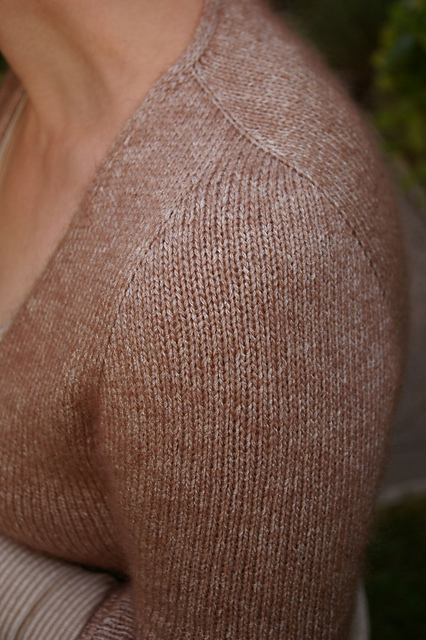
What's so magical?  Its perfect top-down seamlessness.  Moreover, look at the shoulder!  (Mine is a little wonkier than this one, but one can dream.) The pattern is Slanted Sleeven by Ankestrick on Ravelry. It's a contiguous pattern - contiguous knitting is a technique where you knit the back, front and shoulder/sleeve cap seamlessly and top-down. Some contiguous patterns aim at a sleeve that mimics a set-in style but this one looks more like a classic seamed knitted shoulder.  I think it's brilliant.

I'm making my cardigan with ColourMart yarns - 100% alpaca held together with a cashmere/cotton lace weight to get a deeper, richer colour (which is impossible to photograph accurately) and the right gauge.  Once the yarn is washed after knitting, it fluffs up and the knitting evens out beautifully.


Sunday, July 20, 2014

Miscellaneous developments

I finished my latest knitting project.   Here it is on Ravelry.  It's a cotton top and I fear it may become an orphan.  It's too dark to coordinate with grey or black.  Why didn't I anticipate this?

This is the same cotton slub yarn I used last year for some rather more successful items.  But this is heavier.  It's knitted with four strands of the lace-weight yarn that I used single for my Ethereal top and double for my Featherweight cardigan.

Unfortunately, the tendency of this yarn to bias is not manageable at this weight.  I shall have to learn to live with a top that twists.

I went to Montreal on the weekend to meet up with some other bloggers.  Strangely, I do not have a single photo of this gathering!  Among the group were Caro (our fearless leader), VickiAnne-MarieClaire and Julie.  Heather Lou of Closet Case Patterns also joined us after work on her very last day.  Watch for more from her, coming soon!

For anyone who is interested in fabric shopping in Montreal, Caro prepared guides to two distinct fabric shopping areas in the city:  St-Hubert Street and Chabanel.  To shop Chabanel, where we went on Friday, you have to have the addresses since most of the stores are well-hidden on the 4th or 7th floor of several non-descript buildings.  Most of the businesses are not open on weekends, unfortunately.  I demonstrated remarkable discipline, picking up only two pieces.

One is tentatively earmarked for Vogue 8904 - the Marcy Tilton shingle dress.

Yikes that model is long and skinny!

I had a look at the instructions and noticed that each of the shingles is sewn on a full dress piece, so this dress has at least 2 layers of fabric on every square inch. Also, the lower edges of each shingle are supposed to be left raw.

I will look in my stash for a lightweight and smooth knit to use as a base since the fabric I bought has texture. Also, I will experiment with small hems since I have no interest in the tightly rolled edges that my jersey fabric will probably make (especially after washing).

I'll get right on that project since summer is fleeting.


Meanwhile, Vogue 1385 is in time-out.  I cut the longer length and it is practically a dress. I need to  decide how much to remove so I can wear it as a shirt (in or out).  I think I'll make a tie belt for it.  And then I need to figure out what to do about buttons. And, more to the point, buttonholes.  I don't really look forward to sewing them in this fabric.

.

Given the properties of my fabric, I had decided to sew French seams using a narrow serged seam in the first pass.  Imagine my surprise to see that this is exactly what the instructions say to do!  It worked very well.

The order of construction is strange.  You sew the raglan seams together, then apply the facings, and only after that do you make the darts that shape the neckline.  It is, in consequence, impossible to try this on as you are making it.  At left, I'm pinning the darts out prior to applying the facings to see if it is going to work.

(Those hairy white blobs you can see are little pieces of white paper labels holding down poorly-done tailors tacks - the only way I could think of to mark the many points that needed marking on my strange fabric.)

I made the facings from grey silk organza to avoid bulk and to keep the facing as invisible as possible.  It's not my best ever work, but will do.

As for style/fit, my only dislikes are that the armscye is pretty low and I find the transition from the pleated/ruffly front neckline to the smooth back neckline a little abrupt.  It's a bit too "coffin clothes" for my liking.

At right is the most graphic view of that.  If I was going to make this again, I would monkey with the pleat at the shoulder to make it less full, and add at least a couple more pleats at the back raglan seam and somewhere in the back neckline.  Not to add fullness or shaping, just enough to keep the effect going.


Sunday, July 6, 2014

A long tunic top

Yes, a long tunic top is what I need to wear with these.

I suppose the basic fit is better, but as usual a different fabric (lots more stretchy recovery in this RPL doubleknit) makes a world of difference to the garment.


There is still a bit of extra length in the back.  Sigh.

For my next sewing trick I'm going to try Vogue 1385.  I was drawn to this pattern when it first came out, and a couple of prolific bloggers (Margy and Shams) have made truly wonderful garments from it.  I love the pleated neck and sleeves, and the raglan sleeve seams in back.


I'm using this fabric.  It's a fuzzy yarn (probably acrylic) embroidered on a silk (chiffon?) background. I threw caution to the winds and cut it out without testing the fit first.


I'll use silk organza instead of self-fabric for the facings.

I'm hoping for a nice looking but light weight topper for the rest of the summer.

Friday, July 4, 2014

That flat seat thing

I decided to tackle the Barb Pant pattern issues while I could still remember what they were.  

Step one:  pin out the extra fabric.

It's an awful lot.  When I undid the pinning (having replaced the pins to outline what had been pinned out) this is what I was confronted with.

It's roughly 2cm of length below the back waist, and 2.5cm at the widest point of each under-seat fisheye dart.  

Step two:  draw that on the pattern piece (at right).  Hmm ... that was strangely easy.  But now what?

Step three: think.  How the heck do I get those adjustments to the outer edge?  Photo at left was an effort to see if I could use the technique that Kenneth King wrote about in issue 102 of Threads Magazine. Basically, you measure the pinned out dart at each line and then take that amount out at the other end of the line you have drawn perpendicular to the CL of the dart.  The result here (red lines show the adjusted seam lines) didn't fill me with confidence, since it would have the effect of taking horizontal width out of the CB which I am pretty sure wasn't part of my problem.  

Step four:  research.  Good old Google.  I plugged in the term "flat seat adjustment" and up popped (among many other sites) the brilliant Flickr tutorial authored by the brilliant Ann Rowley.  

All of my faithful readers will no doubt recognize this elegant lady, the winner of the first go-round of the Great British Sewing Bee.  She is a talented knitter as well as a fabulous seamstress.  Her photo exposé on the making of Vogue 8804 (the Chanel-ish jacket, my version of which is languishing for a second summer in a UFO closet of shame) beautifully illustrates all 94 (94!!) steps from the pattern instructions.  I bow down to Ann Rowley, truly.  

But I digress.  Her flat seat adjustment instructions are oh-so-simple and, miracle of miracles, they end up producing precisely the result I am pretty sure I need.  

Cutting lines
Step five:  Slice, dice and adjust. Mark one cutting at right angles to the straight of grain, through the crotch point; one running up through the waist, parallel to the grain; and one at an angle intersecting with the crotch curve.  

Adjusted pattern
The result is at right. Black marks the cutting lines, green shows how much they are overlapped.  Blue shows the original pattern piece outlines and red shows the adjusted piece.  As you can see, the crotch curve is lower and the CB seam is more vertical (less darted).  The back waist is lower and the side seam more curved.  

I followed Ann Rowley's instructions to the letter, including the amounts she said to adjust.  This had no automatic relationship with my particular figure, but it so happens that the distance between the more or less horizontal green and black lines (the fisheye dart in action) is 2.5cm, which is exactly what I needed to remove as per my pinned out darts.  The adjustment also narrows the back waist somewhat, which I needed to do anyway, so I will not add this back at the side seams.  

The question remains whether I need to take more length out at CB.  I will try sewing this pattern as adjusted to this point, having taken Ann Rowley's words of wisdom to heart:  

"The suggested size of the diagonal overlap may be adjusted but even so you're unlikely to get a totally flat smooth seat. Do remember that you need to bend, stretch and most importantly, sit down! Don't be tempted to over fit ."

Stay tuned.  

Tuesday, July 1, 2014

In the interests of science I will show you these pictures

Until last week, The Sewing Lawyer has been able to defend herself from all transient thoughts that perhaps all those other bloggers who looooooove Style Arc are probably on to something pretty good.  But when the company recently offered a digital download copy of their Barb's Stretch Pant pattern to anyone willing to subscribe to its newsletter, resistance was futile.

So how did I spend my Canada Day mid-week holiday?

Looks good from the front ...
Testing the pattern, of course!  I used some beefy and synthetic sort of double knit from deep stash.  It has 50% stretch width-wise but no lycra (I think).  It is an unfortunate colour for trousers, but this is a muslin so who cares?

The only problem is that these are seriously comfortable.  I might actually want to wear them...  But maybe not outside the house or with top tucked in.

Style Arc sent me 3 sizes (the size I chose as the best match to my measurements plus one smaller and one bigger) which was very generous, since one of the reasons I haven't been a customer was reluctance to commit to a single size.  I had chosen the size 10 because it was the closest to my hip measurement (38.6" or 98cm) but my waist is between sizes 6 and 8.  If I was making a top, I'd probably go with an 8.

In the interests of science, I did not do a single modification before cutting these out, despite the fact that the back piece didn't look like most of the pants patterns that fit me. This draft is clearly for someone who has a bigger/more projecting derrière.  Normally I'd prefer a more scooped back crotch curve with less of a big ole dart (i.e. a more straight up and down CB seam).

And the camera shows that I was right to be skeptical.  There is fabric pooling below the waistband and a lot of excess at the back upper leg.  From the side, you can see how flat I am.  


I also knew the waist would be too big and it was.  I took approximately the 5cm (2") difference between sizes 8 and 10 out by way of a side-seam dart, blending to nothing at the full hip.  I took a corresponding amount out of the waist band piece.

So what is the verdict?

Well, if I was going to make these to wear out of the house, I'd clearly have to tweak the fit. Nothing so surprising about that.

As for style, Style Arc describes these as featuring a "slimmer leg but not too slim, perfect for the office".  The leg width is pretty perfect.  I'm not sold on the pull-on stretch pants for my office wardrobe, however could definitely imagine wearing this style with a casual tunic length top or sweater.

In other news, I managed to snap this photo of the Snowbirds flying in formation over my house today on their way to Parliament Hill.  Happy Canada Day!