Monday, October 23, 2023

Mission accomplished - Dawn jeans


Here I am enjoying my new Dawn jeans on a wonderfully sunny, if quite chilly day. Winter is definitely coming, but there are still plenty of leaves on the trees. 

What to say about these?

They are very comfortable. Time and wearing will tell me if I should have made them snugger through the hip. 

I did slightly overreact on the waist seam adjustment as informed by my TDCO fitting experiment. I took something less than 1cm out of the front length and brought the back up by about 1.5cm at the very CB - these are sewn with a 4mm seam allowance at that point in compensation.

The back waist band could stand to be a bit more curved as it is standing away from my body very slightly at that point. Not enough to fret about. Indeed, I predict I will forget about it shortly.  Otherwise, I'm super happy with the fit in the back. 
I used a fun print for the pockets and waistband lining.  For the buttonhole, I resorted to my trusty Singer Featherweight with the buttonholer. 
Do they make my legs look longer? I hope so!


Wednesday, October 18, 2023

1970s? Your jeans are calling

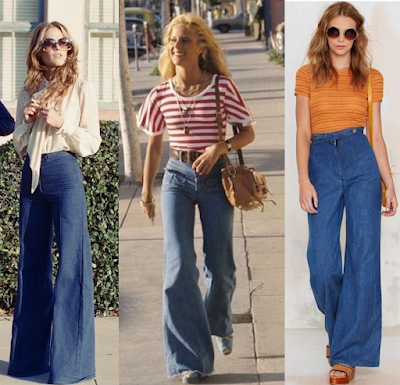
I lusted after jeans with long, wide legs in the 1970s. I have a specific memory of an ad that featured an impossibly leggy young woman wearing such a pair. If she had feet, it wasn't apparent; the hem of her jeans skimmed the floor around her (no doubt) very high platform shoes.

I thought this photo might pop up on the internet but sadly it did not. Instead, I found a bunch of snaps that will show you the general vibe, capturing my wish for my current sewing project. 


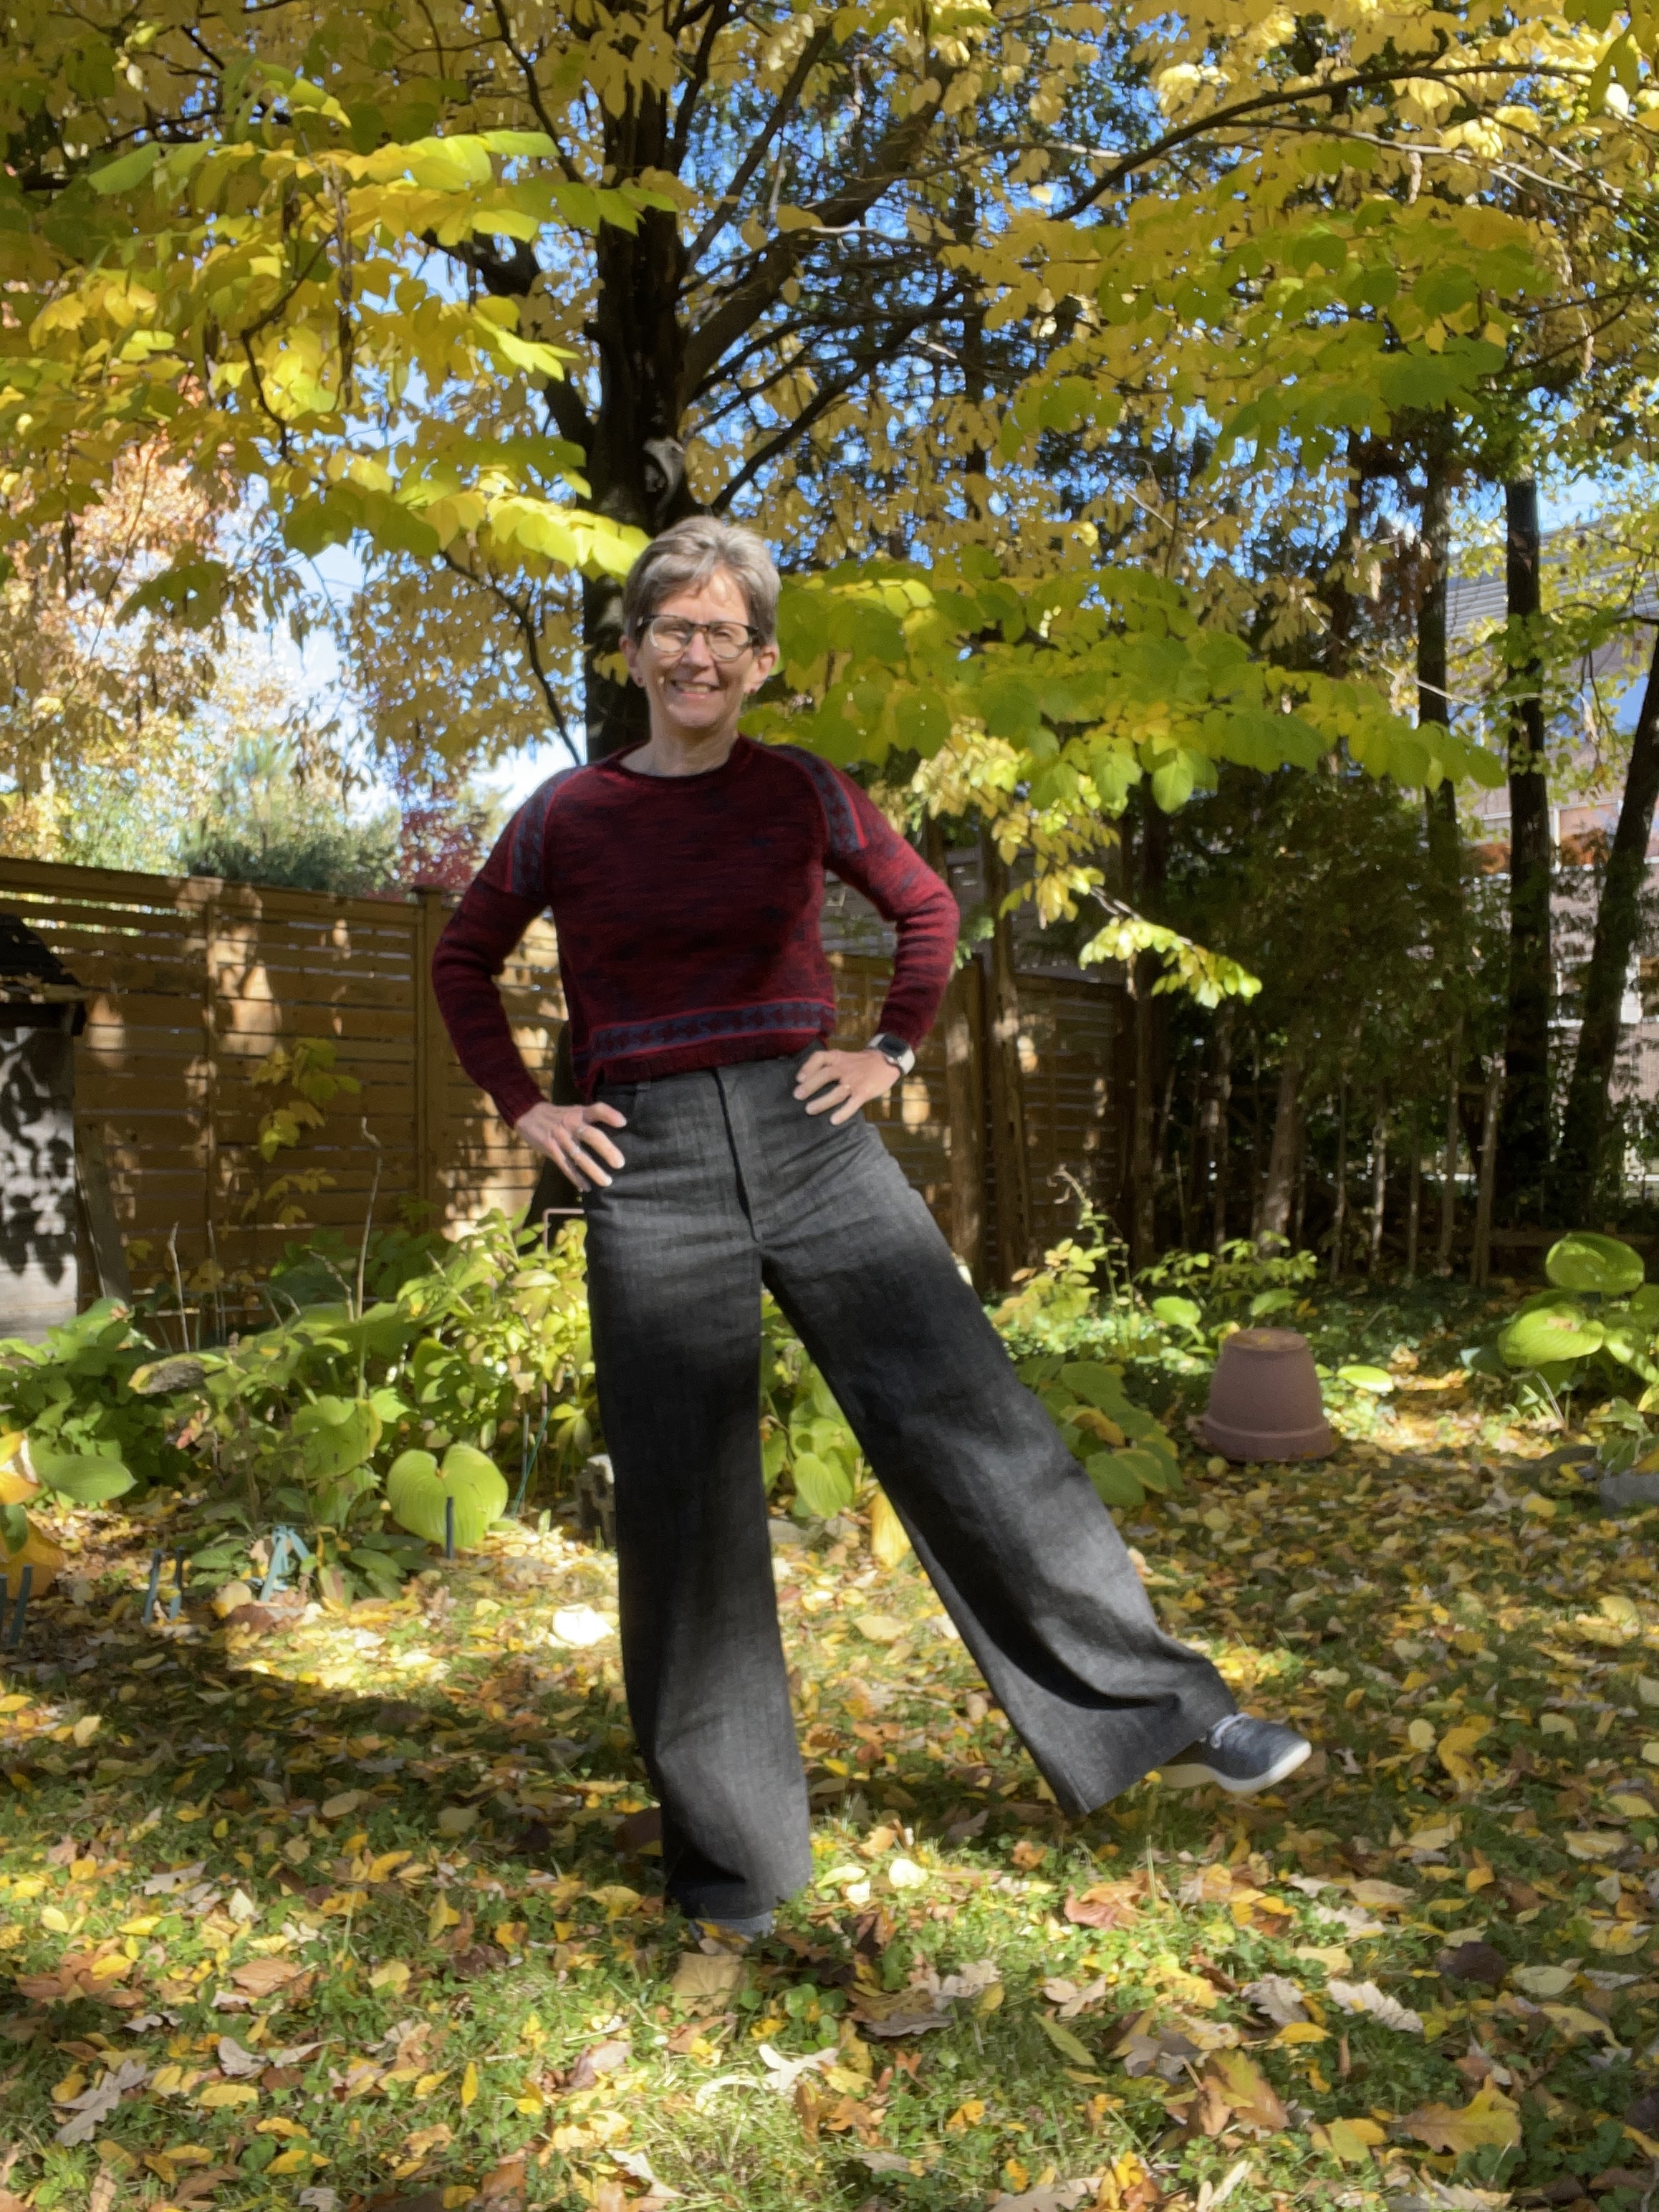
The essential features:
  • The waistband sits at the actual waist.
  • The hips are snug but not skin tight.
  • The legs are wide and flared from the hip. 
I remember the lore of tight jeans. New blue jeans were dark, dark blue. The indigo would always migrate to your skin. The denim was thick. It had zero stretch, except for whatever relaxation you could hope for, over time, from the twill weave and 100% cotton fibre. The pants were so stiff you expected them to stand up and walk around by themselves. 

Ease was not desirable. To put them on you squirmed and held your breath. You inched the zipper up as you tucked yourself into them. Then you tried to wear them for normal activities. I heard that some people would sit in a tub full of water wearing their brand new jeans and then wear them while they dried, in an effort to get them to stretch and mold to the body. Eventually, the jeans might relax and become comfortable.

Now I'm not saying I had a pair that tight or resorted to these shenanigans. I wasn't a cool kid. Nor do I want to reenact any part of the must-wear-too-tight-rigid-denim-jeans-victim-of-fashion scenario. I just want comfortable high waist jeans that evoke my longed-for 1970s silhouette. 

Somewhere I came across mention of the Dawn Jeans from Megan Neilsen. With the exception of the (IMO) too-tight crotch and bizarrely fashionable cropped length, they looked promising. 

I also had heard of the top-down-centre-out fitting method and thought I'd give it a whirl.

I noted that the Dawn Jeans are meant for "rigid denim" and that for my hip size, which put me in size 8, they were allowing a miserly 1 cm of ease. Sorry no - see above re too-tight victim-of-fashion. The young woman in the pink jeans on the website does NOT look comfortable. So I immediately went for size 10 as my base. 

I'll spare you photos of the TDCO fitting process but it was interesting. I found that to make the crotch a comfortable length and to get the leg to fall straight, I had to add about 2cm to the length at the front waist and reduce the back length by even more than that amount. So the front rise needs to be longer and the back quite a bit shorter than the original pattern in order to have a level waist. 

I haven't done that to other jeans patterns, but now that I look at the 5 year old pair I'm wearing (Morgan jeans) I note that the back waist sits a lot higher on me than the front - from the side the waistband is very tilted. The only reason this works OK is that they are lower rise. With pants that are supposed to sit at my waist, there would be no place for all that extra back length to go. Imagine an incredibly baggy butt and all kinds of unattractive back leg wrinkling. 

Despite the TDCO expectation that you can get well-fitting pants without having to adjust the crotch curve or insteam, I noted that the front crotch on my one-legged muslin was pulling sideways and once I added a smidge of extra fabric there, I really wanted to add a cm of fabric at the inseam, to both front and back, to make the crotch curve less narrow front to back. Also, the extreme straightness of the upper inseam on these jeans, as drafted, just looks wrong to me. 

My TDCO muslin told me to take out so much back waist length that I didn't believe it. So I made a two-legged muslin with the pattern adjusted for slightly less of a reduction. 

And ... found that I did in fact need to pinch out exactly as much as I had added back and that the waistband was also too big. Proof at left. 
This gave me the confidence to adjust the actual pattern and cut it out in some denim I have lying around. In fact, it's the same very low stretch black denim I made the Morgan jeans out of in 2018. Now, as then, I feel like there's nothing wrong in having a little extra ease. 

To be continued. 


Tuesday, October 17, 2023

Finishing so I can start something else

I made another pair of shortie Carolyn PJs for myself. But this time I changed the collar to be a more straightforward sew. 

I don't love the fabric, which is a strangely flimsy cotton with this extremely large repeat. 

I obviously wouldn't wear it tucked in but I think the shorts are hilarious (random pattern "matching") and they would be covered up if I had laid them out differently. 

I redrafted the front to have a straight folded CF edge and copied the shape of a collar from a mens' shirt pattern I have been using for my husband's PJs, shortening it at CB so it fit into the adjusted neckline. 


The round collar and lapels of the Carolyn pattern, as drafted, were my least favourite part of this pattern. 

They were more complicated to sew than the shirt collar I now have, which works perfectly. 


Even though this is more or less a test sew, I used piping everywhere, including at the pocket edge in the shorts. 

Phew! With that out of the way (new summer PJs that I can't wear for months), I can turn to my next project.

I'm making the Dawn Jeans and I actually made a muslin to check fit! Haven't done that for years. 

Stay tuned.  


Friday, October 6, 2023

Lumb Bank cardigan


We (the retreaters) have revealed our finished and mostly-finished cardigans to each other and to Nic Corrigan and are cleared to show them to whomever we please. So here is the cardigan I mostly made while in Yorkshire, but finished here at home. There, I used the assigned machine, which was a Silver Reed punchcard (a Zippy plus, which is older than a SR 360 I think). Here, I used my Brother KH965i. 

The Lumb Bank Slipover pattern is named after the location of the retreat (the steep hill) and Nic designed it with or without sleeves and with 3 different stitch patterns that evoke different aspects of the location - a leafy canopy, library bookshelves and mullioned windows. These designs can be used in whichever locations the maker wants - the entire sweater, panels, single motifs or otherwise. 

Even though all of us were working with a limited colour palette and the same pattern, every cardigan was totally different. This is a pattern that allows you to really make it your own. 

I chose to place the leaf pattern on the centre fronts and at the lower edge of the side fronts and back. One punch card repeat perfectly aligned with the pocket opening and continues around the back. 

I didn't know (or possibly had failed to notice or forgotten) that stranded knitting is always longer than the equivalent number of rows in plain stockinette. I found I had to unravel about 10 rows of my centre fronts and re-cast off by hand to even them up with the side fronts.

As you can see, this is a boxy design with relatively narrow 1x1 ribbed sleeves. There is virtually no shaping in the body - no back neck drop, no armscye shaping. The shoulders are shaped with short rows. 
We were able to examine and try on some samples at the retreat, and based on my assessment I made some changes so it would fit me better. 

There is a V neck at front, which is fully fashioned. As designed, it is quite a bit lower than the front of my cardigan. I knit extra rows to raise it up by about 10cm. 

I also decreased the width of the back by approximately 4cm (there is a centre back seam) because my back is narrow. 

Finally, I lengthened the back overall and added a back neck drop. This helps the cardigan sit correctly on my shoulders. 

I did a couple of things differently in the construction as well. 

The samples had seams sewn with wrong sides together. I made mine the conventional way. 

The instructions asked for all body pieces to be taken off the machine on waste yarn rather than cast off, and then seamed using a linker. I wanted the stability of a cast off edge at the shoulder and back neck. Also, I was taking the pieces home in my luggage and wanted the stitches to be extra secure. So I cast off around the gate pegs on all but the sleeves. I left the sleeve stitches live but cast off the waste yarn for security.

I totally recalculated the neck band so that it had a seam at CB rather than (as designed) two seams above the V crossing of the front neck. The structure of the band is many stitches cast on in full needle rib, and then every 2nd stitch transferred on the ribber bed. It looks like 1x1 ribbing on the ribber side, which is the public side once attached, and like FNR on the main bed side. It's OK but not my favourite ever neck band technique. My thought was that it needed to be stretched much more than the pattern indicated - i.e. that the pattern instructions would produce a neck band that is overall too long for the opening. I am glad I shortened it and think I could have been even more aggressive as it is not sitting quite flat at the side neck. 
I made the pockets exactly
as the pattern instructed. They are just an extra length of knitting within the side fronts (knitted with the few stitches to either side in hold). I made them in the contrasting colour. 
I attached the lower corners to the seams so they don't flip up (copying what I saw in Nic's samples).
I assembled the cardigan mostly on my linker but had to attach the band by hand due to technical issues too tedious to describe. 

New features/experiences associated with this project:

  • Intensive knitting experience - no time to ruminate, had to make quick decisions, jump in and just knit. That was surprisingly tiring!
  • Properly fully fashioned ribbing (behold at right the underarm seam). 
  • Put almost the whole thing together using my linker, which hasn't been my favourite piece of kit. 

BTW the actual colour of this cardigan is somewhere between how it appears in the inside and outside-in-the-sun photos. The yarn is very heathery. It's Gardiner Yarns SS11 Shetland, 100% wool. I'm not convinced I got all of the spinning oil out of it when I washed it and may attempt to rough it up some more to make it a bit softer. 
Once I finished it I realized I didn't have a lot of tops that would look good with this. I'll have to make something!

Sunday, October 1, 2023

First ever MKC retreat

Last month, I went to a machine knitting retreat. It was AMAZING! 

Five days in a beautiful house perched halfway down a steep hill (Lumb Bank) outside a quaint, tiny village (Heptonstall) outside a quaint small town (Hebden Bridge) in the Calderdale district of Yorkshire, England, with 15 like-minded knitters, 3 wonderful hosts and 2 expert instructors. 

I'm still processing it. 

For now, enjoy these photos.


Here is the house. It's the Ted Hughes Arvon Centre at Lumb Bank. I took this photo from across the very steep valley. The house is an 18th century millowner's house that once belonged to Ted Hughes, who was for a time the poet laureat of England and the husband of Sylvia Plath. 

Another view of it from the "road" that leads to it. It's really not more than a track. 


This is the view from the front lawn of the house, looking out more or less in the direction from which I took the first photo. 

And here is the cat, Ted Hughes, who is not allowed in the house at all.


Our knitting room was in "the barn". 


This was before we started, which explains why it is so neat.

On day 1, we were introduced to a forthcoming pattern (holding a retreat seems an elaborate way of finding pattern testers LOL) and got to choose our yarn.


My knitting throne. I lucked out!


Proof that I sat there and worked. I was concentrating!


In four very intense days I knitted all of the pieces of my (secret project). It is now finished and this coming week, we retreaters are meeting up by Zoom to unveil our finished items to each other. Afterwards, Nic (Corrigan, founder of the Machine Knit Community) will release the pattern to the world.