Sunday, July 28, 2013

Big floral print

I know, this is unheard of!  A second post so soon?  And about a sewing project?  All I can say is that Vogue 1250 continues to dole out the instant gratification.

I've complained before about cheap-n-cheerful rayon/lycra knit prints, but continue to get sucked into buying them if the price point and print are cheerful enough.  So I found this one at my Fabricland recently.  I am a total sucker for shades of blue-grey, teal and orange.

Feet shown for scale
If you recall from my discussion of Vogue 1250 when it first came out, two years ago (I made it twice), this dress has only three pattern pieces, and one of them is a tiny strip to face the back neck.  With a print this big, I had a choice:

Put big orange flowers right in the centre of my chest and on my skirt below crotch level (shown at left).

Or have a mainly blue-grey front, with big orange flowers at the side and back.  My very sensible choice to avoid big orange splotches on my front meant I got them on my behind!

The front, on the other hand, is very subdued except for the flower which ended up right at my belly button level!

I like it anyway.

And it goes with my recently completed Featherweight cardigan.

In making this dress, I cursed and swore at my coverstitch machine (which I haven't used enough to get very comfortable with) until discovering what most of you already know - it does so much better if you stick the hem down with Steam-a-seam.  I wonder if I can buy shares in the company that makes it?

Before cutting into my fabric today, I had it in mind to alter the dress so that the cowl was less indecently low.  However, in comparing the pattern to my second version of V1250, I realized that the problem is just that the dress has stretched tremendously in its two years of life.  At right I've lined up the back piece at the shoulder.  The pink line is where the seam should be.  The black line is where the seam on my older dress has sagged to.  I thought that knit was a little better quality, but no.  Sigh.

This knit dress is destined to be fast fashion in every sense of the word.

Just knitting

Without more - here is my completed Cherry Equinox top.  For readers on Ravelry, follow this link to see more.  For those who are not, you are missing out on the best-designed craft-oriented social media site on the www.

Ah yes, you want a picture?


The Sewing (Knitting) Lawyer, in her natural habitat.  As predicted, this top looks pretty good with white linen (what doesn't?).  Check out my new sandals - I found them yesterday at a local consignment store. Kork-Ease, in my size, hardly worn.  Score!

This top is made from 100% bamboo yarn which was surprisingly nice to knit with.  This despite its structure - it's composed of seemingly hundreds of fine threads.  Very occasionally, my needle tip would split the yarn, but mostly it behaved.

At left is a close up showing the texture of the knit better, as well (maybe) as the shaping I put in at the waist by decreasing purl stitches between the patterned ribs.

Equinox Top
I did not follow the pattern in several important respects.  The free pattern (Equinox Top) is available here.  A photo from that page may illustrate the effect of some of my changes.  (I had help from knitters who had gone before me in figuring them out.)

I still can't figure out why my gauge is so different from the pattern.  It is a different yarn, but the same weight.  I could stretch my top to have the same gauge as the pattern photo, but given the general bagginess of the top, it looks as if it just falls that way.  The thing I really couldn't abide, though, is the loose sleeves.

Vitamin D cardigan
I am currently swatching some linen/silk blend yarn  from ColourMart for my next knitting project.  The pattern I'm planning to use is Vitamin D.  So far there are over 2,300 projects for this pattern on Ravelry (by comparison there are 97 including mine for Equinox).  I didn't think I was a big fan of the drape front cardigan but this one is appealing.  There is a very interesting pattern of increases and short rows, which will hopefully keep it interesting even though it's an awful lot of stockinette stitch.

Today is kind of wet, however, and I'm planning to do some sewing to give my hands a rest.  Up next?  It might be a patterned version of the Jalie jeans pattern (a wearable muslin to verify my size since I lost weight after last making it), or another instant gratification version of Vogue 1250.  I'm leaning towards the latter.

Thursday, July 18, 2013

Quick white linen skirt

After I made my white cropped pants, I had approximately 2 metres of linen left.  What to do, what to do?  So I made this skirt.

The pattern is Vogue 1762, a "Vogue's Basic Design" ca. 1986.

I made View E, the green one.  But mine is quite a bit (6") shorter. If memory serves, this is the only view I've made from this pattern.  It's reasonably swishy without being overwhelming.  I like the fact that it is somewhat fitted at the hip and then flares.

I briefly considered using the Pavlova skirt from Cake Patterns.  But it's a complete circle, a real fabric hog.  On asking myself the hard questions, I decided I didn't need or want that much swish.  I was aiming at a classic basic that I could wear anytime with anything, not a statement piece that would wear me.  (I really bought the pattern for the wrap top, and I even mentally have some fabric picked out for it.  I'll get around to it some day.)


I also like the shaped waistband on V1762.  My copy of this pattern, which I acquired second-hand, is a bigger size than I would normally buy.  However it fits well and the waistband is nice and loose so I can comfortably tuck blouses in even though it is also quite high.

Flush with the success of my partial flesh-tone underlining on the matching white pants, I did the same again, but this time with a poly-cotton I found lurking in my stash.  It's pretty much invisible, unless someone looks at my lower half far too closely.

Now I have about a half-metre of white linen left, enough to function as trim or contrast on some future project.  I consider the two projects a satisfactory stash-busting exercise.


In other news, I'm still knitting away on my red ribbed top.  It has grown since my last post.  It's past my waist now.  Just a couple more inches to go.  It should look pretty nice with my white bottoms.

Monday, July 1, 2013

Finishitis the third

Sorry about the blogging hiatus, after assuring you I had a third item to show you.  It was true, I am not trying to pull the wool over your eyes.  However, I ran out of time to document it.  In the intervening two weeks, my husband and I visited the other North American national capital and played tourists for a few days, and then my son visited and today is the birthday of my country.

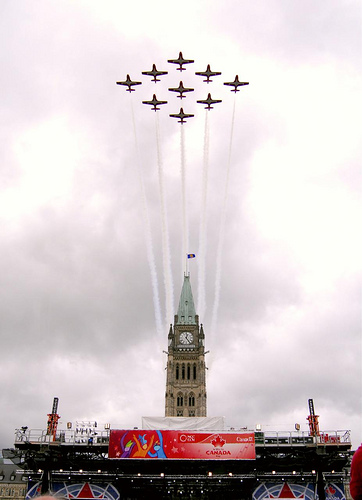
Happy 146th birthday, Canada!

The fancy jets are the Snowbirds.  They show up every year, like clockwork at noon sharp, and fly over the Peace Tower on Parliament Hill.  That's after they scare the bejeezus out of us on their way there at 11:57 or so, as we live underneath their low altitude flight path.

Later, there will be fireworks in the same locale.  It has been years since The Sewing Lawyer has ventured close enough to downtown after dark on July 1 to really feel the explosions, and from a sedate distance they are pretty, but not very exciting.  

Maybe my new cropped linen pants are more exciting?  I'm wearing them now, and they came with me to Washington DC where they performed like champs in the very hot and humid weather that blanketed most of eastern North America last week.

The pattern is from the May 2008 edition of Burda Magazine.  And this is the third time I have made these pants.  They are extremely comfy for summer and (I flatter myself) I think they look pretty good.  To my surprise I again added the vestigial flaps (no pockets) with two decorative buttons as well as the zippered (real) pockets that hardly ever see any use, and the belt loops which often go without a real belt.  And I again made a belt, though this time I added little ties instead of a bulky buckle.

Here is a close up of the front.

In previous versions I used boring nylon zippers.  This time I went all out and bought shiny gold metal zips to mimic Burda's version (at right).  Too bad I can never find ones with interesting pulls.

The main novelty of this version is that I underlined the top part with a flesh-toned cotton interlock knit.  My intention was to hide the pocket bags and the outline of my (perhaps) white undies, since my fabric is white linen.  It looks strange off the body, since the flaps and belt are perceptibly whiter.  Somehow this colour discrepancy is less noticeable when I am wearing them.

I lucked out with the underlining fabric.  I went around my local Fabricland fondling fabric based exclusively on colour.  I thought a lightweight woven might be best, perhaps a cotton/poly blend.  But the interlock was the right price at $3/metre as well as the right colour, and when I tested it I found it was pure cotton.  In addition to hiding the inner details from outer view, this fabric also helps reduce the crotch wrinkling factor which is a definite plus.  And it makes the pants very comfortable without making them any hotter to wear.

Step 1
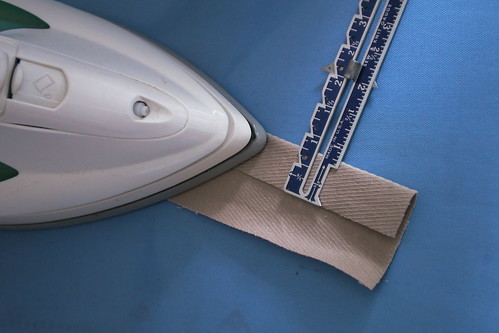
I recalled my own belt loop technique in making loops with no fraying ends to be found (see below).  I think I invented this technique and it works perfectly. The tutorial is in my Flickr photos, starting with this one (illustrated at right).  If only I had checked my photos first, I could have avoided the pain of turning a narrow linen tube right side out.  Oh well.

Check out the clean-finished belt loop!
The tutorial is also part of this set, documenting the first and second times I used this pattern five (ulp) years ago. Is it bad that I still wear both pairs, including the wearable muslin ones?

I also used this technique for the fly front which is neatly finished with no waistband, just facings.  Try it.  The trick is not to topstitch ANYTHING until you have completely finished putting it together.

And I made the belt, using the facing pieces from the pattern (with a seam at CB only).  Because the pieces are curved, they are on the bias at CB.  To counteract this, I interfaced all the pieces with the grain of the weft insertion fusible interfacing going the opposite way (i.e. the CF of the interfacing is on the bias and the CB on the straight grain).  This prevents the belt from stretching and getting narrower where it is on the bias.

See the difference?
At first I (stupidly) did the usual and sewed all around the corners of the belt, trimmed the seam allowances and turned it right side out.  Ew, ugly blumpy corners.  And I realized I had forgotten to insert the little ties (doubled twill tape).  So I picked out the corners and used the best ever technique for getting sharp square corners in a piece like a waistband.  Just press the seam allowances into the inside and attach the pieces together either by hand as in this third tutorial from my past projects (this technique is from the instructions in V7881, a Claire Shaeffer pattern) or by machine if you are topstitching the piece, as I was.  You may have to use a few hand stitches to make the seam allowances behave, but it will look SO much better than if you had tried to get a square corner by sewing first with right sides together.

Click to go to my Ravelry project (if you are a Raveller).
That's it for my finished projects.  I have another knitting project on the go, however.  Here's an in-progress shot.  Too bad I didn't finish it before today; it would have been perfectly patriotic with my white pants.