
Lined wool pants just in time for ... spring. Doh! Oh well, maybe we will have some more unseasonable cool weather before summer hits. Otherwise, these will wait quietly for cooler weather, and in October or so, the Sewing Lawyer will be glad to have them.
These are the same fabric as the last project: a
sheath dress. I should finish a top to wear with them before turning to summer sewing.
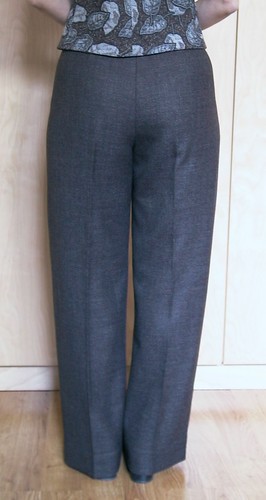
(I believe the legs are both the same length despite the evidence in the photo of the back. I hemmed them quite long, so I can wear them with heels.)
These pants are at least the fourth pair in my closet made from
Vogue 7881, a Claire Shaeffer pattern.
They are plain, comfortable, and versatile. What's not to like?
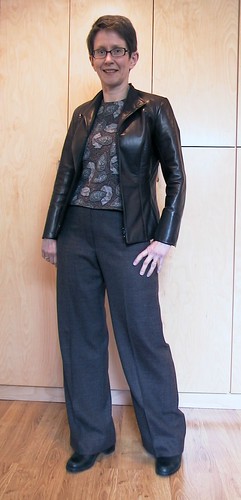
And they look pretty good with my
leather jacket.
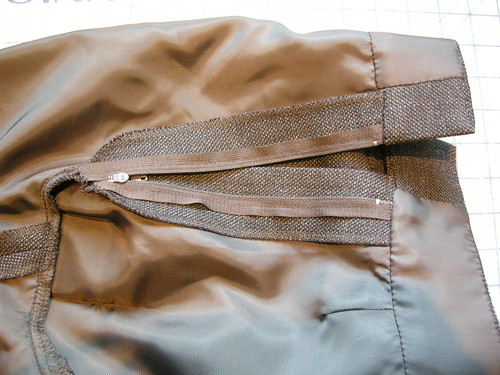
Strangely, since hand-sewing is not my favorite thing, all four pairs are from the "couture techniques" side of the instructions (which are lengthy and, like all the Claire Shaeffer patterns, very informative and helpful). Really, the only special features of the "couture" version are that (1) the wool fabric is eased into the waistband instead of darted and (2) the zipper is sewn in by hand (yes really) and (3) the waistband is constructed mostly by hand.
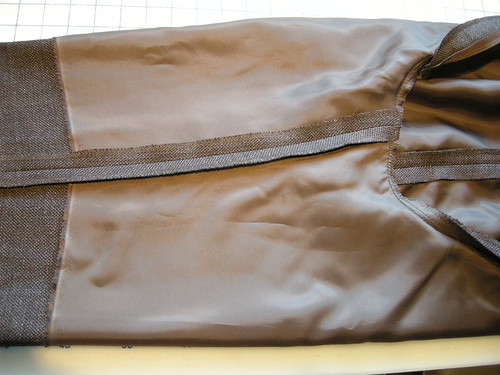
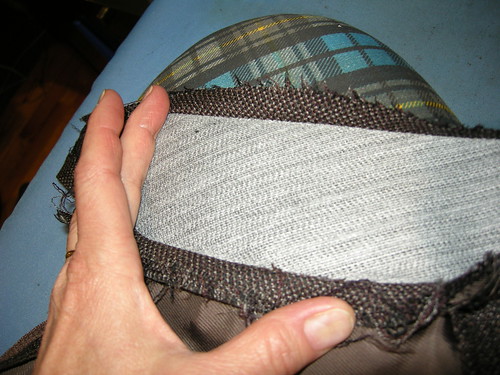
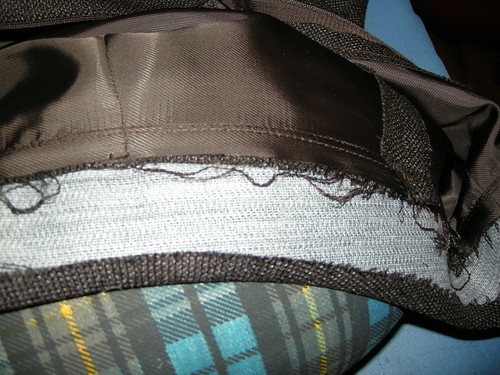
The pattern does not call for lining but I added a half-length underlining of Bemberg. I cut it on the cross grain and use the selvedge for the lower edge of the underlining. No bulk or show-through. I don't fuss too much about how long the half-lining should be. I just place the pattern pieces on the cross grain to get maximum length and so they have the same leg length. It generally turns out that the lower edge hits around my knee.
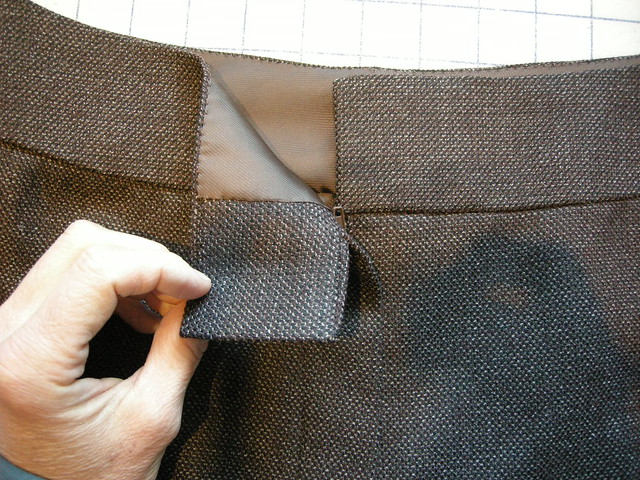
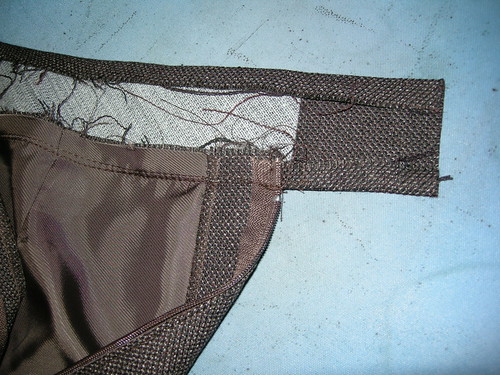
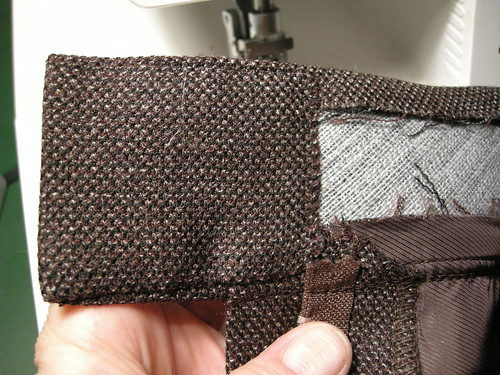
Here is what it looks like at the fly.
Notice there is a tiny dart in the underlining but the outer fabric is eased only. I did these steps separately before basting the underlining to the pants pieces, after which I treated each piece as a single layer.
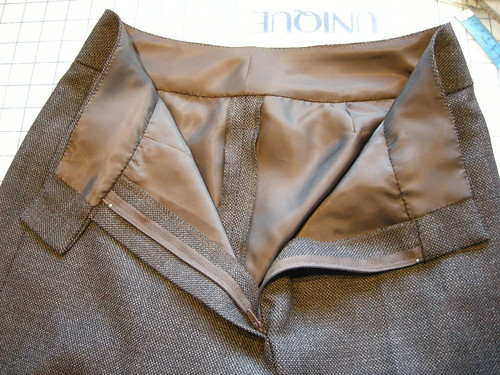
I particularly like the hand-finished waistband. You know those blumpy corners and wavery, not-square ends that result from sewing a waistband right-sides-together, and then turning it right side out? There's none of that. The couture technique that Claire Shaeffer teaches produces sharp corners, right angles, and uniform width. And it's thin, flexible, and looks great inside and out.
(Later, I added a couple of pant hook and bar closures, exactly like
these.)
First, interface the waistband to the seam lines only. The pattern includes separate pieces for the waistband interfacing but you can easily remove the SAs on any waistband pattern pieces. (NB: To use this technique you do need a seam at the upper edge of the waistband so would have to further adapt a pattern which has a straight grain waistband with a folded upper edge.) I used two layers of fusible interfacing to ensure stability, since this is a curved piece with the CB area on the bias. I cut one with the straight grain at the CF and the other with the straight grain at the CB. As a result, the whole thing is totally stable and stretch-proof.
Press the upper SA of the waistband to the inside, along the line of the top edge of the interfacing. Then attach the waistband to the pants by machine. Press so that all SAs at the waist seam are facing into the waistband. To preserve the curve of the pants at the hip I've pressed this seam using my
pressing ham.
The 7881 waistband piece is extra long with about 6.5cm (2.5") extending beyond the finished end of the waistband. This extension is not interfaced. Press the lower SA up on this piece as well. Notice that the extension is very slightly tapered so that it is not as wide as the waistband itself.
Fold this extension along the leading edge of the interfacing. See the nice square corners? See how the slightly narrower width ensures that it will not peek out above or below the waistband itself?
Hand stitch the extension down invisibly along the 3 edges to secure it to the waistband. This is the other end, which on this pattern has a significant overlap.
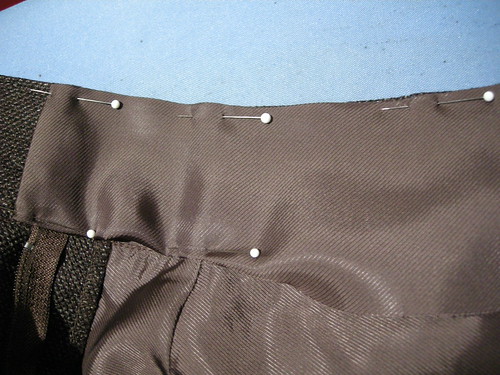
The waistband facing is cut from lining fabric. This keeps the waistband nice and thin. Again, 7881 has separate facing pieces. To adapt this technique for another pattern, the only point to note is that the facing pieces need to be shorter than the waistband, because of the long folded-back extensions.
After sewing the CB seam, press the upper edge seam allowance down on the facing. Then pin this edge to the folded-down upper edge of the waistband, keeping the facing edge a smidge lower than the upper folded edge so it will be invisible from the outside.
Fold under the leading edge SAs, ensuring the edge of the waistband extension is well covered. Then fold and pin the lower edge along the seam line, ensuring the facing lies nice and flat.
Hand sew the facing to the waistband, using a tiny fell stitch.
Done.


Very nicely done. I really like this waistband technique. I will be trying it on my next pair of pants.
ReplyDeleteOne last hurrah of the wrong season is developing into one of my specialties. But you know what? I usually forget about them because I haven't really worn them. And so they're a really nice surprise when I take a look at the next season change :-).
ReplyDeleteNice pants. That said if I were you I'd make sure the lining hits -below- the knees. One of the reasons for a lining is to keep the knees from bagging out, and that works much better when the knees are totally covered. In fact, I like my linings about 6-8" shorter than the pants, that way they never peek out, but they keep my poor lower legs warmer when they need it.
Beautiful and they fit so perfectly. I have this pattern but I haven't had the nerve (or time) to make it yet.
ReplyDeleteGorgeous, they fit wonderfully! :) I actually like hand sewing, I find it really relaxing.
ReplyDeleteAshley x
Beautiful. And a fabulous fit!
ReplyDeleteI'm not sure I'd really want to do the waistband by hand, but maybe some cool topstitching after affixing it with a glue stick would work, because you've produced a really wonderfully looking waistband. And the fit of your pants is fantastic!
ReplyDeleteGreat looking pants, and I agree with ashley, I think handsewing is quite relaxing. I imagine you'll get a few wearings out of them yet this spring if things continue as they have been so far. Spring seems very slow to come.
ReplyDeleteBeautifully done, Kay. I always enjoy seeing your exquisite construction and attention to detail. What a lovely wardrobe you have !
ReplyDeleteThese fit wonderful!!!! Just lovely! Your sewing is just super!
ReplyDeleteWow they look great Kay ! Struggling with pants these days so I can really appreciate the fit on yours :-)
ReplyDeleteLovely pants, lovely fabric!! They look really well made. Clair Shaeffer's designs are superb.
ReplyDeleteBy the way, I just stumbled upon your blog last week and love it. I'd like to pick your brain one day about sourcing fabrics and stuff in Ottawa, I live here too.
Oh, I wish I'd been able to make it to the PR Weekend in Montreal last year; hopefully there'll be another one soon!!
Beautifully done. I love her instructions and details. In fact I have this pattern but have only used the instructions with my tnt pattern.
ReplyDeletePerfect pants! Thanks for the information on the waistband. I'll star this post and save it for my next pair of pants. Very generous of you,
ReplyDeleteMary
Oooo - I love Bemberg and put it in all my pants whether the pattern calls for lining or not. Also the lining prevents the pants from knee spring or fanny spring!!! I love the fit you got. It looks like your right hip might be a smidge higher than your left hip, which might be why the pants hem look different - every body is that way, we carry our books, kids, and groceries on one hip or the other. It's just life...like the weather - will it ever get warm?
ReplyDeleteBeautifully made pants. I don't own any lined pants but like the idea of slipping into them.
ReplyDeleteI have that pattern and I am going to make them , so thanks for the inspiration . They look great and fit beautifully.
ReplyDeleteYour favourite pants pattern. I read your previous review on PR, now I am glad to see the steps in picture. Wonderful article Kay. I might buy the pattern and lower the waist a little bit. I lost the habit of having such high waist pants.
ReplyDeleteThese look beautiful - amazing fit, and the waistband looks lovely!
ReplyDeleteAs Claire says, you could easily have one hip slightly higher. I do, and it amounts to 1cm at the hem!
Your work is so amazing, Kay. I love looking at all the pics you post of the finishing. There truly is no greater sense of satisfaction than a garment that fits and is well-made. This, too, is one of my favourite pants patterns.
ReplyDeleteThank you for such detail. I've had this pattern in hand for too long now.
ReplyDeleteDear Kay
ReplyDeleteI know you posted this a couple of years ago, but I only just found it while searching for hints and tips on waistbands. Thank you for sharing this, your trousers look lovely!
Just a couple of things I'm wondering...do you trim the seam allowances at all?
Also, I'm assuming you attached a hook and bar closure...In my sewing books is tells you to sew these onto the outside of the waistband, but I noticed on bought trousers they are sort of "embedded" into the waistband with the sewn part hidden inside. Do you know how that is done?
Best wishes,
Sarah Jones, UK
WOw. I just bought this pattern and I was a bit intimidated by it. Your instructions - or step-by-step review make this an easier pattern to tackle. I love the pants you made!!!
ReplyDeleteJust found this post thru Pinterest. Your work is absolutely beautiful.
ReplyDeleteWowwee. Super beautiful! I have this pattern and also have been punting in favor of easier ones. But yours step-by-step is inspiring!
ReplyDeleteNice fit. I ll surely try it out.
ReplyDeleteYou do beautiful work. But a quibble: you use the word underlining when you mean to say lining. An underlining is a fabric cut the same shape as the fashion fabric, basted to the fashion fabric, and the two layers are then treated as one throughout the garment construction. An underlining prevents seam allowances from showing on the right side of the garment and provides a layer for hand stitching to prevent stitches from piercing and being seen on the fashion fabric (hems, handstitching seam allowances down, etc). Garments with an underlining are typically lined.
ReplyDeleteI think you missed that the pants are half underlined, in the sense you use the term. Have another look at the photos.
DeleteHi Kay I too am an avid sewer..and a lawyer.So nice to see your pattern trousers..am about to sew my own trousers from 6342 and 6343
ReplyDelete