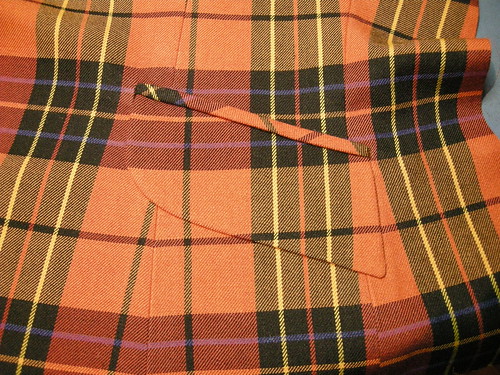
Continuing with my saga of the orange plaid jacket, I am pleased to report that progress IS being made. I have completed the pockets (double welt, with flaps) and thought I'd check in to show you how I made the welt pockets and flaps. BTW the flaps match. I'm pleased.
To sew the seams so the plaid would match, I used (more or less) the hand basting technique Mary Beth recently posted on her blog - "plaid matching by slip basting". It worked. I'm using my lifetime supply of basting thread, purchased on one of my recent trips to Montreal to suss out fabric stores for PR Weekend Canada (weekend of June 18-20, 2010). The lady in the store told me there were two types of basting thread - the kind that breaks and the kind that doesn't. She told me the Montreal tailors mostly favored the kind that does not break. You can give it a good pull, and it all comes out. I thought, if it is good enough for the Montreal tailors it is good enough for me, and bought this gigantic cone. Even though I say I hate hand sewing, I'm growing to like my basting thread.
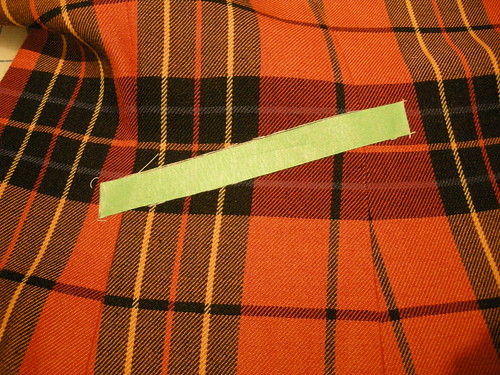
I originally tried to mark the pocket openings using the basting thread - just a running stitch - but I am really not a very good hand sewer and I wasn't satisfied that my markings were precise enough. Then I had another idea, which I think was inspired by the thread on the Stitcher's Guild about stuff you use in the sewing room that isn't intended for sewing. We had some painter's masking tape in the house. I measured the exact size/shape of the pocket opening, cut two (mirror image) in tape, and applied them to the outside of the jacket fronts as shown here.
This created a highly visible and perfectly straight-edge guide for my machine basting to mark the pocket openings - once machine basted, the markings are visible on both sides.
At this point, I cut a generously sized bias patch of fabric to serve as the welts, and centred this over the marked box, on the right side of the jacket front.
Then, working from the wrong side, and using a 2mm stitch length, I stitched a hair inside the basting lines to secure the bias welt piece to the jacket front. I reinforced the ends of the box by going over the stitching with an even shorter (1mm) stitch. This helps with the next step, which is the most nerve-wracking - cutting through all layers, down the middle of the stitched box and into the corners. It is very important to clip right to the stitching at the corners, so that when you turn the welt to the inside, the corners will not pucker.
After I clipped, I trimmed the long clipped edges by a thread or two to make them even and as straight as possible, and to create a tiny gap between the cut edges. This is preparation for the fact that the bias welt piece is wrapped around these cut edges, as shown in the next photo. The result is that the cut edges reinforce and "fill out" the welt, and there is no bulk around the welt area.
I had previously trimmed out the seam allowances in the welt "box", from the wrong side, as shown here from the wrong side. Everything is done to maintain a uniform thickness, as much as possible.
After turning the welts to the inside and pressing them just so, the little triangles at the ends of the welt box need to be stitched down, and then it's time for the flaps.
I didn't cut the fashion fabric for the flaps until after my seams were sewn and pocket openings marked. I matched the plaid for the flaps by placing the tissue paper pattern piece over the markings on the jacket front, and literally drawing the lines of the plaid on it. To match the plaid I had to ignore the suggested grain line, and to avoid having a prominent dark leading edge on the curved corner of the flap, I re-drew the curve as you can see in this picture.
To sew the flaps, I used the same technique as shown in my tutorial. I used lining fabric for the facing of the flap to reduce bulk, and before sewing the lining to the interfaced flap, I trimmed all the seam edges of the flap lining by approximately 3mm or 1/8". This makes the lining layer smaller than the fashion fabric flap. In this photo, you can see how, when I pinned the edges together, it is obvious that the two layers are not the same size. I had to stretch the heck out of the lining layer while sewing along the seam lines.
Then I trimmed the outer flap layer seam allowances to about 3mm. If you do this there is absolutely no need to "clip" to the seam line. Once the flap is turned RS out, the tiny seam allowances squooshed nicely without pleating or puckering. And, best of all, the smaller lining layer means that the joining seam line rolls beautifully to the inside and the lining will never peek out.
I'm using an orange/blue silk fabric from stash for lining. I acquired many metres of this at a yard sale a few years ago. It pays to stash good quality fabric when you can find it for a great price!
After all components were assembled, here's my almost-completed pocket. If I had completely pandered to my matchy-matchy inclinations, I would probably have cut the welts on grain and tried to match them too, but I didn't and I think it's fine.
I won't be able to avoid cutting the sleeves for too much longer ... wish me luck!
Friday, January 22, 2010
Subscribe to:
Post Comments (Atom)


Great looking pocket, especially on a plaid fabric.
ReplyDeleteWow! It looks wonderful! Thanks so much for putting that all together. It is A-MAZ-ING!
ReplyDeleteThanks for sharing. Its a useful step by step.
ReplyDeleteThat's a beautiful pocket. The matching is so precise! Thank you for the tutorial.
ReplyDeleteIsn't it wonderful when the flap lining turns so nicely? Just a little sewing "high" :)
ReplyDelete~Mary Beth
Looking Great, Kay ;)!!
ReplyDeleteSoft hug,
Rhonda
This looks fantastic! The matching is just perfect, your jacket will be gorgeous when it is finished.
ReplyDeleteWow, looking very good. Thanks for showing all details.
ReplyDelete"squooshed"?! great lesson, and lovely results.
ReplyDeleteWow, great lesson. It was very clear and this is coming from a reading directions challenged person. Thank you!
ReplyDeleteCan you ear me clapping in my home of admiration ! Bravo, c'est tellement parfait. je suis toujours aussi impressionnée par tes connaissances, ton habilité et ton talent. Tu es vraiment mon idole de la couture. See you soon.
ReplyDeleteAbsolutely beautiful. The shape of the flaps is so elegant
ReplyDeleteSpectacular. The finer details make all the difference. Great "how to" post. Thanks. Oh, love your work with the plaid. There's sweat equity in that.
ReplyDeleteMagnificent! You could frame that beautiful pocket, haha :) Your tutorial is great too. Thanks for sharing.
ReplyDeleteIt looks fantastic!
ReplyDeleteIs there a number on the thread spool? I think I need some of that thread :)
Looking good! Love that plaid fabric and bet the finished jacket will look fabulous.
ReplyDeleteBeautiful! I love the tape trick --- I've always hand-basted but could never get a perfectly straight line. Can't wait to see your progress!
ReplyDeleteIn my tailoring book the instructions tell you to slip the flap between the welt lips like you did. In the instructions for a Claire Schaffer jacket she attaches the flap to the top of the welt, which seems to be single ( I have to try it out to see it!)Have you tried it both ways but prefer it as you did it for this jacket?
ReplyDeleteAll I can say is WOW!
ReplyDeleteI love this jacket! It's so bold and it turned out beautifully. I know this post is old, but I need assistance picking out interfacing for a suit jacket I'm making. The fabric I have is medium-weight gabardine (I believe) and it drapes perfectly. I'm always afraid to use fusible interfacing, since in the past it has ruined the look of the piece (bubbling, etc). I'm slowly getting into tailoring and making my clothes more durable. What interfacing do you suggest? Thanks, I love your blog :)
ReplyDelete