The Sewing Lawyer is not really sure what drew her to the ruffled blouse in the April 2010 edition of Burda Magazine in the first place. Probably it was not the ruffles. Nor could it possibly be the side zipper opening, or the deeply plunging front neck. All of these features have been eliminated or significantly altered in the Sewing Lawyer's version. She did give the ruffle a try, despite knowing that it would not be satisfactory. Forty or so years of sewing experience does
sometimes enable one to predict when some feature of a garment will be completely wrong. Too bad they don't always allow one to avoid going ahead regardless. The Sewing Lawyer fatalistically reacquainted herself with her trusty seam ripper.

First, she tried cutting the ruffles down, dramatically. Remember
the attack of the ruffles, take 1? Well, take 2, while marginally better, was not enough of an improvement. Off they came ... again.
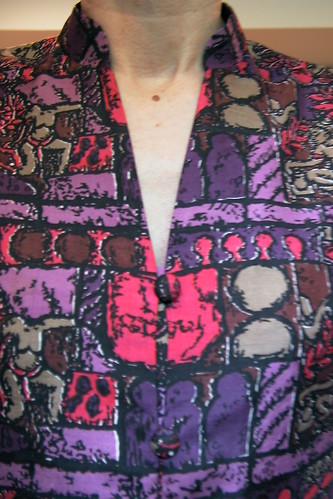
In the end, the Sewing Lawyer's version of the (formerly) ruffled blouse is both less and more. It's ruffle-less, zipper-less, and less plunging. It's more buttoned up, more in keeping with the usual style around here, and will be worn more too. It's all good!
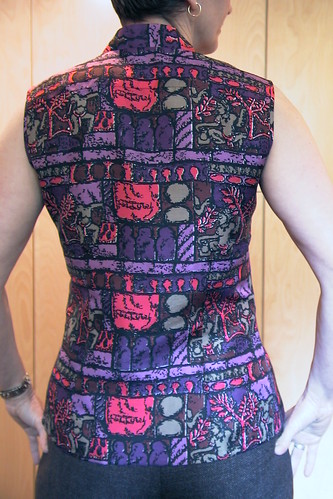
Here's a view of the back.
I'm happy with the print matching. There is a yoke seam at the upper back...
I'm also happy with the fact I was able to re-use the exquisite button loops and self-covered buttons from the plug-ugly skirt that this top was refashioned from. (I don't think I gave details earlier. This project started life as a thrifted floor-length skirt made from Thai silk. A button-up dirndl, floor length, is not a great thing. However, a dirndl will yield quite a lot of usable yardage, it had these beautiful tiny loops and self-covered buttons, the silk has a great hand, and I loved the quirky print and the colours. Finding that the skirt was slightly musty, after taking it apart I threw the pieces into the washing machine. It came out perfectly.)
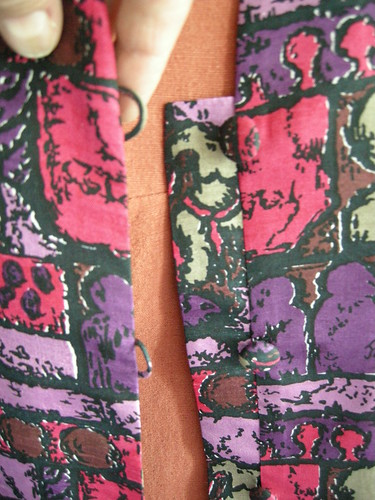
I turned the original cut-on-the-fold front into a button-up by virtue of adding a seam allowance at CF instead. Instead of an overlapping front, I added a little shield to sit behind the loops. It is barely visible, as you can see to the right, which means it
was necessary.
Some additional details. First, the armhole edges are finished with a very narrow self-fabric bias strip. I didn't initially read the magazine instructions (as usual) and thought the strip would make a little facing. When I went to apply it I realized it was too narrow. Then I read the instructions which, as usual, are slightly incomprehensible. If I correctly understand them, Burda wanted me to trim off the seam allowances at the armscye and encase them in a double-folded strip which I would be sewing in one pass. Yeah right. Instead, I cut off the seam allowances, and sewed the unfolded bias strip the desired distance from the raw edge, right sides together. I then folded that over and, on the wrong side, pressed the raw edge up into the fold. Finally, I stitched in the ditch from the right side, catching the wider folded edge underneath. You can see both inside and outside in the picture to the left.
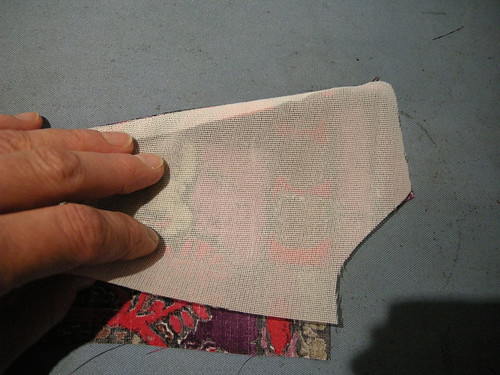
Second, like several other bloggers of late, I clean-finished the facings using fusible interfacing. I do not know who to credit with this technique. It's fantastic - both easy and producing an obviously superior result. There is a tutorial over at
Sigrid's site (from Lori V's blog,
Girls in the Garden) but, thinking a few more details would help, I took some pictures while this was in progress.
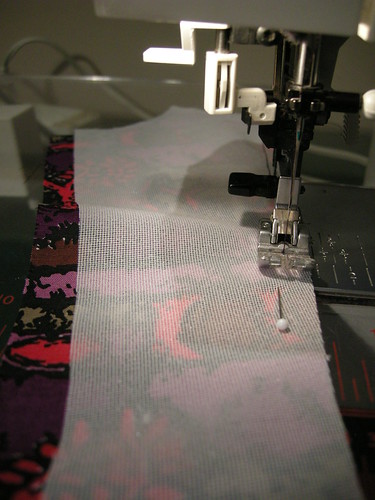
First, cut your fusible as usual using the facing pattern piece. Lay the unfused interfacing on the facing, right sides together (that means with the glue side NOT against your fashion fabric). Sew the 2 together along the edge(s) of the facing which will not be sewn to the garment edge.
I think my seam was about .25" which ended up being about right, because this made the fusing a little bit easier than it might have been, I think.
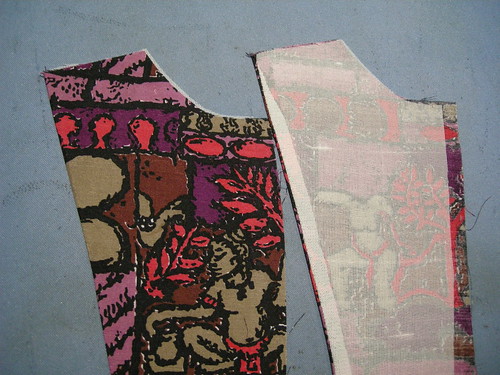
So here is the beginning of the fusing process, in which I use the seam allowance to help me open the seam completely and cleanly.
I started the fusing by opening the seamed unit, and fusing in the seam allowance only while gently holding the fusible interfacing taut and away from the facing. In the photo to the right, the seam allowance is fused to the right, unfused at the left side. Obviously you have to do this carefully and just with the tip of the iron, to avoid sticking your interfacing to the ironing board cover.
Then carefully fold the interfacing over so the seam is barely on the fused side and the interfacing won't show from the right side. Fuse, starting from the seamed edge.
This fusing technique is trickier than the usual where you can take care of any misplacements by trimming away the fusible edges. But it's worth it. You end up with a perfectly finished edge.
My next project? I'm planning to take
Vogue 8718 out of its envelop and contemplate its mysteries.
 First, she tried cutting the ruffles down, dramatically. Remember the attack of the ruffles, take 1? Well, take 2, while marginally better, was not enough of an improvement. Off they came ... again.
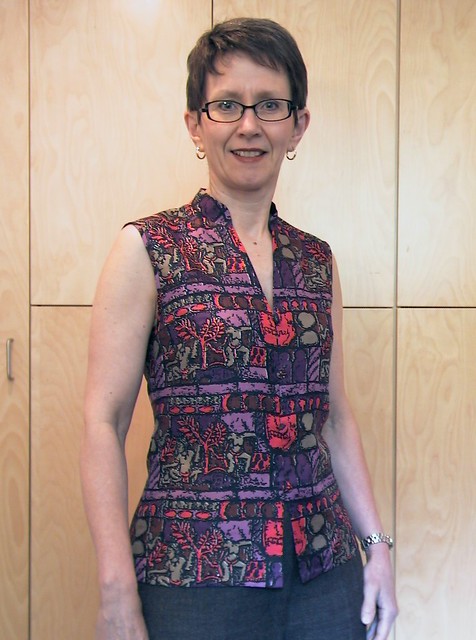


 I turned the original cut-on-the-fold front into a button-up by virtue of adding a seam allowance at CF instead. Instead of an overlapping front, I added a little shield to sit behind the loops. It is barely visible, as you can see to the right, which means it was necessary.
 Second, like several other bloggers of late, I clean-finished the facings using fusible interfacing. I do not know who to credit with this technique. It's fantastic - both easy and producing an obviously superior result. There is a tutorial over at Sigrid's site (from Lori V's blog, Girls in the Garden) but, thinking a few more details would help, I took some pictures while this was in progress.
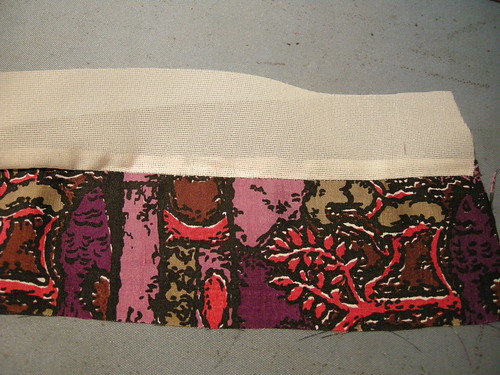


Now THAT looks very "Kay"!! ;)
ReplyDeleteRhonda
Very nice!
ReplyDeleteLovely blouse. Like the lack of ruffles. No fussiness.
ReplyDeleteVery, very nice!
ReplyDeleteI especially love the button closure that you have.
This is a very amusing post. Thanks!
ReplyDeleteYour blouse, whilst only distantly related to Burda's, looks terrific. I admire your button loop salvage.
I just used that clean fused facing technique for the first time, and am a big fan. I cut off the fusable in the seam allowance after sewing though - I was concerned that my garment would be too stiff with 4 layers in the seam.
What a great blouse! I love the print. If I ever see it, I'm going to buy it! It's a good thing we don't live in the same city!! LOL
ReplyDeleteGreat recycle of the skirt! And great matching too.
ReplyDeleteI love it! Beautiful work.
ReplyDeleteBeautifully made blouse and bravo on sticking to your personal style. PS I liked the ruffles!
ReplyDeleteBeautiful blouse and your pattern matching (as always) is perfect.
ReplyDeleteReally nice blouse! I also found myself drawn to that pattern although I *never* wear ruffles. I like your version a lot— great fitted shape. I could see myself making something like it.
ReplyDeleteThat is so great. Smart of you to remove the ruffles. Faboo!
ReplyDeleteLOL! I made this top and removed the ruffles as well. I was drawn to the banded collar and the deep slit neckline - but I still need to raise the slit a bit!
ReplyDeleteCheck it out! http://www.sewinguptheneighbourhood.com/2011/04/banded-collar-ruffle-front-blouse-burda.html
I am intrigued by your button placket. I will have to remember that option the next time!
That's really the best thing about sewing. If you don't like something, you are totally free to change it!
Very nice! Lots of fun details, and it really is perfect for you. I know that interfacing technique has been around a LONG time, like maybe from when SewNews was extra large, and on manila paper. (The Dark Ages.) It still works, though. :)
ReplyDeleteThanks for explaining the technique with the interfacing--I've read about it on a few blogs but didn't really "get it" til your tute!
ReplyDeleteAlso like the front shield--great idea!
That looks stunning! The tailored look is definitely you. I love your sewing and I love your blog. PS. My name is Helen - not sure how to get that on the comment - I'm not anonymous.
ReplyDeleteI am curious as to what interfacing you use? I tried this technique but had problems with my interfacing shrinking so went back to block fusing before cutting.
ReplyDeleteNancy
I took up sewing as an experiment. I'm getting old, and I've heard that learning completely new things helps to keep the aging brain in good shape. I've been amazed at how much fun sewing is, to the point of becoming an obsession. I love the details you provide in your blog, and I always get a smile or chuckle from your comments. Your finished outfits are truly insiring (I like the blouse both with and without the ruffles). Thanks so much for taking the time to blog about your sewing projects!
ReplyDeleteP.S. I'm a lawyer too www.tax-lawyer-texas.com
Very nice without the ruffles! Love the tailored look and of course the fit is perfect!
ReplyDeleteI read about the interfacing technique you used on the facings in Connie Long's Easy Guide to Sewing Blouses (p. 64-65) amd I agree that it is well worth the little bit of finickiness required.
ReplyDelete