But not before leaving you with some photos. Sadly (for now) none of them actually include the jacket being worn. It needs (a) coordinating objects and (b) a model who's having a better hair day. I promise more later.
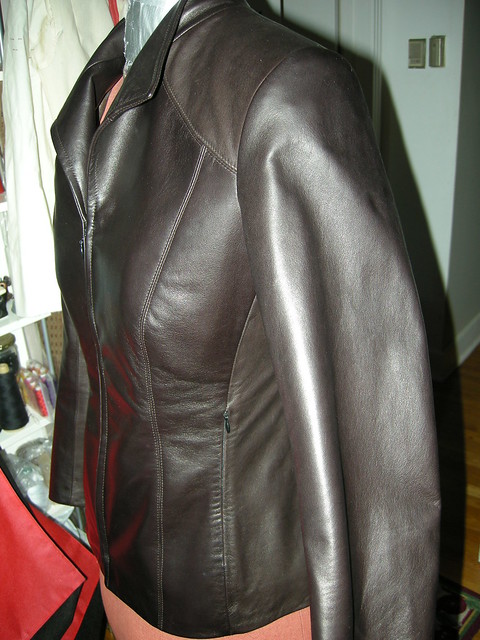
I have no excuse for not having taken a full front photo; except to force you to open my blog again hoping for better pictures. Oh, and to allow you to admire (again) the invisible zipper pockets set into the side front seam. Below right is a close up showing that the lapels are indeed symmetrical and the topstitching worked pretty well.
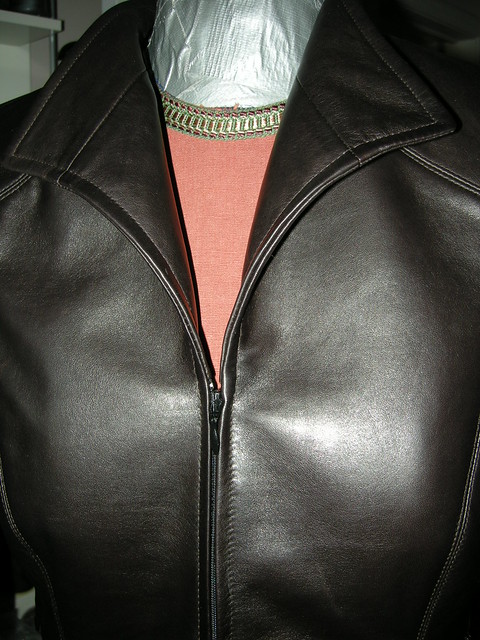 As instructed by Kathryn Brenne, I laboriously paid attention when topstitching to the fact that the upper thread should always be on the public side, and the bobbin thread side is always hidden. This meant stopping and starting again (by inserting the needle in the hole left by the last stitch before stopping, if you please, and pulling the thread tails to the inside for knotting) at four separate points, since the facing side is outermost for the lapels but inner at the back neck. I'm pretty pleased that I placed the stopping/starting points quite well, just at the point where the leather is into the curve, so they are not visible. Because they are not perfect. (Let's hope that the ladies at the Haute Couture Club of Chicago won't be all over it looking for my boo-boos!)
 One thing that is really great about this pattern (and let's not forget that there were lots of things that weren't) is the drafting at the collar/lapel. There is a perfect amount of extra length built into the under collar and front facing so that once you match the edges and sew them together (carefully stretching the other pieces to avoid any puckers) the lapel just does what it's supposed to. There is no guessing about where the roll should happen because it rolls automatically.
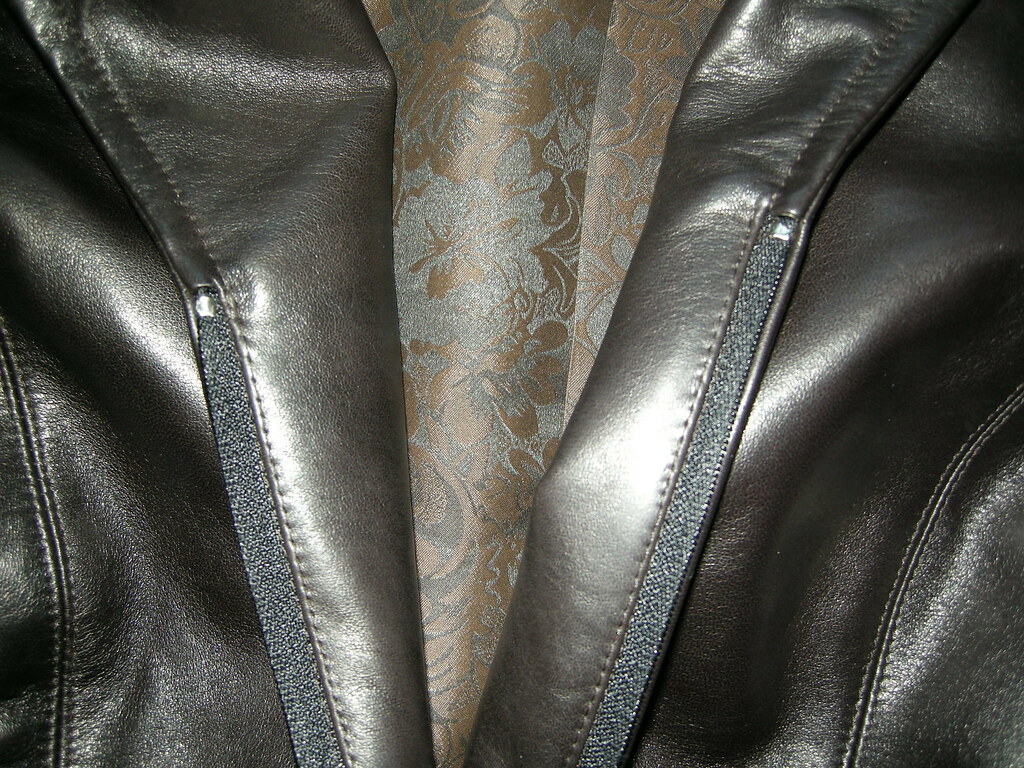
Here's the inside showing how the facings are sewn around the zip (click to biggify the photo to see it better). On the outside, the leather meets at CF to cover the zipper, but on the inside the facing cuts away above and below the zip. I thought Kathryn told me that the pattern instructions (which I have ignored in making this) gave directions for how to do this, but they don't, now that I look at them. Kathryn had worked out an ingenious way to make this inset box in leather after sewing the facings to the jacket above and below the zipper, but I did not take pictures and I think it would be too complicated to describe. Another way to do it, which would also work in fabric, is to sew the inset box using a thin, flat facing (silk organza is ideal) before attaching the facings. If anybody is interested, I'd definitely consider doing a photo tutorial on it because it is a super nice way to finish a separating front zipper on a jacket.
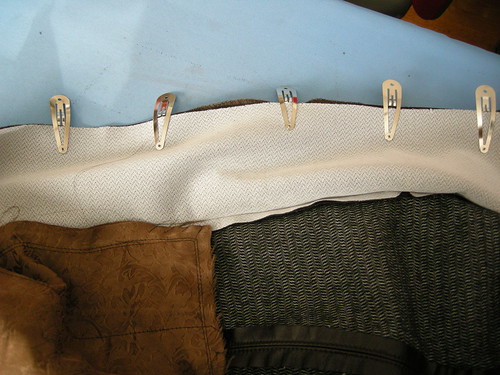
Inner construction:
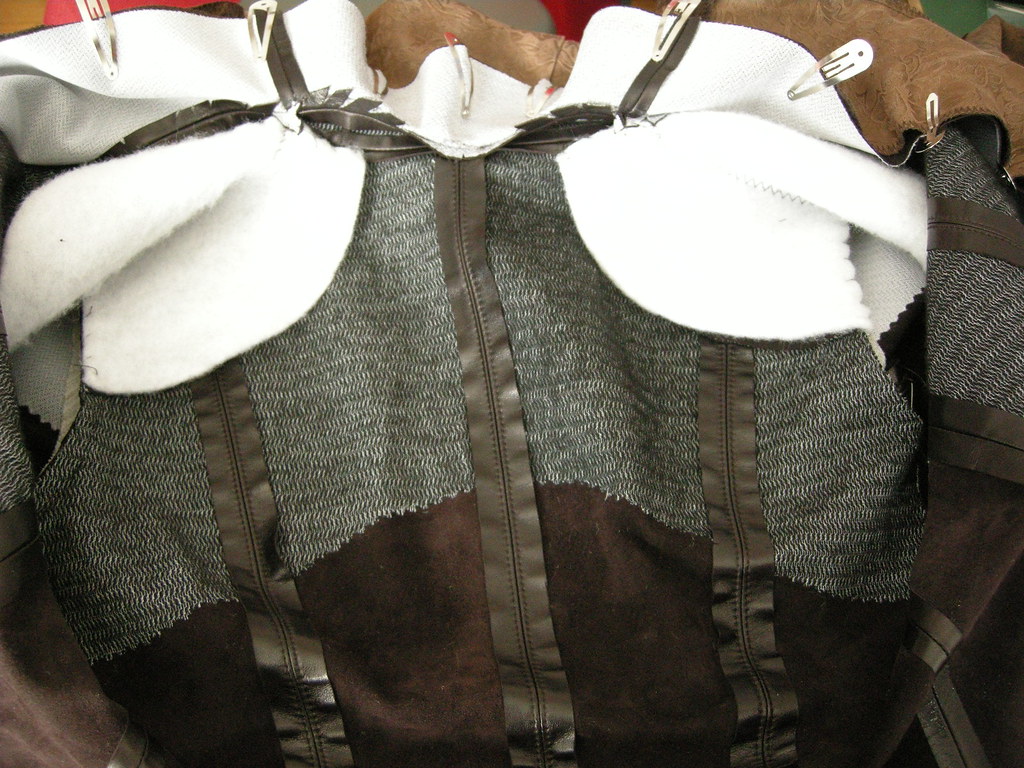
I used these nifty metal clips to hold the leather for sewing, since you can't use pins. I think they are the same as a sort of hair clip, but I bought them in a fabric store. To the left, you see the facing clipped to the lining fabric.
To the right is the inside of the back and shoulder area. At the top, notice how the curved jacket-collar seam is clipped diagonally. I normally trim rather than clip, but was following Kathryn's directions.
The upper back (and the fronts) are interfaced with a fusible weft insertion interfacing. The lower edges are pinked to avoid a show-through ridge. (But if you look hard, you may be able to see a show-through pinked line. Anyway, I could see it right after fusing. My lamb leather is truly thin, but lusciously soft.) The collar and facings are interfaced with a lighter but slightly crisper fusible knit. I did not have room in the jacket for shoulder pads, but inserted a single layer of synthetic batting just to cushion the shoulders and prevent bony shoulder show-through. I used the shoulder pieces from the jacket, and hand stitched the padding to the armscye and neck seams (using a glover's needle).
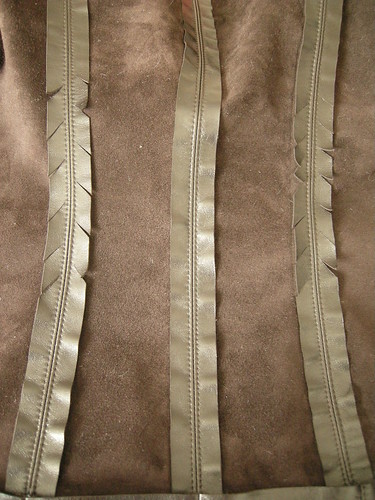
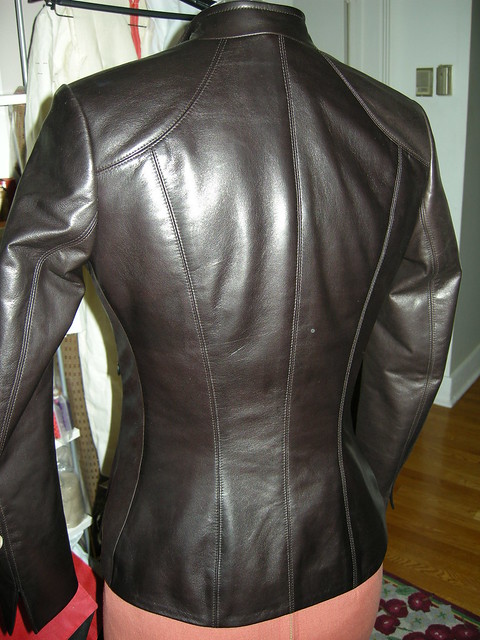
The back seams are very curved (if I am truthful, they are slightly over fitted). They are edge stitched to keep them flat (leather seams have to be treated with glue or stitching; pressing doesn't make them lie flat). I followed Kathryn's instructions to clip diagonally to flatten the seam allowances. All body seams are sewn at 1.3cm or .5" rather than 1.5cm or 5/8".
Oh - I should have said all body seams except the side seams, which were the last ones sewn and due to edgestitching, zipper pockets or other treatments the only ones still available for adjustment once I had the jacket sufficiently put together so I could try it on. It would have been slightly skin tight if they had been sewn as designed. I'm not sure what went wrong.
Let me correct that - a few things happened.
One. When Kathryn saw my muslin, which I thought was pretty good, she recommended that I reduce shoulder width (by something like .7cm or about 3/16") and take in the back seams even further. She pinned out the amount, and I faithfully transferred these further reductions to the tissue and then ... cut right into the leather. (There's something about being the student in a class taught by a trained professional that makes you just trust the said professional when she repeats, reassuringly, "It'll be fine". If I had been doing this at home I would have done some serious agonized thinking, and maybe sewn another muslin, before tackling the leather.)
Two. I sewed my muslins on my trusty treadle. I used a magnetic seam guide which I placed carefully to get exactly 1/2" seams. At Kathryn's I was using one of her Berninas, which have seam guide lines marked only in metric, I seem to recall. I sewed the seams using 1.3cm (the conversion on the pattern) which in actual fact is slightly bigger than 0.5"; 0.5118110236", to be exact. That extra .0118110236" works out to an extra 0.0236" (or so) on each of 7 seams, which isn't a whole lot but...
Three. Even the thinnest leather is thicker than muslin, so takes sort of a leisurely U turn (instead of a sharp fold) when you turn it back on itself as you must at each of the 7 seams. It takes more width, in leather, to do that U turn, than it took in muslin, to do the sharp fold.
All of which is to say that it's a good thing leather doesn't fray, because the side seams at my hip are seriously tiny.
The back. The sleeve caps are also a nice thing about this pattern. There is very little ease (easy to sew even in lining fabric and a no-brainer in leather).
It really is very nice with all those curved seams. But, as I said, maybe a bit on the over-fitted side.
Leather does stretch, right?
I already wore it out to a birthday party last night (with jeans). After I take care of my bad hair, I'll post more photos. I promise.


It's stunning. I can't wait for the model photos.
ReplyDeleteOhhhh, how smashing
ReplyDeleteWow! Your jacket looks amazing. Beautiful job, the seam details are perfectly stitched, and so sleek and flattering! Gorgeous!
ReplyDeleteAmazing jacket, Kay. And you will truly look wonderful with your trim "slightly overfitted" jacket.
ReplyDeleteKarendee
This is one amazingly awesome jacket! Can you hear me clapping all the way from NJ?!!!
ReplyDeleteHow lovely and what a good job that you did!
ReplyDeleteYour jacket is stunning. Wear it well and enjoy it.
ReplyDeleteGita
Amazing jacket! Everything looks so perfect. :]
ReplyDeleteWhoa. That's amazing. Everything looks absolutely beautiful.
ReplyDeleteAbsolutely fantastic Kay!
ReplyDeleteStunning! You don't often zip leather jackets, so I don't think the fitting will bother you. You will be so proud of your fabulous craftsmanship that you won't even think of it.
ReplyDeleteI'm fascinated. Great job!
ReplyDeleteThose back seams are curvalicious!
ReplyDeleteGorgeous and such beautiful work.
ReplyDeleteLove it! Worth the wait!
ReplyDeleteYour leather jacket looks smashing.
ReplyDeleteGlorious! Another wonderful example of expert workmanship.
ReplyDeleteWow, wow, wow. Ths is such a treasure. Your work is so meticulous and so stylish and I've learned so much just reading about your process.
ReplyDeleteSweet! I think I would have to take anti-anxiety pills before I tackled that topstitching!
ReplyDeleteThe line of the back of the jacket is just wonderful. Great work, worthy of showing off to the Chicago Haute Couture Group!
ReplyDeleteWho would even be looking at your hair when we're oooing and ahhhing over that gorgeous jacket!
ReplyDeleteGorgeous jacket. I love the dark chocolate color and fitted silhouette.
ReplyDelete"Luscious" is the word.
ReplyDeletewonderful construction job, and great idea about the hair clips. i saw those in the sewing store and thought they might be for quilting and the heavy layers of batting, but never thought of them for leather! Can't wait to see you in it!
ReplyDeleteKay, what a work of art! Love the chocolate color and the shaping. You really do want a jacket like this to be closely fitted, and you've got the figure for it! All the structural details and gorgeous sewing are enviable. Can't wait to see it on you.
ReplyDeleteAWESOME! What a beautiful jacket, you did an awesome job. Can't wait to see it on you.
ReplyDeleteIt's gorgeous. Can't wait for the model pictures.
ReplyDeleteLooks great Kay!
ReplyDeleteI can't wait to see it in person! (Be envious, everyone.) :)
ReplyDeleteWhat a knockout!
ReplyDelete