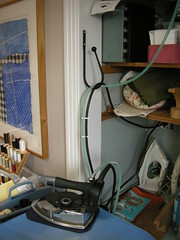
So I thought I'd show you my pressing equipment.
Until about 10 years ago I sewed with the help of what I thought was a pretty good iron - a T-fal. Since acquiring my first "serious" iron, a steam generator, however, I've never looked back. Having a great iron and learning how to use it, and some specialized pressing equipment, kicked my sewing up to a higher level.

The downside of a steam generator is that it takes longer to get to full heat, and it draws a lot of power. This is because you are heating the water in the tank, as well as the sole plate of the iron. Once it's up to full heat, you have unlimited steam until the tank is empty. Unlike a household iron, the iron does not steam when you hold it horizontal; rather it steams when you press the button at the front end of the handle. On my Euro Pro you can lock the steam button down, but I always found it better to press the button only when I needed the steam.
I had an ironing crisis one day about a year ago when the Euro Pro would not turn on - it needed a new switch. In the meantime, I needed an iron! I headed to Cornwall, Ontario, to Giroux Sewing Centre, after realizing they could fix my iron, and that they sold gravity feeds.

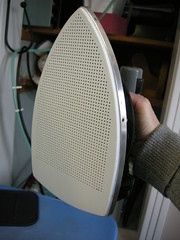
I love the shape of it - low and sleek. The button on the handle is the steam control.
Unlike the steam generator, the gravity feed iron produces steam when the water hits the heated sole plate. They say the steam from the steam generator is drier than the steam produced by the gravity feed. I'm not sure I notice. What I do notice is that because cool water is hitting the hot sole plate, my gravity feed cannot steam continuously the way the steam generator can. But that's OK - I like my steam in short bursts anyway.
These irons only have a few holes for the steam, near the iron's point. This is not a problem - you give it a burst of steam, and then use the dry iron to flatten the fibres.
Now for the ironing board - I have a Reliable C81 Vacuum & Up Air ironing board. This expensive item is an extremely sturdy board with a built in heating element and a fan. The fan can run in 2 directions - down, which pulls the steam through the fabric and cools the piece quickly, or up, which creates a cushion of air you can iron delicate fabrics on. I'm not 100% sure why it has a heating element (to ensure all the steam drawn down inside evaporates, perhaps?) but the fan is great for tailoring or sewing with wool.
Next up are my pressing tools.
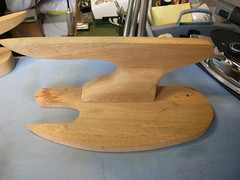
I have a good selection of wooden pressing tools which you can see in the next picture.
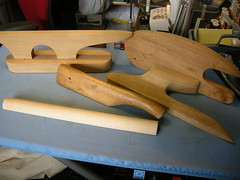
One uses wood because it gives a very hard and flat surface for flattening seams - the clapper is for convincing the wool to STAY flat!
I also use the seam stick a fair bit - it's essentially a dowel with a flat side so it doesn't roll around. Pressing a long straight seam open against the seam stick avoids any risk of the seam allowances imprinting on the garment, since the curved edge means that if you press on the stitching line, there is essentially no pressure between the iron and the seam anywhere else.
The standard shaped ham is very good for pressing open seams with a curve, such as at the hip, or for darts. It basically gives you a curved ironing board so you don't flatten the shape that has been stitched into the garment.
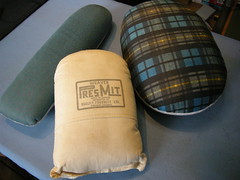
The PresMit is much softer. You slide your hand into the pocket (you can see the edge of it below the label), and then you can place your padded hand right inside a garment (i.e. inside the shoulder) and press against your hand, without burning yourself. I inherited this specimen from my sewing grandmother, along with her Featherweight and a few other choice items.


And then the silk organza press cloth - I just cut off a generous rectangle and serged the edges. It's terrific because you can see through it.
If I ever make any progress on my actual sewing, I'll show these in action. In the meantime if you have questions, post them in the comments.


WOW Kay, I'm IMPRESSED!! I've seen these things for sale--that's as close as I've come so far--except for a ham ;)
ReplyDeleteThanks for sharing!!
Soft hug,
Rhonda
I have the same iron and do I love it! Let me count the ways! the weight and extra steam is invaluable for getting a good press on hard wool worsted. I also have all of the various pressing items that you do and don't know how I would do without them. I also have a sleeve board since I use a large pressing table, your fancy ironing board being the one thing I lack. I have used my needle board for velvet, but it has been years. Have you seen how much these go for new? I remember a friend showing me something she'd sewed, and the edge was a dead giveaway, having not been pressed correctly.
ReplyDeleteI do recall a threads article on making a ham with different shapes like yours, but when I have no clue.
What an amazing and helpful post! Thanks!
ReplyDeleteI own the Consew ES 300 and managed to ruin one jacket when I dubiously questioned the power of the heat one day while pressing. It is a gem. I will look into your ironing board-I am always looking for a new gadget that will improve my sewing...... Thank you!
ReplyDeletewow- a lot of great information here. I use a Rowenta that looks a lot like your Euro Pro and I just love it. I had used it hard for about 3 years, but I imagine it will konk out eventually. I'm sure I'll go with a gravity feed next time, too. I want a pointier tip.
ReplyDeleteI would love to know more about your fancy ironing table. Is the main purpose to cool the fabric faster so you don't have to wait around for it? I admit I get impatient and move things too soon sometimes. All of your work is impeccable, so the pressing is obviously very important. Thanks!
Oh I envy you that velvet board. So so jealous! What a fabulous post on pressing! Thank you so much for the fabulous iron tips. Your ironing board sounds amazing too. Your tools are grand and I really hope we get to see some in action!
ReplyDeleteI have serious sewing accessory esteem issues now...! I have a ham (don't know how a sewer could press accurately without that), and a sleeve board, but that's it. I think I'm going to start with a tailor board, and then grow my collection from there.
ReplyDeleteThanks for the helpful post. I'd *love* to see these in action.
Those tools all make a difference to the finished product. I made myself a ham many years ago and filled it with sawdust too. I also made a pressing board from the instructions in Roberta Carr's book. Love it.
ReplyDeleteKay,
ReplyDeleteThanks for the information! Your work is incredibly beautiful! I am thinking of buying a gravity feed iron, and have been researching. How do you use your C81 board? What is your opinion on the Reliable steam generator irons (i300 and i500)?
Wow,Kay, your sewing studio is well equipped with all those pressing tools! I realize I need some of those things, especially a good iron. I have a $130 Rowenta; they say it's anti-drip but it's not true! And you constantly have to pour water in it. I definitely miss a good iron. Thanks for all the pictures and explanations.
ReplyDeleteI have had the Reliable I300 steam generator iron and the very same "huff and puff" ironing board (Reliable C81) for nearly two years and love, love, love them. Even pressing my husbands clothes (from boxers to shirts) is not as great a chore. It took about a week to get used to the weight as the iron is heavier, but when I picked up my old iron it just seemed wimpy in comparison and it was donated to charity along with the old ironing board. The iron gets a lot of use as I do like my clothes pressed. I too use the Teflon sole plate all the time. I never worry, even when I sew on silk dupioni.
ReplyDeleteVery nice post Kay. I'm trying to find my wooden pressing equipment, and a better ironing board. If you have any suggestions on where to purchase our sewing masters tools I'm all ears :-)
ReplyDeleteI also purchased my gravity feed iron at Giroux's in Cornwall Onario but now I do not find the steam that great. Did you ever have this problem? I purchased it about three years ago and thought maybe it is airlocked. How would you fix this. I was amazed with your pressing tools made of wood.
ReplyDeleteMy iron is still going strong. You should have yours looked at.
DeleteHi can you help me i bought the same but i dont have the manual. I dont know what fabric should be for the numbers in the dial.
ReplyDeleteSee next comment for my answer.
DeleteI'm not sure which iron you are asking about but I didn't get this information either. You need to become familiar with the heat settings. Always test on a scrap until you get comfortable. For the gravity feed iron you should have a Teflon cover for the sole plate which protects the fabric.
ReplyDelete