Monday, February 22, 2016

Old idea, new grey pants

There's a reason to keep old pattern magazines. I earmarked the pattern for these pants soon after I acquired the December, 2005 edition of Burda World of Fashion, as it was then known. And I finally made them, only a decade later.

The fabric might have been waiting almost as long. It's a soft wool in a nice heathery grey, probably acquired at the Fabric Flea Market. It too has long been earmarked for dress pants.

I traced size 38 at the waist and 40 at the hip, and made a quick and dirty muslin in the form of these truly delightful striped shorts. They revealed that while I had the right amount of fabric circumference, more or less, it was poorly distributed.


Specifically, the back. For some reason, pants drafts typically assume that one has a curvy backside. That CB seam therefore slopes away from the crotch at a bit of an angle. When you sew the backs together at that seam, it creates a big dart for your bum. If you have a flat derrière like The Sewing Lawyer, sad wrinkles form at or below the bum, the side seams swing to the front, and the backs of the pants legs get hung up on the backs of the legs of the wearer.

I have written about this before, I think. Ah yes. That is a very elaborate fix I performed. And it didn't work all that well either. This time I flew by the seat of my pants (hahaha) and I'm very pleased with the results.

Altered pattern - pants back
The basic components of the elaborate fix are:

  1. Straighten the CB seam (reduce the dart).
  2. Curve the side seam to keep the overall width the same.
  3. Scoop the back crotch.
So that's what I did. No slicing or folding was involved. I guesstimated I needed about 1cm less of an angle at the CB and I took a bit more than that off at the side seam as the pants were a bit too big at the waist. I also moved the back dart towards the CF by the same amount. 

You can see the results at right. The black lines trace the original pattern and the red ones reflect my changes. 

So these pants. They fit.


I used bemberg lining to underline them since the wool is very soft. The weight and slippery quality of the underlining pulls down on the curved pocket flaps, something I hadn't counted on. I totally need the buttons to hold them flat to the pants front. I didn't originally intend to put buttons on so the pockets are actually closed with a snap and the button is decorative.


Side zipper - pretty good!

Waistband eased into fusible tape
The curved waistband pieces can easily stretch out. I stabilized the upper edge of the interfaced waistband with fusible tape cut to the pattern upper edge measurement, easing the waistband into it. Pressing eliminates those ripples. 


The pants close with an invisible zipper at the side seam. Putting a zipper in the side seam always makes me a bit nervous because it means I can't fine tune the hip curve once the garment is assembled. I double checked the curve by trying them on after sewing the side seams and leaving the front open. It worked!

The sewcation continues and my stash beckons. I think my next project is a machine knitted cardigan in ... wait for it ... heathery grey wool. Or a jacket. Or both...


Thursday, February 18, 2016

This new dress


With my new-found machine knitting expertise (haha) I'm going to say the fabric is a double bed jacquard knit - similar to a ponte knit in weight.Not that any technical information is necessary to appreciate its bold all-over black and white craziness.  The content is a little mysterious, but based on how it responds to the iron I'm confident that it is not a natural fibre, and based on how it stretches, that it contains no lycra.

The pattern is from the October, 2014 Burdastyle Magazine. The details are pretty well disguised.

This somewhat beefy knit is not exactly right for the pattern. The cowl, not a terribly generous one, sticks out a bit instead of draping.

The fabric also doesn't have the stretch intended by Burda for this pattern. So I cut a size 38 above the waist and 40 below, with some fit insurance (1" or 2.5cm seam allowances at the side seams). Once I had completed the neck/shoulder seams I basted it together. My quick and dirty fitting showed that I could take it in above the waist, but that I needed some of that insurance in the hips. The completed dress is figure skimming rather than stretched to cover, which I like.

As you can see at left, it needs the belt to cover for the fact that the back waist is baggy and the torso is slightly too long. And to relieve the expanse of crazy black and whiteness. Without it, the dress wears me.

This is a super easy pattern and it went together really quickly.

On to the next project! I do hope it'll be a pair of grey wool pants.

Saturday, February 13, 2016

The sewcation continues

The swimsuit got its chance to début in the pool. Our coach set up some sprint sets in its honour. Too bad it didn't make me any faster.

In a continuing theme, I made another exercise top, again using the Anne-Marie pattern from Jalie. If you recall, I made this pattern before. That top is in regular rotation but the rest of my workout clothes are getting a little tired. Or maybe I'm just getting a little tired of them. Time to mix it up!


Consider it mixed!

There isn't much to say about this top except:

  • Jeanne of Jalie is a genius. 
  • The fabric (supplex) was purchased in Montreal at PR weekend so many years ago. The stash sewing continues. 
  • The only change I made is to extend the elastic a little bit further up past the princess seam.
  • My coverstitch machine continues to be docile and to do what I want now that I've figured out how little tension is needed on woolly nylon in the looper.
  • I used a stretchier fabric in the build-in bra. The other top (in which the bra is made from two layers of powerstretch) is a little too effective in the compression department. 
  • I would consider combining the side pieces when (not if) I make this again and don't colour block the side panels. 
  • I remembered to adjust the lined upper back for turn of cloth, to let the seams roll naturally to the inside, as you might be able to see in the photo below. The upper edge is edgestitched but not the sides. 

In non-sewing news, my hand knitting project continues apace. I've set myself the task of completing at least 8 rows per day. That amounts to one of the big cable repeats, about 3.5cm. 

My cardigan is now at high hip length (a couple of cables past these photos). The pattern is well named ("Persistence is the key") because the centre back panel requires cabling on every single row. I knit the plain sleeves on my mid-gauge knitting machine. What a relief!


And I finished a dress. But I'll save photos of that for my next post!

Tuesday, February 9, 2016

Splash redux - pink palm trees?


One of the Sewing Lawyer's extra-curricular activities is swimming - twice a week, month in, month out. I swim in a master's swim club. It is hard work and it is early in the morning. The trick is not to think about how much you would prefer to stay in your nice warm bed. Set the alarm, get up, and go.

Anyhow, swimming pools are hard on swimsuits. For years I bought suits and had to replace them annually or more frequently if by mistake I bought one that had any lycra-laden fabric in it. Swimming pools are especially hard on lycra.

Old suit
Then I was lucky enough to buy some 100% poly swimsuit fabric at the Fabric Flea Market one year (2010 according to this post). And I snagged a bit more similar stuff the following year. In 2012 Jalie 3134 came into my pattern stash. And I made a suit.

Last month it served notice that it is reaching the end of its life. That is more than 3 years worth of swimming twice a week! The Speedo fabric is still going strong, but the lining (100% nylon) ripped so badly I ended up cutting it out of the CF piece. I'm still wearing the suit, but ... it was time for a replacement.

I present to you my pink palm paradise swimsuit!
Replacement suit


It's pretty perfect (with PALM TREES!). My lane-mates will be all befuddled when I show up in a not-blue swimsuit.

(Though I found I had a bitty scrap of the Speedo fabric left too - so I cut out another blue one too.)

Technical info:

This fabric is slightly stretchier both in the length and the width than the Speedo blue so I cut it per the pattern whereas the blue one was lengthened (per my 2012 post).

I had mostly run out of 1cm (3/8") elastic, which the pattern calls for, but had plenty of 7.5mm (1/4") elastic in stash so I used that instead. To be honest it doesn't seem that much different.

I used my coverstitch machine with wooly nylon in the looper (tension 3, 3, 0, stitch size 3.5). I had to use the narrow setting due to the narrow elastic. It's not perfect but at 6am there are very few sharp eyes watching out for wobbly stitching.

I had everything in stash except lining. I had to go to a fabric store to buy fabric! But I came away with only 100% nylon swimsuit lining, cut it out the same day and now I have extra in stash for the next time. My stash-busting virtue is intact.

You may hear a bit more from me in the next few weeks as I'm on my annual 5 week leave from work, in which I sew, knit, curl, swim, ski and otherwise loaf. I'll leave a bit of time for blogging.

Monday, January 25, 2016

I might be a little bit addicted

My sewing machines are sadly neglected while I've been knitting.


This colourful item is a shawl I made for a friend's birthday. She had been dropping extremely broad hints ever since clapping eyes on my version. It was a quick knit. And you can't go wrong with Kauni rainbow yarn.

And I've been machine knitting too. I made another zipped cardigan, this one for my husband. It's the same as the one I made for my son except for the colour.

This side view shows the ribbed detail rather well.

Again, I'm quite proud of the finishing on the collar.


And I've just started a hand knitting project - a cabled cardigan for myself. The pattern is challenging as it's knitted top down with all shaping built in by increases, and the back panel requires cabling on every single row. I should be absolutely comfortable with cabling without a cable needle by the end of this project. The photo shows the back. No points for finding my mistake.


My final knitting news is that I acquired yet another knitting machine - a standard gauge Singer with ribber and punchcard mechanism, which excites me excessively. I spent some quality time cleaning and oiling it on the weekend, and then I put it through some of its paces.

Fair Isle


The two samples above are knitted with the same card and technique - the crazy mosaic is the knit side when knitted in two colours and the white sample is the purl side in (obviously) one colour only. Both are tuck knitting.


These two samples are also made with the same card but different knitting techniques. To the left is slip knitting and to the right is fair isle.


Sunday, January 3, 2016

It's a new year, and there is a new dress


Best of a bad lot on a dark January evening
My Burda sheath dress project got temporarily side-lined by Christmas present projects. And by a little mishap that deflated my enthusiasm for it. I was merrily sewing along making great progress towards the end of November when I discovered a hole (yes, a HOLE) in the fabric of the skirt, right at centre front. And above the level of the hem (although luckily near the hemline).

Good God, how did I miss this when I was cutting out the dress? Good God, how was I going to recover?

Mend - inside
Mend - outside
Luckily, the fabric is very thick and very dimensional (it is a double wool crepe, so technically two layers of crepe that are attached to each other, but not extremely firmly), I could easily harvest lots of self-fabric thread for mending, and the hole was worse on the wrong side than the right side (although there were cut threads on the right side too). I did my best invisible weaving imitation. And then I put the mostly-constructed dress into time-out to stew over its sins and let the magic closet do its work with that little mend (out of sight = out of mind). It has mostly worked I think.

Onward. This fabric is magic. It is thick and dimensional and my triple-stitch topstitching looks pretty fabulous on it, if I do say so myself. Further, because it's crepey, it has a lot of give and the dress is super comfortable although quite fitted. And then, because it's wool, it is nice and warm even though it's sleeveless.

Bodice lining is poly tie fabric
I think Burda wanted me to line it to the edge, but I made little facings (which I sewed to the lining and then treated as part of the lining) to prevent the lining from showing at the neck and arm openings. This made the edges fairly thick - I kept it all nice and flat by allowing about 1/8" for turn of cloth at the armhole above the diagonal seams on both front and back.

The relatively thick facings made for a bumpy shoulder area. I retro-fixed this by cutting a little padding out of fusible fleece which I slipped between the layers and fused to the lining side.

The seaming details are really lovely even though they might be mostly invisible to the casual observer. The seams line up very nicely with the darts at the waist and with each other at the side.

As usual these days, The Sewing Lawyer's stash came up with all the needed bits including the interesting lining, invisible zipper, thread and emergency fusible fleece. The fabric for this dress was purchased at Fishman's Fabrics in Chicago when I was there in 2012, along with the fabric for this suit. So they coordinate, right? Well yes, the jacket does look pretty good with the dress.

But to my surprise, another jacket in my closet looks even better with it. I made this jacket in April, 2007, long before this blog got started, and it's what The Sewing Lawyer will be wearing with the dress on the first working day of 2016.

Happy New Year from:

Monday, December 28, 2015

Guess what? Another TS Christmas knitting project!


This one is more complicated. I made a zipped cardigan for my son (details on my Ravelry page). The yarn is Briggs & Little sport in a dark grey. It's a one ply with a manageable tendency to bias. It is very rustic, complete with bits of what looked like wood and straw, and wild hairy bits. Off the skein it's oily and stiff but washed, it has a fluffy but very seriously woolly quality that I like. It left my Passap full of lint. Maybe I should plan to do a deep clean once a year...

A nice variety of things went wrong with this project:
  • I made a PDF of the pattern quite a while ago (from a library book) but when I went to start my project, I only had the last of five pages. I still have no idea how that happened.
  • I requested the book again and it took days and days and days to get to my branch.
  • My parents visited. (This isn't really anything "going wrong" but it was another source of delay.)
  • Stitches delighted in jumping off the needles.
  • (This is totally just between us.) I knitted an extra rib up the side of one front. Didn't notice for the longest time that one piece has 4 ribs instead of 3...
  • In converting my hand-knitting pattern for my machine using basic knitter's math, I failed to note that the sweater is supposed to be 45cm from the bottom of the sweater to the armscye, including 6cm of ribbing. I knitted 6cm of ribbing and then 45cm of stockinette. And then I washed and blocked the first front and DID IT AGAIN before noticing.
That last one cost me a good night's sleep. My inner dialogue at 2AM: "Leave it as is?" "He'll hate it if it's too long." "Cut 6cm out of the middle and kitchener stitch?" "Frog back, rehang and reknit?" "Leave it." "But if I do he'll never wear it." "Cut 6cm out and kitchener?" "Frog back?" (Repeat endlessly.) 

By the light of day it was obvious I should frog back because he would not like a sweater that was too long and let's face it - if you have a knitting machine, reknitting is a lot easier than connecting two bits of knitting invisibly by hand. And in the end it was really fast; so not worth losing hours of sleep over.

Given all of this, I'm really pleased with the finished project. I managed to go straight from the ZZ cast on row to a 3x2 ribbing pattern (this involves lots of transferring stitches between beds). I managed to knit ribbing up through the body of the sweater without any obvious gauge problems (I knit the back bed purl stitches on stitch size 6 when the front bed was SS 8). 

Front
Sleeve
I accurately (subject to my mistake noted above) graphed the pattern and worked from these diagrams. 

I can knit anything!


But the source of most happiness is how well the collar turned out. The pattern called for a standard hand knitted collar which in part (at CF and CB) was knitted straight from the body pieces rather than from cast off edges. The collar is in the 3x2 rib pattern and doubled (i.e. knitted 12cm, then the cast off edge is sewn to the neck edge on the inside). This would make a facing to hide the top of the zipper tape on the inside. 

Cashmere turtleneck sweater 
I wanted a single layer collar (2 layers of Briggs & Little would be too much), and I wanted it to attach the same basic way as the turtleneck of a commercially made cashmere sweater I own. See, there is a single layer of ribbing, and it is knitted directly to a few rows of stockinette - both inside and out - and those stockinette stitches are neatly sewn together through the body of the sweater. Neat huh?

Except I am lacking the machine (a linker) that does this kind of sewing, and I wasn't 100% sure how to knit the little stockinette flanges directly onto the ribbed collar. 

But I did it! I'm so chuffed! For anyone with a Passap, here is how. After knitting the number of rows of ribbing I needed for 6cm, I filled in the missing 2 stitches of each purl column on the front bed by hanging the purl bump (from the row below) for the adjoining stitches on the empty needles. I did the same re the missing 3 stitches of the knit columns on the back bed, but I left the centre needle empty. Then I set the lock to knit circularly (CX/CX) at a stitch size between that of the ribbing (6) and the main knitting (8) - just to keep it a bit firm. I knit three rounds (6 passes) and then some rows of waste yarn. 

Right side
Wrong side
To attach the collar, I hand basted the wrong side flange to the inside of the sweater neckline. Then I very carefully chain stitched the three layers together with a crochet hook, making sure the hook went through the matching loops of the last row of the Briggs & Little. I had to fudge a tiny bit at the CF edges to keep them relatively straight. Subject to that, IT WORKED PERFECTLY!

I sewed the sweater together and installed the zipper with my sewing machine. To keep the inside of the neck neat and make it soft, I added a little fleece facing.  


Top secret Christmas knitting - 3rd edition

You know Cidell? She and I egg each other on about machine knitting. I really like that simple striped cowl she made (four times) for the women in Jordan's family. I really like the same yarn; in fact I had used it for TS Christmas project the second. So I riffed off her project but instead I made a scarf for my dad.

I decided to knit my scarf flat but double width, and seam it along the long edge. I used the same needle pattern that I used for my mom's shawl; 3 in work, one out of work, etc.  I did a 1x1 rib at each end, and the fact that the ribbing is also in a tube is a little weird, but not unacceptable I like to think.

I went with five colours: chocolate, denim blue, sage green, grey and black and calculated how many stripes I'd need to get my desired length (not too long, said my husband) of 54"

I think it took longer to cast off (my achilles heel of machine knitting) and seam it than it did to knit.

Sunday, December 27, 2015

Top Secret Christmas knitting - take two

You already know that I made my mother-in-law a machine knitted shawl. Flushed with my success, I decided to make a second one for my own mother for Christmas, but to "improve" the pattern to get rid of the curling edges.

Curl is built into any item that has any version of stockinette stitch right to its edges, where those edges are not stabilized by being sewn into seams. It's structural, and it causes the bottom and top edges to roll towards the right side of the item, and the side edges to roll towards the wrong side. (TechKnitter wrote on the subject, if you wish to study it in detail...)

Purple swatch - Wrong Side
So anyway, shawl #1, while lovely and purple, had ends and edges that rolled to an extent that (in The Sewing Lawyer's opinion) was excessive.

A swatch told me that if I added ribbing at the ends, and along the edges, I could cure the curl.

Compare the left and top (curling) and right and bottom (ribbed) edges.

I made the entire shawl like this. I will not bore you with the technical difficulties overcome, or the mistakes that had to be fixed/fudged. There were several of each. In the end, I had a cushy, seafoam greeny blue coloured shawl, with more or less flat sides (we can live with their occasional tendency to fold back to the wrong side), lovely corners and ribbed ends.


Top secret Christmas knitting

I compulsively scan the newly published patterns on Ravelry. That site is so addictive! I am embarrassed to tell you how many patterns I have faved. So I won't.

There are SO many new ones every day. Most of them (between you and me) are supremely awful. Patterns for dishcloths and boot toppers, coffee cup cosies and ugly, chunky cowls. Sorry if you like making such things - I think life is too short. I'm always most interested in the sweaters. Most of them are also very forgettable, but every so often one comes along that almost takes my breath away.

And so it was with "Graphic Sweater" from the Fall 2015 edition of Vogue Knitting. See?

Breathtakingly, riotously patterned. I would never in a million years make such a thing by hand. But I have a knitting machine and I know how to make it knit me a crazy stranded pattern.

And so I made it. Out of 50-50 cashmere cotton yarn in ecru and darkest navy from my favourite yarn pusher supplier, ColourMart. I would have used wool but the recipient has sensitive skin. Well, this stuff is so soft, you have no idea.

Needle Selection Tool
What a fun project! Contemplating it led me to get my ancient KnitKing out of the closet and clean it up. It is really an amazing machine, though completely manual. It has a straightforward if somewhat time-consuming way of patterning that is infinitely variable. Unlike people with more complex, more sophisticated machines that use punchcards or other automatic patterning systems, you have to hand-select the needles for knitting with each colour. I have a wonderfully simple tool to make it easier with repeating patterns like the ones in my sweater.

At about the 2 minute mark in this enchantingly antique video, you can see the knitter using this tool; she's knitting a Norwegian style of patterned sweater on a machine that, so far as I can tell, is just like mine except branded "Knittax" (the brand name was different for Europe).

Contemplating this project also led me to get out my brand new version of Excel to plan out the charts because (a) Vogue Knitting editors are apparently incompetent at publishing charts without mistakes and (b) the designer and/or VK editors paid scant attention to the flow of the patterns into each other or their placement on the body. I shifted things around until I was satisfied that they flowed and were more or less centred. Not that you can probably tell, but I also completely redesigned the first chart so that it repeated on the same number of stitches as the second chart above it. This satisfied The Sewing Lawyer's persnickety perfectionism.

KnitCompanion Screen Shot
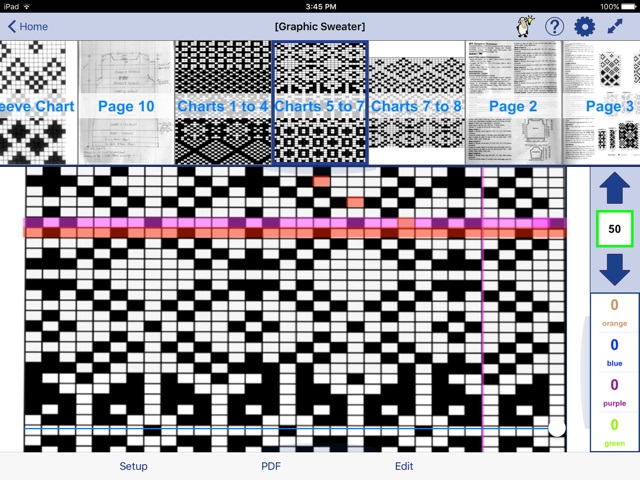
And finally, making this project confirmed me in my love for KnitCompanion, an iPad app that allowed me to easily follow the charts through 80 rows front and back (and 27 on each sleeve) while making only one patterning mistake. You will never get me to reveal where it is.

There is something so very charming about making a crazy patterned sweater using computer technology assists for a 50 year old 100% manual knitting machine.

And I'm so pleased to report that the recipient really, really, really likes her sweater :)