Wednesday, July 16, 2025

Can I post retroactively? Filling in a gap from 2021

A friend told me she couldn't find the post on my blog about an epic machine knitting project that I completed on Christmas day in 2021. Nor could I, because it didn't exist! Poor, poor neglected blog.

To recap, one day in late summer of 2021 I got the totally idiotic idea to knit my husband a vest using left over bits of sock yarn in my (ahem) extensive stash. In intarsia. Based on a hand knitting pattern by Kaffe Fassett. 

Here is the photo from the original pattern (Ravelry link), which is in a book I happen to own. 

Of course, all the yarn that was originally recommended is long since discontinued. However, this is the type of project that practically begs you to use whatever you have on hand. 

I had so much miscellaneous fingering weight yarn, even including some orphan discontinued Rowan skeins sourced by my husband at thrift shops. How fitting to include them in my project.


Husband and I went stash diving and came up with a palette that worked.

I ended up using most/all of these yarns in the finished vest.

The pattern looks complicated but breaks down into understandable chunks. 

If you squint at the pattern photo, it resolves into a quilt-ish looking pattern of hexagons against a neutral background. The hexagons are comprised of 6 triangles each and the background is also triangles. Each triangle is 16 stitches wide at its horizontal side (base or top, depending on whether it is point up or point down) and 16 rows high. 

I decided that each hexagon needed to have two dark triangles, two warm coloured triangles, and two cool coloured triangles. I had two different neutrals (a warmer and a cooler beige). Other than that, my only colour rule was not to repeat the same colour in the same orientation too closely together. It had to look kind of random, but kind of ordered at the same time. 

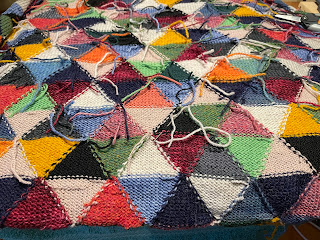
This is what intarsia knitting looks like while on the machine. 


I used "butterflies" of yarn wound on my left hand - a butterfly wrapped about 20 times was more than enough for one triangle. Plus, the dangling butterfly was about the right amount of weight on the yarn to keep it from jumping off the needles during knitting. The clothes pins are holding down the end of the yarn at the very beginning of each triangle; the butterfly hangs from the last knitted stitch in each colour. The other things hanging off the knitting are claw weights, which help keep the entire knitted piece on the machine. 

And here's a video on how to knit intarsia on a machine. It's not rocket science, but it does take concentration. I started with the fronts on the theory that they would ease me into the process (half the width, half the number of different colours in a single row). The photo above is of the back. Even after knitting both fronts without serious incident (that I now recall), I found I could only knit two rows of triangles (total of 32 intarsia rows) at a time before needing a break. 

Long story short, Ravelry tells me that I started this project on August 29 and finished it on December 25, 2021. 

It took forever to weave in all the ends on the back of the knitting. 

Once the ends are woven in, the back is almost as neat as the front.


And now for some finished photos.

With a pipe. Because male models in knitting patterns are often holding a pipe, if not a gun of some kind. 

You can readily see the hexagon quilt-like pattern in the back. 


It has pockets!


Tuesday, July 1, 2025

I made a wedding dress!

It's a few days after the wedding - of my only son to his long-time sweetie - who wore the dress I made for her. Actually, she wore both dresses that I made - the "practice dress" (she changed for the reception) and the "real thing". So I am giving myself full marks for client satisfaction.

I am still processing the whole experience. But you only want to know about the sewing, right?

Initially, when I signed up for this project after finding out that future DIL was going to be 30 weeks pregnant on her wedding day, we were thinking that an easy to wear knit dress would possibly work. I made a number of inquiries and found out that The Fabric Room had white silk jersey in stock. So that's why we went there. Also (confession) I had wanted to visit this store for many years and had never had an opportunity or an excuse to do so. 

Of course, the jersey wasn't quite right, but we found this interesting silk-viscose blend, very drapey but with a bit of body. Up close, it is almost a tiny mesh and I would say it is semi-sheer. It would clearly need to be lined and initially we thought a coloured China silk could work. We bought some pretty red fabric. But to be safe, we also bought some fine white cotton batiste, which ended up in the lining of this dress. 

I'll make her something else out of the many metres of red silk!


To make this dress a bit more fancy, I used a tiny remnant of silk (Shantung? - from a friend's stash) for the bodice insert, topped by a pretty lace (from the same friend's stash) applied to a skin-tone mesh. There is also a band of lace on the "waist" band. 

I didn't even try to pad my dress form for the baby bump, as you can see.

I decided to use the same cotton/lycra knit fabric as in the practice dress as the underlayer for the bodice front. Because I was confident about the pattern (thank you practice dress) I thought I could construct the bodice in a more straightforward way.

However, this dress is both lined and partly underlined, which put all the complexity back into the sewing procedure.

I underlined the back bodice and the waistband with silk organza from stash. This added stability to the dress fabric in areas that would be stressed due to close fit. 

The entire dress, except the bodice front, is lined with cotton batiste. At DIL's request, I again made in-seam pockets, which I cut out of the cotton and inserted through an opening in the lining so that they ended up on the inside of the lining. If left between the fashion fabric and lining, they would have showed through. 

I had initially sewn exactly the same dimensions as the practice dress and had inserted some 2.5cm elastic in the front of the waistband. On a fitting a few weeks before the wedding, it was obvious I needed to let it out as much as possible, and the elastic was deemed uncomfortable. Out it came! (Her wish was my command.) 

My last technical challenge was the hem. I had added height to the front panels as well as width, but based on my experience with the practice dress I had cut all panels about 8cm shorter than the pattern. DIL was planning to wear flat shoes and the skirt was just too long. 

However, as a result of a combination of factors (very shifty fabric and the growing baby bump being the most important), when I finally had the opportunity to figure out the hem, I found I had only about 2cm to turn up in front and close to 10cm in the back. I was hemming this dress in the few days before the wedding at my mom's place, having brought a sewing machine, my serger and a good iron as well as all the tools I could imagine using. Luckily I had also thrown in the remainder of the fashion fabric.

My hem solution was to tear 10cm wide strips of the fabric and use them to face the hem. If I do say so myself, this worked brilliantly (although it took me an entire day).


This view is perfect to illustrate the back (back neck lowered a bit) and show that the hem has real heft and is quite even. I was very relieved to see this, I can tell you!

This ends the saga of the dress, but not all the wedding-related sewing. 

DIL had asked for a bib if there was fabric left over (there was!), explaining she was worried about the dress during the dinner. I didn't think it was fair for her to be the only one, so I made a bib for the groom as well. I found a free pattern on the internet. The bibs are structured due to a lining of the batiste fused to light batting. I decorated them with silk organza and a couple of buttons and they close with velcro. I think they turned out really cute.


Not sure what I'm going to make next but it might be for a small human. 


Tuesday, June 17, 2025

Mother-of-the-groom - that's me!

In between working on THE DRESS, I've also been making the dress I will wear to the wedding. It's my version of an OOP Vogue pattern designed by the late Patricia Jeanne Keay. 


I first saw this dress in 2010 in a Threads Magazine article. A version of that article (written by the designer) is on her website. The full article is on the magazine's website, if you have access to it. 

I instantly thought that the pictured celadon green linen dress was just about the most beautiful creation I had ever seen. Those embellishments! So unique.


Anyhow I didn't forget about the dress and when I saw this Vogue pattern published seven years later, I bought it instantly. But it has been languishing in my collection unused since then, waiting for a suitable occasion.

I decided that my son's wedding would qualify, so I got it out and did a muslin. The pattern has lining pieces that end in a level hem (at a high mini-skirt level) and I used them to check the fit. 

I found that the pattern, unlike the red version on the pattern envelope, but very much like the green version in the article, had an extremely wide and open neckline, with the shoulder "straps" set so wide that they would be of no use in actually holding the dress on the wearer's body. It was far too wide and open to fit me properly, or to be comfortable. 

I was able to adjust the front and back neck by different amounts to fix this problem. I took the back in more because it was generally too wide to fit me properly. The front only needed the neckline adjusted. 

Here's a snap of the adjusted pattern pieces. 

You can see the deeper "dart" reducing the overall width of the upper back piece on the left. 

I bought linen from Core Fabrics, plus matching Bemberg lining, and I'm very impressed with the quality of both. 

Looking at the photo of the back, I could have narrowed the back bodice a bit more, but it is OK.

This adjustment slightly changed the angle where the shoulder "straps" would attach. I had to further adjust this a tiny bit in the back. 

I'm calling them "straps" because they are way more interesting than the usual 2 dimensional strap found in a pattern. 

The bias piece (see photo at left) is sewn into a tube and then pleats are formed at different angles in the front and back. The result is a nicely 3D piece that cups the top of the shoulder. 

With my adjustments to narrow the neckline, the dress will be securely bra friendly. Win!


The other change I made to the pattern was to line the flounce, which Vogue instructs to leave unlined. I think the lining adds the right weight to the piece, which might have been flimsy in comparison to the rest of the dress. The upper part of the dress is lined with a mini-length version of the dress pieces. It also has a facing for the upper edges, which is applied to the top of the lining pieces. I found this a bit surprising, but it works.

I had lengthened the flounce slightly (about 2.5 cm) and cut the flounce lining a tiny bit shorter. Then I seamed the flounce lining to the flounce at the hem, and attached the upper edge at the dress/flounce seam by hand. This makes for a very smooth and completely invisible hem. 

Finally, you ask, what about the bodice embellishment? Isn't this the most important and interesting part of the entire garment?

Why yes of course it is! The Threads article focuses on how to make the skinny bias tendrils and make them curl, and to sew the 3D leaves/petals. I was interested to see that the pattern has a good amount of detail on this too, and in fact the pattern pieces for the leaves were slightly simplified. 

Kay's secret to sewing the tubes and turning them right side out is:

(1) To ensure the correct tube dimension, don't focus on the seam allowance width while sewing. Pay attention instead to the width of the tube itself. Simple but critical. 

(2) After sewing the seam use your serger to beef up the seam allowance with a narrow 3 thread stitch.

(3) Fasten the end of a good length of very strong thread to the seam allowance at one end of the tube piece with a secure knot. 

(4) Thread a darning needle with the other end of the thread and draw it through the tube.

(5) Pull on the thread while helping the end of the tube where the knot is tied to fold inside. Keep pulling gently until the knotted end appears at the other end of the tube. 

No further corsage needed!


Monday, June 16, 2025

Wedding prep - second instalment

So I made the "practice" dress based on my adjusted pattern. Short story - it needed a bit of adjustment, but basically worked very well.

The fabric is rayon challis. The "real" dress would be made from a silk/rayon blend that's very drapey, with a lining that was at that time still undetermined. We had bought some china silk in a rosy red, but also white cotton. 

Future DIL didn't want the crossover bodice of the original pattern so I adjusted the bodice to have two draped halves that would meet just above the underbust band, with a V shaped panel behind. 

It was a challenge to figure out the draped piece. I based it on the original pattern but adjusted it to remove the shoulder seam gathers as well as for the altered bodice configuration. 

The pattern has a princess seamed bodice under the draped front. In fact, it called for two layers under the draping - one is a base for the draping and the other is lining. I decided to use just one layer of fabric under the draped front, but made it as lining, that is with the wrong sides together.

I cut this under-bodice out of stretch knit on the theory that this, coupled with the draping, would adjust for bust expansion, if needed. 

I didn't have to change these pieces too much - the CF pieces only had to be altered to change the angle of the front neck.

I puzzled for far too long over construction steps. It's hard when nobody has figured this out for you ahead of time! I ended up finishing the bodice front neck and arm edges and attaching the V panel (which I figured might need adjustment) with hand stitching. I stupidly attached the back skirt panels to the back bodice and waistband before I attached the front bodice to the back, but I was smart enough to realize I had to wait to insert the zipper until after I sewed the shoulder seams (topology!). I hoped at the time to remember not to do the same with the real dress). 

As you can see in the above photos, the draped front was a bit too long (better than too short!) for the princess seamed bodice pieces once pleated into place. The excess was trimmed off later. 

The hugely expanded skirt front was pleated into the lower edge of the underbust band to match (sort of) the pleated bodice. I made the front of the underbust band into a casing for some elastic in case needed for future sizing issues. 

Also to assist in adjustments later, if needed, I did the side seams last. 

We hadn't seen the happy couple for a few weeks and things had evidently progressed by early May - the bump was a bit more than I was expecting for that point, to be honest. Luckily, there was still plenty of room in the front of the dress for further expansion, so it was all good.

We found that the V panel was too wide and too high. Thanks to my forward planning, it was easy to unpick and adjust. 

I did the hem while they waited, and waited, and waited! Yikes, the skirt hem is LONG (no extra cm were added below hip level). With the practice dress approved and delivered, I could move on to the real thing. 

To be continued ...

Sunday, June 15, 2025

Well this is a surprise!

NB - posting was delayed while matters continued. Stay tuned for additional instalments!

My dear son is in a long-term relationship with a wonderful young woman - like, they have been living together for 10 years. Until recently, there was no talk of marriage, though their friends were happily walking down the aisle (or equivalent) and even producing babies. 

So we were of course delighted when they told us that they planned to marry this year. My future daughter in law broached, very timidly, the subject of me possibly sewing her wedding dress but initially I declined. Mostly, I thought it would be hard to sew such an important dress. I had reasons. She lives a 5 hour drive away, which would make fitting/consultations difficult. She isn't a sewer and hasn't routinely had anyone sew for her so conversations about garment style (patterns) divorced from a specific fabrication thereof are difficult. We don't speak the same language re garments. Mostly, getting it wrong would be horrific! 

She didn't argue with me, and very kindly invited me, along with her mother, to come wedding dress shopping. We did, soon after Christmas. We saw some things that looked promising but no decisions were made.

Weeks later, I asked if she had ended up buying any of the dresses we had seen. I was surprised to get no response. A few weeks after that, my son spilled the beans. She had bought a dress, but it wasn't going to fit, because she is also EXPECTING! Holy cow! All the family things are happening all at once, all of a sudden!

In this new circumstance, despite the dress issue being even more fraught, because SIZE and SHAPE are only to be guessed at months ahead, I offered to make the dress. Yikes! (Yes, I may be an idiot.)

My first task was to pad my dress form to get the approximately correct bust and upper body dimensions based on measurements taken at about 12 weeks. I have my fingers crossed that the bust will be close in size to this until the very end of pregnancy (after the wedding!). 

I found a quilt at the thrift store and draped a muslin cover (notice the separating zipper so I could get it on and off). I briefly thought of also padding for a baby bump but decided it would be unnecessary as well as kind of difficult to get right.


I started draping the fabric and got a positive reaction to this:


I bought this pattern to use as a base, although it will obviously require modification. 


As of mid-April, I was mulling over how much width and length I would need to add for the expanding belly. I decided to make the waistband narrower by about 5.5 cm so it would sit higher on the body. I also decided to build in stretch in the front (stretch fabric base and elastic in the waistband). A draping experiment using a pillow as simulation suggested I would need about 4 cm more length at CF in the skirt, plus the removed length from the original waistband - in total about 10 cm. Plus about 2 cm at CF to bring the line of the bodice up at the very centre. Fingers crossed!

Re the width, I measured the skirt front of a Burda Magazine maternity evening dress. It was 80 cm wide! I thought that might be excessive (?) so added "only" to make it about 74 cm. 

Thus, I got an adjusted pattern. Next step would be to cut out my muslin, which I had billed as a "practice dress". Wish me luck.