Showing posts with label PatternMaster Boutique. Show all posts

Friday, April 15, 2011

Another sheath dress

The Sewing Lawyer cannot have too many sheath dresses, since she has a pattern that fits.  For years, a simple dress with no waist seam that fit everywhere was an elusive goal, given a hip measurement that is about 2 sizes bigger than the waist or bust.  PatternMaster Boutique to the rescue.

PMB produces a pattern that is a decent but not excellent fit.  It needs tweaking in the pattern editor (CAD) component of the program.  My goal for the program is to produce basic blocks, like this dress and my princess seamed skirt, that I can make over and over as is, or adjust for different styles.

For this sheath, I started with a princess seamed dress.  This is a simple shape that as originally drafted, had both a shoulder princess seam and a second seam that corresponds to the second waist dart in front and back.

To the right are the finished pattern pieces.  One of the standard changes I make is to take a little wedge at the CB waist, since PMB drafts with a dead straight CB seam.  I'm not straight there, are you?  As you can see, I converted the second princess seam back to a fisheye dart in the front.  In the back, it's a long dart that ends in the armscye.  The hem is also slightly pegged so it looks less blocky.

So this is at least the third sheath dress I've made from the pattern.  You last saw it here.


Here are the pictures of my most recent iteration of this dress.  So comfortable!  It has about 2" or so of ease at the hip.  

I think it looks pretty good with my leather jacket.  

I wore this to the Haute Couture Club of Chicago luncheon and fashion show last Sunday.  But I had not correctly anticipated the weather.  It was 85 degrees F (29.5 C)!    

Sunday, October 17, 2010

A finished object

In the aftermath of the Fabric Flea Market, I did muster enough energy to finish a sheath dress which had been in the planning for several years, and in the execution for several weeks.

I had purchased the fabric for this dress a couple of years ago on a flying trip to the Wool House when I was wearing  this jacket:


(I pause here to note that I hate Windows Live Writer.  When I first used it, it was brilliant.  Then I got a notice to update it.  Now I hate it.  I can no longer figure out how to format text around the photos – the previous version worked perfectly.  I think I’m going back to editing using Blogger.)

Back to the regularly scheduled blog.

As I was saying, I was wearing that jacket, which I seem to have made in November, 2007.  I know that because that's when I reviewed it on PatternReview (here).  I was having trouble finding pieces to coordinate with it – the fabric has some dark blue, some light blue, some creamy beige, but putting any of these colours next to it looked strangely wrong.  I dashed into the Wool House and asked for advice.  The man in the store led me straight back to the Zegna shelves and pulled out a bolt of the fabric I bought for my new finished object; this dress:


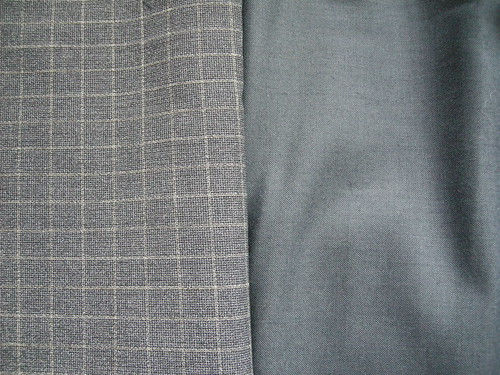
This fabric is thin, smooth, and I think it’s a blend of wool and mohair.  It has black and a grey-ey blue-y green-y threads and is an impossible-to-describe colour which somehow goes perfectly with that jacket.

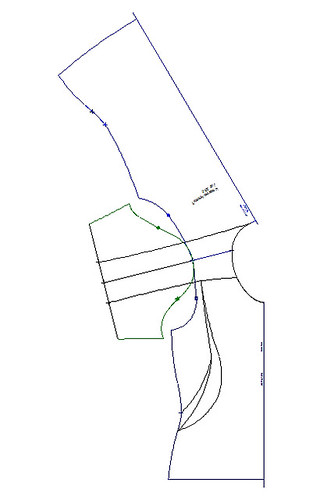
This dress is made from a pattern I developed using PatternMaster Boutique or PMB.  I wrote all about it in a pattern review here.  I was thrilled to have a sheath dress that fit and that I thought looked pretty good.  I've never found a commercial pattern that did these two fairly simple things so this one is a keeper.

As soon as I bought the strangely-coloured fabric I knew it was going to be this dress.  Well, it had to be, because it was damnably expensive fabric and I only bought a small amount (I think 1.2 metres).  You see, another other great thing about this pattern is that it's a true fabric miser.

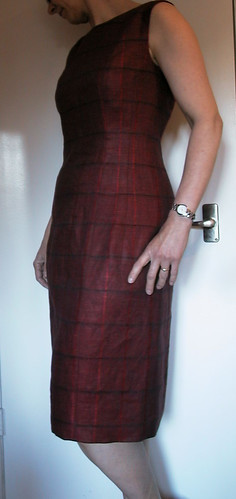
In this picture, the dress looks ripply and puckered.  I swear it does not look like that in real life.  Here's another picture, a sort of side view.  The pattern has lots of shaping seams - princess seams front and back and side seams and long shaping darts besides.


In the next pictures you can see a bit of the fabric up closer, if you click to open them.

They were taken in natural light so are somewhat truer to the actual strange colour which overall looks more green than blue.

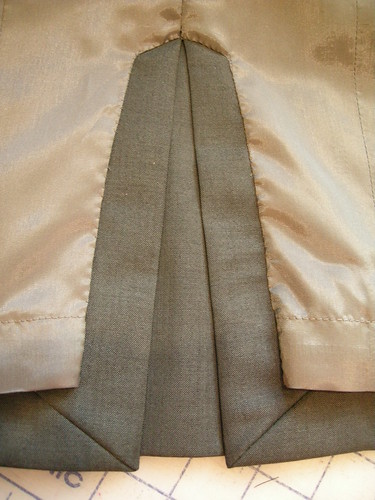
Notice my not-perfect hand understitching at the neck edge.

To the right is the shoulder seam with princess seams meeting nicely.


The CB sports a simple slit opening for walking.  Notice the mitred corners.  The lining (Bemberg) is hand felled to the facing.  The dress is underlined with silk organza.  I decided not to serge the raw edges at seam allowances and hem to avoid show-through in the pressing, but found some black lace at the Fabric Flea Market which I used to finish the hem edge.  


And finally, it looks good with a jacket (or two).


Sunday, July 25, 2010

Planning for fall

It's still July but I'm thinking about wool - specifically, a scrumptious piece of feather-light wool/cashmere blend of which I have just enough for a sheath dress, and a coordinating, amazing, hard but light and airy pure wool for a jacket (I probably have enough to eke out a skirt as well).

The colour is blue - a greyish but still blue blue.  I purchased the cashmere blend in Toronto at the Wool House on Queen Street West (highly recommended, if you're in Toronto) and the coordinating fabric in Montreal at PR Weekend at Couture Elle (highly recommended, if you're in Montreal).  I gave my little swatch of the Toronto wool to the guy in Montreal and asked him to recommend a coordinating fabric (finding coordinating jacket fabric for 2 dress lengths was another of my shopping goals for the weekend).  He strode decisively to a high stack of bolts, pulled one out, placed the swatch on top and ... TA DA!  Perfect, first time.  This guy is amazing.


Is it true that real blazers are in style for fall?  I'm not very good at sussing out trends, but what I want to make is a traditional, single-breasted, long and lean jacket with tailored shoulders, and a slightly peaked lapel.  I found this in the new Burda envelope patterns.  What do you think?  It's #7421.  (Sorry for the fact that this is not an English page.  Thankfully, Burda's unbelievably inept decision to migrate ALL of its English content to the inane "Burdastyle" page, from which it is impossible to find any of the actual corporate content - i.e. its magazine and envelope patterns - has not yet affected its French site).  

But no - the dress and boots would not be part of my wardrobe plan, though they are utterly cute on this 20-something model.  You'll just have to imagine the jacket on top of something more sleek and age-appropriate.  

Much like this, in fact.  (It's a PatternMaster Boutique pattern reviewed here.)   Shorter??  

In the meantime, I'm finishing up another pair of bike shorts today, and really ought to finish the knit jacket so I can wear it ...

Wednesday, July 21, 2010

More stretchiness


OK, I’m clearly running out of catchy names for this spate of exercise-related sewing I’m doing recently.  Here’s evidence of two more jacket-and-iron-avoidance projects.  I have finished my Champion technical T-shirt knockoff and made a pair of snazzy new bikeshorts. 

There’s not much to say about the bike shorts.  I used an ancient (ca 1989) Stretch & Sew pattern  which, by some miracle, is still on their website here.  This is the 3rd pair I’ve made.  If (as I do) you choose not to make the contrast side stripe, you can construct them from a whopping 2 pattern pieces.  Not front and back, but front/back (no side seams if you so choose) and a crotch gusset, which runs from left shorts hem to right shorts hem.   

I add another piece – a casing for the waistband elastic.  S&S says just to fold the top edge over too-thin elastic.  I’m either very long through the crotch as compared with S&S’s ideal figure (which is possible) or these bike shorts are meant to be a lot lower-slung than I prefer.  This is also possible, though doubtful, given the date on this athletic wear classic.  

One of my few fabric-purchasing goals for PR Weekend Montreal, since I knew we’d be visiting the favourite stretch-fabric buying haunts of Jeanne Binet (Jalie), was to buy a good beefy black something-or-other with lycra for new bike shorts.  My other pairs are very old and tired.  I found this absolutely fantastic bottom-weight which I think is RPL.  It’s very firm in its negative ease – easily the most comfy girdle-like garment I’ve ever worn!

The S&S pattern also has pieces to make your very own “seat padding” which I have done in the past.  However for this pair I installed a commercial pad (all curvy in 2 directions, laminated foamy stuff etc.).  I swear my bike goes faster when I’m wearing these shorts, so mission accomplished.  I’m going to make another pair while I am in the mood and will have to make the padding myself, so stay tuned for a post on that.

The shirt is one of 2 I’ve completed (a third is cut out) which combines a very stretchy mesh for the dark grey side panels and under sleeve, with a polyester athletic knit purchased some time ago from Wazoodle.  

To the right is the completed PMB pattern which turned out just as I wanted.  That is, it fits exactly like the original plain T-shirt before I started slicing and dicing it, and its style lines are more or less mimicking the commercial shirt I was trying to clone.  For once I got smart and drafted .65cm (1/4") seam allowances like Jalie does - this uses less fabric and I can sew with my serger by letting the blades just skim the cut edges.  The tiny seam allowances make it easy to sew the curved edges without puckering.  

I used the Jalie neckline technique  and it works marvellously even with the rather non-stretchy poly knit.  The stretchy panels stretch when I’m hunched over on my bike, so that the whole shirt doesn’t ride up.  To jazz it up and get rid of the puckering at the seams, I used a quasi-utility quasi-decorative stitch on my sewing machine.   

Tuesday, July 13, 2010

Still stretching

It is hot here!  Being inside, in non-air-conditioned discomfort WITH a hot steam iron going next to me, wasn't my idea of fun, which meant that very little sewing got done last week.  When the temperatures dipped, slightly, I got started on my knit jacket.  But the dratted thing is complicated!  I'm sure it'll go faster once the fronts are completely done.

In the meantime, I made two more sports bras.  They are ridiculously easy, take virtually no fabric at all, and don't require the iron.  Plus they are more comfortable than most things to wear these hot nights.  And the thought of working out in anything with more coverage is just not too interesting.  If this heat keeps up I may make a few more.

Tonight I took an break to monkey with a pattern I made for a T-shirt, using PatternMaster Boutique.  This is a software program that drafts patterns.  However, for me the real value is that it has a CAD (computer-aided design) component called Pattern Editor (PE for short).  Once you have chosen the various pattern elements you like in the pattern-drafting part of the program, you can tweak it using PE.  So fun!

(edited to answer Gail's question below)  My goal with PMB is to develop patterns for true basics that fit well.  I used it to draft (with PE to refine) a basic T-shirt pattern that fits quite well.

To the left you can see the very plain-jane shirt I made myself from this pattern a while back.  It's OK but not very flashy, and also it's a bit too tailored (in a not-really-stretchy athletic fabric).  I ride my bike in it and I want more room/more stretch across the back.  And more ventilation.


I went prowling on the www looking for more flash athletic wear and came up with the very technically-named Champion double-dry vented burnout shirt, shown here.  The main panels are probably similar to the fabric I used for my blue shirt (100% poly) and the side panels are a mesh fabric.  I have more of the poly which I purchased from Wazoodle several years ago and some stretchy mesh acquired in Montreal at PR Weekend.


So far my computer pattern looks like this.  Those multiple lines on the front will go - I took several tries to mimic the curve of the side panel.  Once I like the lines, I'll separate the bits, add seam allowances, print it, and sew it up.