Showing posts with label hand sewing. Show all posts

Sunday, June 19, 2011

In lieu of actual sewing results ...

The Sewing Lawyer will write instead about sewing process.

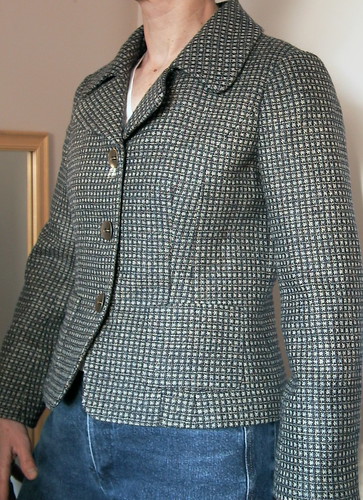
I have learned over the years to take my time in the preparation of my projects.  Before actually starting to sew Vogue 8718 and its coordinating skirt, I had to:


  • Choose the fabric, including all the inner layers (lining, underlining, and interfacing).  I eventually decided to underling with white silk organza, even though I have some grey in stash, because the grey is a little too stiff and substantial for the tropical weight wool.  
  • Prep the fabric.  This included steam shrinking/pressing the wool with my super-duper gravity feed iron, while checking and marking with safety pins all the little flaws.  I also had to iron the Bemberg lining and the silk organza, which had been sitting in a bin folded up for quite some time.  
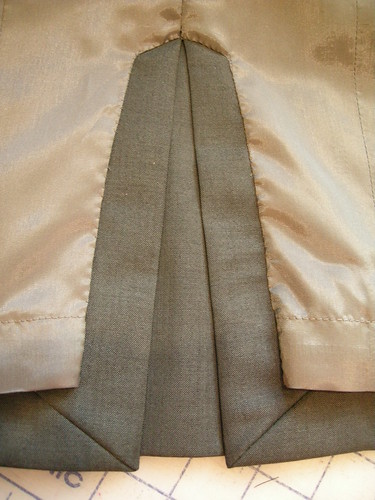
  • Cut all layers.  In this process I had to pay attention to the many jacket pieces which had to be cut x 4 (the peplum and front edge pieces are self-lined), which needed to be cut x 2 in the wool and x 2 in lining, and which had to be cut as well from interfacing.  I decided to underline all the body pieces that were not being interfaced with my chosen fusible, and to cut the sleeve underlining on the bias to avoid stiffness in the draped/pleated sleeves.  Other decisions (like whether to use the organza selvedge to stay the front edges or a fusible tape, and whether to use the slightly stiffer grey organza to underline the peplum as well) will be made as I go.  
  • Go and buy grey thread.  I also bought a spool of matching topstitching thread because I think I want to topstitch at least some seams and/or edges, although I haven't quite decided 
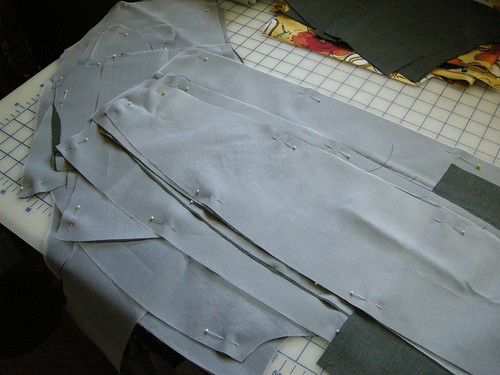
Right now, I am at the stage of having pinned the organza underlining to the wool.  True confession time:  I am not going to hand-baste the organza to the wool along the seam line (!!) - I am going to machine-baste.  So far I am still of the view that life is too short for hand-basting and thread-tracing and the like.  I've had entirely acceptable results before without having resorted to these somewhat laborious techniques and I'm not convinced that the effort is worth the possibly-more-beautiful results.  Feel free to try to convince me otherwise...

Despite my unwillingness to go to the trouble of thread-tracing, I have (as you may be able to tell from some previous projects) come around to the view that an aversion to hand-sewing is not consistent with my objective of producing well-sewn and properly-finished clothing.  I took an on-line class from Susan Khalje last year through PatternReview.  It was just in time for to give me what I needed to know for making my not-necessarily-black-not-necessarily-a-dress cocktail outfit for last year's PR Weekend in Montreal.  

Two things of which I am now completely convinced re hand-sewing:  
  • Waxing the thread makes it a far more enjoyable process.  Say goodbye to knots and tangles.  Waxed thread pulls smoothly through the fabric and is less likely to break or tie itself in knots while you are trying to work with it.  
  • Using better quality needles will also make hand-sewing a better experience.  
And there is one thing I am not completely convinced of yet, but am working on:
  • Using a thimble may make one a better hand-sewer.

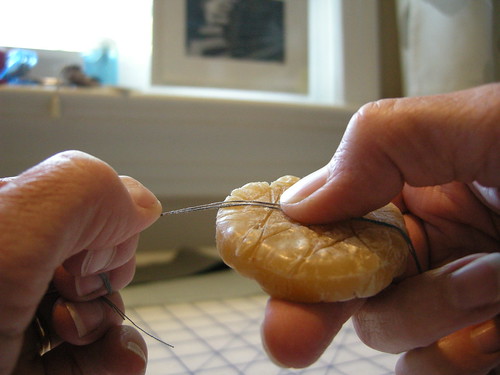
Here's how to wax thread.  Cut some lengths of your chosen colour, about 40-50cm (15"-18") long.  Hold them firmly at one end, and pull them through a block of beeswax.  You can see I'm holding the thread against the wax block, and pulling down slightly as I pull the threads through.  Repeat a few times, to ensure that there is a more or less even amount of wax on all the threads for their entire length.

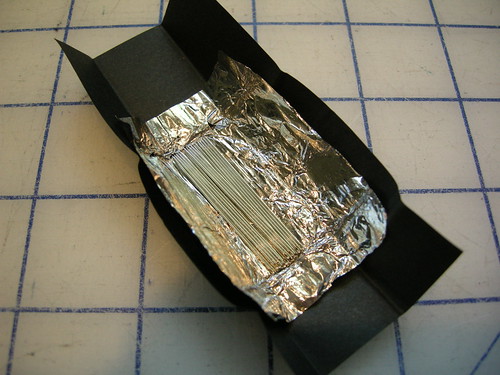
Then put the thread between two sheets of paper towel.  Go over the paper towel with a dry iron.  You'll see the shape of the threads on the outer sheet as the wax melts into the thread and onto the paper towel.  

Simple.  The result is a slightly stiff, strengthened and smooth length of thread.  It's easier to thread your needles with waxed thread, and generally easier to use.  

I splurged on some Japanese hand-sewing needles which I purchased from Susan Khalje.  They are pretty expensive if you measure by the pound but I figure one package will last years if not my lifetime. These needles are very fine but strong, with a tiny hole (good for hand-eye coordination) and they feel very luxurious somehow.  

The whole thimble thing still feels very awkward but I am going to persevere until I get the hang of it and it seems natural.  I was doing some hand-sewing recently without a thimble and managed to practically shred my fingers because the fine ends of the Japanese needles are quite pointy!  I do not think I could tolerate the standard closed-end thimble but in my sizeable thimble stash there was one little tailor's thimble with an open end which I like a lot better.  

Googling "tailor's thimble" reveals that they are available for sale in different sizes, and how to use one.  Based on the pictures on the English Cut, I clearly need to work on my technique.  

Sunday, October 17, 2010

A finished object

In the aftermath of the Fabric Flea Market, I did muster enough energy to finish a sheath dress which had been in the planning for several years, and in the execution for several weeks.

I had purchased the fabric for this dress a couple of years ago on a flying trip to the Wool House when I was wearing  this jacket:


(I pause here to note that I hate Windows Live Writer.  When I first used it, it was brilliant.  Then I got a notice to update it.  Now I hate it.  I can no longer figure out how to format text around the photos – the previous version worked perfectly.  I think I’m going back to editing using Blogger.)

Back to the regularly scheduled blog.

As I was saying, I was wearing that jacket, which I seem to have made in November, 2007.  I know that because that's when I reviewed it on PatternReview (here).  I was having trouble finding pieces to coordinate with it – the fabric has some dark blue, some light blue, some creamy beige, but putting any of these colours next to it looked strangely wrong.  I dashed into the Wool House and asked for advice.  The man in the store led me straight back to the Zegna shelves and pulled out a bolt of the fabric I bought for my new finished object; this dress:


This fabric is thin, smooth, and I think it’s a blend of wool and mohair.  It has black and a grey-ey blue-y green-y threads and is an impossible-to-describe colour which somehow goes perfectly with that jacket.

This dress is made from a pattern I developed using PatternMaster Boutique or PMB.  I wrote all about it in a pattern review here.  I was thrilled to have a sheath dress that fit and that I thought looked pretty good.  I've never found a commercial pattern that did these two fairly simple things so this one is a keeper.

As soon as I bought the strangely-coloured fabric I knew it was going to be this dress.  Well, it had to be, because it was damnably expensive fabric and I only bought a small amount (I think 1.2 metres).  You see, another other great thing about this pattern is that it's a true fabric miser.

In this picture, the dress looks ripply and puckered.  I swear it does not look like that in real life.  Here's another picture, a sort of side view.  The pattern has lots of shaping seams - princess seams front and back and side seams and long shaping darts besides.


In the next pictures you can see a bit of the fabric up closer, if you click to open them.

They were taken in natural light so are somewhat truer to the actual strange colour which overall looks more green than blue.

Notice my not-perfect hand understitching at the neck edge.

To the right is the shoulder seam with princess seams meeting nicely.


The CB sports a simple slit opening for walking.  Notice the mitred corners.  The lining (Bemberg) is hand felled to the facing.  The dress is underlined with silk organza.  I decided not to serge the raw edges at seam allowances and hem to avoid show-through in the pressing, but found some black lace at the Fabric Flea Market which I used to finish the hem edge.  


And finally, it looks good with a jacket (or two).


Saturday, May 15, 2010

Hand Sewing

What is it about hand sewing?  I'm at the point of inserting the lining sleeves and I'm going to do it by hand.  So I've paused (or am procrastinating) to write this blog entry instead.  In my youth, I hated the hand-work that went with finishing a garment so much that most of my "finished" garments required at least one safety pin...  I still yearn after beautiful machine techniques that substitute for hand stitching and count it as a victory if I only have to wield a needle to sew on the buttons.  However, sometimes, I come up against it, and I choose to use hand-sewing for certain tasks. 

For instance, I've already inserted the shoulder pads in my Vogue 2770 jacket with hand stitches as seen in this post.  I like to bag the jacket body lining (without sleeves) by machine, then hand-baste the lining around the armscye of the jacket.  Sewing the sleeves this way ensures the lining will not budge inside the jacket.  Then, you stitch the sleeve to the lining using more-or-less invisible stitches.  The sleeves likewise will never budge.  If there is the correct amount of ease in the lining, all will be well. 

I did this on my orange plaid jacket as you can see in this post, and I like how it looks, once done.  But hand-sewing is definitely not my favorite part of sewing. 

Which may also explain why I signed up for a class on PR with Susan Khalje.  The class name is "Couture Hand Stitches" and we're supposed to learn these ones:

  • The Basting Stitch
  • Hand Overcasting
  • The Catch Stitch
  • The Slip Stitch
  • The Fell Stitch
  • The Invisible Hem Stitch
  • The Back Stitch
  • The Prick Stitch
  • The Thread Chain
  • The Thread Bar
  • The Blanket Stitch
  • The Buttonhole Stitch 
I downloaded the first lesson today but haven't had time to read through it.  I did spot a very definitive statement to the effect that the "only" satisfactory way to underline anything was to hand baste the two layers together at the seamlines.  Harumph I say.  We'll see if she can make a convert of me. I will review the class once I'm done with it - it's my first on-line class outing and Ms. Khalje seems to be very well-regarded generally on all things "couture". 

Random information:  "couture" is a pretty ordinary word in its language of origin, which is French.  It simply means "sewing".  "Haute couture", on the other hand, was a very formal term which designates those design houses which are formally designated as members of the French Chambre syndicale de la haute couture.  According to Wikipedia, to be eligible for this they must:
  • Design made-to-order for private clients, with one or more fittings.
  • Have a workshop (atelier) in Paris that employs at least fifteen people full-time.
  • Each season (i.e., twice a year), present a collection to the Paris press, comprising at least thirty-five runs/exits with outfits for both daytime wear and evening wear.
Sigh.  Even Wikipedia acknowledges that this lofty élite term has been watered down and confused. Simple French words may tend to have a certain je ne sais quoi about them - thus prosaic "sewing" has become something elusively elegant and (perhaps) unattainable. 

If only, after (virtually) rubbing shoulders with Ms. Khalje, my hand-sewing will have this je ne sais quoi too.  Right now, my stitching is rather utilitarian... (and I don't much like the process either). 

Jacket is almost done ...