Sunday, September 12, 2010

Sewing without a plan ... and 3 ghostly garments

The Sewing Lawyer has always been mightily impressed by the entrants to the various "SWAP" contests.  That anyone completes these grueling marathons is a wonder, especially if their marriages or significant relationships remain intact.  What is this thing - a sewing "plan" anyway?  How could anyone actually settle ahead of time on pattern and fabric combos to make 11 (or whatever other double-digit number the SWAPpers aim to make) garments that would work together as a complete wardrobe?  How do they keep motivated, or even interested?  How can they stand the deadlines?

It's beyond the Sewing Lawyer.  She has occasionally read the rules and has always immediately dismissed the idea of participating.  She prefers to (mentally) endlessly reformulate a stream of projects which may or may not employ fabric, patterns and other bits from her stash, thumb aimlessly through her stack of Burda magazines and bulging pattern files, examine each and every bolt in the local fabric store to see what's new and what's deeply discounted, while waiting for inspiration to strike.  There is rarely any kind of deadline other than hoping vaguely to be able to make something-or-other before the season (or fashion) for it has completely passed.  The only advantage to be gained from not seizing the day and putting scissors to cloth is that the potential sewing disaster or fashion faux-pas is avoided, or at least put off for another day.

In the meantime, the Sewing Lawyer bumbles along making things that strike her fancy from time to time, and (mostly) turning out garments she's prepared to wear out in public, which sometimes even coordinate.

Ya, I'm exaggerating but right now it sure does feel this disorganized!  Since the last post, I've got three ghostly garments which have been slapped together to test patterns and fit to show you.  It is probably not a great idea to have this many ideas on the actual go.  One of the patterns has even been translated (well, cut out) into actual fabric!  But more on that later.

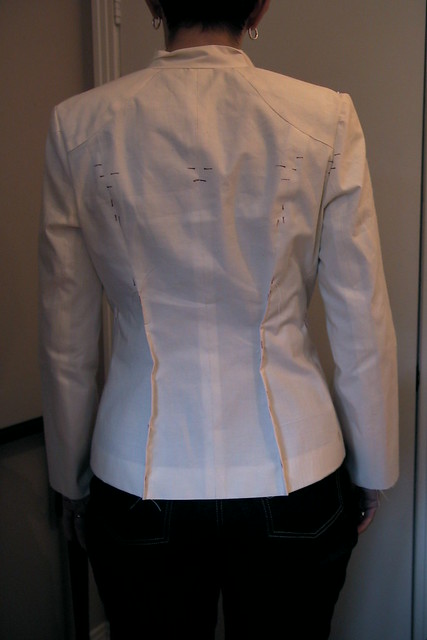
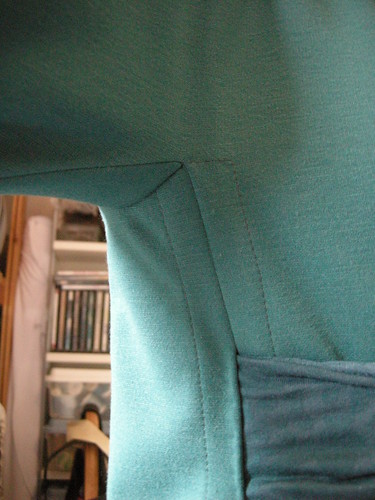
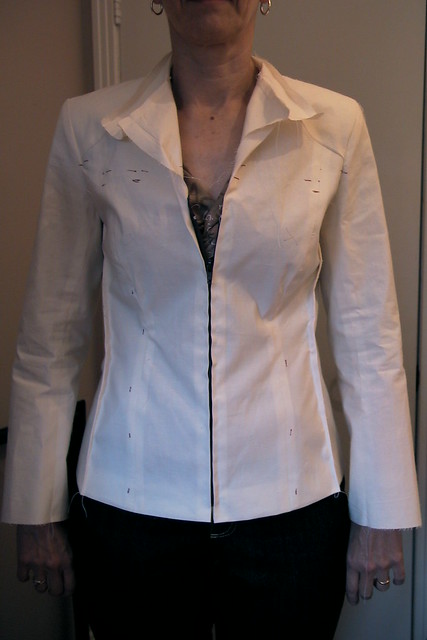
First up, I've improved the Material Things "Fearless Jacket" muslin immensely and I'm warming to the idea of actually using it to make out of my luscious lamb leather.  I took the muslin completely apart, adjusted the tissue in the places I had already identified, and recut the pieces.  I was at about size 0 (if there had been such a thing) on the MT tissue.  After sewing it together again I realized that it was still too big!  If I was at 0 before, I guess this is size -2.  In the Big 4, I would usually choose a 10 as my base size.  The new tucks are out of the side front and centre/side back seams.  The other change that needs to be made is to raise the armscye to improve mobility - the muslin looks ok while I have my arms at my side but when I raise them it's not a good look.


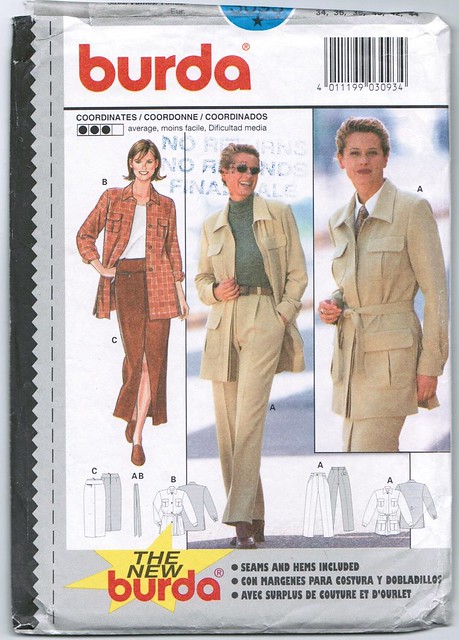
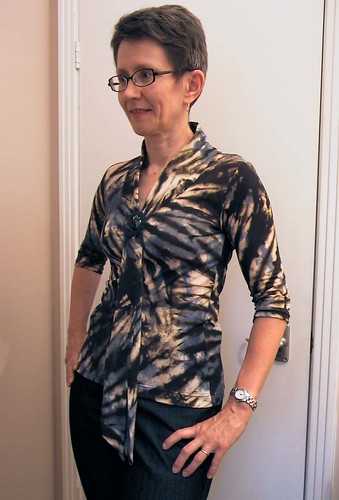
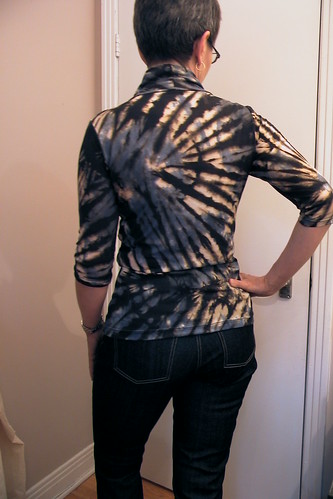
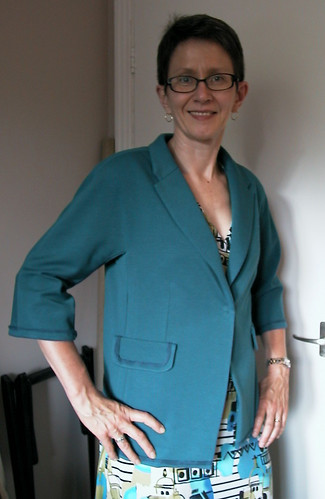
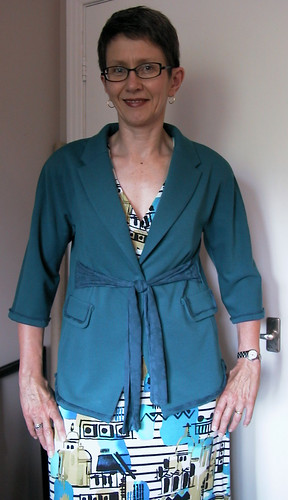
My second muslin is supremely uninteresting, but it's the one that's getting made first.  This is from a 1990s Burda envelope pattern which I have made before and wore to death.  I still really love the picture on the envelope.

I made a muslin only to check how much too low these armscyes are - I'm raising them by 2.5cm (1") so the answer is - a lot!


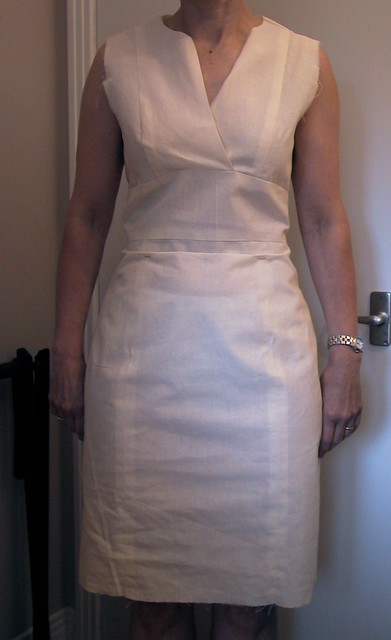
My final ghostly garment is a muslin of Vogue 1183, the second Kay Unger dress released this summer.  I could tell from the measurements printed on the pattern that this dress was going to be a snugger fit than V1182, my cocktail dress.  Before cutting out the muslin, I separated the skirt front into two so there will be princess seams instead of darts.  The back already has a corresponding seam and the bodice is princess-seamed all over the place, so this change seems natural and adds more opportunities to adjust fit.  For the muslin I cut a size 10 in the bodice and midriff, transitioning to a 12+ at the hips.

It is too snug.

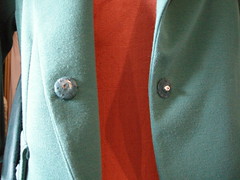
Besides that, there is something strange happening at the join between the bodice and midriff at the front.  It almost feels like I need an FBA (!).  I notice that several reviewers of this dress on PR had a problem with the overlap gaping - they did need an FBA.  Mine isn't gaping so much as the leading edges of the front are pulling up on the midriff piece.

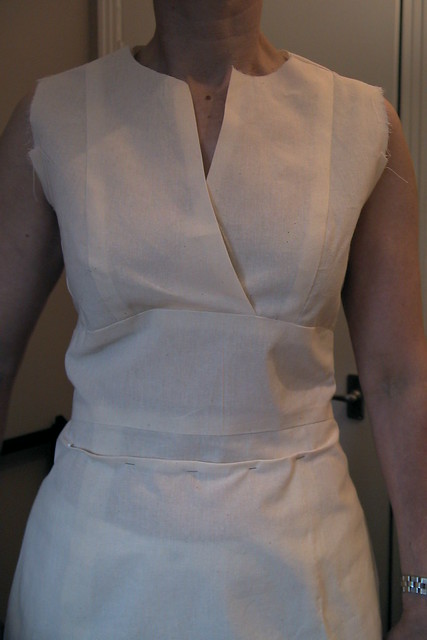
Here's another picture (in which the left neck edge is not folded under).   I'm going to mull this over some more but if you have a suggestion for how to fix this, please put it in the comments!

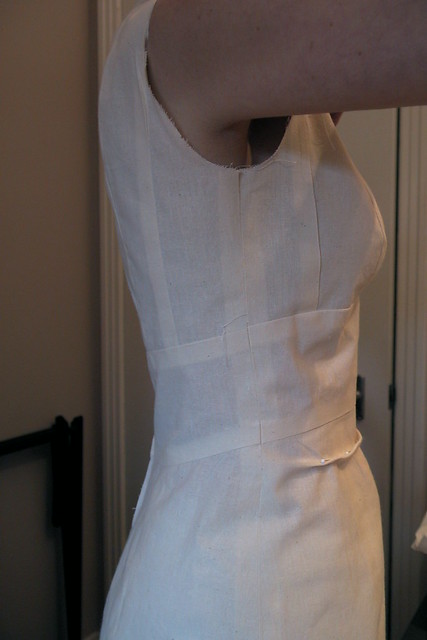
But the strangest thing is that the skirt front is too long on me just below the midriff, around the level of my actual waist. I've pinned out a wedge/tuck that is about 2cm deep at CF and tapers to nothing at the side seams.  You can see it better in the side view to the right.

I really like the way the midriff piece curves downward in the back.

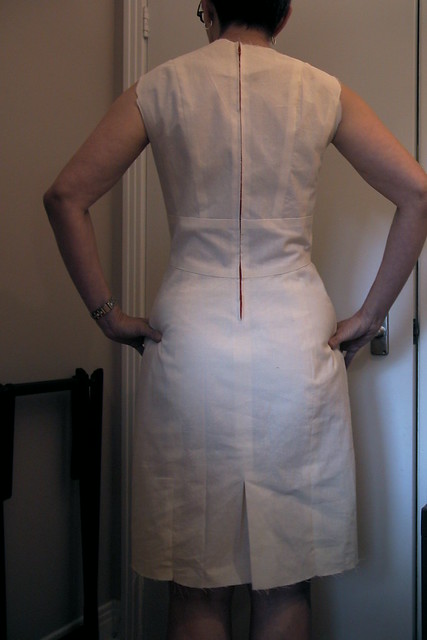
The back fits pretty well except for the too-tightness of it.

It's also too short for my taste.  The muslin hits about 1cm above where I'd like the finished edge to land, and it includes the hem allowances!

Wednesday, September 8, 2010

Idea overload

I'm in major future-potential-project muslin mode so I have nothing to show.

First, I'm trying to fix my Material Things jacket muslin.  I took it apart and trimmed the pattern an obscene amount before putting it back together, but it is still too big!  I figure I'll be down to a size 0 in the MT size chart before long, which is just ridiculous.  I am going to make a muslin of the Burda leather jacket too, as I'm still not sure if the MT pattern is what I want to make.

I muslined another jacket, an unlined sort-of-safari jacket Burda envelope pattern from the 1990s.  I made this pattern way back when but no longer have the garment, and I wanted to check the armscyes (yes, they were too low on the body for my current taste in fit).  I've got some crepey woven wool earmarked for it, and lining to do Hong Kong finished seams.

I want to make a dress to wear with the jacket. I was going to reprise a sheath dress made from a much-tweaked Pattern Master Boutique pattern but then got the bright idea to try the other Kay Unger dress (Vogue 1183) instead.  It's a real fabric miser and I have only 1.2 metres of the softest, finest Zegna wool...

Oh yeah, I also had to go back to work.  Less time for sewing.  Phooey.

Sunday, September 5, 2010

Swearing off Material Things patterns now ...

Just remind me if I seem to be falling off this particular wagon.  I don't like the way they, or at least the two I own, (don't) fit me.  


Earlier this year, I tried out the "Fearless T Shirt" pattern.  Yuck.  


I spent much of yesterday trying to kill two birds with one stone - namely actually sewing on my new machine (which turns out to be an interesting back-to-basics learning experience) and making a muslin of the "Fearless Jacket & Vest" pattern.  I'm planning to make a leather jacket.  


Now there are only 3 reviews of this pattern on PR.  Two give it a glowing "love it" type thumbs up while the third does mention that it was too big so she had to give the vest she made away.  Well, my experience is more like that reviewer's.  Ms. Podolak might say that it's my fault for not reading ALL of the information on the back of the pattern envelope, which does include the finished garment measurements (OK you can now all mock the the Sewing Lawyer for not reading the fine print).  It turns out full disclosure is made of the fact that size 6 (my bust size) has 12 cm of ease at the bust (that's a whopping 4.75"!!) and size 8 (my hip size) has 15 cm of ease at the hip (holy cow; 6").   


But the "fashion drawing" on the envelope is so very misleading.  If that drawn jacket showed 15cm of ease it would have been standing visibly away from the skinny hips of that "model", as indeed my too-real muslin is doing on me.  


If this were a waiver clause in a contract, I'd say the ease measurements should have been in RED and large bold type; perhaps saying something like:


WARNING!
IF YOU CHOOSE YOUR SIZE BY YOUR ACTUAL BODY MEASUREMENTS, THE RESULTING JACKET WILL NOT RESEMBLE THE PICTURE ON THE ENVELOPE.  READ THE "FINISHED MEASUREMENTS" CHART ON THE ENVELOPE CAREFULLY BEFORE PROCEEDING.  


GRRR.  


All of that said, I like the lines of this jacket, and to its credit it does have a ton of seams to take in.  I experimentally pinned out (a lot) of extra fabric last night and will work with it a bit longer before starting a muslin of the pattern shown in leather in September's issue of Burda Magazine, which is really pretty!  It's shown on a real human being ... and it's Burda whose sizing is quite predictable (but I think I'd move the sleeve zips to the back seam).


Oh yeah, the armscye on the fearless "fitted" jacket is too deep on me as well, and it was drafted for Ms. Gorilla Arms.  I'll be taking about 2.5cm (1") of length out through the upper chest and sleeve cap and at least the same out of the length of the sleeve.  


Tuesday, August 31, 2010

New (to me) sewing stuff

The Sewing Lawyer had a sudden, severe, sewing-related mania (clearly, it is contagious) this week which resulted in a drive to a not-too-distant town to purchase a rather large thing (luckily not for a gigantic sum); which hopefully will be more than another piece of furniture.  Without further ado, here it is.  Can you guess what's inside?


If you guessed a working treadle sewing machine, you are correct.  The contents, please.

Well, it's a Singer 127 (or 128; not sure, the manual - original - is for both).  She's in lovely condition - purchased in 1935, probably in Timmins, Ontario, by Émerilda, the grandmother of the seller.  The manual is in French which was Émerilda's mother tongue (though it's clear from the notes and clippings found in the drawers that she was fluently bilingual).

It seems from the drawer contents that Émerilda was still using this machine in the early 1970s, which is kind of remarkable given that my grandmother, who may have been Émerilda's contemporary, had an electric Singer (a Featherweight) much earlier than that.  I wonder if Émerilda got a new machine in the 1970s, or if  she used this one all of her sewing life?

 At left is the beautiful scroll-work and at right, the shuttle - all clean; no rust.  The leather belt is in place and she really goes!  So quiet!

On to the ephemera and tools that were stuffed into the drawers.  Alongside the usual suspects (bags of old metal zippers, spare buttons in pill bottles and bits of trim) were some intriguing items.

Don't you love these promotional rulers?  The lower one is a campaign item from a 1971 mayoral race in Timmins.  What a thoughtful guy to supply sewing notions as give-aways!


The next (left) is a mystery.  The round part is an expanding metal bracelet-like thing.  It stretches to fit over my wrist, but mine are on the small end of wrists so I'm not certain it's meant to be worn in this way.  Attached to it is this odd device (right).  The end piece is a very thin bit of metal which rotates (with some help).  The inscription is PAT 405/14 which tells me nothing in particular.  Does anyone reading have any idea what this is?
Perhaps the strangest item was this souvenir sewing kit (left) which proudly proclaims "Temagami, Canada".  (Temagami is a northern Ontario cottage/summer camp paradise.)  The clown's hat is a (plastic) thimble and thread is concealed inside his head.  Weird!  OTOH I wish we still lived in an era of sewing-related tourist drek.

To the right is a very handy hosiery mending kit.  Another promotional item.

The needle book at top is almost complete and very pristine.  The other side sports a photo of 4 biplanes flying over a very busy harbour.

The mending tape may be nothing to write home about but I like that it's in the original packaging.

The little taped booklet at the bottom of this photo is clearly Singer propaganda aimed at the younger set.  Inside it warbles "Let Us Send You a Singer Machine For Free Trial!" - beware of those dealers who sell (horrors) second-hand!  Inside the rear cover is a picture of a machine "For the Little Girl"; a Singer 20 (chain stitch machine) which "is at once a fascinating amusement and a means for instruction in an essential household art".


Last but not least is this intriguing clipping (click to enlarge to readable size).  It looks like a free-motion quilting item, but specially designed for making buttonholes.  "Twice as neat results in half the time, too!"  For "only" $1.00 or three for $2.50.  But wait a minute - maybe it was an expensive item after all.  Based on some other newspaper items bundled into the drawers, 89¢ would have purchased "strongly-made Blue Red-back Denim overalls" sized to fit children from 8-16 years from Simpson's, one of Canada's original department store chains.

I'm delighted with my purchase; the seller was happy it was going to a sewing home.

Saturday, August 28, 2010

A combination of favorite things

There is a lot to be said for re-using a pattern that's (a) simple and (b) classic.  Even more so if it's a type of garment you like to wear.  As the Sewing Lawyer has arrived at a certain age, she has come to appreciate sleeveless shirts and tops.  Even in the depths of winter, when the freezing winds howl around, she has found that a lined wool top is quite comfy to wear and permits climate control when paired with a long-sleeved jacket.  For summer, bien sûr,  the benefits are truly obvious, especially when it's a crisp cotton shirt.

The Sewing Lawyer is also a sucker for a really nice batik print - especially one that's an overall repeating block print in indigo and white.  Recently while in Saskatoon, there was a flying visit to the lonely downtown fabric store, Unique Textiles Studio (on 1st Ave.).  Like so many others, this store specializes in quilting cottons of a good quality, all neatly displayed in colour-coded or print themes.  Snagged!  Some  indigo and white block-printed floral batik came home to the Nation's Capital, earmarked for a sleeveless shirt from a previously-tested vintage Simplicity pattern.

Speaking of the Nation's Capital, I came across this quaint YouTube video about my home city originally filmed in the late 1940s - though it's older than my vintage pattern, the scenes of the Parliamentary precinct and Rideau Canal, the War Memorial (seen from the roof of the Chateau Laurier) and the buildings opposite, are unchanged to a surprising extent.  Except, NB, we pronounce the canal's name REE-do, not ri-DOH; you don't see red-coated Mounties hanging about in random fashion; the rowers in the Ottawa River will surely be in modern racing hulls; and that interesting diving (?) platform is no more.  It's a great place to live.


But I digress.  Of course, the OOP Simplicity pattern was approximately 3,000km away from the place in which a decision had to be made about how much to buy.  It turns out the pattern calls for 1 3/8 yards (1.25M).  Oops.  After pre-shrinking in the washer and dryer, there was exactly 101 cm of this crisply-wonderful fabric which gave rise to a few anxious moments but in the end, only necessitated a VERY efficient layout and piecing of the under collar.  There was enough (in the lower left corner) to cut bias strips to face the arm openings instead of the facings that Simplicity wanted.  And the CB could be placed on a  natural break in the printed pattern (you can see that the selvedges are slightly offset; that's why).


If you click on this photo to enlarge it, you can see why the print was so enticing.

So here's the finished shirt (worn with Jalie jeans #1).

It made up super fast (or would have if The Sewing Lawyer's day job hadn't interfered) and has that lovely crisp quality that makes for such a great summer garment.  It's getting hot again this week, so it will have some more outings before the leaves start falling, to be sure.

Friday, August 20, 2010

Light relief ... again

 Jeans are hard.  Not only was the fitting a challenge, as you know, but the actual sewing is physically demanding.  Denim is thick and tough to sew; there's lots of practical details like belt loops and topstitching, to be sewn through multiple layers, and there are metal zippers and metal rivets, and buttons that need to be hammered in place.  Assembling the main pieces of the jeans is relatively quick; finishing them off takes three times as long.

When the Sewing Lawyer has had it with a tough project it may be time for some knit tops.  Jalie always  seems ready to come to the rescue.

By lucky coincidence there were two dark brown-based knit fabrics in stash begging to be made up, and so another iteration of Jalie 2805 and Jalie 2921 (the scarf-collar top) came quickly into being.

Here's the latest version of 2908. The most interesting thing about this shirt is the print - the fabric is a fine rib-knit cotton/lycra printed with a VERY large and colourful swirly paisley motif (this was a Fabricland offering from earlier this summer).  The motif is larger than the front or back pattern pieces as you can see here (the fabric is lying on my cutting table; those are 1" squares).  I had two complete motifs plus parts - which became the sleeves.

I cut out the back with the print in this orientation (orange swirls at the shoulder) as you can see in the next picture, but the front in the opposite direction after a moment of angst about whether the print had a noticeable direction.
What do you think?  Not obvious?  Phew!


The scarf-collar top is, as any of you who have tried it will know, quite magical.  The instructions for the ingenious construction of the collar/tie are well illustrated in the pattern, but I was also lucky enough to see Jeanne Binet demonstrate how to make this top at PR Weekend Montreal.  I'm sure it works best with a thin knit; luckily that's what was on hand in the stash (a crepey polyester knit acquired at Couture Elle in Montreal, a few years back).  This is another big-scale print, but although one needed to be alert to avoid the dreaded big "bull's eye" on the upper front, cutting it out involved less angst.

I'm wearing the top with a vintage plastic buckle in this picture.  It also looks good threaded through the little hole in the CF (another genius trick in this pattern) or simply tied in a bow.

Saturday, August 14, 2010

New computer; new jeans

The Sewing Lawyer spent much of the past week, after mostly recovering from a nasty summer cold and jet lag (bad combination) sewing the Jalie jeans pattern.  Or rather, sewing it twice.   Why, you might wonder?  It comes down to fabric choice.  The Sewing Lawyer owns quite a lot of fabric, including what remains, after 2 previous pairs of jeans, of some very nice stretch denim purchased years ago from Wazoodle, which was claimed to be genuine Levis denim, 1% stretch.  Too nice to try on a new pattern, must save ...  THAT affliction accounts for much of our stashes, no?

Off to Fabricland, where the "denim ends" table yielded up a serviceable denim of approximately the same stretchiness.  When sewn up into the Jalie jeans pattern, the resulting pair of jeans appeared to be i-m-p-o-s-s-i-b-l-y tight.  As you already know, The Sewing Lawyer got a little discouraged and thought; well, maybe Fabricland's ends table could turn up another piece of denim that could be turned into an actually-wearable pair of jeans.  There was none of the same stretch, but for $8 a beefy and stretchier dark denim was available.  The second pair of jeans was cut and sewn to the same point.

The Sewing Lawyer hates sewing failures.  So returned to the first pair, and realized that by using ALL of the seam allowance insurance adding an extra 6cm (yes you heard that right) of width through the hips and most of the thigh, the first pair of jeans would actually be wearable.

So two pairs of jeans were sewed simultaneously.

Sometime before the cutting and sewing of the 2nd pair, The Sewing Lawyer got smart and altered the back piece to add more (let's call it) sitting room by slashing the back and adding a 2.5cm (1") wedge at the CB.  She also got confused, and thought she understood where the seam lines should always be on these Jalie jeans, but then almost instantly forgot this understanding, and sewed the 2nd pair with 2.5cm side seams.  Maybe the cold was still operating to fuzzify the Sewing Lawyer's brain.

In the end there were 2 pairs of jeans which fit remarkably similarly except the second stretchier pair is tighter through the knees, as a result of the cold-induced confusion.  It's a good thing they're stretchy!

All the pictures are on Flickr - here are the highlights.

The back - This happens to be the first pair; the second (despite the extra 2.5cm of length) looks really identical.  There are only 5 belt loops with one at CB - that extra one Jalie wants you to sew on looks weird, IMHO.

The front (this also happens to be the first pair).


And the side (for a change, this is the second pair - told you they looked identical).  Of course you will note the absence of "bootcut" flare.  The leg was redrawn to be completely straight below the knee.

Of possibly more interest is the fact that rivets were actually used, for the very first time.  And, on the 2nd pair, interesting pocketing was used, and the pocket seams were enclosed so no raw or serged edges are visible.  Behold:


This post concludes with a view of essential jeans-sewing tools and hardware.  The blue-handled and very pointy awl pokes the holes needed for the jeans buttons (to left) and the rivets (right).  Of course, to sew through denim, you also need a good jeans needle and for topstitching, heavy thread plus a topstitching needle.  Without 3 machines going to make these - my regular Pfaff threaded with dark blue thread; my Featherweight which is the topstitching and buttonhold station, and my serger, I might have gone mad.

This post was created on my new (Windows 7) computer - could you tell?

Thursday, August 5, 2010

Jeans & fit

Just about everyone (all 67 of them) who has reviewed Jalie 2908 for women's stretch jeans on PatternReview has loved it.  Me ... well, let's just say I'm working on it.  However, I fear I'm not really the target audience.  I do not want very tight jeans, like enough room to sit down without the waistband pulling down at CB, and really don't care for either a low rise or a boot cut.  Holy cow!  I should have just bought their version of Mom Jeans (#968) and be done with it!

I traced according to my hip (size U) and waist (size S) measurements.  When I compared the pattern to my current jeans pattern, a Burda WOF pattern from 2004 (reviewed most recently here), I decided I needed insurance and added 1.5cm extra on the side and inseams.  The pattern includes 1cm so that gave me 2.5cm or 1" to play with.

I cut out of an inexpensive denim with the required amount of lycra/stretch.  The assembly of the fronts and backs went swimmingly.  The rest, not so much.  All came to a grinding halt when I tried them on after basting at the original seam line.  Talk about skin tight!  Since then I have let out both the side seams (better) and the inseam (not a help).  I have read and re-read Kathleen Fasanella on why jeans fit lousy these days.  These jeans definitely give the mono-butt effect, which I'm not all that enamoured of.  There will be no pictures, by the way!

My current theory is that I need more length and width through the back.  I am off to purchase more inexpensive denim of similar quality.  Wish me luck.

Tuesday, August 3, 2010

Style - knowing one's own (but barging ahead anyway)

Thanks for sympathizing, and offering constructive comments - so many suggested I delete the belt.  So obvious, why didn't I think of that?  It is better, although still not my favorite garment.

This experience does cause me to stop and think - and wonder why I didn't trust my instincts?  While I liked the look of the jacket on the envelope, I'm not that model!  I probably wouldn't have bought it for myself if I had tried it on in a store.  I'm not a frilly-frou-frou person, but this pattern has some of that (albeit with collar and lapels).  I don't care for raw-edge embellishment; this jacket had tons of it.  I am usually cautious around things that tie in the middle.  I threw caution to the winds.

I should have read the PR review of the jacket, which would have warned me it was too-long and kind of bathrobey.  I should have made a muslin; I would have learned lots from it.

I should have made a cleaner style - more like a blazer.  

I should have trusted my instincts.

In the Jalie jeans department, I'm not quite throwing caution to the winds.  I traced the size per my hip measurement, and after comparing the result to a tried & true jeans pattern I've made many times, I'm adding 1.5cm insurance to the side seams and inseams.  My fabric is stretchy, but I don't want the jeans to be skin tight!


Monday, August 2, 2010

The sweatshirt version ... meh

How do we choose our projects?  As previously explained, I had this teal ponte de roma knit and had thought to make a simple, unlined jacket.  Something I could throw on when the AC was too frigid, or to dash across the street to get a coffee.  It would look good with some dresses in my closet, and (of utmost importance) it would be easy to wear.  I was leaning towards making Simplicity 3631 when suddenly, and without warning, Vogue 2942 leapt out at me.  I had to make it.  I'm not sure why.

Well, it's done.  Meh.  As you can see at right - Exhibit A - my version (MV).  Below - Exhibit B - is the Vogue version (VV).

I do believe Vogue has engaged in a little pattern manipulation to ensure that MV does not bear enough similarity to VV to be cute and perky instead of .... bathrobe-ish.

The VV is visually square and blocky - looks fresh.  The MV not so much.  It is rectangular and droopy.

Both jackets are cut in the middle by the tie belt, but the MV tie is lower on the body.  The pocket flaps are higher on the VV.  The tie belt is shorter on the VV.

Partly this is explained by fabric choice - the VV is evidently made of a crisp silk whereas I chose a drapey knit.  But I think the proportions are off.

The VV is a veritable sampler of weird sewing/finishing techniques, some of which I chose to ignore.  Thinking about trying to describe them all makes me tired.  So here are some details of MV:

Pocket flap - This is a single layer of fabric with an applied facing edge, into which the trim is inserted.  The edge of the edge is raw, the trim has raw edges (VV had bias-silk Gazar; I used a thin jersey knit).

The underarm gusset and side panel.  The latter has wide 1" (2.5cm) seam allowances which are topstitched (I used a triple-stitch about 4.5mm long).  You leave two openings in this seam - the upper for the belt and the lower for the pocket (the flap is decorative).


I had to tack the belt to the back of the side seam opening to keep it from rolling down to the bottom of the opening, making the jacket look even more bathrobe-ish.


A covered snap at CF.


I'm moving on.  Time to tackle the Jalie jeans pattern, and I need a nice pair of shorts.