Showing posts with label Kay Unger 1183 dress. Show all posts

Sunday, November 26, 2017

Dress and jacket combo

I could start by noticing how neglected this blog has become but I won't. It records my projects, and they have been few and far between since my last post. The blog is accurate.

We went on a European holiday. It was wonderful. We came back. It was busy. It still is, come to think of it. So my sewing and knitting have taken a back seat to other things. But I am still sewing and knitting. I just have a lot of WIPs.

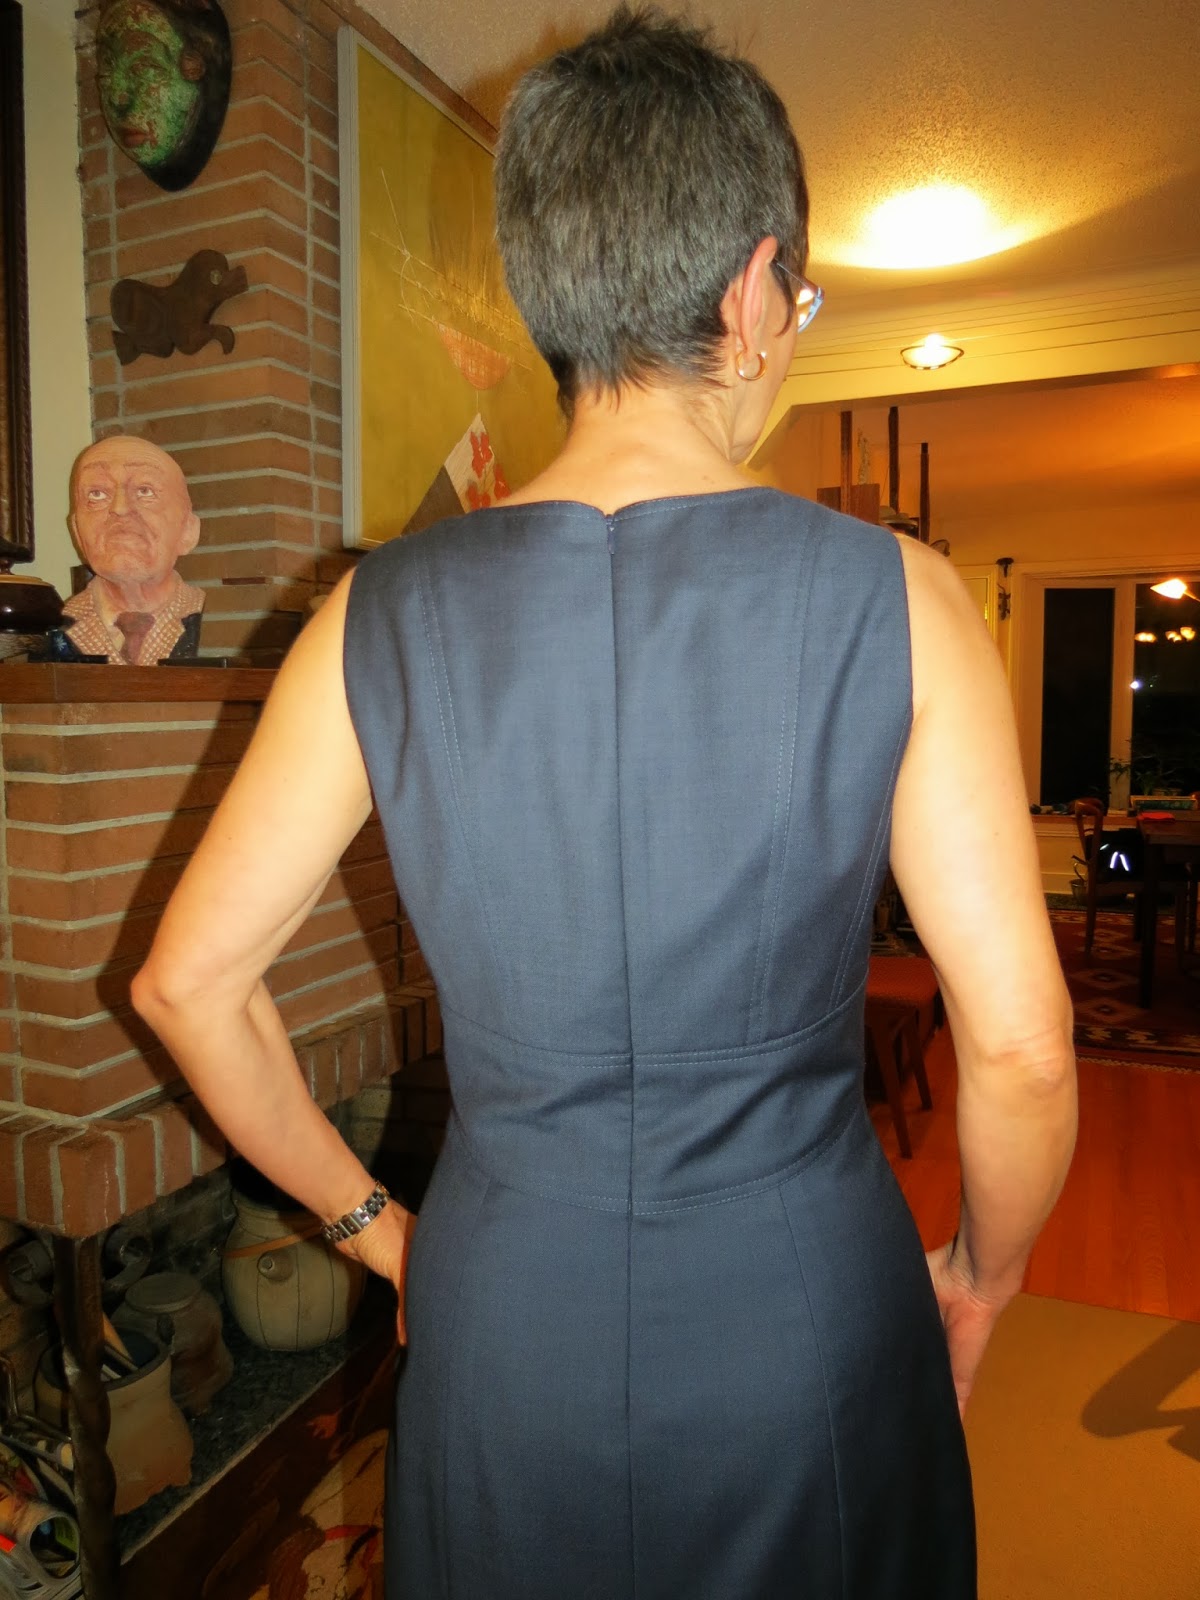
But today I finished a dress, and last week I finished its coordinating jacket. Or at least I hope they coordinate. I will wear them together anyway.

Both are patterns I have made before. I feel like I have less time and energy for fitting new patterns. So I am turning to ones I have made before and still wear, so I know the fit is OK.

New one
Old one
The jacket is a Burda Fashion Magazine pattern from 2006 - the August issue from that year was a winner. This is pattern #108 from that issue - the zipper jacket. I made it some months later, in the spring of 2007. The version on the right is 10 years old (link to Pattern Review)! I still wear it! I have enough stash to make a million new things, but I still like, and wear, the things I made 10 years ago. This is why I have reached SABLE (stash accumulation beyond life expectancy).

But the new one - the lovely, wooly, tweedy, rosy new one. It is so different from the old one - the smooth, muted, understated old one. I love them both.

I got the fabric in one of my favourite Montreal fabric stores - Couture Elle on St. Hubert Street. I know I was shopping with sewing friends. They encouraged me. I am glad they did. The tweed is predominantly rosy but has lots of warm brown, and undertones of blue, grey and green. It is surprising.

The sewing was uneventful. So nice to make a pattern that doesn't have to be second-guessed.
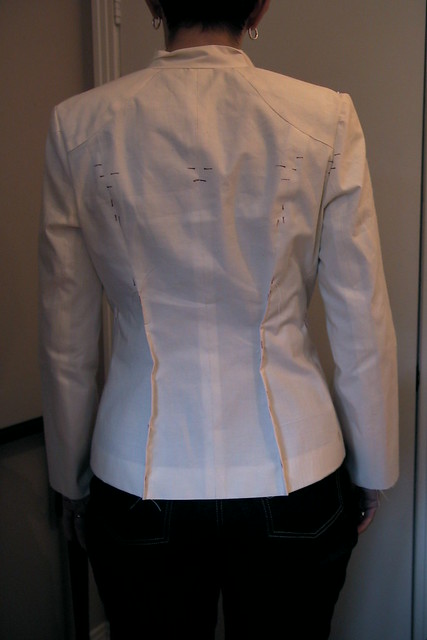
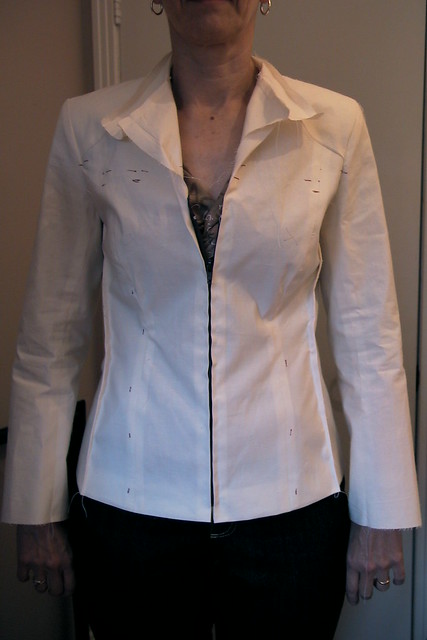
Jacket innards
Inside, I used fusible interfacing on the front and facings, etc. and underlined everywhere else with silk organza.

I made shoulder pads from hair canvas (top layer), cotton quilt batting (bottom layer) and wool quilt batting (in between). I just wanted a bit of lift at the sleeve cap seam and nowhere else.
Zipper facing

To the right is the zipper facing construction. I like this method. Basically, you set the zip into a window in the facing, with the back of the zipper nicely framed by the window (as shown in the photo). The right side of the zipper is concealed at CF. I sewed the zipper in by hand because I didn't want a line of machine topstitching. I also sewed on the pockets by hand for the same reason.

To the left is the inside. I had this nice patterned Bemberg in stash that coordinated well enough.

All the materials for this jacket came from stash. I even had the thread. SABLE (sigh).

The jacket is lovely and warm. I wore it with a brown tweed sheath dress (7 years old) last week because my other project - a coordinating dress - was taking longer than expected. 

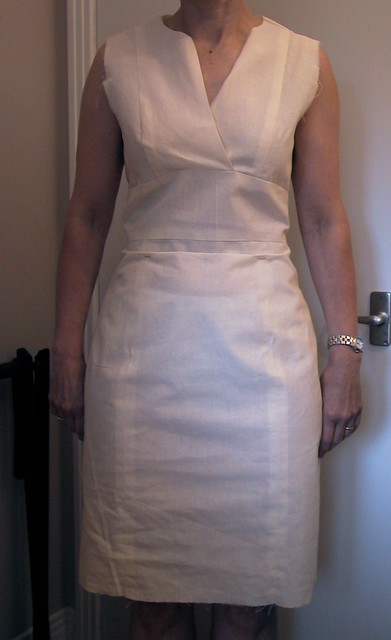
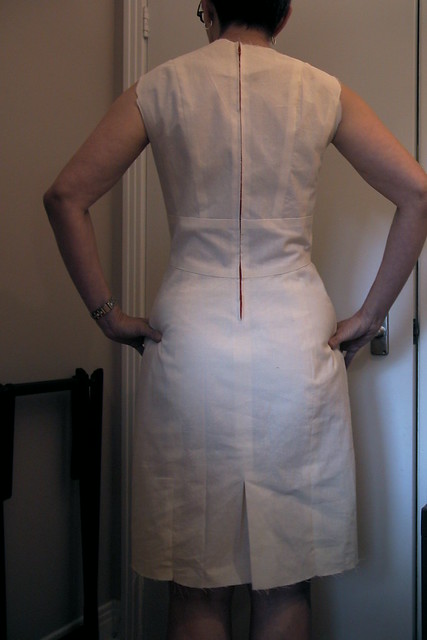
However next week I will be able to wear it with my new dress - another version of V1183, a Kay Unger dress pattern. I see I made it almost exactly four years ago. But if you read the whole story of that dress, you will see I first got the pattern in 2010! Things do move slowly chez The Sewing Lawyer. Sigh.

The fabric could have been a light coat, it's so dense. Is it weird to make a sleeveless dress from such a fabric? I decided not, especially since this piece came thanks to the second-hand shopping chops of my husband. The piece was at least 4 metres and I think he paid $4 for it all. The dress is practically free!

I won't go into the sewing process, since I wrote about it last time. I did the same again to make sure that I could fit at the side seams if needed. It wasn't, but it sure was satisfying to outwit Vogue's instruction writers, once again. I used the triple straight stitch on my machine. It is not perfect but I count on time and distance to make it seem perfect.

I had to buy two spools of thread since I was short on magenta/fuchsia thread. Otherwise, again, it was all stash. I had a good colour zip in the right length and the lining stash also came through.

Bodice lining
This dress is a party on the inside, as you can see at right. I had this amazing LOUD fuchsia flowered silk brocade (husband again) which I used to line the bodice, and a plain red Bemberg for the skirt.

Faced hem
I wanted the skirt to be as long as the cut pieces and so I made a faced hem using a cross-grain strip of the silk. I folded it lengthwise and sewed a 1cm seam at the bottom edge. The folded edge of the strip is then hand sewed to the skirt. The fabric is so thick the stitches disappear.

I will try to take modeled photos next time I am at home during daylight. That could be a week from now. November - not my favourite month!

It is now time for my annual Xmas sewing/knitting to commence. I had my bulky machine out experimenting this weekend. Talk later!

Thursday, November 7, 2013

Unfinished business

I owe you, my loyal readers, with some further explanation of my somewhat elliptical comments about the dress I made from V1183.

First, let's recall the photo of the dress from the pattern envelope, and have a look at the line drawing.


There is one difference between these two that can readily be seen - the corners at the upper CF edge of the bodice meet in the photo but lie apart, allowing a V to form, in the line drawing.  The drawing is an accurate depiction of the pattern; the photo is not. Perhaps the photo is of an actual Kay Unger dress rather than of the pattern made up. Luckily, I like the little V at the neck!

Next I'll shame myself by posting a photo of my original muslin, made in (gasp) 2010.  At the time, I weighed about 15lbs more than I do now, most of which was at or below the waist.  This had led me to add approximately 1.25" (3cm) of width at the back skirt princess seams, and to grade the pattern out from size 10 at the waist to beyond size 12 at the hip side seams.  I had also split the skirt front at the darts to make princess seams that allowed me to add more room at the hip.  The skirt was still too tight at the time.  Even though I'm slimmer now, I was comfortable keeping almost all these changes when I put the muslin back on.   Maybe I just like more ease than Vogue intended

More serious were the fitting problems in the front of the dress where the midriff piece interacted with the bodice above and the skirt below.

I've annotated the photo of the muslin using Skitch to illustrate the fitting problems inherent in this pattern.  I say "inherent" because some variant of these problems is evident in just about every example of this pattern I've seen in my internet travels.

The red and blue arrows point to some awkward pulling in the CF bodice pieces coming from the points where the fronts overlap.  These pieces are not sewn together.  Many who have made this dress had to stitch the overlapped side down to prevent the entire front from gaping open.  This may in part be because they needed a FBA, but it is also due to the fact that there is a drafting problem with these pieces.  The bodice felt and looked too short on me (and I've never needed an FBA!).  The green arrows show the distortion that translated to the midriff piece from the fact that the bodice was too short between the princess seams.

At the same time, the skirt below the midriff felt and looked too long.  It was pooching out.  The black arrow shows the tuck I had pinned out to get rid of this extra length.

My friend G, who has a lot of experience fitting and sewing, commented that if the bodice was too short and the skirt was too long, it was probably the midriff piece itself that was the real problem.  She is probably right, but the midriff piece seemed to be the right shape, and for me it was easier to adjust the pieces on either side of it.

Once I added length (about 3/8" or .75cm at CF, tapering to nothing near the princess seams) to the lower edge of the bodice pieces and shaved approximately the same amount off the top edge of the front skirt pieces, the whole thing settled into place, as you can see at right.  Phew!

To answer a question in the comments to my last post, the overlapping front is very secure and does not gape open, once it fits properly!

Next up: more info on construction.  This dress is fully lined and as already noted, the bodice front overlaps.  This means that the bodice fronts had to be finished to the CF edges before they could be attached to the midriff.  You cannot construct the outer shell and the inner lining and attach them at the edges.

Vogue's instructions say to sew the front and back bodice pieces together (including topstitching) and join them at the shoulder, and then do the same with the bodice lining.  Before the fronts are connected to anything, you can then machine sew the lining to the fashion fabric at CF and neck edges, and at arm openings, and turn it right side out.  Then topstitch the CF and neck edges.  All good.  However, then Vogue wanted me to fully construct the other two vertical components i.e. the midriff and skirt, in each case sewing the side seams together, before attaching them at the horizontal seams.  The midriff edges are supposed to be topstitched in one pass all the way around which makes for a nice smooth line at the side seams.


And the zipper comes dead last.  No way!  It's harder to sew in a zipper after the dress is fully constructed in the round. I decided to build the entire back and sew the zipper in flat before attaching the bodice fronts at the shoulder and clean finishing the bodice edges.  Long story short, I completely finished the front and the back and sewed the side seams last which is completely not how Vogue wanted me to make this dress.  I was very pleased when I was able to get the lines of midriff topstitching to line up almost perfectly at the side seams.

Take that, Vogue instruction-writers!


Monday, November 4, 2013

Kay Unger dress - completed!

For some reason I had a terrible time getting any decent full length pictures of me in my new dress, and the other photos were all hit and miss.  It could be due to:  a dark November evening; a short window in which to fiddle with my camera; inept fiddling with my camera; an unpredictable flash; or all of the above.

 It's late so I will save comments on the pattern and the many adjustments I had to make to it for a later post, if I have the energy.

On the plus side, I love the finished dress.  It's soft and the cotton underlining somehow makes it kind of cozy.  The colour looks pretty with this jacket.  It does fit me well, and so it's very comfortable to wear.  I would even consider making the pattern again.

And I love the shape of the midriff, now that it actually works with the pattern pieces above and below it.  Just look at this side view.  Not bad, especially when you consider that I sewed the side seams last.

This soft wool and cashmere suiting looks wrinkled in all the pictures.  You'll have to take my word for the fact that the dress looks better in real life.


Sunday, November 3, 2013

Why the Sewing Lawyer was MIA

When one gets to a certain stage of life, one's parents are necessarily at a more advanced stage.  This led to The Sewing Lawyer giving up a week of sewing and knitting (and blogging) to help her parents reduce and recycle.  The re-using will have to wait until they have relocated.  In the course of that exercise
, some family heirlooms were unearthed.


A christening gown.  Not worn by me.  It was apparently considered too fragile in the 1950s.  I tossed it blithely into the washing machine and ironed it, except for the sleeves.  They are so tiny I couldn't figure out how.


It is machine made but quite lovely.  Every edge is either encased in a tight scalloped hem stitch, or in a French seam.

To the right are the embroidered motifs from the skirt, and on the bodice.


And who doesn't need white cotton guest towels, complete with monogram and crocheted lace inset at each hem?  I now have a matched pair.


Soon, I'll post my just-completed version of Vogue 1183.  What with the time change, it may be a while before I can get any decent photos.  In the meantime, here's a teaser in-progress shot of the insides of the dress (inside-out on my dress form).  You can see the lining (light blue Bemberg), fashion fabric (dark blue wool/cashmere) and interlining (striped cotton).  


Saturday, October 5, 2013

One project finished, another one started


I put on a vaguely matching hat and took a lot of very bad pictures of myself wearing my new cape.  For some reason my camera had a terrible time focusing on it.

Cooler weather is just around the corner.  Even though this is just one layer of wool with one layer of Bemberg lining, it's warm.

I feel bad for not having many wonderful pictures of this subtle garment to show you. Here's one more that wasn't too bad.

In other news, today I cut out a dress!  It's Vogue 1183, a pattern I purchased and muslined three whole years ago (click to see my muslin and read about the first round of pattern adjustments).

Originally, I wasn't satisfied with the fit, and that's why I set it aside.  It was too tight, too short, and (even though I'm hardly busty) the bodice didn't seem big enough.  Plus there was some strange pulling where the bodice front pieces overlap and attach to the midriff piece, and the front skirt was too long and pooched out.  Checking the reviews for this dress on PatternReview, I notice that almost everyone had bodice issues, and many chose to sew through all layers at the bodice overlap to prevent it from gaping open.

Trying on the ancient muslin again today (after losing a few inches in the hips) it fits a lot better and I felt it was time to tackle the structural problems.

I made some more changes to the pattern today, including lengthening the front bodice pieces slightly, taking in the princess seams at the bust, just above the midriff, and narrowing the midriff to match.  I also took some length out of the skirt front below the midriff piece.  And I added 4 cm at the hem because the unhemmed length seemed about where I would want the finished skirt to land.

I'm using some gorgeous light suiting purchased many years ago on a flying trip to The Wool House in Toronto.  If I remember correctly, it's wool and cashmere, and it's light as a feather.  Because I want a bit more weight to this dress without stiffening it even slightly, I'm going to underline the wool with a soft cotton shirting, and I will line the dress with Bemberg.  All from stash.  I even had the right thread colour in my extensive collection.  Stay tuned.

Sunday, September 12, 2010

Sewing without a plan ... and 3 ghostly garments

The Sewing Lawyer has always been mightily impressed by the entrants to the various "SWAP" contests.  That anyone completes these grueling marathons is a wonder, especially if their marriages or significant relationships remain intact.  What is this thing - a sewing "plan" anyway?  How could anyone actually settle ahead of time on pattern and fabric combos to make 11 (or whatever other double-digit number the SWAPpers aim to make) garments that would work together as a complete wardrobe?  How do they keep motivated, or even interested?  How can they stand the deadlines?

It's beyond the Sewing Lawyer.  She has occasionally read the rules and has always immediately dismissed the idea of participating.  She prefers to (mentally) endlessly reformulate a stream of projects which may or may not employ fabric, patterns and other bits from her stash, thumb aimlessly through her stack of Burda magazines and bulging pattern files, examine each and every bolt in the local fabric store to see what's new and what's deeply discounted, while waiting for inspiration to strike.  There is rarely any kind of deadline other than hoping vaguely to be able to make something-or-other before the season (or fashion) for it has completely passed.  The only advantage to be gained from not seizing the day and putting scissors to cloth is that the potential sewing disaster or fashion faux-pas is avoided, or at least put off for another day.

In the meantime, the Sewing Lawyer bumbles along making things that strike her fancy from time to time, and (mostly) turning out garments she's prepared to wear out in public, which sometimes even coordinate.

Ya, I'm exaggerating but right now it sure does feel this disorganized!  Since the last post, I've got three ghostly garments which have been slapped together to test patterns and fit to show you.  It is probably not a great idea to have this many ideas on the actual go.  One of the patterns has even been translated (well, cut out) into actual fabric!  But more on that later.

First up, I've improved the Material Things "Fearless Jacket" muslin immensely and I'm warming to the idea of actually using it to make out of my luscious lamb leather.  I took the muslin completely apart, adjusted the tissue in the places I had already identified, and recut the pieces.  I was at about size 0 (if there had been such a thing) on the MT tissue.  After sewing it together again I realized that it was still too big!  If I was at 0 before, I guess this is size -2.  In the Big 4, I would usually choose a 10 as my base size.  The new tucks are out of the side front and centre/side back seams.  The other change that needs to be made is to raise the armscye to improve mobility - the muslin looks ok while I have my arms at my side but when I raise them it's not a good look.


My second muslin is supremely uninteresting, but it's the one that's getting made first.  This is from a 1990s Burda envelope pattern which I have made before and wore to death.  I still really love the picture on the envelope.

I made a muslin only to check how much too low these armscyes are - I'm raising them by 2.5cm (1") so the answer is - a lot!


My final ghostly garment is a muslin of Vogue 1183, the second Kay Unger dress released this summer.  I could tell from the measurements printed on the pattern that this dress was going to be a snugger fit than V1182, my cocktail dress.  Before cutting out the muslin, I separated the skirt front into two so there will be princess seams instead of darts.  The back already has a corresponding seam and the bodice is princess-seamed all over the place, so this change seems natural and adds more opportunities to adjust fit.  For the muslin I cut a size 10 in the bodice and midriff, transitioning to a 12+ at the hips.

It is too snug.

Besides that, there is something strange happening at the join between the bodice and midriff at the front.  It almost feels like I need an FBA (!).  I notice that several reviewers of this dress on PR had a problem with the overlap gaping - they did need an FBA.  Mine isn't gaping so much as the leading edges of the front are pulling up on the midriff piece.

Here's another picture (in which the left neck edge is not folded under).   I'm going to mull this over some more but if you have a suggestion for how to fix this, please put it in the comments!

But the strangest thing is that the skirt front is too long on me just below the midriff, around the level of my actual waist. I've pinned out a wedge/tuck that is about 2cm deep at CF and tapers to nothing at the side seams.  You can see it better in the side view to the right.

I really like the way the midriff piece curves downward in the back.

The back fits pretty well except for the too-tightness of it.

It's also too short for my taste.  The muslin hits about 1cm above where I'd like the finished edge to land, and it includes the hem allowances!

Wednesday, September 8, 2010

Idea overload

I'm in major future-potential-project muslin mode so I have nothing to show.

First, I'm trying to fix my Material Things jacket muslin.  I took it apart and trimmed the pattern an obscene amount before putting it back together, but it is still too big!  I figure I'll be down to a size 0 in the MT size chart before long, which is just ridiculous.  I am going to make a muslin of the Burda leather jacket too, as I'm still not sure if the MT pattern is what I want to make.

I muslined another jacket, an unlined sort-of-safari jacket Burda envelope pattern from the 1990s.  I made this pattern way back when but no longer have the garment, and I wanted to check the armscyes (yes, they were too low on the body for my current taste in fit).  I've got some crepey woven wool earmarked for it, and lining to do Hong Kong finished seams.

I want to make a dress to wear with the jacket. I was going to reprise a sheath dress made from a much-tweaked Pattern Master Boutique pattern but then got the bright idea to try the other Kay Unger dress (Vogue 1183) instead.  It's a real fabric miser and I have only 1.2 metres of the softest, finest Zegna wool...

Oh yeah, I also had to go back to work.  Less time for sewing.  Phooey.