Saturday, November 16, 2013

Etherial squared

Since I was on a roll I made another bra from the remains of the blue stretch lace from Merckwaerdigh.  I had enough to cut the entire bra from lace, and even to match the motifs.  It's fully lined with the same light nude coloured fabric that has found its way into several bras here recently.


I promise not to clutter up these (virtual) pages too much with lingerie sewing, but here are some photos showing the inside, and how it's made.

Giant roll of
strap elastic
The straps are cut from my giant roll of silvery strap elastic.  I sewed them between the upper band elastic and the front of the bra to secure the ends at the top of the cups.

I let the scalloped edge of the lace be the lower edge of the bra band pieces, which meant I had to finish the band elastic a little differently.  First, I attached the lower band elastic to the lining only.  Then I basted the lace and lining (wrong sides together) at the top edge, folded the lower elastic to the inside, and finished the lower edge with triple stitch zig zag through all layers. The stitching is practically invisible on the face of the lace.

The top of the cups is finished similarly with very narrow but very snappy elastic from Merckwaerdigh since they supplied enough for two bras.  I'm pretty sure I've never seen similar elastic here so will have to give some thought to different ways to finish the cup top edge if I'm using lace again.  And I might; I'm pretty pleased with the look of this bra.

I attached the strap to the inside of the back band at both top and bottom for stability since the band is fairly narrow and the fabric fairly flimsy.

This is the end of the blue lace, but I still have quite a lot of the paisley mesh, and some blue elastic, and 1,000,000 metres (minus about 1) of strap elastic for some more bras.  And some more fabric from my ample stash.

I actually have another bra cut out, but think my blog audience might have had it up to here with the underwear by now.

I do promise to make something to wear on the outside soon.

Monday, November 11, 2013

Not utilitarian

Etherial, more like.


This is quite unlike The Sewing Lawyer's usual undergarments.  It's more colourful and lacier.  More ... delicate?

But still sturdy enough.  Here is a shot of the inside.


The mesh fabric and stretch lace (ordered on-line as a bra kit from Merckwaerdigh in Rotterdam) are pretty flimsy, when you get right down to it.  So I lined the entire bra with a light stretch mesh acquired a forgotten time ago from a forgotten source.  Luckily, I have lots.  Because I think I've been bitten by the lingerie bug. There was enough of the lace to cut out another bra.  The next one will be entirely blue lace, but lined like this one.  I have a RTW bra that uses stretch lace, with scalloped edges intact, for the side pieces.  I'm copying that.

A word about the supplier - Merckwaerdigh's supplies are reasonably priced and (I hate to say it) less expensive even including international shipping than Bra-Makers Supply in my home province. The kit included enough lace for two bras - even enough to mirror the motifs for both, enough printed mesh for at least one pair of panties plus bra(s), elastic - 4 kinds including for straps, stable mesh to line the bridge (you can sort of see it in the second photo) - enough for dozens more bras, a little piece of crotch lining, hooks & eye for the bra, loops and sliders for the straps, and wire casing.  And the shipping was quick, and you can save on shipping (relatively) by combining items.  I also bought a set of findings in white and wire casing in 3 colours (white, black and nude).  I'm a satisfied customer.

That said, I'm pretty sure I have enough lingerie notions now to last the rest of my natural life so they may not get much more of my business.  Especially since I came across about 9,000 metres of 1cm wide elastic at the Value Village on the weekend (exaggerating, but only slightly). See previous post re SABLE.

And a word on the pattern.  It's totally customized.  The cups are from an ancient Burda WOF (as it was) swimsuit pattern, much tweaked.  The side piece is from a Bra-Makers pattern.

And because I want to reward you for reading this far ...


Thanks to the skin-tone lining, it looks even more etherial than it really is.  But it's really not see-through.

Thursday, November 7, 2013

Unfinished business

I owe you, my loyal readers, with some further explanation of my somewhat elliptical comments about the dress I made from V1183.

First, let's recall the photo of the dress from the pattern envelope, and have a look at the line drawing.


There is one difference between these two that can readily be seen - the corners at the upper CF edge of the bodice meet in the photo but lie apart, allowing a V to form, in the line drawing.  The drawing is an accurate depiction of the pattern; the photo is not. Perhaps the photo is of an actual Kay Unger dress rather than of the pattern made up. Luckily, I like the little V at the neck!

Next I'll shame myself by posting a photo of my original muslin, made in (gasp) 2010.  At the time, I weighed about 15lbs more than I do now, most of which was at or below the waist.  This had led me to add approximately 1.25" (3cm) of width at the back skirt princess seams, and to grade the pattern out from size 10 at the waist to beyond size 12 at the hip side seams.  I had also split the skirt front at the darts to make princess seams that allowed me to add more room at the hip.  The skirt was still too tight at the time.  Even though I'm slimmer now, I was comfortable keeping almost all these changes when I put the muslin back on.   Maybe I just like more ease than Vogue intended

More serious were the fitting problems in the front of the dress where the midriff piece interacted with the bodice above and the skirt below.

I've annotated the photo of the muslin using Skitch to illustrate the fitting problems inherent in this pattern.  I say "inherent" because some variant of these problems is evident in just about every example of this pattern I've seen in my internet travels.

The red and blue arrows point to some awkward pulling in the CF bodice pieces coming from the points where the fronts overlap.  These pieces are not sewn together.  Many who have made this dress had to stitch the overlapped side down to prevent the entire front from gaping open.  This may in part be because they needed a FBA, but it is also due to the fact that there is a drafting problem with these pieces.  The bodice felt and looked too short on me (and I've never needed an FBA!).  The green arrows show the distortion that translated to the midriff piece from the fact that the bodice was too short between the princess seams.

At the same time, the skirt below the midriff felt and looked too long.  It was pooching out.  The black arrow shows the tuck I had pinned out to get rid of this extra length.

My friend G, who has a lot of experience fitting and sewing, commented that if the bodice was too short and the skirt was too long, it was probably the midriff piece itself that was the real problem.  She is probably right, but the midriff piece seemed to be the right shape, and for me it was easier to adjust the pieces on either side of it.

Once I added length (about 3/8" or .75cm at CF, tapering to nothing near the princess seams) to the lower edge of the bodice pieces and shaved approximately the same amount off the top edge of the front skirt pieces, the whole thing settled into place, as you can see at right.  Phew!

To answer a question in the comments to my last post, the overlapping front is very secure and does not gape open, once it fits properly!

Next up: more info on construction.  This dress is fully lined and as already noted, the bodice front overlaps.  This means that the bodice fronts had to be finished to the CF edges before they could be attached to the midriff.  You cannot construct the outer shell and the inner lining and attach them at the edges.

Vogue's instructions say to sew the front and back bodice pieces together (including topstitching) and join them at the shoulder, and then do the same with the bodice lining.  Before the fronts are connected to anything, you can then machine sew the lining to the fashion fabric at CF and neck edges, and at arm openings, and turn it right side out.  Then topstitch the CF and neck edges.  All good.  However, then Vogue wanted me to fully construct the other two vertical components i.e. the midriff and skirt, in each case sewing the side seams together, before attaching them at the horizontal seams.  The midriff edges are supposed to be topstitched in one pass all the way around which makes for a nice smooth line at the side seams.


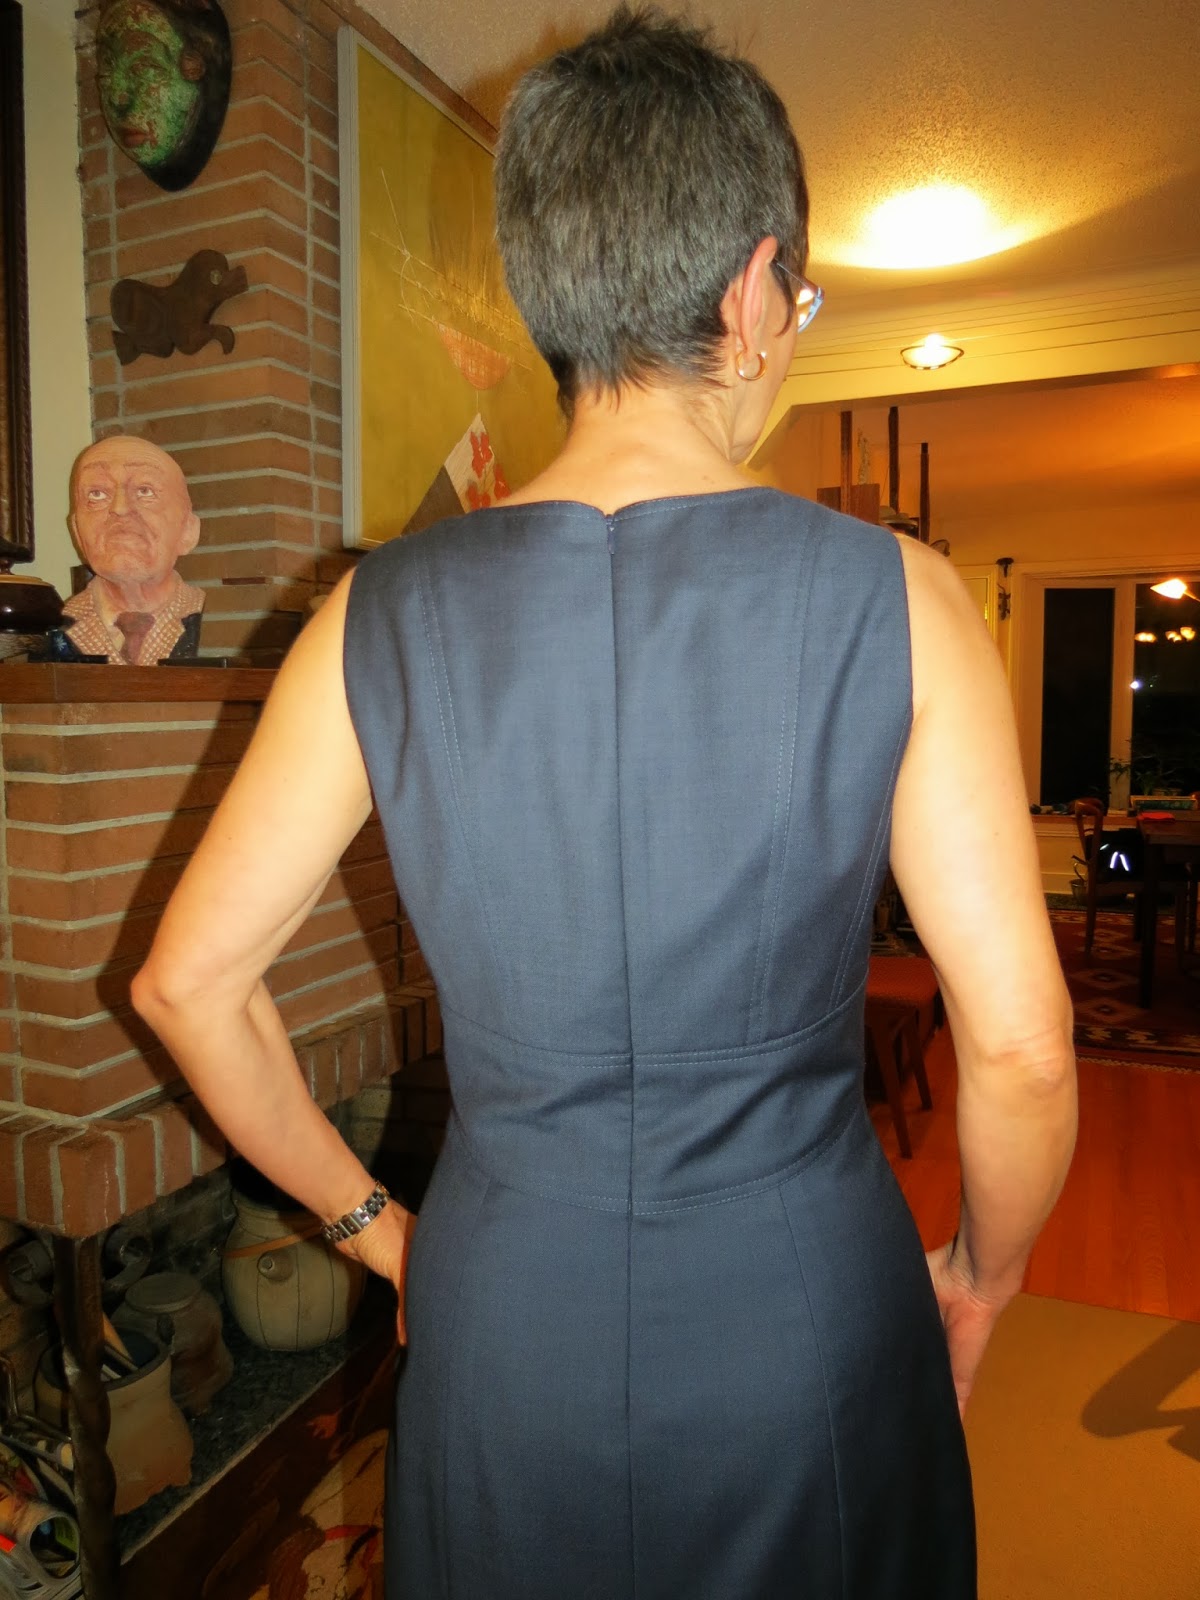
And the zipper comes dead last.  No way!  It's harder to sew in a zipper after the dress is fully constructed in the round. I decided to build the entire back and sew the zipper in flat before attaching the bodice fronts at the shoulder and clean finishing the bodice edges.  Long story short, I completely finished the front and the back and sewed the side seams last which is completely not how Vogue wanted me to make this dress.  I was very pleased when I was able to get the lines of midriff topstitching to line up almost perfectly at the side seams.

Take that, Vogue instruction-writers!
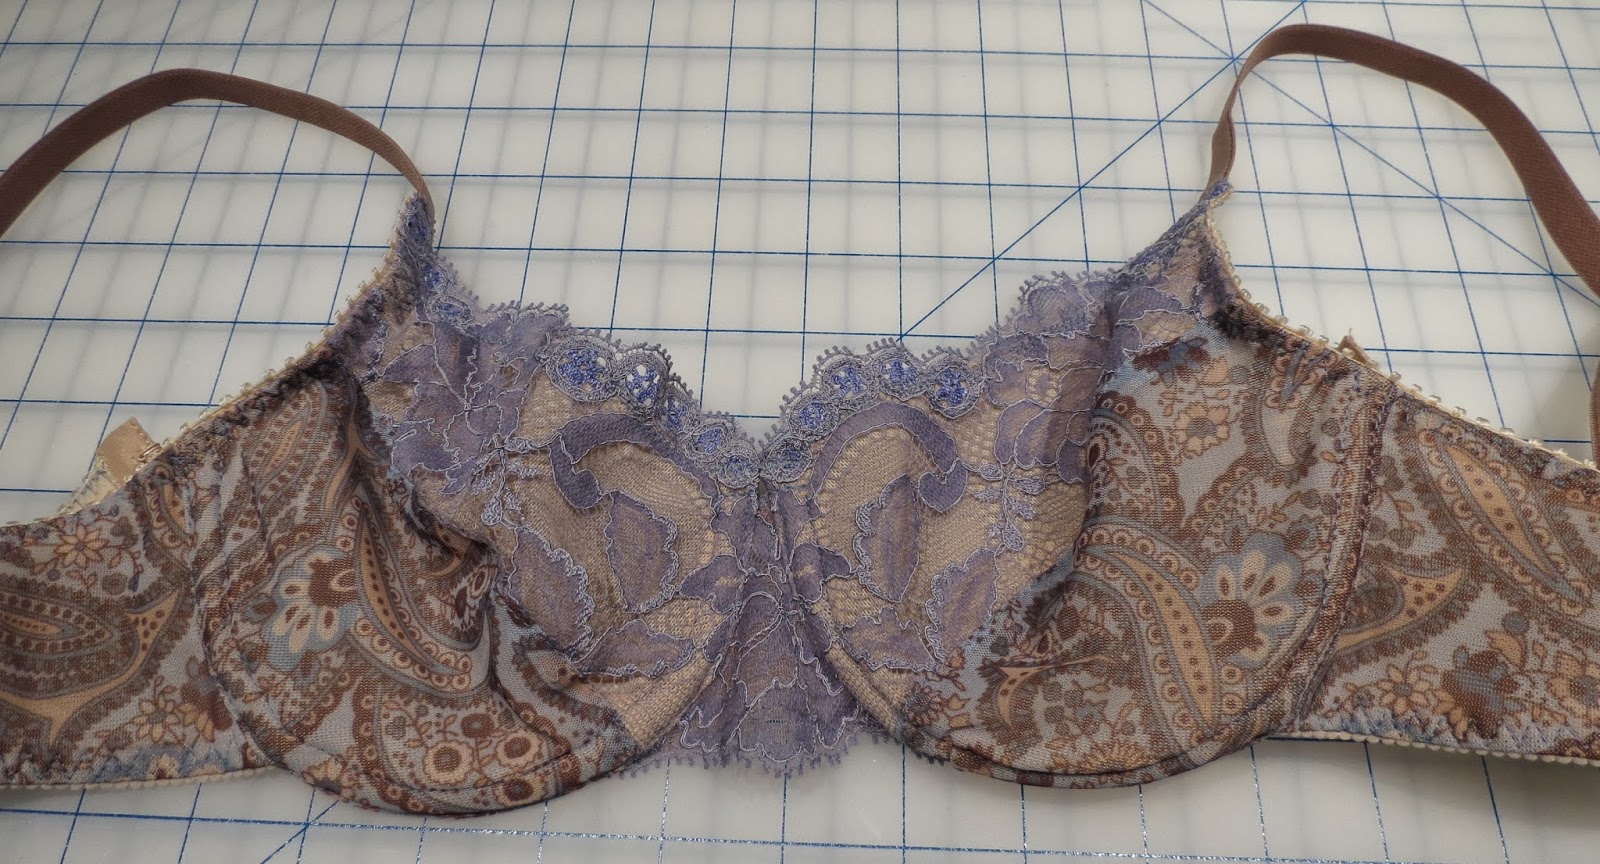

Monday, November 4, 2013

Kay Unger dress - completed!

For some reason I had a terrible time getting any decent full length pictures of me in my new dress, and the other photos were all hit and miss.  It could be due to:  a dark November evening; a short window in which to fiddle with my camera; inept fiddling with my camera; an unpredictable flash; or all of the above.

 It's late so I will save comments on the pattern and the many adjustments I had to make to it for a later post, if I have the energy.

On the plus side, I love the finished dress.  It's soft and the cotton underlining somehow makes it kind of cozy.  The colour looks pretty with this jacket.  It does fit me well, and so it's very comfortable to wear.  I would even consider making the pattern again.

And I love the shape of the midriff, now that it actually works with the pattern pieces above and below it.  Just look at this side view.  Not bad, especially when you consider that I sewed the side seams last.

This soft wool and cashmere suiting looks wrinkled in all the pictures.  You'll have to take my word for the fact that the dress looks better in real life.


Sunday, November 3, 2013

Why the Sewing Lawyer was MIA

When one gets to a certain stage of life, one's parents are necessarily at a more advanced stage.  This led to The Sewing Lawyer giving up a week of sewing and knitting (and blogging) to help her parents reduce and recycle.  The re-using will have to wait until they have relocated.  In the course of that exercise
, some family heirlooms were unearthed.


A christening gown.  Not worn by me.  It was apparently considered too fragile in the 1950s.  I tossed it blithely into the washing machine and ironed it, except for the sleeves.  They are so tiny I couldn't figure out how.


It is machine made but quite lovely.  Every edge is either encased in a tight scalloped hem stitch, or in a French seam.

To the right are the embroidered motifs from the skirt, and on the bodice.


And who doesn't need white cotton guest towels, complete with monogram and crocheted lace inset at each hem?  I now have a matched pair.


Soon, I'll post my just-completed version of Vogue 1183.  What with the time change, it may be a while before I can get any decent photos.  In the meantime, here's a teaser in-progress shot of the insides of the dress (inside-out on my dress form).  You can see the lining (light blue Bemberg), fashion fabric (dark blue wool/cashmere) and interlining (striped cotton).  


Sunday, October 20, 2013

It's official - The Sewing Lawyer has hit SABLE


Intellectually, I knew it, but yesterday proved that I have internalized the truth.  I have more than enough fabric in my personal stash to last me the rest of my time here.

What caused this revelation?  The annual Fabric Flea Market.  For past devotees of this blog, you've read about this fabriganza before, in 2010 and 2011.  My camera didn't come along with me yesterday, but the above scene from last year is an accurate rendition, believe me.  Hundreds of happy shoppers, the buzz of conversation, punctuated by squeals of delight and laughter as new finds and old friends are located.

Much of The Sewing Lawyer's extensive stash, including fabric, notions, patterns and miscellaneous tools, was found at this annual event (yesterday was the 19th).  Every year, I spend the Friday before sorting through donations (this is a fundraiser event), which leads to the perk of being in the right place at the right time to scoop those delicious things that, if only I had known it, I had been looking for all those years.

It was different this year.  Not only have my friend G and I graciously and apparently successfully eased out of the role of being "The Organizers", we both left the venue early with (in my case anyway) very little in the way of stash acquisition, and pocketbook mostly intact.  And not exhausted, another very good thing!

The stash remains ample.  I did have to go to a real store to buy some more thread, but NO MORE FABRIC!


Monday, October 14, 2013

Meh - a knitting project

Back in late July I mentioned I was swatching for another knitting project, the Vitamin D cardigan.  This is a hugely successful pattern if the  numbers on Ravelry are to be believed.  Then, there were just over 2,300 projects; now another 175 have joined the throng.

 "Look Ma, short rows!"
Including mine.

I'm hoping this grows on me.  I like the drapiness of it (a ColourMart linen and silk blend of unknown proportions) and hope the neutrality of its colour makes it a useful addition to my wardrobe.

Its fibre, shape and style probably make it more a spring to summer garment than a fall to winter one but I'm wearing it now on this sunny and somewhat unseasonably warm October day, but predict it will soon be packed away to be a surprise sometime around next April.

More details on Ravelry.

By the way, that red knitted top featured in my late July post stretched a great deal after I washed it.  It is at least 4" longer than it was in my July photos, and looser widthwise too.  The neckline became impossibly open.  I have prevented it from being completely unwearable by putting a line of crocheted chain stitch behind the neck ribbing to pull it in, which has the effect of supporting the weight of the whole top and keeping it from sagging too terribly.  I may later have to do something similar to keep the armscye from stretching out any more.  This is the last time I will ever knit with rayon yarn!  It's just too heavy for its own good.

I have also, you may be glad to know, been making progress on my latest sewing project.  I'm loving the topstitching!

I'm not following Vogue's instructions, which want you to complete the bodice, the midriff band, and the skirt in the round before sewing them all together (fully lined), with the last step being ... putting in an invisible zipper at CB.  I'd rather sew in the zipper flat, thanks very much.  That means I have assembled the back (a view of one side to the left) and will sew side seams last.

All well and good, but the overlap at CF bodice requires one to have the inner bodice finished (including at least part of the lining) before attaching it to the front midriff band.  I'm currently working on the topology of how to accomplish this.  In my mind I think I can make it work.

Saturday, October 5, 2013

One project finished, another one started


I put on a vaguely matching hat and took a lot of very bad pictures of myself wearing my new cape.  For some reason my camera had a terrible time focusing on it.

Cooler weather is just around the corner.  Even though this is just one layer of wool with one layer of Bemberg lining, it's warm.

I feel bad for not having many wonderful pictures of this subtle garment to show you. Here's one more that wasn't too bad.

In other news, today I cut out a dress!  It's Vogue 1183, a pattern I purchased and muslined three whole years ago (click to see my muslin and read about the first round of pattern adjustments).

Originally, I wasn't satisfied with the fit, and that's why I set it aside.  It was too tight, too short, and (even though I'm hardly busty) the bodice didn't seem big enough.  Plus there was some strange pulling where the bodice front pieces overlap and attach to the midriff piece, and the front skirt was too long and pooched out.  Checking the reviews for this dress on PatternReview, I notice that almost everyone had bodice issues, and many chose to sew through all layers at the bodice overlap to prevent it from gaping open.

Trying on the ancient muslin again today (after losing a few inches in the hips) it fits a lot better and I felt it was time to tackle the structural problems.

I made some more changes to the pattern today, including lengthening the front bodice pieces slightly, taking in the princess seams at the bust, just above the midriff, and narrowing the midriff to match.  I also took some length out of the skirt front below the midriff piece.  And I added 4 cm at the hem because the unhemmed length seemed about where I would want the finished skirt to land.

I'm using some gorgeous light suiting purchased many years ago on a flying trip to The Wool House in Toronto.  If I remember correctly, it's wool and cashmere, and it's light as a feather.  Because I want a bit more weight to this dress without stiffening it even slightly, I'm going to underline the wool with a soft cotton shirting, and I will line the dress with Bemberg.  All from stash.  I even had the right thread colour in my extensive collection.  Stay tuned.

Sunday, September 29, 2013

Tweed


Paco's cape - not mine!
Waaaay back when, I reported the purchase of some patterns from Paco Peralta.  It is embarrassing that the patterns have been waiting so long for me to make something.  Better late than never - feeling the need of an easy to wear outer garment I could put on in between season weather, I made the short version of the "poncho cape".

It's pretty simple to construct - two main pieces, two collar pieces and the back facing.  The pattern is nicely drafted, however.  There is turn of the cloth built into the bias under collar, something I always appreciate.  No lining pieces were supplied, but it was very easy to create my own.  Seriously, the hardest part of this was the hemming, a task that seemed to go on forever.

You'll have to wait a bit to see me model this, as it's dark and the beauty of this fabric is subtle.  It was found by my husband, pro thrift-shopper that he is, a few years ago.  I think it's Donegal tweed.  It's certainly hairy enough!  At first I thought it was pretty dull, but it has delightful flecks of colour, when you get close enough to see them.  I have enough left to make a skirt.

For now, here's a view of the collar.


Thursday, September 12, 2013

Progress

My last post that was actually about sewing involved the architecture of a bra.  Thank you to those who commented and provided food for thought.

I overthought the whole bridge thing and tried making it even wider.  Wrong!

I did some internet research, and read into the details of Beverley Johnson's book.  I also borrowed the Lee Ann Burgess book Making Beautiful Bras.  (Horrid picture on the cover.)

Recall that my problem was that after I widened the base of the bridge, I had a flat area inside the wire at the CF and lower edge of the cups.  The first comment was to the effect that because the widened bridge had the effect of rotating the cups down and towards the outside of my body, I might need to remove fabric from the cups.  The flattening could be a symptom of too much fabric.

Similarly, Johnson wrote that "too much depth in the bra cup will manifest itself as a flattened area of fabric right above the middle of the bottom of the cup".

Promisingly, the Burgess book had a section on "An Underwire that sits Down on the Front of the Chest". Her diagnosis?  "This annoying problem can be caused by a number of factors: either the wires are too deep a U shape, ... and/or the cup volume may be insufficient, and/or the cup shape may be too shallow and/or the breast may be drooping within the cup due to a very loose, slack lower cup."  Oh boy, even the experts may not know where to start!

Long story short, I pinched out fabric inside the wire to make the lower cup smaller, and I think it worked. I'm wearing the second and most modified bra now, and it's pretty comfortable, and it is not slipping downward in front.

The most you are going to get are these crappy pictures on my DTD.  Please believe that both bras fit my flesh and blood much better.

First bra, in white.  The ruffly trim was leftover from a BraMakers' Supply kit.  For straps, I used a strip of extremely firm power net covered with the fashion fabric.  They are kind of thick, but they work. I did not bother with rings and sliders (I'm making it the right length, right?).  This bra has some depth taken out of the cup next to the bridge but the lower curve of the cup is still a bit too deep.  However, it's not bad.
 Second bra, in nude (the next pic shows the colour better).  This is a lightweight type of power net with random satiny spots.  I used fold over elastic to finish off the upper edge of the cups and wide strap elastic for straps (again left off rings/sliders).  The band is slightly snugger and the straps slightly shorter than bra #1 and I like that snugness.

The pattern for this bra is close to being just right.
Inner construction.  The cups are lined with a very lightweight flesh-tone mesh.  The bridge is stabilized with firm fusible attached to a lining.

All materials for these were in my (ahem) extensive stash.  However I am now out of wire casing.

This weekend I'm headed to Kitchener Ontario to visit my cousin and his knitter wife.  On Saturday, she and I are going to the Knitters' Fair, reportedly the largest event of its kind in Canada, with "35,000 square feet dedicated to the craft of knitting, offering an incredible display of a diverse variety of yarns in an explosion of colour, knitting books, patterns and accessories." 

I'm expecting it to be a lot of fun!