Sunday, June 16, 2013

Finishitis #2

Let us turn, for a moment, to knitting.  A while ago I showed you an incredibly light knitted summer top.  It's made with a single thread of lace-weight slubby cotton from ColourMart.  It's hardly there at all.  While it will be just the thing for those hazy hot days of summer when The Sewing Lawyer would really rather not be wearing anything at all, those days are few in this neck of the woods.  For more versatility, a matching cardigan is just the thing.  However, it took almost 2 months of knitting to produce a sleeveless top that weighs only 51 grams.  So for the cardigan, the lace weight cotton was doubled to produce a slubby and still very lightweight cardigan.

This is the Featherweight cardigan.  There are 5,405 projects using this pattern on Ravelry.  So, a very successful pattern for the designer.  Briefly, mine is top of the heap :-) as it's the most recently-posted.

Beginning of endless rounds
However, as usual the Sewing/Knitting Lawyer cannot leave well enough alone.  The cardigan is knit top down and seamless, starting with a bunch of stitches which are the back neck and about 6 on either side which turn into the sleeves and front.  Then you increase, and increase, and increase, at the raglan sleeve points (8 stitches every 2 rows) until you have enough to make sleeves and are down to your underarms, and then you knit, and knit, and knit, and knit on and on and on until you have a sweater body and sleeves.

Back neck unattractiveness - as
designed
And then, you pick up those front/collar bands and knit back and forth in endless rows of stockinette stitch until you are ready to slit your throat with the boredom, and then you have a sweater where if you don't haul down on the front bands (as the model is doing, I notice), the back neck sort of sticks out at the wide and sharply curved back neck in a most unattractive fashion, as shown at right.

This would never do!  Taking a cue from the weightless top, I made front bands using the same lace pattern as in the top (but 2x the heft with doubled yarn), and blocked these into long bands which I sewed to the body.  This allowed me to ease the fronts above bust level and to make the band hug the back of my neck.

Without further ado, some pictures of this object, finished today after only one month of knitting!  (I bow down to people who can toss off a project in a couple of days.  I cannot figure out how this is done without time travel.)

Neck-hugging band
of lace
The sleeves are slightly shorter than the pattern calls for - they hit at my elbow.  The length of the body is slightly longer than the pattern calls for - I wanted it to end at about the same spot as the matching top.

The band hugs the neck very satisfactorily.


 I did the equivalent of a 3 needle bind off at the neck CB (I had to knit 2 bands to ensure the arrows in the lace bands would be in the same direction).  However, I used a crochet hook to do the bind off.  This makes for some nice symmetry in the pattern.  Do pause and admire the neck-hugging properties of the lace band.

Here it is with matching top.

Sorry for the dress form photos.  It is really wet and cool here today.  If it warms up tomorrow, maybe I'll model these for the blog with the last of the Finishitis projects.  If you were keeping count you will know it is a sewing project.  


Finishitis #1

The Yarn Harlot (funny knitting blog, amusing even for non-knitters) writes of "startitis" in which a knitter compulsively casts on for multiple projects at a time rather than calmly working on and finishing those already in process.  I'm sure there is a version for sewing, although perhaps it is a bit less common.  I think I've had the knitting version in a mild dose.

Is there an opposite condition?  Finishitis, finishista, finish-it-up-itis?  Whatever, there is nothing like the high that comes from a week during which multiple projects were finished.  To wit:  one blouse, one pair of cropped pants, and one cardigan.  Or by category:  sewing (2); knitting (1).  It doesn't sound so grand when I go by the numbers, does it - kind of disappointing.  However, I refuse to be dejected.

Because it is cool and wet here today, I am not quite up to modelling all my new pieces as they are very summery.  However, a couple of days ago I took pictures of my first-to-be-finished item, a modern take on my personal "vintage" pattern, Vogue 2281.

This pattern is from the late 1970s, really almost the 1980s, hence the very loose, fits-where-it-touches silhouette.  In those days I always bought size 8, and I made this up completely unaltered except to shorten it since there is absolutely no need for a shirt that I can sit on.

The fabric is very smooth and light (silk-cotton).  I interfaced with silk organza and I'm proud of the completely finished interior of this shirt.  To the right, you can see the encased lower seam of the pockets (built into the yoke) and the finished edge of the facing.

Except for sewing on the buttons, the shirt is entirely done by machine.  The hem is a machined baby hem.

This is the easiest possible finish, and it's very light and secure for a fine fabric.  Turn up the raw edge a small amount and run a line of machine stitching very close to the fold.  Then trim the edge close to the stitching.  Then turn it up once more, and stitch again on top of the first stitching.

All materials are from my stash, including the perfectly coloured buttons.


Sunday, June 2, 2013

French seams

It has been years.  Decades perhaps.  However.


This is a yoke seam with built-in pocket, from a vintage Vogue pattern.  The pattern instructions specify French seams.  Mine are definitely not as small as Vogue wanted me to make them (1/8") but they are not too bad and the inside of this shirt is definitely as pretty as the outside.  In the end, it may be more so.  I have yet to make the buttonholes...

The last time I made it, it was the 70s and this pattern was new and fresh.  The Sewing Lawyer was yet to become a Sewing Law Student.  I am (again) making view B at top right.

I found a tiny scrap of the original fabric.  Chinese silk brocade, with tiny woven birds.  Fabulous stuff, found in (if memory serves) Fanny's Fabrics in Regina Saskatchewan.  I wish I had more of that silk.

This version is made of lightest silk and cotton blend, purchased in Montreal during PR Weekend in June, 2010.  I hauled it out of deep stash thinking it would look great with my cashmere skirt.  Now I'm aiming more squarely for summer wear.

By the way, did you notice the somewhat rumply white fabric upon which my new airy version of V2281 was resting?  It's 100% linen, 3.5 metres.  It is pretty beefy and, realizing the futility of trying to maintain its crisp smoothness, I tossed it into the washing machine and dryer to soften it up.

Some of the linen is destined to be a pair of summery cropped pants.  The rest ... perhaps a skirt?  Any suggestions as to what silhouette I should aim for?  Don't be shy - give me some ideas!

Tuesday, May 28, 2013

The Sewing Lawyer's latest lawyer's suit

It's not so much that a sewing slump has hit The Sewing Lawyer; but the output has slowed to a crawl as she compulsively knits away the evenings.

So, I am thrilled to announce that the skirt to match my jacket is now finished.  As predicted, with temperatures in the low 20's (C) during the day, this outfit will have to wait until fall to be really enjoyed.   But I put it on to take some low-light pictures.


Does this look like a lawyer's suit to you?

I need some interesting tops to wear with it.  I like the red colour with the suit, but this top is pretty old.


I've already given you all the interesting construction details.  There's not much more to say about this skirt.  It is straightforwardly lined to the top edge.  I did not do anything fancy to justify the extreme amount of time it took to finish it.  There is no inner corset, and no boning.  This fabric is so soft and cushy and I didn't want to interfere with that.  Besides, it's a little stretchy, always a good quality in a pencil skirt with a high waist.  The skirt should be very comfortable.

I also got lazy in relation to the back walking vent.  Instead of making a concealed vent, properly lined (as per my tutorial here - the most-visited page on this blog, by far), I just folded the vent facings back at the seam line and tacked it invisibly by hand to the facing, leaving a little extra length for ease above the top of the vent.  I mitered the hem and facings for a clean finish but it's practically invisible in this fabric.    

And that is that.


Friday, May 17, 2013

Ethereal

See-through stockinette
Here is another finished object - it's a wispy knitted top.  It's made from 100% cotton yarn, 2 ply, quite slubby, lace weight.  In 150g of this (from ColourMart), there are 1,500 yards of yarn.  Needless to say, this little number barely made a dent in my two cones (3,000 yards) of this stuff, even though it took me about two months to knit it with tiny little 3mm needles.


Between the lace panels and the inherent thinness of the knitted fabric, this top is so airy as to hardly be there.


The pattern is from a free online knitting magazine, Knitty.  It's called "Etherial" (mis-spelled, yes).

As usual, I was incapable of slavishly following the pattern.  The designer had envisaged it in a lace weight alpaca, which would have a completely different character from my cotton.  The cotton is drapier and even though it is knit at the correct gauge (28 stitches and 42 rows per 10cm or 4"), so that the garment has the finished dimensions called for, it fits far more loosely.  Finished, it has about 4cm (1.5") of negative ease at the bust.

Knitty schematic
As I was knitting I was scheming how to change the way the design fits at the arm openings.  To the right is the schematic provided on the Knitty website.  You start at the hem, and continue in the round to knit a straight tube, which has a double panel of lace at each side.  The arm openings are created by simply splitting these two lace panels and decreasing.  I think it looks uncomfortable in the pattern photo on the Knitty page.

Knitty's version
Besides, in my looser fabric, the tightness below the arm would not look right with the relative looseness elsewhere.

Gusset - in progress
My solution was to insert a knitted gusset between the two side lace panels which allowed me to cast off a number of stitches below the arm, creating a looser, rounder opening.  As I added stitches under the arm, I decreased in the centre panels on the other side of the lace, keeping the stitch count the same.  This means the lace starts moving towards the centre more gradually, but it doesn't change the overall look of the top.

I made the back a little longer than the front, and a tiny bit wider, for fit.  I also firmed the finished arm edges up a little bit with an invisible edge of single crochet.  I think my modifications worked really well.

I'm going to love this top on the hottest days of summer, but it's kind of revealing.  While I'm waiting for the weather to really change, I've already started a coordinating cardigan, worked with the same yarn, but held double.  It's coming along nicely.

Check out my Ravelry project page for the top and cardigan.


Tuesday, May 14, 2013

Ta. Da.

I finished the jacket, just in the nick of time as temperatures plummeted (frost warnings three nights in a row) so I could actually wear it.  The entire suit, alas, will have to wait until fall, since I will be lucky to finish it this coming weekend and surely it will be unsuitably wintry garb after the long weekend in May (Canadian tradition demands that one shift mentally to spring after this holiday which nominally celebrates the Queen's birthday).

Anyway, here it is.  The photo of the front  is pretty bad due to bright light conditions and camera operator ineptitude.  I darkened it but unfortunately, the jacket looks kind of drab.  It isn't, in real life.  I'm wearing it with these pants. The fabric leftover from making them supplied the contrast for the piping and buttonholes.  Therefore they must "go with" this jacket perfectly.


Speaking of those details, here's a closeup of the jacket front.  As I said in my last post, I was very pleasantly surprised by how smoothly the piping insertion went.  Shortage of fabric meant that the bias strips were pieced.  The piping is therefore marginally thicker in a couple of spots, which are however functionally invisible if you follow the 6 foot rule.*

Buttons are plastic with silver metallic inserts.  The lining is Bemberg which, as you can see, has a woven-in pattern.  All materials - every last bit - came from stash.

I really am going to finish the skirt very soon, after which I'll record it here, put it lovingly in my closet, and switch to writing about sewing lightweight, airy cotton items.  I have such a thing already cut out, in fact, and am dreaming of white linen jeans...


* If a sewing mistake cannot be seen by the average viewer standing a reasonable distance away, it doesn't exist.

Sunday, May 12, 2013

I'm still heeeeeeeere!

Hello.  You may remember me.  I'm The Sewing Lawyer.

Again, I have been busy, in what passes for real life around here.  I have this full time job which takes me away from sewing, knitting and blogging.  Nevertheless I have slowly been making progress on a few fronts, though not blogging, evidently.

Easter sunrise socks
I made some more socks.  I know, yaaawwwn.  But for posterity, they are precisely the same as the last ones; the blue pair (finished in Halifax).  Except obviously they are a very different colour.

On Ravelry, there is a free pattern for a stitch pattern to disguise ugly sock yarn (the Ugly Duckling Socks, if you are on Ravelry).  I kind of wish I had started these socks with a sober solid colour for contrast.  They are (ahem) very bright.  My sole innovation was instead to try to start sock #2 at the same point in the colour progression as sock #1.  This was very unscientific and it only almost worked.  However I consider it close enough.

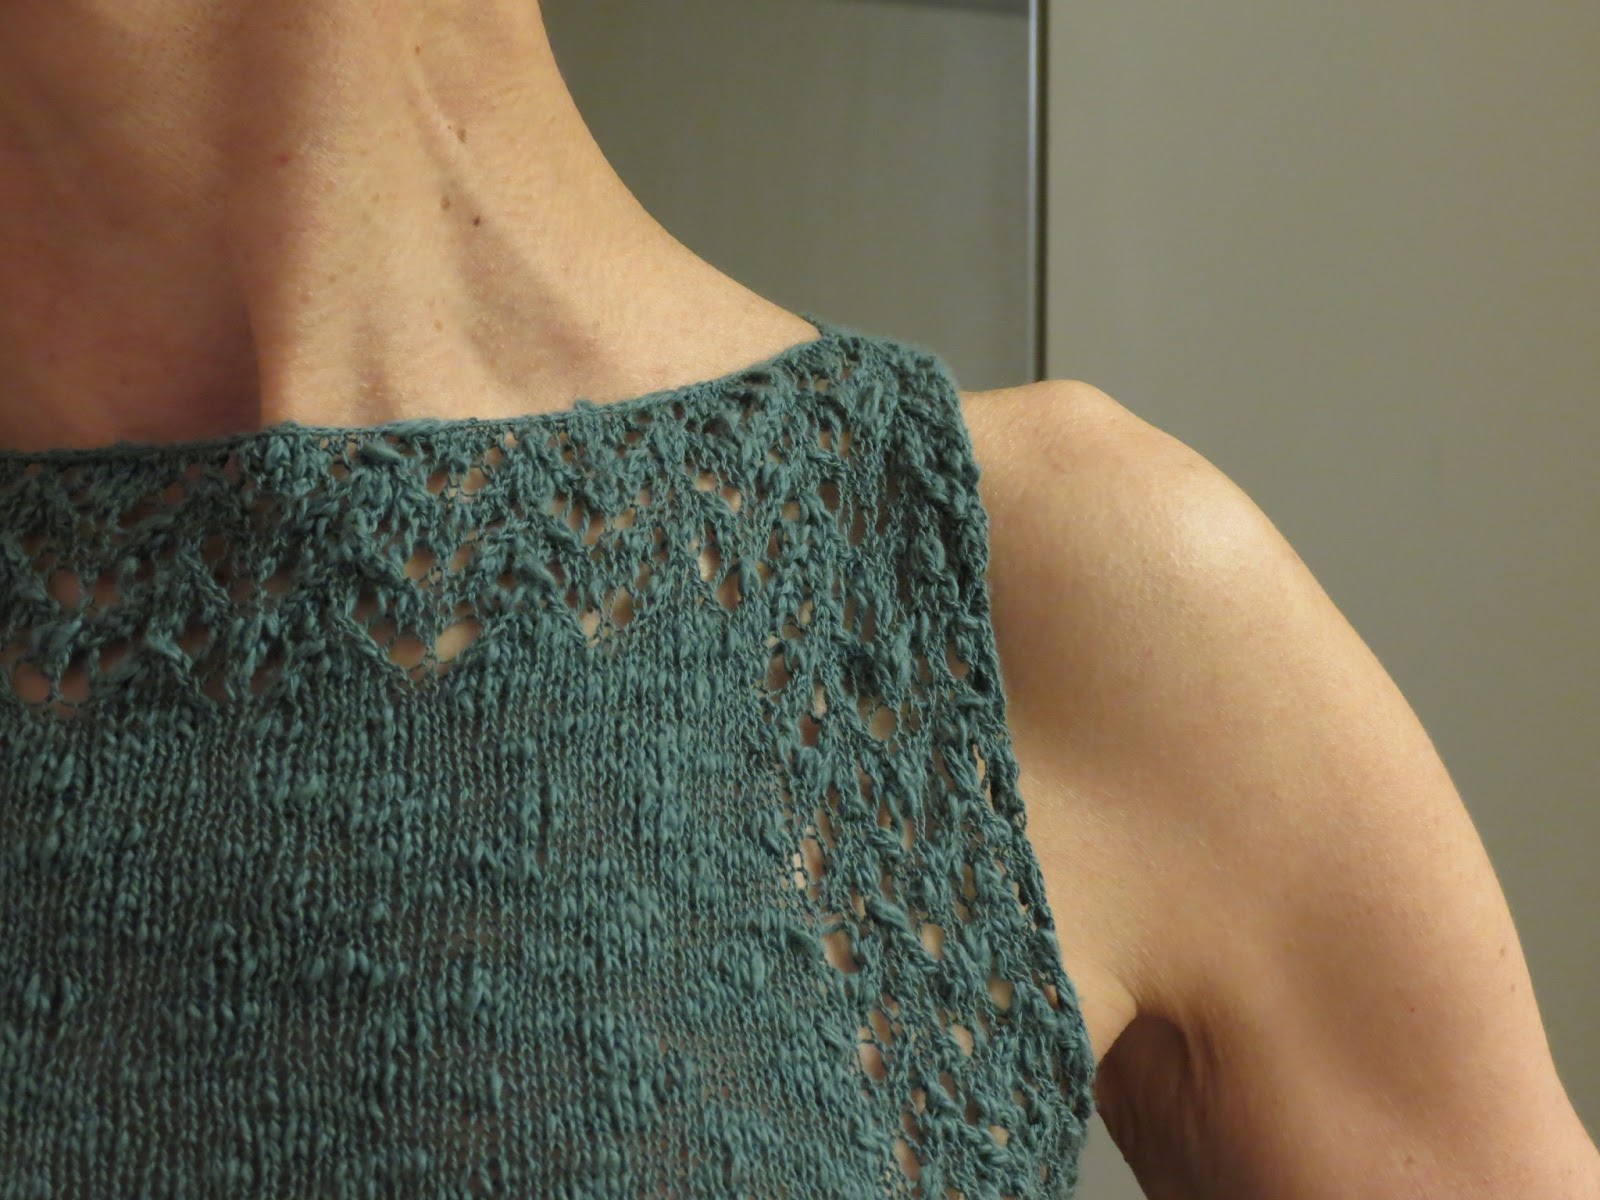
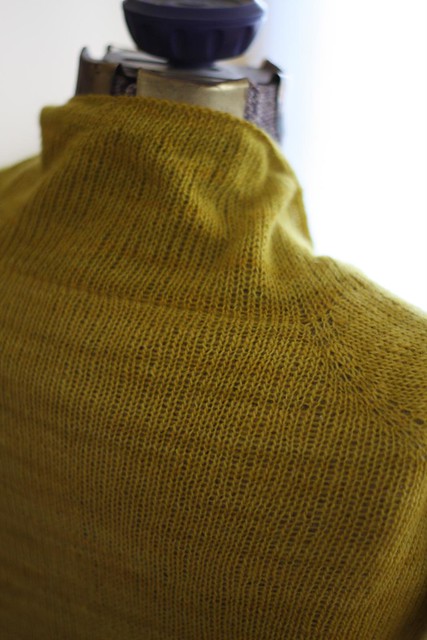
I'm also knitting another little summer top.  It's a free pattern from Knitty called "Etherial".  I'll save my review for the next post.  For now, This will have to suffice:  Lace weight.  Oy!

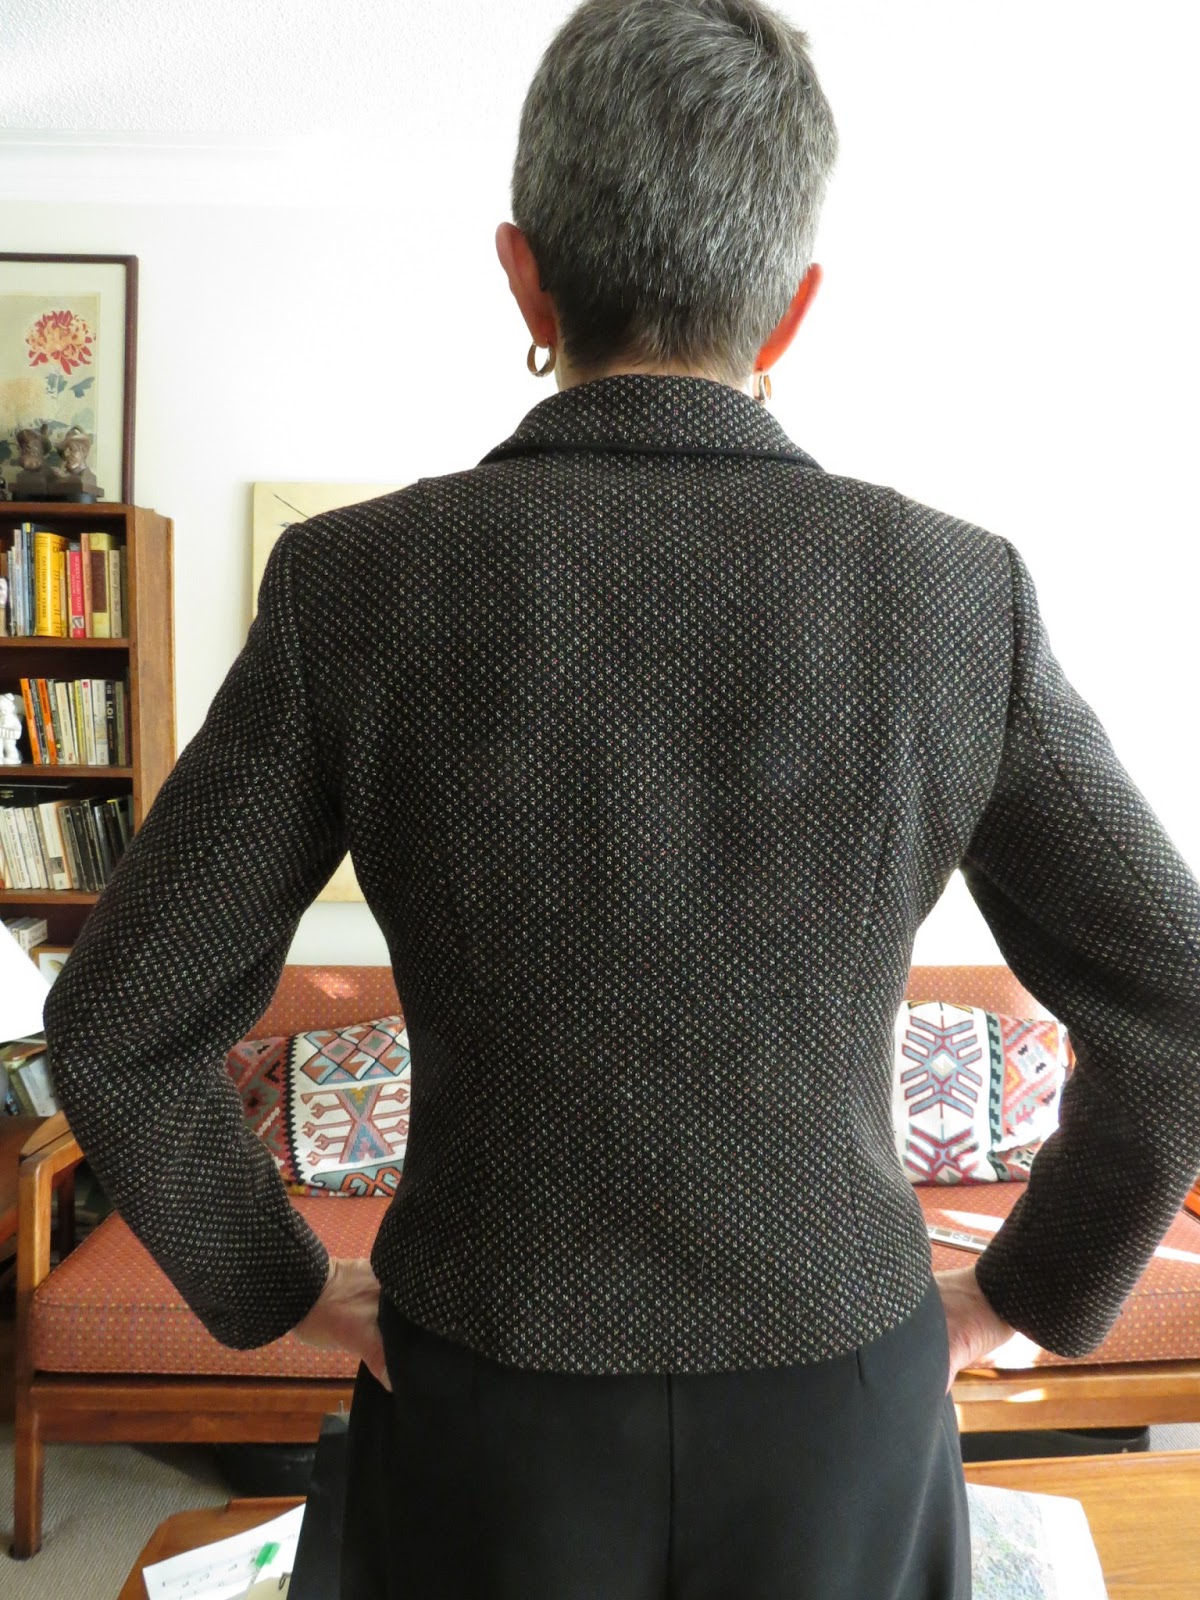
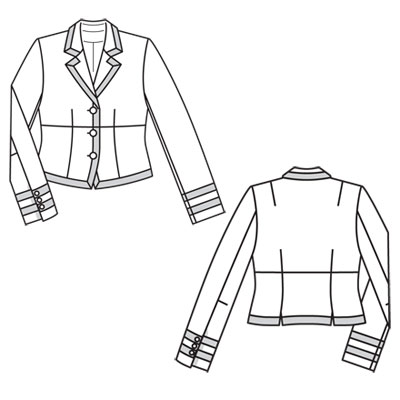
I have been sewing too (Yay!).  The suit is somewhat closer to being wearable, and The Sewing Lawyer has done it again folks.  The wool suit will be unwearable once complete, due to a very predictable break out of warmer weather, expected to last for months.  I console myself with the thought of the delightful surprise I will have, come September or so, on rediscovering its pristine, probably unworn newness in my closet.

Sorry for having to feed you with more progress shots.  But the jacket has really taken shape.  It does actually have sleeves, and a (partially completed) lining, but it seems I'm going to make you wait until the thing is completely finished with arms in it.

You can see I inserted piping at CF, around the lapels and collar. I'm really pleased at how easy this turned out to be, and how good it looks.  I thought of using two pieces which would end/overlap at the notch, but then thought I'd first try a single pass, and to my amazement it worked really well.  Much trimming of the bulky fabric, along with strategic clipping and much steam and pressure, was required to get it all to lay flat enough.

BTW, if you haven't already, get a really good iron (I love my Consew gravity feed iron and Reliable board).

Finishing the inside of the bound buttonholes required some mental preparation.  Given how much my fabric ravels (and that I had not used any fusible on the jacket facing), I decided to use silk organza squares to make no-bulk windows in the facing.  I located the corners of the buttonholes by jabbing pins straight through all layers, then double- and triple-checked these by measuring, before using a small stitch length to sew the organza via buttonhole shaped rectangles, clipping and turning.  I have now sewn the facing to the buttonholes from the back, by hand.  And all I can say is that it's a good thing my fabric is all black, and that hand stitches virtually disappear in the fabric of both the jacket and the buttonholes themselves, because it is not all that wonderful a hand-sewing job.

However, onward!

Next I am going to complete the jacket lining, and the jacket will be all done but for the sewing on the buttons.

The skirt is also almost in the home stretch.  I have to assemble the lining, and do the hem.

Maybe I can finish them both today, while there is still some chill in the air?


Sunday, March 31, 2013

Various activities - but not so much sewing

Bound buttonholes
Two weeks of blogging silence is due to the fact that I had a trip to Halifax Nova Scotia last week, partly work (for which I had to use valuable potential sewing time to prepare) and partly pleasure.  I did manage to vanquish the bound buttonholes but got very little else done in the sewing department.

The buttonholes will match the piping perfectly because I am using the same black fabric for both.  Considering that this fabric is pretty ravelly the buttonholes weren't too hard to make.  I used my usual technique except that I did not try to press open the teensy tiny seam allowances because the fabric used for the lips is much less bulky than the fashion fabric.  The fashion fabric fills in the lips very nicely and the relatively thin lip fabric doesn't make the buttonholes feel much thicker than the rest of the jacket front.  Nor did I attempt to sew the ends of the buttonholes by machine, since I thought the tiny triangles would disintegrate with the handling that would have had to happen while I wrestled with them at the sewing machine.  Instead I took tiny hand stitches to finish the ends (short sides) of the buttonhole and then hand back-stitched in the ditch to anchor all layers along the long sides.  I think the buttonholes look pretty good (at least from a polite viewing distance).


I took some knitting with me to Halifax since my husband wanted to play in an open session at the Old Triangle Irish pub and knitting on a sock would give me something to do (other than drinking excellent beer) while I listened to the music.  It worked admirably well - I both enjoyed myself and almost finished the sock.  Knitting was even a bit of a conversation starter.  (The Old Triangle is a great pub if you are in need of food/beer/musical entertainment in Halifax.)

This is a very bad picture of the sock, but does sort of prove that we had a partial view of the Halifax Citadel from our hotel room window.

Better depiction of the socks
As I make more socks, I have learned that a snugger fit is better than comfortably loose.  These are the closest fitting socks I have made yet, so much so that I was a bit worried they would be too small.  But the wool relaxes and the fabric stretches slightly when worn so they are very comfortable but do not slide around when putting shoes on.  I immediately started another pair the same.  This is the "Ridgeline" master pattern from Cat Bordhi's New Pathways for Sock Knitters book.

I've also recently started knitting a summer top in lace weight yarn (slubby cotton) which is scary skinny stuff.  So far I have knit about 12cm from the cast on edge which makes it about 40 rows.  It's quite a different knitting experience, not to mention slow going.  Even sock yarn feels very substantial in comparison.

I leave you with a couple of pictures of The Sewing Lawyer, wearing this coat (perfect for a blustery March day), at Peggy's Cove.  I swear it is impossible to take a photograph there that doesn't turn out looking exactly like a post card or a painting by Alex Colville.

Postcard
.
"Alex Colville"

Saturday, March 16, 2013

Piping!

I love sewing with cushy textured wool.  It's so forgiving!  This fabric is so thick and resilient that I decided it needed minimal interfacing on the under collar and stand, the front edge of the jacket, and the skirt waistband pieces.  I'm using Pam Erny's Pro-Weft fusible.  It stabilizes the fabric (which has quite a bit of natural give) without changing its hand appreciably.    

I quickly assembled the jacket fronts and backs, and then paused since I'm planning to make three bound buttonholes.  One has to fortify oneself for bound buttonholes, although I'm confident that in this fabric, I could make many mistakes and no one would ever notice.

In the meantime I decided to test out the piping on the skirt.  This caused me to stop and ponder sewing order.  Burda instructs sewing the lower front skirt (with pockets) first, then the lower back (which has no CB seam).  The right side seam is sewn.  Then the waistband is constructed, except for the left side seam (which has the zipper).  The entire waistband is then sewn in one pass, and the left side seam with zipper is constructed last.

Phooey to that I say!  First, I find it easier to insert the zipper in the relatively straight CB so I made a seam there.  This also allows me to make a back vent, for walking ease.

A brief word on fitting:  This pattern is meant for quite stretchy cotton/lycra twill and as designed it has almost no ease.  All the PR reviews showed it was very tight.  Based on flat pattern measurement, I added a 1cm strip down the CF and CB (4cm or 1.5").  This gives about the right amount of ease.  Then all I had to do was fine tune the shape of the side seams.

Back to construction.  I like to put in the zipper flat, then sew the side seams last.  This allows me to do fine changes to improve the fit as I sew.  Normally I would make the front starting with the pockets, then apply the waistband in one pass, as illustrated in green at right.

However, I'm piping the seams shown in pink at left.   I wanted a continuous line of piping which would be impossible if I sewed the waistband seam last.

So I changed the sewing order.  It isn't all that hard.

First I sewed the CB waistband to the lower skirt front (the curved waistband seam between the lines of piping).  Then I piped the edges in a continuous line.

Then I attached the pocket facing piece, but stopped sewing at the waistband seam.

Next, I attached the side waistband at the piped seam, again stopping sewing at the waistband seam.  Ideally there is no more than a tiny gap between the two.

Finally, I attached the side piece, which forms the back of the pocket.  I sewed the top seam first, again stopping at that point (or as close as I could get to it) where all the seams meet.  After that it was an easy task to sew the pocket bag.

The last step was to anchor the waistband seam through all layers by stitching in the ditch (did I say this fabric is very forgiving?) for a centimetre or so.  It's invisible.

For piping and the pocket facings, I'm using left over black wool fabric from these pants. I'll do the bound buttonholes in this too, as narrow and unobtrusive as I can make them.  Later.

Friday, March 8, 2013

In progress

The overwhelming consensus is that it is not just not a bad thing but actually a good thing to re-visit and re-use a pattern already made.  (I thought so too.)

I finished cutting out the jacket and skirt last night and the biggest left-over bit of my 2m of fabric is about 35 x 45 cm (maybe 1 sq.ft.).  I sure hope I didn't make any mistakes!

I am going to insert black piping at the curved line formed by the pocket edge and front waistband seams, just for fun and because the detail of this line is really rather beautiful but would completely disappear if I didn't do something to make it pop in my dark and textured fabric.  To unite the two pieces, I'll continue the piping at the CF, collar and lapel edges in the jacket.  Or maybe at the horizontal seam...

Here, as a reminder, are the line drawings:


Where do you think piping would best be inserted?