Sunday, March 31, 2013

Various activities - but not so much sewing

Bound buttonholes
Two weeks of blogging silence is due to the fact that I had a trip to Halifax Nova Scotia last week, partly work (for which I had to use valuable potential sewing time to prepare) and partly pleasure.  I did manage to vanquish the bound buttonholes but got very little else done in the sewing department.

The buttonholes will match the piping perfectly because I am using the same black fabric for both.  Considering that this fabric is pretty ravelly the buttonholes weren't too hard to make.  I used my usual technique except that I did not try to press open the teensy tiny seam allowances because the fabric used for the lips is much less bulky than the fashion fabric.  The fashion fabric fills in the lips very nicely and the relatively thin lip fabric doesn't make the buttonholes feel much thicker than the rest of the jacket front.  Nor did I attempt to sew the ends of the buttonholes by machine, since I thought the tiny triangles would disintegrate with the handling that would have had to happen while I wrestled with them at the sewing machine.  Instead I took tiny hand stitches to finish the ends (short sides) of the buttonhole and then hand back-stitched in the ditch to anchor all layers along the long sides.  I think the buttonholes look pretty good (at least from a polite viewing distance).


I took some knitting with me to Halifax since my husband wanted to play in an open session at the Old Triangle Irish pub and knitting on a sock would give me something to do (other than drinking excellent beer) while I listened to the music.  It worked admirably well - I both enjoyed myself and almost finished the sock.  Knitting was even a bit of a conversation starter.  (The Old Triangle is a great pub if you are in need of food/beer/musical entertainment in Halifax.)

This is a very bad picture of the sock, but does sort of prove that we had a partial view of the Halifax Citadel from our hotel room window.

Better depiction of the socks
As I make more socks, I have learned that a snugger fit is better than comfortably loose.  These are the closest fitting socks I have made yet, so much so that I was a bit worried they would be too small.  But the wool relaxes and the fabric stretches slightly when worn so they are very comfortable but do not slide around when putting shoes on.  I immediately started another pair the same.  This is the "Ridgeline" master pattern from Cat Bordhi's New Pathways for Sock Knitters book.

I've also recently started knitting a summer top in lace weight yarn (slubby cotton) which is scary skinny stuff.  So far I have knit about 12cm from the cast on edge which makes it about 40 rows.  It's quite a different knitting experience, not to mention slow going.  Even sock yarn feels very substantial in comparison.

I leave you with a couple of pictures of The Sewing Lawyer, wearing this coat (perfect for a blustery March day), at Peggy's Cove.  I swear it is impossible to take a photograph there that doesn't turn out looking exactly like a post card or a painting by Alex Colville.

Postcard
.
"Alex Colville"

Saturday, March 16, 2013

Piping!

I love sewing with cushy textured wool.  It's so forgiving!  This fabric is so thick and resilient that I decided it needed minimal interfacing on the under collar and stand, the front edge of the jacket, and the skirt waistband pieces.  I'm using Pam Erny's Pro-Weft fusible.  It stabilizes the fabric (which has quite a bit of natural give) without changing its hand appreciably.    

I quickly assembled the jacket fronts and backs, and then paused since I'm planning to make three bound buttonholes.  One has to fortify oneself for bound buttonholes, although I'm confident that in this fabric, I could make many mistakes and no one would ever notice.

In the meantime I decided to test out the piping on the skirt.  This caused me to stop and ponder sewing order.  Burda instructs sewing the lower front skirt (with pockets) first, then the lower back (which has no CB seam).  The right side seam is sewn.  Then the waistband is constructed, except for the left side seam (which has the zipper).  The entire waistband is then sewn in one pass, and the left side seam with zipper is constructed last.

Phooey to that I say!  First, I find it easier to insert the zipper in the relatively straight CB so I made a seam there.  This also allows me to make a back vent, for walking ease.

A brief word on fitting:  This pattern is meant for quite stretchy cotton/lycra twill and as designed it has almost no ease.  All the PR reviews showed it was very tight.  Based on flat pattern measurement, I added a 1cm strip down the CF and CB (4cm or 1.5").  This gives about the right amount of ease.  Then all I had to do was fine tune the shape of the side seams.

Back to construction.  I like to put in the zipper flat, then sew the side seams last.  This allows me to do fine changes to improve the fit as I sew.  Normally I would make the front starting with the pockets, then apply the waistband in one pass, as illustrated in green at right.

However, I'm piping the seams shown in pink at left.   I wanted a continuous line of piping which would be impossible if I sewed the waistband seam last.

So I changed the sewing order.  It isn't all that hard.

First I sewed the CB waistband to the lower skirt front (the curved waistband seam between the lines of piping).  Then I piped the edges in a continuous line.

Then I attached the pocket facing piece, but stopped sewing at the waistband seam.

Next, I attached the side waistband at the piped seam, again stopping sewing at the waistband seam.  Ideally there is no more than a tiny gap between the two.

Finally, I attached the side piece, which forms the back of the pocket.  I sewed the top seam first, again stopping at that point (or as close as I could get to it) where all the seams meet.  After that it was an easy task to sew the pocket bag.

The last step was to anchor the waistband seam through all layers by stitching in the ditch (did I say this fabric is very forgiving?) for a centimetre or so.  It's invisible.

For piping and the pocket facings, I'm using left over black wool fabric from these pants. I'll do the bound buttonholes in this too, as narrow and unobtrusive as I can make them.  Later.

Friday, March 8, 2013

In progress

The overwhelming consensus is that it is not just not a bad thing but actually a good thing to re-visit and re-use a pattern already made.  (I thought so too.)

I finished cutting out the jacket and skirt last night and the biggest left-over bit of my 2m of fabric is about 35 x 45 cm (maybe 1 sq.ft.).  I sure hope I didn't make any mistakes!

I am going to insert black piping at the curved line formed by the pocket edge and front waistband seams, just for fun and because the detail of this line is really rather beautiful but would completely disappear if I didn't do something to make it pop in my dark and textured fabric.  To unite the two pieces, I'll continue the piping at the CF, collar and lapel edges in the jacket.  Or maybe at the horizontal seam...

Here, as a reminder, are the line drawings:


Where do you think piping would best be inserted?


Wednesday, February 27, 2013

Is it wrong?

The Sewing Lawyer is glad that a couple of readers noticed the little teaser at the very end of her last post.  So here are a few more tidbits.

In stash is this luscious pure wool fabric, purchased for me in Italy by a good friend a few years ago.  She claims to have forgotten giving  it to The Sewing Lawyer.  But she did.  Anyway, here is an extreme close up view of said fabric (there are about 5 little bumps to the inch so you're looking at about 2.25" worth of fabric).

Black, textured, with tiny sprinkles of red, white and green.  It's a little more vibrant in real life.

There are only 2 metres but I can get a suit (jacket and skirt) out of it if I use the pattern for this jacket again.

Pros:  It's a real fabric miser; I've got it fitted perfectly, and it's a cute and wearable shape.

So my question.  Given that I have dozens of patterns for jackets I have never made, is it wrong to make the same one again?


Sunday, February 24, 2013

Been knitting

I finished my cardigan.  

Soooo, what else can I say about it?  

I used extra-fine merino, double knitting weight, from ColourMart.  I've sung the praises of the yarn from this UK vendor before.  They are like a knitting yarn jobber - they reformat fine machine knitting yarns used in top knitting mills in the UK and Europe into weights that hand knitters can cope with.  (I'm wearing the cardi with a silk top also from ColourMart yarn.)

It does fit, as you can see.  The shoulders are dropped but not excessively so.  I made something between the smallest and second-smallest size and it seems about right.

The fabric is stretchy and could be pinned together at CF, if I was so inclined.  

I like the simple zig-zag lace - it was very easy to memorize the pattern.  

Inside Out
To the right you can see how the sweater is constructed, from the inside.  The horizontal line is where the back joins the front and lower edge of the collar.  I've reinforced this line with a row of single crochet chain, to stabilize the shoulder line.  

The edges of the cardigan lie nice and flat - it's a simple edge - K3, P1, K1, P1 (on wrong side, K1, P1, K1, P3) and then on with whatever the body is.  The 3 stockinette stitches at the edge curl to the wrong side and the 3 stitches of ribbing contain the amount of curl very effectively.  You can see the wrong side of this edge on the collar.  

I'm contemplating my next project.  I have a muslin cut out for this skirt.  

The problem is, as designed it's pretty skin tight.  I've added 2 cm at CF and another 2 at CB, because I'm contemplating it in a woven suiting instead of a cotton-lycra sateen as Burda intended.  

I need another suit...


Saturday, February 9, 2013

Knitting patterns - The Sewing Lawyer muses

Knitting.  Sometimes you start slow and simple (bottom rib band of a sweater or the top rib band of a sock) and sometimes you have to plunge right into some sort of complicated manipulation or technique.  Inevitably there will be chunks of relatively mindless knitting (back and forth, around and around) on an established number of stitches, and transition points where you have to engage your brain.  However, overall knitting gives you lots of time to think.

If you are making anything to fit the human body, the characteristics of knitting are truly wonderful.  Its geometry and the fluidity of knitting combine to allow you to make the stitches flow and grow or decrease as the case may be, turn corners, attach new garment segments sideways, make holes and close them up again as needed, and do virtually anything to make the needed shape.  Knitting designers love all this stuff.  But do they care about fit?  

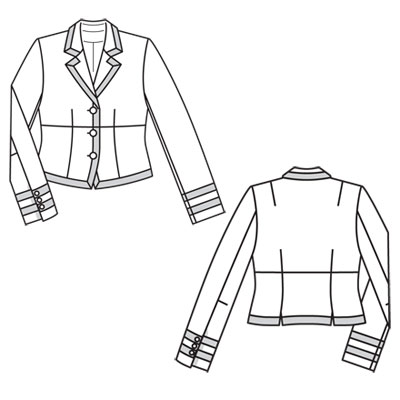
Chic Knits - Vonica Pattern
Right now, I'm working on a cardigan.  It combines a relatively simple lace pattern (7 stitch repeat over 16 rows) with some mindless stockinette sections.  The pattern is by an accomplished designer, Bonnie Marie Burns (Chic Knits).  It's called Vonica.  It was first published on Ravelry in April, 2011.  As of today, it has been favorited by 2,727 people, making it one of her most popular patterns, although there are "only" 184 projects posted on the site as of today.

People really like this sweater.  As does The Sewing Lawyer, I hasten to add.  (I actually can't wait to finish this - I SO need a black cardigan...)  It's just that, from a fit perspective, it's kind of strange.  More on that below, but first read about how this sweater is built.

Progress so far
Construction-wise, the pattern grows out of the centre back collar. You do a provisional cast on, knit a narrow strap to form the back collar, cast on to make the piece a lot wider for the shoulder on one side, and work the front down to the bottom of the armscye.  (This seems to flummox lots of knitters, judging from comments I've seen on Ravelry, but produces a shape that is completely logical to anyone who has ever sewn a garment with a shawl collar.)  Next, it's back to the CB collar where you work in the opposite direction from your provisional cast on to make a mirror-image piece for the other front.  Then you pick up stitches along the cast on front shoulder edges and the lower edge of the collar, and work the back down to the bottom of the armscye before casting on additional stitches at the armscye (for under the arm), joining front to back, and knitting seamlessly down to the ribbed hem.  Then you pick up stitches all around the armscye and knit the sleeves, in the round, down to their ribbed hems.  It's truly ingenious, as per comments above about knitting's fluidity and ability to change direction.

I've just finished the body, and have started on the left sleeve.  To the right, you can see what it looks like so far.  Once it's blocked, the fabric should actually cover me ... although this cardigan is designed to be unfastened and looks pretty good even if the front edges don't touch or overlap.

Here's the weirdness, at least to this sewing person.  Everybody knows (don't they?) that the back, above the armscye, needs to be wider and longer than the front to fit the body.  If it isn't, the garment shoulders will slip to the back, as the relatively-too-short back borrows fabric from the relatively-too-long front.  Moreover, the wider front shoulders will facilitate the garment's tendency to slip to the back.

Bonnie Marie Burns did not follow these "rules".  This pattern has many fewer stitches at the shoulder line in the back (22 in my size) than the front (29).  In the intended gauge of 20 stitches to 4" (10cm) that's a dimensional difference of about 1.4" (3.5cm) Personally, I think the back fits my relatively narrow shoulders correctly.  At left, you can see that the edge of the back armscye lies pretty much straight down from the shoulder point.  At right, a view from above showing that, as I would have expected, the actual shoulder line (red) is slipping to the back.  The blue line is the actual top of the shoulder.  Believe me, the edge of the sleeve at front is falling off the shoulder.  The fit of this cardigan is going to be quite different in the front than it is in the back.  Neither is, in the abstract, wrong or bad, but shouldn't they match?

I get that knitting is different from sewing, and its qualities allow different fitting norms to apply.  But do they have to be so different?  Is there something technical that requires this garment to be constructed this way?Or should The Sewing Lawyer stop fussing and enjoy the process?


Saturday, February 2, 2013

Sweaterknit jacket

I mentioned in a recent post that the floaty wrap blouse from Burda Magazine (February, 2009) would soon make another appearance, in a form closer to what Burda intended.  

I'm sort of unconvinced.  This is a printed wool blend sweater knit, which loses its sweateriness if you look at it from more than a foot away, at which point it looks ... kind of faded and tired, if I'm honest.


Up close it is pretty interesting.  But I don't want you to be THAT close!

I tested this pattern (designed for a single layer construction of very light woven fabric) with a single layer of a hideous acrylic jersey from stash and kind of liked it.  But for this printed jersey I needed to face the "lapels", which introduced a structure absent from the original.  I drafted a pattern piece for the facing.  On auto-pilot, I actually interfaced these pieces (Facings.Must.Be.Interfaced...).  What was I thinking?  Way too stiff.  It is, however, possible to pull fusible away and cut it out, which I did today.  I like it better, but it's not my most favorite piece ever.

Here it is with my orange cashmere skirt - already a favorite even though I've only worn it a couple of times.

What do you think?

Sunday, January 27, 2013

The Sewing Lawyer tries something new

In response to the post about my orange cashmere skirt, Steph A asked a question about the little thread chain I made to keep the lining fabric from peeking out below the skirt hem when I sit down.  It's a great question, and led me to think perhaps I could answer it with a little video.

As I had mentioned, I miscalculated in placing these chains so I needed to redo them anyway.

Without further ado...


I noticed that I said I would pull "the chain" through - but I meant I would pull the doubled thread through - to make the chain.  

Essentially, this is like single crochet, but you use your fingers and thread.  Easy peasy.  

If I do this video thing again, I'll try to be a more polished performer.  

Sunday, January 20, 2013

Wool/lycra jersey "twinset"

A few posts back, I mentioned that I had sewed a top and cardigan, and teased you with a picture of the back of the top and a mangled photo of the cardigan.

So here they are again.

The cardigan started life as this wrap blouse from the February, 2009 issue of Burda Magazine.  Hard to believe, no?

I used the back and sleeves as Burda intended but added a swingy front and a shawl collar that folds over in front.

As for the matching top, it's Jalie 2682 which I think I have made 4 times now.  I would have made sleeves but I ran out of fabric.

So far I think the two pieces together with my orange skirt are too matchy-matchy, but I might change my mind.

I'll end with a teaser:  The wrap blouse is about to make another appearance, in a form more closely resembling Burda's vision, but not exactly.


Presenting: orange cashmere skirt

A somewhat prosaic title - but so long awaited!  The Sewing Lawyer finally finished her multi-seamed plush orange cashmere skirt, designed for Vogue (#1324) by Donna Karan.

Behold:

Here, I'm wearing it with the recently-completed cowl neck top from Burda 09/2012, which has turned out to be a very versatile and much-worn item.  Too bad it's made from that pilly rayon knit which won't survive washing very many times.

A confession - when I made the top, it was pairing with this skirt I had in mind.  I think they look pretty good together.

From the full-length picture at left, I hear you think "ho hum:  another pencil skirt".

Closer up, however, check out the construction detail and topstitching! The consensus here and IRL was that I should accentuate the positive by adding topstitching at the darts and waistband, so I did.  Even though I had already attached the zipper, which made it a bit tricky.

I have worn the skirt - it's narrow but not uncomfortable although one must take little, ladylike strides in it.

Aside from the fitting adjustments already chronicled here and the endless testing of said fitting adjustments in muslin (twice) mentioned here, what else to tell you?  Let me see....

Well, this plush fabric is, I am pretty sure, a wool and cashmere blend.  It is thick enough to be a decent coat, but I only had one metre.  This because my husband found the fabric at our local thrift store for (drummmmmmrolll) $1.99.  Despite its provenance and price, this lush find languished in The Sewing Lawyer's stash for a couple of years while she came to terms with the fact that (a) the only upper body garment that could be made from it would be a vest, which due to its colour would only look right if worn in the forest with a hunting rifle and (b) it was not "too good" to be sewn and (c) there was enough for an orange pencil skirt which could be pretty interesting.

The skirt is underlined with silk organza and lined with hot pink mystery lining from stash.  I used this technique to line around the vent.  

 I made little thread chain connectors to keep the lining from peeking out below the hem of the skirt when I sit down, but need to re-do them because they are the wrong length and/or attached in the wrong place, and so allow the lining to peek out about .75cm, which is sort of cute but also annoying.

The zipper in this skirt is inserted after the entire garment is sewn, and it's installed up to the top of the back waistband.  A regular skirt-length zipper would be too short so I used a dress-length one, from stash.  I first tried using an extra-long zipper in my black high-waisted skirt and it is so much easier to get in and out of.  In this skirt the zipper opening is probably 30cm (12").

Finally, and just to prove that experience is no guarantee that no sewing mistakes will be made, I will confess that I had the entire skirt finished and put it on, only to realize that there was a very obvious problem at the top of the back vent - a drag line indicating that something was out of whack.  It took me quite a long time, after totally un-sewing the back vent, CB seam and lining, to realize that in sewing the CB seam below the zipper, I had eased more fabric into the underlap side, which released just at that point and created a big bubble of fabric.