Sunday, June 29, 2014

Deadlines

The Sewing Lawyer has been known to sew to a deadline - many times in fact.  However, it is probably not such a great thing to be sewing on buttons a mere 60 minutes before one has to appear appropriately attired at a professional event involving la crème de la crème of Canada's legal community.  Which is exactly what happened yesterday.

It got done, but there were some tense moments.  And (if truth be told) the lining wasn't properly hemmed before the dress made its début.  Yikes!

As it was worn.

SCC Law Clerks Reunion - with the Chief Justice of Canada

What's that you say?  This is a sewing blog and you can hardly see any details?

OK then.  Here's a better photo taken today, after the lining was hemmed and a couple of other little details were taken care of so it is really finished.  


The back fits well. In the end I took in the CB seam above the waist for a better fit for my narrow back. Notice that I added a bit more fabric to the back of the armscye opening below the cap sleeve.  I also lengthened the sleeve about 1.5cm.  As usual, this type of sleeve doesn't provide for much upward arm mobility, and these modifications didn't improve that.  However, I felt the extra coverage was required.

I have no memory of where or when these great buttons came into stash, but believe they had been used before as I had to do a little polishing to bring up their fake tortoiseshell colouration and sheen.

The pattern calls for 7 decorative buttons and four flat ones for the concealed placket below the waist.  I only used 5 - 2 on the pockets and 3 at CF.  The remaining 2 would have been on the collar but I liked the way it falls open without these extra buttons.

Speaking of the concealed placket, I sewed the placket to the facing between each of the buttons as you can (sort of) see at left.  This prevents the placket from completely falling open when you sit down.  The pattern omits this instruction, which is really essential for this type of closure.

I wish I had realized when cutting out the lining that the front lining piece was shorter than the other dress pieces (that do double duty as lining).  I hemmed the dress a tad longer than the pattern called for, which means the lining is pretty skimpy.  Note to self to check this the next time before cutting.

Finally, as you can see I did not make a self-fabric belt.  Life was definitely far too short yesterday, and I like the way this leather belt looks with the dress.

Saturday, June 21, 2014

There's a reason for my delayed progress

The Sewing Lawyer was in Iceland!  Literally, it's the land of fire and ice.

Gunnuhver geothermal area - Reykjanes peninsula
Hiking on the Falljjökull in south Iceland
At Jökulsárlón in Southeast Iceland
  

In between it also boasts beautiful canyons, unbelievable waterfalls and bathtub temperature rivers.  My camera was my constant companion.  It's a very photogenic place!

Fjaðrárgljúfur

Gulfoss

Seljalandfoss

Behind Seljalandfoss - human being for scale

Relaxing in the warm river at Reykjadalur
But now I'm back.  With a deadline to produce my version of Vogue 1233.  

I've had the fabric in stash for a long time.  It was a Fabric Flea Market find and is of undetermined content, although I am betting on a linen blend.  It creases and it frays. A lot of both.  

But it's very pretty.  I think I haven't used it all these years because I was conflicted about the right v. wrong side.  I am pretty sure that the originator of this fabric intended the greener side to face outwards, but to me it looked like not very likeable upholstery. 
I'm favouring the reverse, where the green is in the background and mysterious rich browns dominate. There is a large pattern repeat and I spent too long contemplating where the diamond motifs should land on my body.  Or maybe not long enough.  I am pretty sure that the beautifully matched large diamond on my belly is less obvious in real life. 
As for fit, I decided to shorten the entire dress by 1 cm above the waist.  This was so obvious but I didn't see it until I read through all the very helpful comments.  Thanks to everyone who weighed in!  Re girth, I decided to adjust on the fly rather than go to a smaller size.  I've decided that the front fits well enough (except for that odd wrinkle in the front shoulder area - which I think I will attack with some interfacing). However, I need to take the entire CB in above the waist.  This is such a constant issue; I guess I should just face up to my narrow back.  

Next step - the collar and facings.

Saturday, June 7, 2014

Gearing up for a new dress

The Sewing Lawyer has two important reunions to attend this summer and feels like a new dress is required for at least the first one, later in June.  Vogue 1233, a 2011 dress by Pamella Roland, is on the agenda.

Here's the pattern photo, front and back.  Why are there only a couple of reviews of this dress on Pattern Review I wonder?

 This dress needs to be fitted so it falls smoothly without being tight.  So, even though a fit and flare dress might seem pretty fool-proof, I made a half-muslin of the bodice, down to the hip area, cutting a straight size 10.

So the front.  The dress has princess lines that run to the side, away from the full bust.  There are short bust darts running horizontally from that princess seam.  They looked really weird off the body, and slightly less so on.  I have to move the point in and up, by less than 1.5cm in each direction, to get rid of a little poof that hits below where it ought to.  So my dart will be longer, and angled slightly upward.

But the most obvious problem is that the CF is not hanging properly.  Below the waist, it's opening up all by itself.  This isn't, by the way, because the hips are too tight.  The CF is too long above the waist.

It's less obvious from the picture, but the side seams were also too extremely curved in at the waist, even though (again) the total circumference of the dress fits ok.

 To fix the length in CF, I pinned a wedge from the CF edge to the side seam.  It's about 1.2cm wide at the widest point and tapers to nothing.

I also sewed a less extreme curve at side seams which relaxes the fit overall.

I have a question for you experts out there.  Once I take a wedge out of CF, the front edge is no longer on the straight grain.  My hunch is that this is irrelevant.  I've adjusted the facing pieces accordingly, and I will stabilize the CF edge with fusible tape to make sure it doesn't stretch.  But if anyone out there has had a bad experience with this adjustment, please pipe up in the comments!


In the back, it looks too big through the mid back, but mostly too long.  The upper part of the princess seam is also a little poofy.

I'll fix the CB length problem by taking a wedge out of the CB panel, 1cm at the widest and tapering to nothing at the princess seam.

And what is going on at my back neck?  Dowager's hump???  I may have to take a little dart there.

I like the finished length of the sleeves as is, so will add a bit of length there.

Monday, May 19, 2014

Because, really I don't already have enough hobbies?

Way back in the mists of time I purchased a very elderly knitting machine.  It's a Knit King M3, according to a Ravelry discussion thread.  (The manual has no model number anywhere, but rather quaintly starts out "May I introduce myself?  I am KNITKING.")

I made exactly one sweater on it before putting it away for about 25 years.  In the younger Sewing Lawyer's usual fashion, the sweater was (a) without any instruction on the use of the knitting machine and (b) multi-coloured. This machine, my friends, is completely and utterly manual.  I can hardly believe I did it.
Behold.  (Yes, it's rather loud.)  I made it from many colours of Regia sock yarn.

My son (not born when it was made) has appropriated it for his own, and claims to even wear it occasionally.  

Some years later, I found another only slightly less elderly knitting machine at a yard sale.  I forget how much I paid but it wasn't more than $20.

Into the closet it went with KNITKING.  Until something prompted me to get them both out a few weeks ago.

Here I was on Friday night with my "newer" knitting machine, a Studio SK-303.  It's only slightly less manual - it has knobs that select certain needles.

I managed to turn out a credible sample by going through the manual.  I now have plans to make a much plainer lightweight merino sweater for my husband.  Stay tuned.

In the meantime, I finished my hand-knit project.

It's a very luxurious blend of baby llama and mulberry silk.  The pattern is Windswept and all details are on Ravelry. It was a pretty fun knit, all things considered.  Since it is made top down I was able to weigh how much yarn was left after I had completed the body, so as to confidently make the sleeves as long as possible.  I got to 8", which isn't too bad, even using most of my unravelled swatch.

Too bad I'll have to pack it away until fall - it's a bit woolly for summer.

Friday, May 2, 2014

Knitting progress

I've cast off the body as you can see at left.  This is shorter than the pattern intended - I like this length for a close-fitting top.  And besides, I didn't have enough yarn to make it longer AND have sleeves.

I shaped the body by decreasing at the sides rather than next to the lace panel.  I'm happy with the fit.

I used a new (to me) stretchy cast-off.  It's called (not surprisingly) "Elastic Bind Off" and it's one of the stretchy ways to finish off your knitting in the book Cast On Bind Off - 54 step-by-step methods by Leslie Ann Bestor.  I'm impressed with this method.  It's easy, and produces a very smooth and neat edge which is, as advertised, pretty stretchy.

After finishing the body, I weighed the yarn and have exactly 60g left, which means I can use 30g for each sleeve.  I'm guessing they will be at least elbow-length.

Ravelry page is here.

Sunday, April 27, 2014

A freebie

I knocked off this little skirt from the minimal remnants of the grey ponte that I used for last week's pants.

The most remarkable thing about it, really, is that it's one of the patterns from this very month's Burda Style Magazine.  Such up-to-the-minute creation is rare in these parts.

The pattern has two versions - a micro-mini skirt and a more modest knee length view with a self-fabric tie belt.  Mine is somewhere between due to fabric shortage.  The need for ingenious cutting out of about 65cm of fabric meant that the high waist had to be lowered and the hem is all but non-existent.  But 10cm above the waist would have been too high anyway (my waistband is 5cm).  As for the hem, I'm seeing how long 1/2" steam-a-seam, without stitching, will last.

The pattern is designed for woven fabrics.  I should have cut a size smaller.  I did a lot of in-progress fitting to get the waist and hip curve right.

Other than that, the only change I made was to turn the separate pockets into a single kangaroo pocket, which you can see from this inside-out shot.  I used a remnant of woven cotton to reduce bulk (and because I had no extra fabric).  I used the same cotton (interfaced) for the waistband facing.

Monday, April 21, 2014

Grey.

There's an extremely elegant knitter on Ravelry who has the most lovely white hair and knits a lot in grey.  It looks fabulous.  For many years, I never even considered wearing that "colour" (if it really is one).  But recently I've taken to it.

I have made two grey suits - the Akris knock off from the summer of 2011 and my most recent tailored creation.  I'm enjoying both of them quite a lot.


And now The Sewing Lawyer has made another pair of comfy but hopefully not unattractive stretch pants in ... grey.

They are the same as the black ones.  Which I wear all the time.

So far I have had them on three days in a row, including for two very serious meals.  They remained very comfortable throughout.

And, in knitting news, I'm working on a grey top!  It's the Windswept Pullover.  I will keep knitting until my yarn runs out. I only have 300g of my yarn, which is 70% baby Llama and 30% Italian mulberry silk. (Yum!) I'm going to block it so the lace panels along the neck line lie straight.

Stay tuned to find out if it will have short or 3/4 length sleeves.  Ravelry notes are here.


Sunday, April 6, 2014

Baby hems done - voilà a completed silk blouse

After posting yesterday, I gave myself a talking-to and just finished those baby hems.  It didn't take very long.  Of course.

I posted a review on Pattern Review, where you can read all about the things I did differently and what worked and what didn't.  But here's the bottom line:

Spray starch.  It works.


It tamed the shifty static-prone and flimsy silk like nobody's business.  It made making this top (complete with French seams, continuous lap placket, bias collar and baby hems) a piece of cake.


I managed to find perfect buttons in stash. They are a bit like gold nuggets. Closed with teensy bias loops, which would actually have been impossible to sew without my friend spray starch.

And the entire ensemble.  Don't ask me why my camera refused to focus for this one.

And the weather may finally be warming up.  For once, The Sewing Lawyer's latest project is going to be seasonally appropriate!


Saturday, April 5, 2014

Mitred hems made easy

Working for a living has its good and bad features.  On the plus side it provides an income with which to purchase fabric, patterns etc.  And it gives The Sewing Lawyer a venue in which her custom-made suits, dresses and other items of clothing can be worn.

The negative of course is that working full time means The Sewing Lawyer has less time for sewing and knitting and ... blogging.  Even though the skirt to match the latest jacket creation was in fact complete before work resumed (3 weeks ago) and this blog post planned well enough that all the in-progress photos were taken, life intervened and you all had to wait.  I'm sorry about that.

The skirt is really profoundly uninteresting as a fashion object.  It's made from the same OOP Vogue pattern as the skirt in this post.  Except I did not shape the waistband so it's even plainer.  However it makes a good foil for the jacket and someday, I promise pictures of the entire ensemble along with the silk blouse to match that is stalled and waiting only for its baby hems.

In the meantime I offer a photo tutorial on mitering corners.  It's my preferred method for a super-neat finish on a skirt with a back slit, but it can be used any time you have to sew a corner where two folded or faced edges, such as the slit facing and the skirt hem, meet.  No pattern fudging required; you do it on the fly.

Start by pressing the facings that are going to be mitered.  At right is the inside of my skirt hem at the CB.  I've made sure the corners are exactly in line.

Next, mark on each fold separately the point where the inside edges of the two facings intersect.  In the photo at left, I've done this with pins.


Unfold the edges, and refold with right sides together so that the pins meet.  As you can see in the photo to the right, the pressed corner is exactly on the fold line.  That is where you want it to be.


The line between the pins and the pressed corner is your stitching line.  Mark it.

Sew along the line.  Do the other side of the slit.  Then turn the corners right side out and press.  I find that I do not need to trim away the parts of the facings that are  inside the mitered corner, unless the fabric is very bulky.  On this skirt, they fit in there very neatly and give weight to that part of the hem.


Saturday, March 15, 2014

Burda 7576 jacket ... done and dusted!

The Sewing Lawyer totally failed to comply with her self-imposed schedule for her five weeks of leave.  However, she did finish this jacket.


And the skirt is underway and will be wearable pretty soon.  But not yet, which is why I am modelling this with jeans.

Blouse and lining fabric
As for a new top ... well, time will tell.  I purchased the silk chiffon (or maybe it's georgette, I never know the difference) in Hamilton when I was there last month.  It coordinates beautifully!

I'm in search of a simple pattern, and might even use the top from Burda 7576.  But I'm not sure about the high neck.

More details.

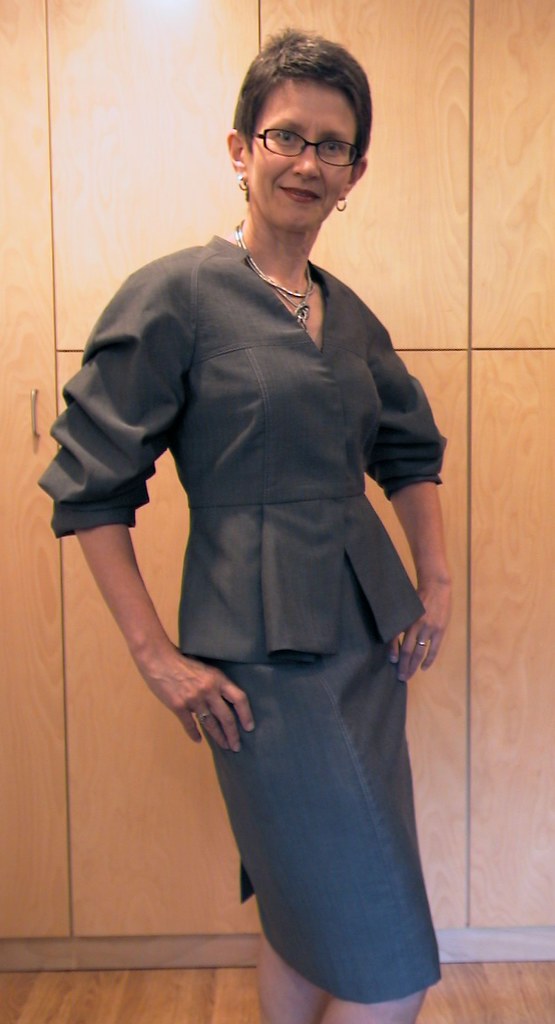
I made numerous fitting adjustments to this pattern based on what my muslin told me.

  • To adjust for my narrow frame (which seems to be affected by my constant seated-at-the-computer posture i.e. my shoulders roll forward making my front narrower than my back), I took 7mm (.25") of width out of the front shoulder.  I pinned the excess fabric out of the muslin and then slashed the pattern tissue in that area, overlapping it and slashing as needed.  This sounds very sketchy, but it actually works.  
  • For the same reason I took a horizontal wedge out of the jacket front above the bust, reducing the length at CF but leaving the side length undisturbed.  The wedge measures about 1cm (3/8") at CF.  In sewing, I reduced the length in this area further by easing the front fabric to a fusible tape along the roll line (i.e. the tape was about 1cm shorter than the roll line).  
  • I lowered the bust dart by 2.5cm (1").  
  • Like other reviewers, I wanted 2 buttons instead of a single one.  I adjusted the roll line and moved the under-lapel dart accordingly.
  • You already know that I blunted the extreme corners of the collar and lapels.  I brought the points in by 2cm (.75").  
  • I added width at the waist.  This was a surprising fitting issue for me.  This jacket has very little or possibly no ease built in at the waist.  
  • I flattened the curve of the back peplum to adjust for my flat seat.  I took a 1cm wedge, i.e. reduced the hem length by a total of 2cm but leaving the waist seam the same length.
  • I ditched the extreme cuffs on the sleeves.  In sewing, I decided the sleeves were a little floppy so I narrowed the front sleeve seam by bringing in the curve approximately 1cm at the elbow level, bringing the new seam line back to the original location at the hem and armscye.  
Lined to the hem

  • I lengthened the peplum by 2.5cm (1").  
What else?  In sewing, I did the following things not instructed by the pattern:
  • I did not cut the side pieces on the bias.  I couldn't see why the pattern called for this.  The corresponding lining piece is identical but cut on the straight grain.  I didn't want the visual distraction of the bias panel.  
  • I added a back shield as you have already seen.
  • I interfaced the peplum and sleeve hems with my softer interfacing.  
  • I made a chest/shoulder shield from the pattern pieces, and a sleeve head, all cut from one layer of cotton quilt batting (this technique is illustrated here).  I also installed shoulder pads. 
  • Peplum lining - in progress
  • I cut the peplum lining the same length as the peplum pieces and lined the peplum to the edge with a normal seam allowance.  
  • The order of sewing the body lining was:  First, construct the body pieces and peplum pieces separately.  Second, sew the two together near the front edges, but leaving most of the seam open.  Third, sew the lining to the facing in a continuous pass.  Fourth, sew the lower edges of the jacket and facing/lining together.  Fifth, sew the upper edge of the peplum lining to the waist seam allowance, making sure it all lies smoothly.  Finally, attach the bodice lining at the waist by hand.  
Everything, down to the buttons and thread, came from my extensive stash.  The bemberg satin lining was left over from a dress I made quite a few years ago.  I had enough for the jacket body and skirt.  I cut the sleeve lining from striped bemberg, also in stash. 

The buttons were purchased at (I think) Button Button in Vancouver many many many years ago.  

That's about it.  Stay tuned for the next piece.