Sunday, January 27, 2013

The Sewing Lawyer tries something new

In response to the post about my orange cashmere skirt, Steph A asked a question about the little thread chain I made to keep the lining fabric from peeking out below the skirt hem when I sit down.  It's a great question, and led me to think perhaps I could answer it with a little video.

As I had mentioned, I miscalculated in placing these chains so I needed to redo them anyway.

Without further ado...


I noticed that I said I would pull "the chain" through - but I meant I would pull the doubled thread through - to make the chain.  

Essentially, this is like single crochet, but you use your fingers and thread.  Easy peasy.  

If I do this video thing again, I'll try to be a more polished performer.  

Sunday, January 20, 2013

Wool/lycra jersey "twinset"

A few posts back, I mentioned that I had sewed a top and cardigan, and teased you with a picture of the back of the top and a mangled photo of the cardigan.

So here they are again.

The cardigan started life as this wrap blouse from the February, 2009 issue of Burda Magazine.  Hard to believe, no?

I used the back and sleeves as Burda intended but added a swingy front and a shawl collar that folds over in front.

As for the matching top, it's Jalie 2682 which I think I have made 4 times now.  I would have made sleeves but I ran out of fabric.

So far I think the two pieces together with my orange skirt are too matchy-matchy, but I might change my mind.

I'll end with a teaser:  The wrap blouse is about to make another appearance, in a form more closely resembling Burda's vision, but not exactly.


Presenting: orange cashmere skirt

A somewhat prosaic title - but so long awaited!  The Sewing Lawyer finally finished her multi-seamed plush orange cashmere skirt, designed for Vogue (#1324) by Donna Karan.

Behold:

Here, I'm wearing it with the recently-completed cowl neck top from Burda 09/2012, which has turned out to be a very versatile and much-worn item.  Too bad it's made from that pilly rayon knit which won't survive washing very many times.

A confession - when I made the top, it was pairing with this skirt I had in mind.  I think they look pretty good together.

From the full-length picture at left, I hear you think "ho hum:  another pencil skirt".

Closer up, however, check out the construction detail and topstitching! The consensus here and IRL was that I should accentuate the positive by adding topstitching at the darts and waistband, so I did.  Even though I had already attached the zipper, which made it a bit tricky.

I have worn the skirt - it's narrow but not uncomfortable although one must take little, ladylike strides in it.

Aside from the fitting adjustments already chronicled here and the endless testing of said fitting adjustments in muslin (twice) mentioned here, what else to tell you?  Let me see....

Well, this plush fabric is, I am pretty sure, a wool and cashmere blend.  It is thick enough to be a decent coat, but I only had one metre.  This because my husband found the fabric at our local thrift store for (drummmmmmrolll) $1.99.  Despite its provenance and price, this lush find languished in The Sewing Lawyer's stash for a couple of years while she came to terms with the fact that (a) the only upper body garment that could be made from it would be a vest, which due to its colour would only look right if worn in the forest with a hunting rifle and (b) it was not "too good" to be sewn and (c) there was enough for an orange pencil skirt which could be pretty interesting.

The skirt is underlined with silk organza and lined with hot pink mystery lining from stash.  I used this technique to line around the vent.  

 I made little thread chain connectors to keep the lining from peeking out below the hem of the skirt when I sit down, but need to re-do them because they are the wrong length and/or attached in the wrong place, and so allow the lining to peek out about .75cm, which is sort of cute but also annoying.

The zipper in this skirt is inserted after the entire garment is sewn, and it's installed up to the top of the back waistband.  A regular skirt-length zipper would be too short so I used a dress-length one, from stash.  I first tried using an extra-long zipper in my black high-waisted skirt and it is so much easier to get in and out of.  In this skirt the zipper opening is probably 30cm (12").

Finally, and just to prove that experience is no guarantee that no sewing mistakes will be made, I will confess that I had the entire skirt finished and put it on, only to realize that there was a very obvious problem at the top of the back vent - a drag line indicating that something was out of whack.  It took me quite a long time, after totally un-sewing the back vent, CB seam and lining, to realize that in sewing the CB seam below the zipper, I had eased more fabric into the underlap side, which released just at that point and created a big bubble of fabric.


Saturday, January 12, 2013

A look back at 2012, and sewing goals for 2013

The annual January look back at what was accomplished in the past year seems compulsory for sewing bloggers.  Maybe it keeps us honest.  Around this time last year, I see that I set some goals for The Sewing Lawyer:


  1. I need to do more sewing.  
  2. I do not want to buy more fabric.  I have so much it's embarrassing.  I will sew the fabric I already own.  I really like it as fabric, but I think I'd like it even more as clothing.  
  3. I am going to make a work jacket.  Or two.  And nice dresses or separates to coordinate with them.  
  4. One of those jackets is going to be in leather.
  5. I want to integrate knitted pieces into my work and home wardrobes.  I foresee one or two knitted tops. 


How did I do?

More sewing:  Fail.

It would be too depressing to actually count the number of completed garments.  So I won't.

Part of the explanation is that I shed approximately 10 pounds and a few inches in 2012.  This led to (a) lots of altering things I had made in the past (sewing to preserve rather than create wardrobe items) and (b) having to learn how to fit the new me.  I'll spare you any more complaints.

On the plus side, I really like the pieces I finished in 2012.  Big faves are my tweedy bouclĂ© jacket, my turquoise dress, and my black ponte knit pants.  Oh, and my black wool dress with the zipper up the back.  Some of these styles were much easier for the smaller-hipped me to wear.

I am also very happy with my swimsuit and my goretex pants, although these are hardly fashion statements.

Less fabric:  Success.

I tried very hard to stay away from fabric stores in 2012.  I don't keep track of metres in or out but based on my possibly inaccurate recollection, I stayed pretty much on the wagon last year.

Coordinates and including knitted items:  Success.

The jacket I made in March looks great with both the dresses, and the two pairs of black pants I made in 2012.  I can also wear it with three of the four knitted tops I made during the year.  My favourite is the one at right, with the leaf yoke top coming in a close second.

Speaking of which, only one of my knitted tops (this one) is a style/colour orphan.  The rest of them have slotted into my wardrobe and get worn regularly, as does the cardigan I completed in January.

One big surprise for me in 2012 was that I started knitting socks.  Who would have thought?  I finished some yesterday and could not seem to help myself from starting another pair immediately.

Leather jacket:  Fail

 Need I say more?  Maybe in 2013...

And on that note, what should the rest of my goals be for the year?


  1. Write here more often.  I'm aiming at 5 posts per month. 
  2. Sew more.  Including more basics (jeans) and getting a well-fitting bra or two made.  
  3. Keep up with the coordinates.  I have a dress/jacket combination or two in mind, and the fabric for them, which makes me add...
  4. Sew the good stuff from my stash, instead of "saving" it.  Unless I have something specific to "save" it for, that is.  
Wish me luck!


Friday, January 11, 2013

Incoming ... socks


These are from Cat Bordhi's book New Pathways for Sock Knitters (Book One) which is the only book one needs to make perfect-fitting socks, in my opinion.  They took a very long time because I got tired of the cables.  But now they're done and I'm very happy with them.  The next ones I make are going to be very plain.

Don't worry, I've also been sewing and the skirt is progressing nicely.  Thanks to the perceptive comments in my last post and further inspection of my muslin (in which I sewed the waistband without any difficulty) I realized that the problem was that I had basted the lining and fashion fabric together (as Vogue instructs in step 18).  It is MUCH easier to sew the waistband on to a single layer.  Serendipitously, doing so also means that both sides of the waistband can be clean-finished by machine. I'm always in favour of that.  

Why yes, that is hot pink lining.
Here's a sneak peek of one side of the waistband.  The lining is at top, CB is to the right.  The waistband is folded along the dotted line.  I managed to get all four corners just about perfect, so I'm  happy.

To the commenters who suggested that it would be easier if the waistband was sewn to the top of the skirt first, and the diagonal seam sewn last together with the dart, I think you were definitely onto something.  Vogue instructs sewing these darts before the skirt pieces are sewn together (which I had done) but I don't see why they couldn't be left to later.

I'm not usually a slave to pattern instructions and these were bad ones to follow slavishly.  This is a beautiful skirt and Vogue was not kidding when they said the pattern is "Advanced/Plus Difficile".  But better instructions would have been a good idea.

Right now I'm inclined not to do all the topstitching Vogue is asking for.  My fabric is a plush cashmere (yummy) and so far I've just topstitched (rather than topstitched and edgestitched) the major skirt seams.  The stitching makes for a nice texture but the darts and seams also show up well as you can see in the picture.  According to Vogue, I should also topstitch the darts and the lower edge of the waistband.  Thoughts?


Sunday, January 6, 2013

Physically impossible?

The problem
The waistband on V1324 has me stumped.  I hope it's temporary.  Here is the problem.

That intersection is where the waistband intersects perfectly with the angle of the already-sewn dart (pressed towards CF).  The acute angle of the corner, the top of the dart and the angled "side" seam will all serendipitously meet at exactly the same point.

Uh huh.

Normally when you have to sew an inset into an existing corner the corner is capable of being pulled open (by clipping into the reinforced point).  I'm reluctant to do that here, as  the topstitched SA of the "side" seam continues up and towards CF.  I think clipping into it would create a big structural weakness at that point.

The pattern instructions are completely unhelpful.

I'm seriously considering pressing all the SAs on the waistband to the inside, and applying it by hand.

Does anyone out there have advice for me?

Sunday, December 30, 2012

A bad blogger attempts to bring you up to date

Wow, I've been MIA for the entire month of December!  Some of this is due to necessarily secretive pre-Christmas sewing.  Which really wouldn't excite you anyway, consisting mainly of pajamas.  One example at right.  I did well in my annual quest for unusual/loud/surprising prints with this urban scene.  Notice the contrast piping on the collar.  It's repeated on the pocket and cuffs.

Vonica
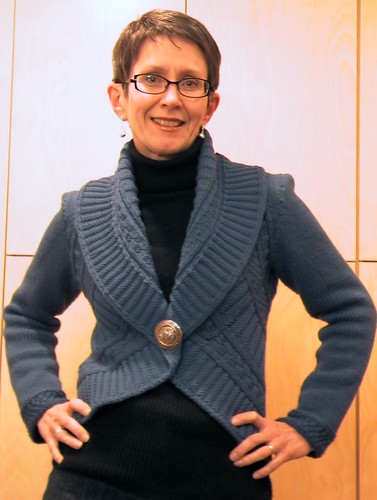
I have also been knitting. I'm making yet another pair of socks, and this cardigan.  Mine will be black and I'm pretty sure that it will have full length sleeves since a wool cardigan with 3/4 length sleeves sort of misses the mark in the climate I live in.

Why yes, that is a kid-sized Chicago
Blackhawks hockey jersey ...
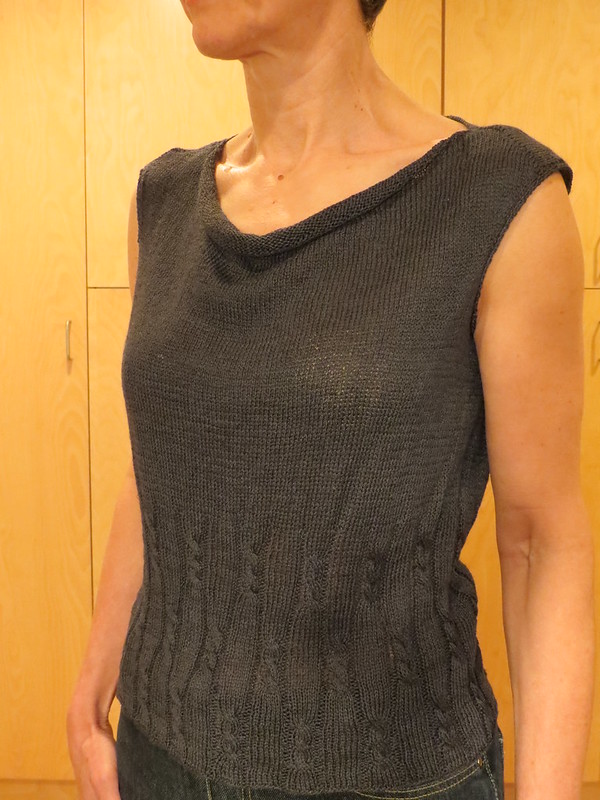
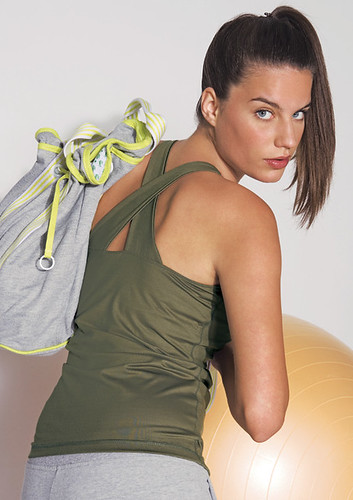
I also  sewed up a top and cardigan for myself, but my computer decided to freeze up on me as I was attempting to cut and paste all the photos.  The forced restart resulted in some interesting visual effects, as you can see.

I'll take some more pics soon, maybe even with the skirt they are supposed to coordinate with.  When it is more than a muslin, that is.

In the meantime, here is the back of the top.  For some reason, this is the only picture that survived unscathed.

If you're a very dedicated follower of patterns, you may be able to tell that this is Jalie 2682.  The fabric is an extremely stretchy wool and lycra jersey purchased many years ago at a knitting mill in downtown Hamilton Ontario.  A friend knew about weekly sales of seconds, and I snapped this up for (if memory serves) about $2 per 1.5 metre piece.  Two pieces made the sleeveless top and a coordinating waterfall cardigan.  The atmosphere of the place was positively Dickensian and I wonder if it could possibly have survived.  If anyone knows, leave me a comment.

I didn't have enough fabric to double the front, so I finished the neck edge and armscyes with the world-famous Jalie no-elastic trim finish.   This time I put the binding on the inside, like a facing, and topstitched it.  Looks just great, and as always it produces a firm and beautifully finished edge.


The delightful skirt I'm wearing with my new top is the second muslin of Vogue 1324.  For fun I thought I'd show you how the first muslin compares.
  
Before
After
To the left is my first muslin.  It's unaltered, except that I sewed the front darts lower in an unsuccessful effort to get rid of the unattractive pooching.  

There are not too many reviews of this pattern as made up, but every one I've seen has had this tell-tale pooching at approximately crotch level in the front.  It's not a great look, IMHO.  

While the skirt is overall too tight, the main problem in the front is that there is too much length from waist to hip level in the CF piece, and there is too much width caught in the darts, which release just where the pooching is at its max, making it all so much worse.  I showed you the fix in this post.

The post-alteration front is smoother through the tummy.  I think once it's made up in my cashmere fabric (yummy) it will lie smooth and flat.  Or maybe I'm self-deluding.


Before
After
The original side view shows that the skirt is too tight.  See how it cups in under my butt? I'm too old for that, and anyway I don't think such a tight skirt would be at all comfortable.

The arrow on the other side is pointing to the folds caused by too much length in front.

My adjustments add width through the thigh, making the skirt more wearable.  However, now that the skirt can fall from the waistband, other problems appear.  The back is also too long.  See how it's pulling diagonally at the upper side, drooping under my seat, and hitting the back of my knees at the hem?  If I scoop about 1.5cm off the waist seam at CB, tapering to the original point where the side seam would be, it should take care of these problems.

So I hear you thinking that I've taken all the interesting bits out of this and turned it into a ho-hum pencil skirt that looks like every other pencil skirt in the universe.  I assure you, it's still slim fitting and plenty interesting with those curved seams.  I've just altered it into the wearability range, for The Sewing Lawyer.  Besides, it will be orange cashmere when I've finished.


Friday, November 30, 2012

Refashioned

Wow, it was a year ago (minus one day) that I debuted the idea of refashioning this gigantic mohair sweater. What a hideous garment!

This thing sat around all summer, and through the fall, and in the end, it was a few hours of work.

Now it's a relatively sleek cowl/turtle neck, courtesy of Burda Magazine.

I used pattern #104 from the September, 2012 issue.


It's one of those sleeper patterns.  A great basic that's hidden behind other less interesting garments.  Like this jumper.

There was tons of room for the body pieces.  But it is a lucky thing that my arms are short.  The pattern has much higher sleeve caps than the original, dropped shoulder, design.

Sleeve cuffs use the original hem
I used the stockinette face of the knitted fabric.  This had been the wrong side of the original sweater.  Part of the long delay in getting this project done was caused by my worrying about the original hems which sported a few rows of 2x2 rib, then a stockinette section that rolled to the outside.  Switching faces meant that this section would be reverse stockinette that would roll to the inside.  Now I'm wondering why I thought this wouldn't look just fine.

For the turtleneck collar, I used the width of the original front hem, which was about the height of the collar Burda called for.  It rolls to the inside too.  Doesn't bother me in the slightest.

I constructed the entire thing on my serger.  The fabric is ethereal.  


Thursday, November 29, 2012

New machine

It was switching my serger back and forth from serge to coverstitch that did it.  Remember, the swimsuit?  I broke down and bought a dedicated coverstitch.  It's the Janome 1000CPX.  Does one thing with three variations, and does it well.

Of course I had to try it out right away.  Of course, I didn't pick an "easy" project.  I made a fleece yoga top from the November, 2007 issue of Burda Magazine.

It's simple enough to put together. Front, back and straps.

But the fun part was adding a jersey fabric binding at all edges.  It's the technique I wrote about here.

I had to do quite a lot of practice strips to get the hang of coverstitching through 2 layers of fleece and 3 layers of jersey.  The needles were not  consistently picking up the lower looper thread.  This is a problem because a coverstitch is an elaborate chain stitch, and any open loop means the whole shebang can pull out.  Experimentation revealed that it is important to use heavier needles and pay attention to the tension settings for heavier fabric.  Also, using woolly nylon thread in the lower looper produced more consistent results.

Anyway, this is my first effort.  Don't look too close.  I used scraps leftover from this top for the binding.

Experiment no. 1

Then I made another, using fleece scraps leftover from the jacket blogged here for the body, and jersey scraps leftover from the faux-wrap dress blogged here for the binding.  It's very cozy.  And I did a better job.  But I'm not showing you the hem.  It's not up to my usual standards.  

Experiment no. 2

They'll be nice and cozy as an under-layer for curling and skiing ... that is, if we ever get any snow.  


Monday, November 12, 2012

Quick knit top (in which The Sewing Lawyer gets grumpy about Burda)

Way, way back in the mists of time I showed you a gigantic mohair sweater, purchased with refashioning in mind.  It got put away over the summer.

In September, Burda published this cowl neck sweater/top in its magazine.

Hmmmm, I thought.  Maybe.  But what a completely unhelpful picture. What would that neckline look like if not completely distorted by a pair of sunglasses?  What's with all that probably clean, lustrous and lovely but so difficult-to-see-through HAIR?

[Reminder to Burda.  You are not a "fashion" magazine.]


Of course, there is a line drawing, which is a bit easier to read.  It looked OK.

So I made a muslin from some rayon knit.  The kind that will self-destruct in a short while, but I love the print and the colours.

Tracing the pattern revealed that the top is too long for a top and not long enough to be a dress.  I took a lot - 18cm (7") - off the bottom right away, and another 2.5cm in "hemming" (i.e. I neatened the raw edge) and it's quite long enough.

The sleeves are, quite simply, ridiculous.  I confirmed via wearing another Burda pattern (this funnel-necked top) that I really don't like sleeves that flop over my hands, even if they are sort of controlled through application of elastic at the seam.  So right off the bat, I took another 18cm of length off.  Burda says that the sleeves are intended to be approximately 5cm (2") longer than usual.  Really?  My arms are short, but not THAT short!  I am clearly not on the same "fashion" wavelength as Burda, or the hordes of people who think that sleeves are the right length if they cover the knuckles.

What else?

  • The shoulders are too broad for me (I traced the 36).  I think the quick fix for next time is to take about 1.5cm out at the CF and CB.  The quick fix in sewing was to add elastic at the back neck.  
  • The neckline is too wide.  (Oh yeah, that white thing showing at the model's left shoulder?  It's underwear of some kind.  Not for me, thanks.)  The same quick fix as above might take care of this too, for next time.
You can see both of these issues illustrated in the photo at right.  The edge of the paper is the CB as cut.  Elastic threaded through the neck facing (a strip cut on the lengthwise grain of the knit) has cinched it in to the line, which is the CB for next time.
  • The sleeves are sloppy wide though they were the right circ. at the hem.  I straightened the seam line.  
  • There is a smidge too much length through the armscye.  
  • The cowl is nice.  
So what do you think?  Should there be a next time?